Instructions
Page 1
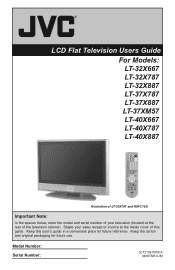
LCD Flat Television Users Guide For Models: LT-32X667 LT-32X787 LT-32X887 LT-37X787 LT-37X887 LT-37XM57 LT-40X667 LT-40X787 LT-40X887 Illustration of LT-32X787 and RM-C18G Important Note: In the spaces below, enter the model and serial number of your sales receipt or invoice to the inside cover of the television cabinet). Staple your television (located at the rear of this user's guide in a convenient place for future use. Model Number: Serial Number: LCT2104-001B-A 0406TNH-II-IM Keep the carton and original packaging for future reference. Keep this guide.
LCD Flat Television Users Guide For Models: LT-32X667 LT-32X787 LT-32X887 LT-37X787 LT-37X887 LT-37XM57 LT-40X667 LT-40X787 LT-40X887 Illustration of LT-32X787 and RM-C18G Important Note: In the spaces below, enter the model and serial number of your sales receipt or invoice to the inside cover of the television cabinet). Staple your television (located at the rear of this user's guide in a convenient place for future use. Model Number: Serial Number: LCT2104-001B-A 0406TNH-II-IM Keep the carton and original packaging for future reference. Keep this guide.
Instructions
Page 3
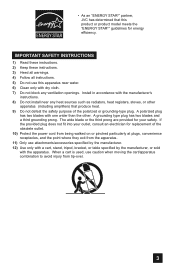
... the cart/apparatus combination to avoid injury from the apparatus. 11) Only use this product or product model meets the "ENERGY STAR®" guidelines for energy efficiency. • As an "ENERGY STAR®" partner, JVC has determined that produce heat. 9) Do not defeat the safety purpose of the obsolete outlet. 10) Protect...
... the cart/apparatus combination to avoid injury from the apparatus. 11) Only use this product or product model meets the "ENERGY STAR®" guidelines for energy efficiency. • As an "ENERGY STAR®" partner, JVC has determined that produce heat. 9) Do not defeat the safety purpose of the obsolete outlet. 10) Protect...
Instructions
Page 7
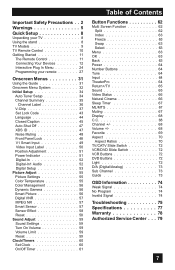
Important Safety Precautions . . 2 Warnings 5 Quick Setup 8 Unpacking your TV 8 Using the stand 8 TV Models 9 TV Remote Control 10 Getting Started 11 The Remote Control 11 Connecting Your Devices 12 Interactive Plug In Menu 24 Programming your remote 27 Onscreen ...Menus 31 Using the Guide 31 Onscreen Menu System 32 Initial Setup 34 Auto Tuner Setup 34 Channel Summary 35 Channel Label 36 V-Chip 37 Set...
Important Safety Precautions . . 2 Warnings 5 Quick Setup 8 Unpacking your TV 8 Using the stand 8 TV Models 9 TV Remote Control 10 Getting Started 11 The Remote Control 11 Connecting Your Devices 12 Interactive Plug In Menu 24 Programming your remote 27 Onscreen ...Menus 31 Using the Guide 31 Onscreen Menu System 32 Initial Setup 34 Auto Tuner Setup 34 Channel Summary 35 Channel Label 36 V-Chip 37 Set...
Instructions
Page 9
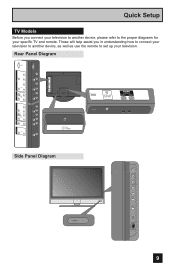
L S-VIDEO VIDEO OVER R - AUDIO - Quick Setup TV Models Before you in understanding how to connect your television to another device, please refer to set up your specific TV and remote. AUDIO - AUDIO - L INPUT 1 FOR HDMI 1 AUDIOAUODIUOTOUT Side Panel Diagram POWER INPUT MENU + CHANNEL - + VOLUME - L Y Pr Pb S-VIDEO VIDEO OVER R - L AUDIO INPUT R L R - AUDIO - AUDIO - ...
L S-VIDEO VIDEO OVER R - AUDIO - Quick Setup TV Models Before you in understanding how to connect your television to another device, please refer to set up your specific TV and remote. AUDIO - AUDIO - L INPUT 1 FOR HDMI 1 AUDIOAUODIUOTOUT Side Panel Diagram POWER INPUT MENU + CHANNEL - + VOLUME - L Y Pr Pb S-VIDEO VIDEO OVER R - L AUDIO INPUT R L R - AUDIO - AUDIO - ...
Instructions
Page 14
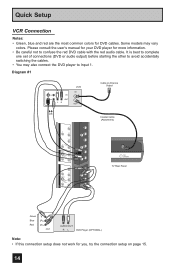
...) before starting the other to avoid accidentally switching the cables. • You may vary colors. L Y Pr Pb S-VIDEO VIDEO OVER R - Some models may also connect the DVD player to confuse the red DVD cable with the red audio cable. AUDIO - L R INPUT INPUT 1 DIO Coaxial Cable (Attachment...) TV Rear Panel Green Blue Red Y PB PR OUT AUDIO OUT R L DVD Player (OPTIONAL) Note: • If this connection setup does not work for...
...) before starting the other to avoid accidentally switching the cables. • You may vary colors. L Y Pr Pb S-VIDEO VIDEO OVER R - Some models may also connect the DVD player to confuse the red DVD cable with the red audio cable. AUDIO - L R INPUT INPUT 1 DIO Coaxial Cable (Attachment...) TV Rear Panel Green Blue Red Y PB PR OUT AUDIO OUT R L DVD Player (OPTIONAL) Note: • If this connection setup does not work for...
Instructions
Page 16
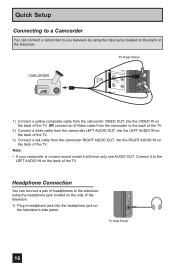
... the side of the TV. Headphone Connection You can connect a camcorder to the LEFT AUDIO IN on the back of the television. 1) Plug a headphone jack into the RIGHT AUDIO IN on the back of the television. Note: • If your camcorder is a mono sound model it to you televison... by using the headphone jack located on the television's side panel. Connect it will have only one AUDIO OUT. POWER TV Side Panel 16 TV Rear Panel CAMCORDER OR INPUT 2 S-VIDEO VIDEO OVER R -
... the side of the TV. Headphone Connection You can connect a camcorder to the LEFT AUDIO IN on the back of the television. 1) Plug a headphone jack into the RIGHT AUDIO IN on the back of the television. Note: • If your camcorder is a mono sound model it to you televison... by using the headphone jack located on the television's side panel. Connect it will have only one AUDIO OUT. POWER TV Side Panel 16 TV Rear Panel CAMCORDER OR INPUT 2 S-VIDEO VIDEO OVER R -
Instructions
Page 18
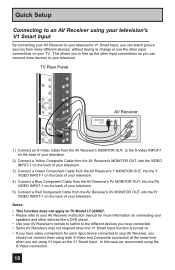
Notes: • This function does not apply to TV Model LT-32X667. • Please refer to your AV Receiver instruction manual for...1 Y Pr Pb S-VIDEO VIDEO OVER R - AUDIO - In this case we recommend using V1 Input as the V1 Smart Input. TV Rear Panel Y Pr Pb INPUT 3 VIDEO R - AUDIO - Quick Setup Connecting to an AV Receiver using your television's V1 Smart ...an S-Video Cable from the AV Receiver's PR MONITOR OUT, into the Pr VIDEO INPUT-1 on your TV. L INPUT 2 S-VIDEO VIDEO OVER R - This allows you to free up the other input connections so you are using the ...
Notes: • This function does not apply to TV Model LT-32X667. • Please refer to your AV Receiver instruction manual for...1 Y Pr Pb S-VIDEO VIDEO OVER R - AUDIO - In this case we recommend using V1 Input as the V1 Smart Input. TV Rear Panel Y Pr Pb INPUT 3 VIDEO R - AUDIO - Quick Setup Connecting to an AV Receiver using your television's V1 Smart ...an S-Video Cable from the AV Receiver's PR MONITOR OUT, into the Pr VIDEO INPUT-1 on your TV. L INPUT 2 S-VIDEO VIDEO OVER R - This allows you to free up the other input connections so you are using the ...
Instructions
Page 77
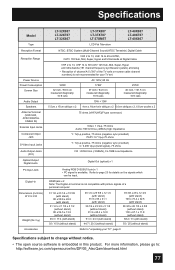
...with picture signals of the TV set . 160W 32 inch / 80.0 cm measured diagonally, 16:9 ratio AC 120V, 60 Hz 178W 37 inch / 94.0 cm ... x 1 • PC signal is embedded in this product. Specifications Model Type Reception Format Reception Range Power Source Power Consumption Screen Size Audio Output...Accessories LT-32X887 LT-32X787 LT-32X667 LT-37X887 LT-37X787 LT-37XM57 LCD Flat Television LT-40X887 LT-40X787 LT-40X667 NTSC, BTSC System (Multi... available. For more information, please go to "unpacking your TV set 's on the signals which can be input. Refer to page 23...
...with picture signals of the TV set . 160W 32 inch / 80.0 cm measured diagonally, 16:9 ratio AC 120V, 60 Hz 178W 37 inch / 94.0 cm ... x 1 • PC signal is embedded in this product. Specifications Model Type Reception Format Reception Range Power Source Power Consumption Screen Size Audio Output...Accessories LT-32X887 LT-32X787 LT-32X667 LT-37X887 LT-37X787 LT-37XM57 LCD Flat Television LT-40X887 LT-40X787 LT-40X667 NTSC, BTSC System (Multi... available. For more information, please go to "unpacking your TV set 's on the signals which can be input. Refer to page 23...


