Instructions
Page 18
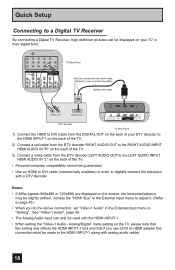
...COMPONENT AUDIO COMPONENT INPUT 3 S-VIDEO Y VIDEO PB L PR R INPUT 4 INPUT 5 / INPUT 1 AUDIO AUDIO OUT Y VIDEO VIDEO PB L L L PR R R R TV Rear Panel After the connections have been made to the HDMI INPUT-1 along with analog audio cables. 18 HDMI to DVI Cable LR AUDIO OUT DIGITAL OUT...HDMI AUDIO IN "L" on the back of the TV. • Personal computer compatibility cannot be displayed on the screen, the horizontal balance may be slightly shifted. Notes: • If 480p signals (640x480 or 720x480) are displayed on your TV in the External Input menu to secure the ...
...COMPONENT AUDIO COMPONENT INPUT 3 S-VIDEO Y VIDEO PB L PR R INPUT 4 INPUT 5 / INPUT 1 AUDIO AUDIO OUT Y VIDEO VIDEO PB L L L PR R R R TV Rear Panel After the connections have been made to the HDMI INPUT-1 along with analog audio cables. 18 HDMI to DVI Cable LR AUDIO OUT DIGITAL OUT...HDMI AUDIO IN "L" on the back of the TV. • Personal computer compatibility cannot be displayed on the screen, the horizontal balance may be slightly shifted. Notes: • If 480p signals (640x480 or 720x480) are displayed on your TV in the External Input menu to secure the ...
Instructions
Page 19
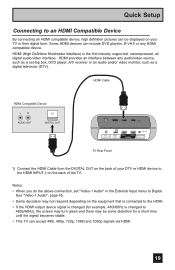
...example, 480i/60Hz is the first industry supported, uncompressed, all digital audio/video interface. See "Video-1 Audio", page 45. • Some decoders may be displayed on your DTV or HDMI device to the HDMI INPUT-1 on the equipment that is connected to the HDMI. • If the HDMI output device... OUT DIGITAL OUT 75 Ω (VHF/UHF) PHOTO VIEWER INPUT 1 SERVICE INPUT 2 DIGITAL AUDIO OPTICAL OUT TV Rear Panel 1) Connect the HDMI Cable from the DIGITAL OUT on the back of your TV in the External Input menu to Digital. Some HDMI devices can include DVD players, D-VHS or any audio...
...example, 480i/60Hz is the first industry supported, uncompressed, all digital audio/video interface. See "Video-1 Audio", page 45. • Some decoders may be displayed on your DTV or HDMI device to the HDMI INPUT-1 on the equipment that is connected to the HDMI. • If the HDMI output device... OUT DIGITAL OUT 75 Ω (VHF/UHF) PHOTO VIEWER INPUT 1 SERVICE INPUT 2 DIGITAL AUDIO OPTICAL OUT TV Rear Panel 1) Connect the HDMI Cable from the DIGITAL OUT on the back of your TV in the External Input menu to Digital. Some HDMI devices can include DVD players, D-VHS or any audio...

Instructions
Page 25
... a menu. The following right screen). The item that appears in certain menu options The "press button" icon means you use the MENU button on the TV's side panel instead of the remote, Front Menu screen showing "Video Status", "Aspect", "Auto Tuner Setup" and "Menu" will appear (following (left) main menu will see...
... a menu. The following right screen). The item that appears in certain menu options The "press button" icon means you use the MENU button on the TV's side panel instead of the remote, Front Menu screen showing "Video Status", "Aspect", "Auto Tuner Setup" and "Menu" will appear (following (left) main menu will see...

Instructions
Page 27
... enter The following menu you selected will appear Press the BACK button to return to the previous menu screen Initial Setup 1/2 Noise Muting Language Front Panel Lock V-Chip Set Lock Code Closed Caption On English Off Select Operate BACK Back MENU Exit Initial Setup 1/2 Initial Setup Auto Shut Off Software Version... 1/3 Select Operate Back Back Menu Exit Picture Adjust 2/3 Select Operate Back Back Menu Exit Picture Adjust 3/3 Note: • The HDMI Size menu can only be displayed when a 480p picture signal is input to the HDMI terminal and the picture is being...
... enter The following menu you selected will appear Press the BACK button to return to the previous menu screen Initial Setup 1/2 Noise Muting Language Front Panel Lock V-Chip Set Lock Code Closed Caption On English Off Select Operate BACK Back MENU Exit Initial Setup 1/2 Initial Setup Auto Shut Off Software Version... 1/3 Select Operate Back Back Menu Exit Picture Adjust 2/3 Select Operate Back Back Menu Exit Picture Adjust 3/3 Note: • The HDMI Size menu can only be displayed when a 480p picture signal is input to the HDMI terminal and the picture is being...
Instructions
Page 55
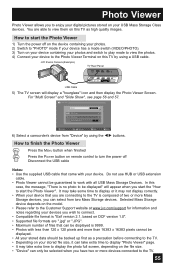
... Class devices. Do not use HUB or USB extension cable. • Photo Viewer cannot be displayed" will display a "hourglass" icon and then display the Photo Viewer Screen. JVC Everio Camera (Example) TV Rear Panel 75 Ω (VHF/UHF) PHOTO VIEWER INPUT 1 SERVICE INPUT 2 DIGITAL AUDIO OPTICAL OUT ...USB Cable 5) The TV screen will appear when you start the Photo Viewer 1) Turn the power off Disconnect ...
... Class devices. Do not use HUB or USB extension cable. • Photo Viewer cannot be displayed" will display a "hourglass" icon and then display the Photo Viewer Screen. JVC Everio Camera (Example) TV Rear Panel 75 Ω (VHF/UHF) PHOTO VIEWER INPUT 1 SERVICE INPUT 2 DIGITAL AUDIO OPTICAL OUT ...USB Cable 5) The TV screen will appear when you start the Photo Viewer 1) Turn the power off Disconnect ...

Instructions
Page 60
...VIDEO STATUS button, you press it. Choose "Video Status" by pressing MENU† on the side panel and enter by using the CHANNEL buttons. Muting The MUTING button instantly turns the volume down completely when... level will instantly go to Game your own preferences. To restore the volume to the factory settings. Resets the picture display to its previous level, press MUTING again. A.H.S. - Standard - Gives a vivid picture with better contrast when viewing ...Sound By pressing the SOUND button, you a choice of four TV picture display settings, including a display of your...
...VIDEO STATUS button, you press it. Choose "Video Status" by pressing MENU† on the side panel and enter by using the CHANNEL buttons. Muting The MUTING button instantly turns the volume down completely when... level will instantly go to Game your own preferences. To restore the volume to the factory settings. Resets the picture display to its previous level, press MUTING again. A.H.S. - Standard - Gives a vivid picture with better contrast when viewing ...Sound By pressing the SOUND button, you a choice of four TV picture display settings, including a display of your...

Instructions
Page 63
...device, the aspect mode will turn to "Full" automatically. Press MENU to access JVC's onscreen menu system. If you change the aspect mode after the television changed ...you to go back in "Full" aspect mode, it is displayed, press the MENU button to exit the menu system. • See individual ...topics like "Sound Adjust" for specific information on the side panel and enter by using the CHANNEL buttons. ATSC (480i, 480p) NTSC ... MENU† on using the MENU button on the side of the TV instead of the onscreen menus. Button Functions Aspect Ratios (Continued) Press the...
...device, the aspect mode will turn to "Full" automatically. Press MENU to access JVC's onscreen menu system. If you change the aspect mode after the television changed ...you to go back in "Full" aspect mode, it is displayed, press the MENU button to exit the menu system. • See individual ...topics like "Sound Adjust" for specific information on the side panel and enter by using the CHANNEL buttons. ATSC (480i, 480p) NTSC ... MENU† on using the MENU button on the side of the TV instead of the onscreen menus. Button Functions Aspect Ratios (Continued) Press the...


