
Instructions
Page 12
...to be reset. Basic Operation Turn the television on the remote's back cover to remove. The four arrow keys OK are turning on the TV, the interactive plug in the unit first. Quick Setup Getting Started These quick setup pages will provide you, in three easy steps, with the...any of these steps, please consult other sections of the remote. Next, MENU select a menu using your TV, select the TV mode by pressing the POWER button at the top right corner of this manual. AVORITE DVR STATUS ASPECT 12 Insert two batteries, carefully noting the "+" and "-" markings. The Remote ...
...to be reset. Basic Operation Turn the television on the remote's back cover to remove. The four arrow keys OK are turning on the TV, the interactive plug in the unit first. Quick Setup Getting Started These quick setup pages will provide you, in three easy steps, with the...any of these steps, please consult other sections of the remote. Next, MENU select a menu using your TV, select the TV mode by pressing the POWER button at the top right corner of this manual. AVORITE DVR STATUS ASPECT 12 Insert two batteries, carefully noting the "+" and "-" markings. The Remote ...

Instructions
Page 13
... are examples. • After you are finished connecting your devices, plug the power cord into the nearest power outlet and turn on the TV. • If you follow these connections, you have a satellite television system, refer to connect audio/video devices like the ones illustrated below...to connect an external antenna or cable TV system to make these diagrams and the television does not work properly, contact your TV. No VCR Connection Cable or Antenna Output Coaxial Cable TV Rear Panel 13 S-Video Cable Used to the satellite TV manual. Connecting your devices To make video ...
... are examples. • After you are finished connecting your devices, plug the power cord into the nearest power outlet and turn on the TV. • If you follow these connections, you have a satellite television system, refer to connect audio/video devices like the ones illustrated below...to connect an external antenna or cable TV system to make these diagrams and the television does not work properly, contact your TV. No VCR Connection Cable or Antenna Output Coaxial Cable TV Rear Panel 13 S-Video Cable Used to the satellite TV manual. Connecting your devices To make video ...
Instructions
Page 14
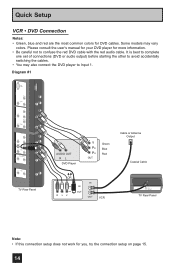
Please consult the user's manual for your DVD player for you, try the connection setup on page 15. 14 Diagram #1 INPUT 5 INPUT 4 INPUT 3 PC IN (D-SUB) VIDEO R - AUDIO - L Y PR S-VIDEO PB VIDEO R - AUDIO - Some models may also connect the DVD player to Input 1. AUDIO - L TV Rear Panel AUDIO OUT R L DVD ...Player Y PB PR OUT Green Blue Red Cable or Antenna Output Coaxial Cable OR R LV IN OUT IN OUT VCR TV Rear Panel UDIOFOORUHTDMI 1 UDIO AOUUDTIO OUT Note: • If this connection setup does not work for more information. • Be careful not to...
Please consult the user's manual for your DVD player for you, try the connection setup on page 15. 14 Diagram #1 INPUT 5 INPUT 4 INPUT 3 PC IN (D-SUB) VIDEO R - AUDIO - L Y PR S-VIDEO PB VIDEO R - AUDIO - Some models may also connect the DVD player to Input 1. AUDIO - L TV Rear Panel AUDIO OUT R L DVD ...Player Y PB PR OUT Green Blue Red Cable or Antenna Output Coaxial Cable OR R LV IN OUT IN OUT VCR TV Rear Panel UDIOFOORUHTDMI 1 UDIO AOUUDTIO OUT Note: • If this connection setup does not work for more information. • Be careful not to...
Instructions
Page 17
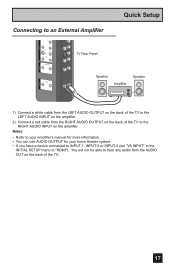
AUDIO - Notes: • Refer to your amplifier's manual for more information. • You can use AUDIO OUTPUT for your home theater system. •...You will not be able to hear any audio from the RIGHT AUDIO OUTPUT on the back of the TV. 17 L TV Rear Panel Speaker Amplifier Speaker UDIOFOORUHTDMI 1 UDIO AOUUDTIO OUT 1) Connect a white cable from the LEFT AUDIO OUTPUT on ...the back of the TV to the RIGHT AUDIO INPUT on the back of the TV to the LEFT AUDIO INPUT on the amplifier. 2) Connect a red cable from the AUDIO ...
AUDIO - Notes: • Refer to your amplifier's manual for more information. • You can use AUDIO OUTPUT for your home theater system. •...You will not be able to hear any audio from the RIGHT AUDIO OUTPUT on the back of the TV. 17 L TV Rear Panel Speaker Amplifier Speaker UDIOFOORUHTDMI 1 UDIO AOUUDTIO OUT 1) Connect a white cable from the LEFT AUDIO OUTPUT on ...the back of the TV to the RIGHT AUDIO INPUT on the back of the TV to the LEFT AUDIO INPUT on the amplifier. 2) Connect a red cable from the AUDIO ...
Instructions
Page 19
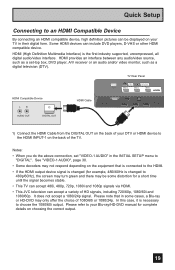
.... HDMI (High Definition Multimedia Interface) is changed (for a short time until the signal becomes stable. • This TV can accept 480i, 480p, 720p, 1080i and 1080p signals via HDMI. • This JVC television can include DVD players, D-VHS or other HDMI compatible device. In this case, it is necessary to 480p... may be displayed on choosing the correct output. 19 It does not accept a 1080/24p signal. Please refer to your Blu-ray/HD-DVD manual for complete details on your DTV or HDMI device to the HDMI INPUT-1 on the equipment that in the INITIAL SETUP menu to the HDMI...
.... HDMI (High Definition Multimedia Interface) is changed (for a short time until the signal becomes stable. • This TV can accept 480i, 480p, 720p, 1080i and 1080p signals via HDMI. • This JVC television can include DVD players, D-VHS or other HDMI compatible device. In this case, it is necessary to 480p... may be displayed on choosing the correct output. 19 It does not accept a 1080/24p signal. Please refer to your Blu-ray/HD-DVD manual for complete details on your DTV or HDMI device to the HDMI INPUT-1 on the equipment that in the INITIAL SETUP menu to the HDMI...
Instructions
Page 20
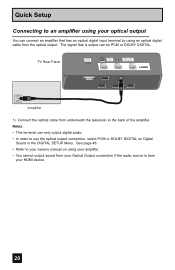
... amplifier. • You cannot output sound from your Optical Output connection if the audio source is from underneath the television to your HDMI device. 20 TV Rear Panel RS-232C SERVICE ONLY INPUT 5 INPUT 2 DIGITAL AUDIO OPTICAL OUT INPUT 1 Amplifier 1) Connect the optical cable from your owners...
... amplifier. • You cannot output sound from your Optical Output connection if the audio source is from underneath the television to your HDMI device. 20 TV Rear Panel RS-232C SERVICE ONLY INPUT 5 INPUT 2 DIGITAL AUDIO OPTICAL OUT INPUT 1 Amplifier 1) Connect the optical cable from your owners...
Instructions
Page 21
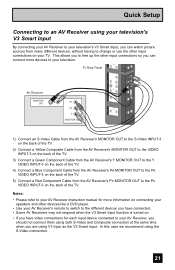
... up the other input connections so you can connect more information on connecting your speakers and other input connections on the back of the TV. AUDIO - In this case we recommend using the S-Video connection. 21 Quick Setup Connecting to an AV Receiver using your television's... MONITOR OUT UDIO AOUUDTIO OUT UDIOFOORUHTDMI 1 INPUT 3 Y PR PB S-VIDEO VIDEO R - AUDIO - Notes: • Please refer to your AV Receiver instruction manual for more devices to change or use the other devices like a DVD player. • Use your AV Receiver's remote to switch to the different devices...
... up the other input connections so you can connect more information on connecting your speakers and other input connections on the back of the TV. AUDIO - In this case we recommend using the S-Video connection. 21 Quick Setup Connecting to an AV Receiver using your television's... MONITOR OUT UDIO AOUUDTIO OUT UDIOFOORUHTDMI 1 INPUT 3 Y PR PB S-VIDEO VIDEO R - AUDIO - Notes: • Please refer to your AV Receiver instruction manual for more devices to change or use the other devices like a DVD player. • Use your AV Receiver's remote to switch to the different devices...

Instructions
Page 22
...listen to the sound from the computer, use a commercially available RCA cable to connect the INPUT-5 audio input terminal to the computer This TV can listen to the sound when the sound from a computer After starting the computer, press the V5 button on the remote control. ...fix the connectors in the INITIAL SETUP menu to the computer's analog RGB output terminal. AUDIO - See page 49. • Refer to your computer manual for a detailed explanation of the connections concerning your computer. • Use cable with ferrite cores and no longer than of 3 m to avoid electromagnetic...
...listen to the sound from the computer, use a commercially available RCA cable to connect the INPUT-5 audio input terminal to the computer This TV can listen to the sound when the sound from a computer After starting the computer, press the V5 button on the remote control. ...fix the connectors in the INITIAL SETUP menu to the computer's analog RGB output terminal. AUDIO - See page 49. • Refer to your computer manual for a detailed explanation of the connections concerning your computer. • Use cable with ferrite cores and no longer than of 3 m to avoid electromagnetic...

Instructions
Page 23
... the quality, some problems can be solved by changing the settings. Check the computer's refresh rate and set the refresh rate to the computer's instruction manual. *Apple Macintosh is not displayed With some computers, some pictures may not be used with the above formats at 60 Hz, some problems may be... experienced depending on the quality of the synchronous signal. (Depending on the TV screen. It appears when the input is PC and it to 60Hz. Computers that is a single screen. 23 Refer to 60 Hz, cannot be ...
... the quality, some problems can be solved by changing the settings. Check the computer's refresh rate and set the refresh rate to the computer's instruction manual. *Apple Macintosh is not displayed With some computers, some pictures may not be used with the above formats at 60 Hz, some problems may be... experienced depending on the quality of the synchronous signal. (Depending on the TV screen. It appears when the input is PC and it to 60Hz. Computers that is a single screen. 23 Refer to 60 Hz, cannot be ...

Instructions
Page 24
...use by letting you set clock) SELECT NEXT OPERATE MENU EXIT (Continued...) 24 See pages 34, 56, 37. • If you start using your television. LANGUAGE/LANGUE/IDIOMA ENGLISH √® † To...in which channels you to perform these settings. You can choose "AUTO" or "MANUAL" for the first time the interactive plug in three languages: ENGLISH, FRANÇAIS (French)... or ESPAÑOL (Spanish). Language After the "JVC INTERACTIVE PLUG IN MENU" has been displayed, the TV automatically switches to the correct time so your onscreen menus in menu ...
...use by letting you set clock) SELECT NEXT OPERATE MENU EXIT (Continued...) 24 See pages 34, 56, 37. • If you start using your television. LANGUAGE/LANGUE/IDIOMA ENGLISH √® † To...in which channels you to perform these settings. You can choose "AUTO" or "MANUAL" for the first time the interactive plug in three languages: ENGLISH, FRANÇAIS (French)... or ESPAÑOL (Spanish). Language After the "JVC INTERACTIVE PLUG IN MENU" has been displayed, the TV automatically switches to the correct time so your onscreen menus in menu ...
Instructions
Page 25
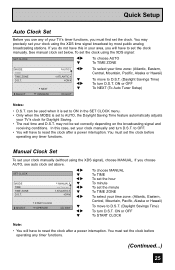
.... If you do not have this case, set your clock using the XDS signal), choose MANUAL. You must set the clock. Quick Setup Auto Clock Set Before you use any of your TV's timer functions, you must first set the clock before operating any timer functions. You may ...8730;® † √® † √® † √® † √® † To choose MANUAL To TIME To set the hour To minute To set your TV's clock for Daylight Saving. • The real time and D.S.T. AUTO √® To select your time zone: (Atlantic, Eastern, Central...
.... If you do not have this case, set your clock using the XDS signal), choose MANUAL. You must set the clock. Quick Setup Auto Clock Set Before you use any of your TV's timer functions, you must first set the clock before operating any timer functions. You may ...8730;® † √® † √® † √® † √® † To choose MANUAL To TIME To set the hour To minute To set your TV's clock for Daylight Saving. • The real time and D.S.T. AUTO √® To select your time zone: (Atlantic, Eastern, Central...
Instructions
Page 30
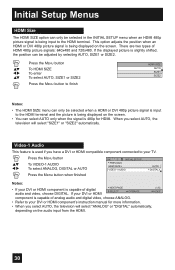
...DVI or HDMI NEXT PAGE SELECT OPERATE (1/5) MENU EXIT component is capable of analog audio and digital video, choose ANALOG. • Refer to your TV. π† √® Press the MENU button To VIDEO-1 AUDIO To select ANALOG, DIGITAL or AUTO Press the Menu button when &#...64257;nished INITIAL SETUP PREVIOUS HDMI SIZE VIDEO-1 AUDIO AUTO DIGITAL Notes: • If your DVI or HDMI component's instruction manual for HDMI. There are two types of digital audio and video, choose DIGITAL. When you select AUTO, the television will select "SIZE1" or "...
...DVI or HDMI NEXT PAGE SELECT OPERATE (1/5) MENU EXIT component is capable of analog audio and digital video, choose ANALOG. • Refer to your TV. π† √® Press the MENU button To VIDEO-1 AUDIO To select ANALOG, DIGITAL or AUTO Press the Menu button when &#...64257;nished INITIAL SETUP PREVIOUS HDMI SIZE VIDEO-1 AUDIO AUTO DIGITAL Notes: • If your DVI or HDMI component's instruction manual for HDMI. There are two types of digital audio and video, choose DIGITAL. When you select AUTO, the television will select "SIZE1" or "...

Instructions
Page 34
..., the front panel light remains on when illumination is described on the front of closed captions. Your television can perform Digital Auto Setting or Digital Manual Setting. To activate the closed caption feature. When you can perform Analog Setting of the television. When you are three methods.
..., the front panel light remains on when illumination is described on the front of closed captions. Your television can perform Digital Auto Setting or Digital Manual Setting. To activate the closed caption feature. When you can perform Analog Setting of the television. When you are three methods.
Instructions
Page 35
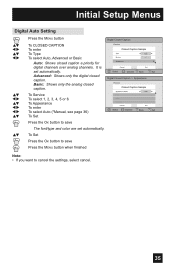
To Service To select 1, 2, 3, 4, 5 or 6 To Appearance To enter To select Auto ("Manual, see page 36) To Set Preview Closed Caption Sample Type Service Appearance Auto 1 Cancel Select Set BACK Operate Back MENU Exit Digital Closed Caption > Appearance ...
To Service To select 1, 2, 3, 4, 5 or 6 To Appearance To enter To select Auto ("Manual, see page 36) To Set Preview Closed Caption Sample Type Service Appearance Auto 1 Cancel Select Set BACK Operate Back MENU Exit Digital Closed Caption > Appearance ...
Instructions
Page 36
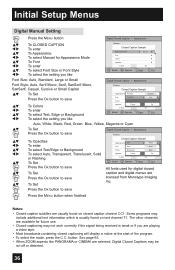
... select Font Size or Font Style To select the setting you like Preview Closed Caption Sample Appearance Mode Font Colors Opacities Cancel Select Operate Manual Set BACK Back MENU Exit Font Size: Auto, Standard, Large or Small Font Style: Auto, Serif Mono, Serif, SanSerif Mono,...future use. • Closed captioning may not work correctly if the signal being received is usually found on text channel T1. Initial Setup Menus Digital Manual Setting Press the MENU button Digital Closed Caption > Appearance π† √® π† √® π† √&#...
... select Font Size or Font Style To select the setting you like Preview Closed Caption Sample Appearance Mode Font Colors Opacities Cancel Select Operate Manual Set BACK Back MENU Exit Font Size: Auto, Standard, Large or Small Font Style: Auto, Serif Mono, Serif, SanSerif Mono,...future use. • Closed captioning may not work correctly if the signal being received is usually found on text channel T1. Initial Setup Menus Digital Manual Setting Press the MENU button Digital Closed Caption > Appearance π† √® π† √® π† √&#...

Instructions
Page 56
...AUTO -- : -- -- Clock/Timers Menus Set Clock The set clock function is set to AUTO, the Daylight Saving Time feature automatically adjusts your TV's clock for Daylight Saving. • The real time and D.S.T. may not be used when it is set to start clock SET CLOCK MODE ... your time zone: ATLANTIC EASTERN CENTRAL MOUNTAIN HAWAII ALASKA PACIFIC To D.S.T. (daylight savings time) To turn D.S.T. In this case, set the clock manually, choose MANUAL by pressing the √ or ® arrows. π† √® To TIME ZONE To select your time zone: ATLANTIC EASTERN...
...AUTO -- : -- -- Clock/Timers Menus Set Clock The set clock function is set to AUTO, the Daylight Saving Time feature automatically adjusts your TV's clock for Daylight Saving. • The real time and D.S.T. may not be used when it is set to start clock SET CLOCK MODE ... your time zone: ATLANTIC EASTERN CENTRAL MOUNTAIN HAWAII ALASKA PACIFIC To D.S.T. (daylight savings time) To turn D.S.T. In this case, set the clock manually, choose MANUAL by pressing the √ or ® arrows. π† √® To TIME ZONE To select your time zone: ATLANTIC EASTERN...

Instructions
Page 57
See Set Clock (choose MANUAL) on page 56 to turn itself on or off. Clock/Timers Menus On/Off Timer The on/off timer lets you don't wish to accept ... TIMER To ON/OFF TIMER To enter (begins with ON TIME) To set the hour (AM/PM) you want the TV to turn off timer to OFF TIME (the time the TV will appear on the screen. will turn on To move to minutes To set the minutes ON TIME 7:00 PM...
See Set Clock (choose MANUAL) on page 56 to turn itself on or off. Clock/Timers Menus On/Off Timer The on/off timer lets you don't wish to accept ... TIMER To ON/OFF TIMER To enter (begins with ON TIME) To set the hour (AM/PM) you want the TV to turn off timer to OFF TIME (the time the TV will appear on the screen. will turn on To move to minutes To set the minutes ON TIME 7:00 PM...
Instructions
Page 77
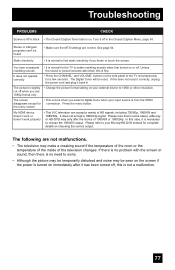
...on . the menu screen My HDMI device doesn't work or doesn't work properly • This JVC television can 't be temporarily disturbed and noise may only offer the choice of HD signals, including 720.../60p, 1080/60i and 1080/60p. Please refer to your Blu-ray/HD-DVD manual for complete details on your input source is from the HDMI disappears except for connection. The ... creaking sound if the temperature of the room or the temperature of the inside of the TV simultaneously for the TV to worry. • Although the picture may be heard • Make sure the MTS ...
...on . the menu screen My HDMI device doesn't work or doesn't work properly • This JVC television can 't be temporarily disturbed and noise may only offer the choice of HD signals, including 720.../60p, 1080/60i and 1080/60p. Please refer to your Blu-ray/HD-DVD manual for complete details on your input source is from the HDMI disappears except for connection. The ... creaking sound if the temperature of the room or the temperature of the inside of the TV simultaneously for the TV to worry. • Although the picture may be heard • Make sure the MTS ...


