Instructions
Page 4
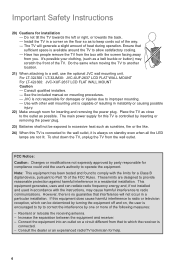
...interference to allow satisfactory cooling. - Consult the dealer or an experienced radio/TV technician for a Class B digital device, pursuant to Part 15 of heat during operation. See the included manual on standby even when all the LED lamps are designed to provide reasonable...down the TV, unplug the TV from you. Have two people remove the TV from the box with other wall mounting unit is available around the TV to radio communications. JVC is always on mounting procedures. - For LT-32J300 / LT-32JM30: JVC-XUF-2637 LCD FLAT WALL MOUNT For LT-42J300: JVC-XUF-2637 LCD FLAT ...
...interference to allow satisfactory cooling. - Consult the dealer or an experienced radio/TV technician for a Class B digital device, pursuant to Part 15 of heat during operation. See the included manual on standby even when all the LED lamps are designed to provide reasonable...down the TV, unplug the TV from you. Have two people remove the TV from the box with other wall mounting unit is available around the TV to radio communications. JVC is always on mounting procedures. - For LT-32J300 / LT-32JM30: JVC-XUF-2637 LCD FLAT WALL MOUNT For LT-42J300: JVC-XUF-2637 LCD FLAT ...
Instructions
Page 23
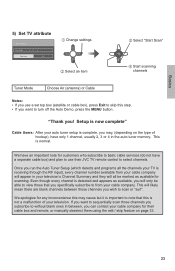
... receiving through the RF input), every channel number available from your cable company for their JVC TV remote control to without blank ones in the auto tuner memory. Basics 5) Set TV attribute Set TV Attribute Tuner Mode Air Start Scan Exit 1 Change settings 2 Select an item 3 Select... "Start Scan" 4 Start scanning channels Tuner Mode Choose Air (antenna) or Cable Notes: • If you use their cable box and remote, or manually deselect them using...
... receiving through the RF input), every channel number available from your cable company for their JVC TV remote control to without blank ones in the auto tuner memory. Basics 5) Set TV attribute Set TV Attribute Tuner Mode Air Start Scan Exit 1 Change settings 2 Select an item 3 Select... "Start Scan" 4 Start scanning channels Tuner Mode Choose Air (antenna) or Cable Notes: • If you use their cable box and remote, or manually deselect them using...

Instructions
Page 33
... VCRs, DVD players, Blu-ray or camcorders connected to skip. button. Notes: • V-CHIP will appear. Please input password: TV Continued... 33 Advanced Edit Channel Allows you to block channels or content that you deem inappropriate for children. You can still access those ...skipped channels manually using the + CH - V-Chip Allows you try and access the V-Chip menu, "Please input password" will not work properly in Canada. - Main ...
... VCRs, DVD players, Blu-ray or camcorders connected to skip. button. Notes: • V-CHIP will appear. Please input password: TV Continued... 33 Advanced Edit Channel Allows you to block channels or content that you deem inappropriate for children. You can still access those ...skipped channels manually using the + CH - V-Chip Allows you try and access the V-Chip menu, "Please input password" will not work properly in Canada. - Main ...
Instructions
Page 42
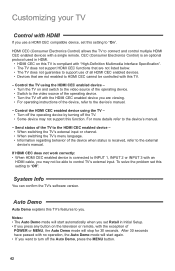
... • For operating instructions of the device, refer to the device's manual. - Send status of the TV to the HDMI CEC enabled device - • When switching the TV's external input or channel. • When switching the TV's menu language. • Information regarding behavior of the device when status is...If you press any button on and switch to the video source of the operating device. • Switch to the external device's manual. Control the TV using the TV - • Turn off the operating device by turning off with a single remote. To solve the problem set this setting to the...
... • For operating instructions of the device, refer to the device's manual. - Send status of the TV to the HDMI CEC enabled device - • When switching the TV's external input or channel. • When switching the TV's menu language. • Information regarding behavior of the device when status is...If you press any button on and switch to the video source of the operating device. • Switch to the external device's manual. Control the TV using the TV - • Turn off the operating device by turning off with a single remote. To solve the problem set this setting to the...
Instructions
Page 44
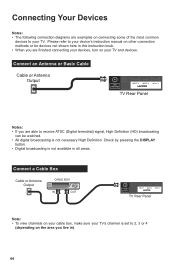
... in). 44 Connect an Antenna or Basic Cable Cable or Antenna Output 75 Ω (VHF/UHF) INPUT 1 INPUT 2 INPUT 3 TV Rear Panel Notes: • If you are able to your device's instruction manual on your devices, turn on other connection methods or for devices not shown here in all areas. Please refer...
... in). 44 Connect an Antenna or Basic Cable Cable or Antenna Output 75 Ω (VHF/UHF) INPUT 1 INPUT 2 INPUT 3 TV Rear Panel Notes: • If you are able to your device's instruction manual on your devices, turn on other connection methods or for devices not shown here in all areas. Please refer...
Instructions
Page 46
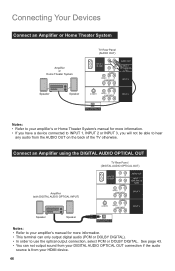
... device. 46 Connect an Amplifier using the DIGITAL AUDIO OPTICAL OUT TV Rear Panel (DIGITAL AUDIO OPTICAL OUT) Amplifier (with DIGITAL AUDIO OPTICAL INPUT) Speaker Speaker Notes: • Refer to your amplifier's manual for more information. • This terminal can not output sound .... Connecting Your Devices Connect an Amplifier or Home Theater System TV Rear Panel (AUDIO OUT) Amplifier or Home Theater System Speaker Speaker Notes: • Refer to your amplifier's or Home Theater System's manual for more information. • If you have a device connected to INPUT 1, INPUT ...
... device. 46 Connect an Amplifier using the DIGITAL AUDIO OPTICAL OUT TV Rear Panel (DIGITAL AUDIO OPTICAL OUT) Amplifier (with DIGITAL AUDIO OPTICAL INPUT) Speaker Speaker Notes: • Refer to your amplifier's manual for more information. • This terminal can not output sound .... Connecting Your Devices Connect an Amplifier or Home Theater System TV Rear Panel (AUDIO OUT) Amplifier or Home Theater System Speaker Speaker Notes: • Refer to your amplifier's or Home Theater System's manual for more information. • If you have a device connected to INPUT 1, INPUT ...
Instructions
Page 48
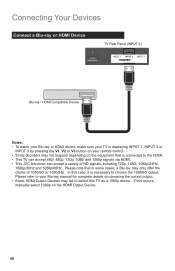
... accept 480i, 480p, 720p, 1080i and 1080p signals via HDMI. • This JVC television can accept a variety of 1080/60i or 1080/24p. If this TV as a 1080p device. Connecting Your Devices Connect a Blu-ray or HDMI Device TV Rear Panel (INPUT 2) 75 Ω (VHF/UHF) INPUT 1 INPUT 2 INPUT 3 Blu-ray / HDMI ...Compatible Device Notes: • To watch your Blu-ray or HDMI device, make sure your TV is displaying INPUT 1, INPUT 2 or INPUT 3 by pressing the V1, V2 or V3 button on your Blu-ray manual for complete details on the HDMI Output Device. 48 In this case, it is necessary to...
... accept 480i, 480p, 720p, 1080i and 1080p signals via HDMI. • This JVC television can accept a variety of 1080/60i or 1080/24p. If this TV as a 1080p device. Connecting Your Devices Connect a Blu-ray or HDMI Device TV Rear Panel (INPUT 2) 75 Ω (VHF/UHF) INPUT 1 INPUT 2 INPUT 3 Blu-ray / HDMI ...Compatible Device Notes: • To watch your Blu-ray or HDMI device, make sure your TV is displaying INPUT 1, INPUT 2 or INPUT 3 by pressing the V1, V2 or V3 button on your Blu-ray manual for complete details on the HDMI Output Device. 48 In this case, it is necessary to...
Instructions
Page 49
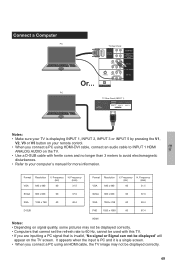
... electromagnetic disturbances. • Refer to 60 Hz, cannot be used with this TV. • If you connect a PC using an HDMI cable, the TV image may not be displayed correctly. • Computers that cannot set the refresh... is displaying INPUT 1, INPUT 2, INPUT 3 or INPUT 5 by pressing the V1, V2, V3 or V5 button on the TV screen. Or... Frequency (kHz) 31.5 SVGA 800 x 600 60 37.9 SVGA 800 x 600 60 37.9 XGA 1024 ... quality, some pictures may not be displayed" will appear on your computer's manual for more information. Format VGA Resolution 640 x 480 V. Connect a Computer PC...
... electromagnetic disturbances. • Refer to 60 Hz, cannot be used with this TV. • If you connect a PC using an HDMI cable, the TV image may not be displayed correctly. • Computers that cannot set the refresh... is displaying INPUT 1, INPUT 2, INPUT 3 or INPUT 5 by pressing the V1, V2, V3 or V5 button on the TV screen. Or... Frequency (kHz) 31.5 SVGA 800 x 600 60 37.9 SVGA 800 x 600 60 37.9 XGA 1024 ... quality, some pictures may not be displayed" will appear on your computer's manual for more information. Format VGA Resolution 640 x 480 V. Connect a Computer PC...


