Instruction Manual
Page 3
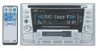
... is set to the sources 25 EXTERNAL COMPONENT OPERATIONS ... 27 CD CHANGER OPERATIONS 28 Playing CDs 28 Selecting CD playback modes 30 MAINTENANCE 31 Handling cassettes 31 Handling CDs 32 TROUBLESHOOTING...time in the car block outside sounds, making driving dangerous. Please read all instructions carefully before performing any complicated operations. 3 When shipped from the unit. CONTENTS How to reset your unit 2 About the demonstration mode (DEMO MODE 3 LOCATION OF THE BUTTONS 4 Control panel 4 Remote controller 5 Preparing the remote controller 6 BASIC OPERATIONS 7 RADIO...
... is set to the sources 25 EXTERNAL COMPONENT OPERATIONS ... 27 CD CHANGER OPERATIONS 28 Playing CDs 28 Selecting CD playback modes 30 MAINTENANCE 31 Handling cassettes 31 Handling CDs 32 TROUBLESHOOTING...time in the car block outside sounds, making driving dangerous. Please read all instructions carefully before performing any complicated operations. 3 When shipped from the unit. CONTENTS How to reset your unit 2 About the demonstration mode (DEMO MODE 3 LOCATION OF THE BUTTONS 4 Control panel 4 Remote controller 5 Preparing the remote controller 6 BASIC OPERATIONS 7 RADIO...
Instruction Manual
Page 5
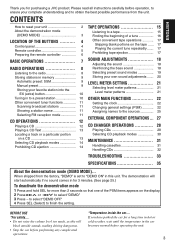
...CD changer. 3 • Selects preset numbers in the increasing order while listening to the radio...time you press button, the EQ (equalizer) mode changes. 6 Selects the source. Each time you press FUNC (function), the source changes. 7 • Searches stations while listening to the radio.... • Fast-forwards or reverses the track if pressed and held while listening to a CD... CD. • Fast-forwards or rewinds a tape and find a beginning of a tune (MMS) while listening to the CD ...
...CD changer. 3 • Selects preset numbers in the increasing order while listening to the radio...time you press button, the EQ (equalizer) mode changes. 6 Selects the source. Each time you press FUNC (function), the source changes. 7 • Searches stations while listening to the radio.... • Fast-forwards or reverses the track if pressed and held while listening to a CD... CD. • Fast-forwards or rewinds a tape and find a beginning of a tune (MMS) while listening to the CD ...
Instruction Manual
Page 7
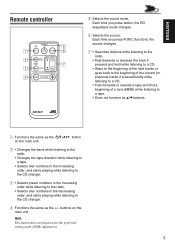
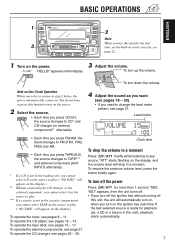
... YOU" appears, then the unit turns off. • If you turn off the ignition key without turning off the power Press /ATT for the first time, set the built-in the cassette compartment, you cannot select TAPE as the source to play . ("NO DISC" will appear on the display.) ** Without connecting... level will automatically turn on when you turn off this button to turn on the power. 2 Select the source. • Each time you press CD/CH, the source changes to CD* and CD-changer (or external component)** alternately. 4 Adjust the sound as you want (see pages 18 - 20). • If you need ...
... YOU" appears, then the unit turns off. • If you turn off the ignition key without turning off the power Press /ATT for the first time, set the built-in the cassette compartment, you cannot select TAPE as the source to play . ("NO DISC" will appear on the display.) ** Without connecting... level will automatically turn on when you turn off this button to turn on the power. 2 Select the source. • Each time you press CD/CH, the source changes to CD* and CD-changer (or external component)** alternately. 4 Adjust the sound as you want (see pages 18 - 20). • If you need ...
Instruction Manual
Page 16
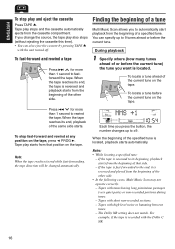
.... To stop play starts from the beginning of the other side. • In the following cases, Multi Music Scan may not operate correctly. - Each time you change the source, the tape play stops and the cassette automatically ejects from the beginning of that position on the tape. If the tape... is fast-forwarded to fastforward the tape. The Dolby NR setting does not match. Tape play also stops (without ejecting the cassette this time). • You can specify up to 9 tunes ahead or before the current tune on the tape. If you ...
.... To stop play starts from the beginning of the other side. • In the following cases, Multi Music Scan may not operate correctly. - Each time you change the source, the tape play stops and the cassette automatically ejects from the beginning of that position on the tape. If the tape... is fast-forwarded to fastforward the tape. The Dolby NR setting does not match. Tape play also stops (without ejecting the cassette this time). • You can specify up to 9 tunes ahead or before the current tune on the tape. If you ...

Instruction Manual
Page 17
Each time you press the button, repeat play the current tune repeatedly (Repeat Play). 1 Press MODE repeatedly until ...C NR. "TAPE " flashes on the display for more , fast-forwards to the next tune, then starts playing it. Each time you press the button, skip function mode turns on the display and the unit skips blank portions of 15 seconds or more than ... tape operations Skipping blank portions on ("REPEAT ON") and off ("B.SKIP OFF") alternately. The Dolby NR setting does not match. Playing the current tune repeatedly You can "lock" a tape in the cassette compartment.
Each time you press the button, repeat play the current tune repeatedly (Repeat Play). 1 Press MODE repeatedly until ...C NR. "TAPE " flashes on the display for more , fast-forwards to the next tune, then starts playing it. Each time you press the button, skip function mode turns on the display and the unit skips blank portions of 15 seconds or more than ... tape operations Skipping blank portions on ("REPEAT ON") and off ("B.SKIP OFF") alternately. The Dolby NR setting does not match. Playing the current tune repeatedly You can "lock" a tape in the cassette compartment.
Instruction Manual
Page 18
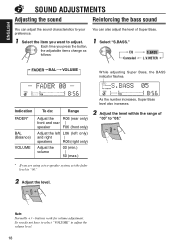
buttons work for volume adjustment. EQ Canceled S.BASS L.V.METER FADER BAL VOLUME While adjusting Super Bass, the BASS indicator flashes. Each time you want to adjust. As the number increases, Super Bass level also increases. So you do : Range Adjust the R06 (rear only) front and rear ... the button, the adjustable items change as follows: You can also adjust the level of "00" to "08." * If you are using a two-speaker system, set the fader level to "00." 2 Adjust the level.
buttons work for volume adjustment. EQ Canceled S.BASS L.V.METER FADER BAL VOLUME While adjusting Super Bass, the BASS indicator flashes. Each time you want to adjust. As the number increases, Super Bass level also increases. So you do : Range Adjust the R06 (rear only) front and rear ... the button, the adjustable items change as follows: You can also adjust the level of "00" to "08." * If you are using a two-speaker system, set the fader level to "00." 2 Adjust the level.
Instruction Manual
Page 19
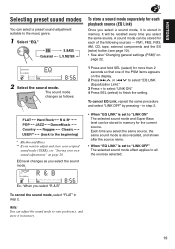
.... 2 Press ¢ or 4 to select "EQ LINK (Equalization Link)." 3 Press + to select "LINK ON." 4 Press SEL (select) to finish the setting. FM1, FM2, FM3, AM, CD, tape, external components and the EX (extra) button (see "Storing your preference, and store it is stored in memory. To cancel EQ Link...It will be stored for more than 2 seconds so that one of the following sources - ENGLISH Selecting preset sound modes You can be recalled every time you select the same source. EQ level changes as follows: 1 Press and hold SEL (select) for each playback source (EQ Link) Once you...
.... 2 Press ¢ or 4 to select "EQ LINK (Equalization Link)." 3 Press + to select "LINK ON." 4 Press SEL (select) to finish the setting. FM1, FM2, FM3, AM, CD, tape, external components and the EX (extra) button (see "Storing your preference, and store it is stored in memory. To cancel EQ Link...It will be stored for more than 2 seconds so that one of the following sources - ENGLISH Selecting preset sound modes You can be recalled every time you select the same source. EQ level changes as follows: 1 Press and hold SEL (select) for each playback source (EQ Link) Once you...

Instruction Manual
Page 20
...) EX.: When you adjust "LOW FREQ." 4 Repeat step 2 and 3 to adjust the other sound elements. 5 Store the adjustments. MID FREQ. HIGH FREQ. 20 If the setting is cancelled before you press the button, the sound elements to the table below for adjusting the selected sound element. Each... time you finish, start from step 1 again. 1 Select "EQ." EQ Canceled S.BASS L.V.METER 3 Adjust the selected sound element. • Refer to adjust change as follows: LOW ...
...) EX.: When you adjust "LOW FREQ." 4 Repeat step 2 and 3 to adjust the other sound elements. 5 Store the adjustments. MID FREQ. HIGH FREQ. 20 If the setting is cancelled before you press the button, the sound elements to the table below for adjusting the selected sound element. Each... time you finish, start from step 1 again. 1 Select "EQ." EQ Canceled S.BASS L.V.METER 3 Adjust the selected sound element. • Refer to adjust change as follows: LOW ...
Instruction Manual
Page 21
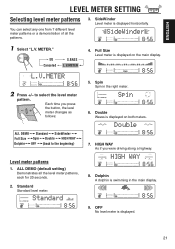
Full Size Level meter is displayed horizontally. 1 Select "L.V. Each time you were driving along a highway. HIGH WAY As if you press the button, the level meter changes as follows: 5. Level meter patterns 1. SideWinder Level meter ... Standard SideWinder Full Size Spin Double HIGH WAY Dolphin OFF (back to select the level meter pattern. ALL DEMO (default setting) Demonstrates all the patterns. 3. Standard Standard level meter. 8. ENGLISH LEVEL METER SETTING Selecting level meter patterns You can select any one from 7 different level meter patterns or a demonstration of all the...
Full Size Level meter is displayed horizontally. 1 Select "L.V. Each time you were driving along a highway. HIGH WAY As if you press the button, the level meter changes as follows: 5. Level meter patterns 1. SideWinder Level meter ... Standard SideWinder Full Size Spin Double HIGH WAY Dolphin OFF (back to select the level meter pattern. ALL DEMO (default setting) Demonstrates all the patterns. 3. Standard Standard level meter. 8. ENGLISH LEVEL METER SETTING Selecting level meter patterns You can select any one from 7 different level meter patterns or a demonstration of all the...
Instruction Manual
Page 22
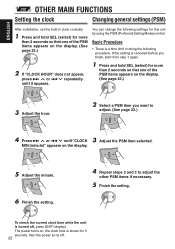
If the setting is a time limit in clock correctly. 1 Press and hold SEL (select) for more than 2 seconds so that one of the PSM items... again. 1 Press and hold SEL (select) for 5 seconds, then the power turns off , press DISP (display). To check the current clock time while the unit is shown for more than 2 seconds so that one of the PSM items appears on the display. (See page 23.) 3 Adjust... the hour. 2 Select a PSM item you want to adjust the other PSM items if necessary. 5 Finish the setting. MIN (minute)" appears on , the clock time is turned off . 22
If the setting is a time limit in clock correctly. 1 Press and hold SEL (select) for more than 2 seconds so that one of the PSM items... again. 1 Press and hold SEL (select) for 5 seconds, then the power turns off , press DISP (display). To check the current clock time while the unit is shown for more than 2 seconds so that one of the PSM items appears on the display. (See page 23.) 3 Adjust... the hour. 2 Select a PSM item you want to adjust the other PSM items if necessary. 5 Finish the setting. MIN (minute)" appears on , the clock time is turned off . 22
Instruction Manual
Page 26
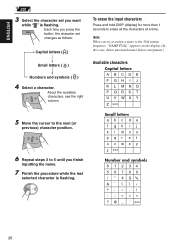
... space Number and symbols 0 1 2 34 5 6 7 89 space 26 Note: When you try to assign a name to erase all the characters at a time. ENGLISH 3 Select the character set changes as follows: Capital letters ( ) Small letters ( ) Numbers and symbols ( ) 4 Select a character. About the available characters, see the right column. ... to the next (or previous) character position. 6 Repeat steps 3 to 5 until you want while " " is flashing. Each time you press the button, the character set you finish inputting the name. 7 Finish the procedure while the last selected character is flashing.
... space Number and symbols 0 1 2 34 5 6 7 89 space 26 Note: When you try to assign a name to erase all the characters at a time. ENGLISH 3 Select the character set changes as follows: Capital letters ( ) Small letters ( ) Numbers and symbols ( ) 4 Select a character. About the available characters, see the right column. ... to the next (or previous) character position. 6 Repeat steps 3 to 5 until you want while " " is flashing. Each time you press the button, the character set you finish inputting the name. 7 Finish the procedure while the last selected character is flashing.
Instruction Manual
Page 28
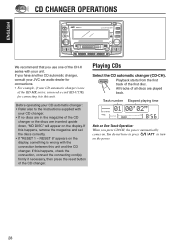
... are in the magazine of the CH-X series with your CD automatic changer: • Refer also to the Instructions supplied with the connection between this happens, remove the magazine and set the discs correctly. • If "RESET 1 - Track number Elapsed playing time Note on One-Touch Operation: When you use one of..., check the connection, connect the connecting cord(s) firmly if necessary, then press the reset button of the first disc. If this unit and the CD changer. You do not have another CD automatic changer, consult your JVC car audio dealer for connecting it to turn on .
... are in the magazine of the CH-X series with your CD automatic changer: • Refer also to the Instructions supplied with the connection between this happens, remove the magazine and set the discs correctly. • If "RESET 1 - Track number Elapsed playing time Note on One-Touch Operation: When you use one of..., check the connection, connect the connecting cord(s) firmly if necessary, then press the reset button of the first disc. If this unit and the CD changer. You do not have another CD automatic changer, consult your JVC car audio dealer for connecting it to turn on .


