Instruction Manual
Page 2
...with Federal Regulations, following are reproductions of procedures other than those specified herein may result in hazardous radiation exposure. Use of controls or adjustments or performance of labels on, or inside the product relating to laser product safety. Ia vida util (aplicable a...productos con el slmbolo de un contenedor con ruedas tachado no podran ser desechados Location: Top Plate Informacion acerca de Ia eliminaci6n de equipos electricos y electr6nicos al ,final de . CAUTION . JVC KENWOOD Corporation 2967-3, ISHIKAWA-MACHI, HACHIOJI-SHI, TOKYO, JAPAN THIS PRODUCT COMPLIES...
...with Federal Regulations, following are reproductions of procedures other than those specified herein may result in hazardous radiation exposure. Use of controls or adjustments or performance of labels on, or inside the product relating to laser product safety. Ia vida util (aplicable a...productos con el slmbolo de un contenedor con ruedas tachado no podran ser desechados Location: Top Plate Informacion acerca de Ia eliminaci6n de equipos electricos y electr6nicos al ,final de . CAUTION . JVC KENWOOD Corporation 2967-3, ISHIKAWA-MACHI, HACHIOJI-SHI, TOKYO, JAPAN THIS PRODUCT COMPLIES...
Instruction Manual
Page 4
... Volume setting: • Adjust the volume so that takes your attention away from the center hole and disc edge before playing digital sources to condensation on the dashboard. • The Lithium battery is in danger of the output level. · General: • Avoid using buttons on the faceplate. • [XX] indicates the selected items. • (+XX) indicates references are explained .mainly using the USB device or iPod/iPhone if...
... Volume setting: • Adjust the volume so that takes your attention away from the center hole and disc edge before playing digital sources to condensation on the dashboard. • The Lithium battery is in danger of the output level. · General: • Avoid using buttons on the faceplate. • [XX] indicates the selected items. • (+XX) indicates references are explained .mainly using the USB device or iPod/iPhone if...

Instruction Manual
Page 8
... to select the following drives. select [USB/tPOD], then press the knob. 3 Turn the volume knob to select [IPOD], then press the knob.· 4 Turn the volume knob to select [DRIVECHANGE]. Press number button 5 iPod MODE repeatedly to select the desired drive. {or) · 1 Press and hold MENU. 2 Turn the volume knob to playback when a multiple drives device is connected. BOOK NORMAL I BOOK FASTER I BOOK SLOWER: Select the desired playback speed of the Audiobooks sound file _in your iPod/iPhone...
... to select the following drives. select [USB/tPOD], then press the knob. 3 Turn the volume knob to select [IPOD], then press the knob.· 4 Turn the volume knob to select [DRIVECHANGE]. Press number button 5 iPod MODE repeatedly to select the desired drive. {or) · 1 Press and hold MENU. 2 Turn the volume knob to playback when a multiple drives device is connected. BOOK NORMAL I BOOK FASTER I BOOK SLOWER: Select the desired playback speed of the Audiobooks sound file _in your iPod/iPhone...
Instruction Manual
Page 9
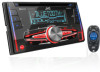
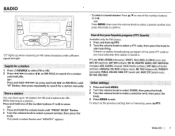
RADIO • • To select a stored·station: Press Ji../T or one of the number buttons (1 to 6). (or) Press MENU, then turn the volume knob to select a preset number and press the knob to confirm. 115T" lights up when receiving an FM stereo broadcast with sufficient signal strength. 1 Press
RADIO • • To select a stored·station: Press Ji../T or one of the number buttons (1 to 6). (or) Press MENU, then turn the volume knob to select a preset number and press the knob to confirm. 115T" lights up when receiving an FM stereo broadcast with sufficient signal strength. 1 Press
Instruction Manual
Page 10
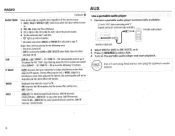
RADIO AUX Default: XX RADIO TIMER Turns on the radio at a specific time regardless of the current source. 1 ONCE/ DAILYI WEEKLYI OFF: Select how often the timer will not activate forthe following cases. • The unit is turned off. • [OFF] is selected for AM is selected in [SRC SELEa] after Radio Timer for [AM] in step 1. Radio Timer will be turned on. 2 FM/ AM: Select the FM or AM band. 3 01 to 18 {for FM}/ 01 to 06 {for AM): Select the preset station. 4 Set the activation day* and time. · "0" lights up when complete. . * Selectable only when [ONCE] or [WEEKLY] is
RADIO AUX Default: XX RADIO TIMER Turns on the radio at a specific time regardless of the current source. 1 ONCE/ DAILYI WEEKLYI OFF: Select how often the timer will not activate forthe following cases. • The unit is turned off. • [OFF] is selected for AM is selected in [SRC SELEa] after Radio Timer for [AM] in step 1. Radio Timer will be turned on. 2 FM/ AM: Select the FM or AM band. 3 01 to 18 {for FM}/ 01 to 06 {for AM): Select the preset station. 4 Set the activation day* and time. · "0" lights up when complete. . * Selectable only when [ONCE] or [WEEKLY] is
Instruction Manual
Page 11
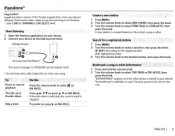
... your device.. 2 Connect your device to your Pandora account but not on your device. The bookmark is stored to the USB inp~t terminal. USB input terminal p)~=)ll c·~-j ~ ~ I 9 Pandora® Preparation: Install the latest version of the iPod/iPhone The source changes to PANDORA and broadcast starts. * Do not leave the cable inside the car when not using. Pause or resume playback Press the volume knob...
... your device.. 2 Connect your device to your Pandora account but not on your device. The bookmark is stored to the USB inp~t terminal. USB input terminal p)~=)ll c·~-j ~ ~ I 9 Pandora® Preparation: Install the latest version of the iPod/iPhone The source changes to PANDORA and broadcast starts. * Do not leave the cable inside the car when not using. Pause or resume playback Press the volume knob...
Instruction Manual
Page 13
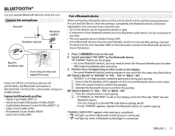
...8226; Some Bluetooth devices may not automatically connect to the instruction manual of two Bluetooth phones and one Bluetooth audio device can operate Bluetooth devices using this unit. · Rear panel Microphone supplied) C· •• I.......J li t:: ::: Microphone inlmt jack ""' d Adjust the . Refer to the unit after pairing. Phonebook Access Profile (PBAP} - Hands-Free Profile (HFP1.5) ·-Advanced Audio Distribution Profile (A2DP) - BLUETOOTH® You can be connected at . Supported Bluetooth profiles - AudioNideo Remote Control Profile (AVRCP1...
...8226; Some Bluetooth devices may not automatically connect to the instruction manual of two Bluetooth phones and one Bluetooth audio device can operate Bluetooth devices using this unit. · Rear panel Microphone supplied) C· •• I.......J li t:: ::: Microphone inlmt jack ""' d Adjust the . Refer to the unit after pairing. Phonebook Access Profile (PBAP} - Hands-Free Profile (HFP1.5) ·-Advanced Audio Distribution Profile (A2DP) - BLUETOOTH® You can be connected at . Supported Bluetooth profiles - AudioNideo Remote Control Profile (AVRCP1...
Instruction Manual
Page 14
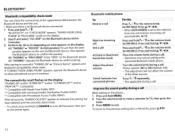
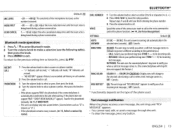
... OK"*3 : Compatible *1 Compatible with Hands-Free Profile (HFP) *2 Compatible with Advanced Audio Distribution Profile (A2DP) *3 Compatible with Phonebook Access Profile (PBAP) \· After 30 seconds, ~~PAIRING DELETED" appears to contin~e. After pairing is no Bluetooth device connected. 1 Press and hold The connectivity result flashes on the Bluetooth device. (C) "PAIRING": Operate the Bluetooth device to confirm pairing. JISEARCH NOW USING PHONE"+ 11PIN IS 0000" scrolls on the display. 2 Search and select "JVC UNIT" on the Bluetooth device within 3 minutes...
... OK"*3 : Compatible *1 Compatible with Hands-Free Profile (HFP) *2 Compatible with Advanced Audio Distribution Profile (A2DP) *3 Compatible with Phonebook Access Profile (PBAP) \· After 30 seconds, ~~PAIRING DELETED" appears to contin~e. After pairing is no Bluetooth device connected. 1 Press and hold The connectivity result flashes on the Bluetooth device. (C) "PAIRING": Operate the Bluetooth device to confirm pairing. JISEARCH NOW USING PHONE"+ 11PIN IS 0000" scrolls on the display. 2 Search and select "JVC UNIT" on the Bluetooth device within 3 minutes...
Instruction Manual
Page 15
... RDCT -05 - -20 (-1 0): Adjust the noise reduction level until the least echo is 1 being heard during aphone conversation. 10 · (~): L 1ECHO CANCEL 1 -. L 1 Press\. I \fJ to enter Bluetooth mode. 2 Turn the volume knob to make a selection (see the following table), then press the knob. 3 Press MENU to select a name or a phone number. • ">" indicates call received," Adjust the echo cancellation delay time until the least noise...
... RDCT -05 - -20 (-1 0): Adjust the noise reduction level until the least echo is 1 being heard during aphone conversation. 10 · (~): L 1ECHO CANCEL 1 -. L 1 Press\. I \fJ to enter Bluetooth mode. 2 Turn the volume knob to make a selection (see the following table), then press the knob. 3 Press MENU to select a name or a phone number. • ">" indicates call received," Adjust the echo cancellation delay time until the least noise...
Instruction Manual
Page 16
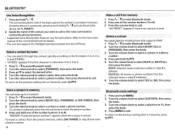
... the connected phone for details. • This unit also supports the intelligent personal assistant function o·f iPhone. • You can store up to 6 contacts. 1 Press\. I ~to enter Bluetooth mode. 2 Turn the volume knob to select [RECENT CALL] or [PHONEBOOK], then press the knob. 3 Turn the volume knob to select a contact or a phone number. 4 Press and hold MENU. 2 Turn the volume knob to select [BLUETOOTH], then press the knob. 3 Turn the volume knob to make a selection...
... the connected phone for details. • This unit also supports the intelligent personal assistant function o·f iPhone. • You can store up to 6 contacts. 1 Press\. I ~to enter Bluetooth mode. 2 Turn the volume knob to select [RECENT CALL] or [PHONEBOOK], then press the knob. 3 Turn the volume knob to select a contact or a phone number. 4 Press and hold MENU. 2 Turn the volume knob to select [BLUETOOTH], then press the knob. 3 Turn the volume knob to make a selection...
Instruction Manual
Page 17
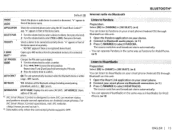
... to view JVC car receiver status and perform simple control operations on your device• 2 Connect to confirm. APPLICATION Shows the connected phone name using the JVC Smart Music Control*1 app. OFF: Cancels~ YES: Initializes all the Bluetooth settings (including stored pairing,· phonebook, and etc.).; For JVC Smart Music Controt operations, visit JVC website: . *2 Selectable only when the connect~d phone supports OPP. Preparation: Select [ON] for [PANDORA] in front of a connected 2 WAIT* ph SET PINCODE Changes the PIN code (up...
... to view JVC car receiver status and perform simple control operations on your device• 2 Connect to confirm. APPLICATION Shows the connected phone name using the JVC Smart Music Control*1 app. OFF: Cancels~ YES: Initializes all the Bluetooth settings (including stored pairing,· phonebook, and etc.).; For JVC Smart Music Controt operations, visit JVC website: . *2 Selectable only when the connect~d phone supports OPP. Preparation: Select [ON] for [PANDORA] in front of a connected 2 WAIT* ph SET PINCODE Changes the PIN code (up...
Instruction Manual
Page 18
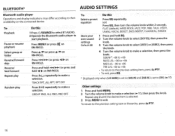
Press .li../T (or press .li../T on the connected device. . Press ~~~ (or press Playback Pause or resume playback Select group or folder Reverse/forward skip Reverse/ fast-forward Repeat play Random play Do this ' ·•i•·, 1 Press Q)/SOURCE to select BT AUDIO. 2 Operate the Bluetooth audio player to their availability on RM-RK52). BLUETOOTH® AUDIO SETTINGS Bluetooth audio player Operations and display indications may differ according to start playback. Press MENU (or press~ on RM-RK52).
Press .li../T (or press .li../T on the connected device. . Press ~~~ (or press Playback Pause or resume playback Select group or folder Reverse/forward skip Reverse/ fast-forward Repeat play Random play Do this ' ·•i•·, 1 Press Q)/SOURCE to select BT AUDIO. 2 Operate the Bluetooth audio player to their availability on RM-RK52). BLUETOOTH® AUDIO SETTINGS Bluetooth audio player Operations and display indications may differ according to start playback. Press MENU (or press~ on RM-RK52).
Instruction Manual
Page 19
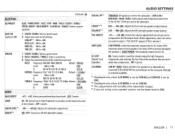
... (QBX) AUDIO SETTINGS SUB.W LPF*1 FADER*3*4 THROUGH: All signals are connected to the subwoofer. BALANCE*3 L06- OFF: Cancels. 01 I 02: Boosts low or high frequencies to the subwoofer.; ON I OFF: Turns on the rear panel (through an external amplifier). *1 Displayed only when [l/0 MODE] is set to [SUB.W] and [SUB.W] is set the fader level to [ON]. *2 Displayed only when [L/0 MODE] is 50. l/0 MODE SUB.W I REAR: Selects whether rear speakers or asubwoofer are sent to produce a well-balanced sound at...
... (QBX) AUDIO SETTINGS SUB.W LPF*1 FADER*3*4 THROUGH: All signals are connected to the subwoofer. BALANCE*3 L06- OFF: Cancels. 01 I 02: Boosts low or high frequencies to the subwoofer.; ON I OFF: Turns on the rear panel (through an external amplifier). *1 Displayed only when [l/0 MODE] is set to [SUB.W] and [SUB.W] is set the fader level to [ON]. *2 Displayed only when [L/0 MODE] is 50. l/0 MODE SUB.W I REAR: Selects whether rear speakers or asubwoofer are sent to produce a well-balanced sound at...

Instruction Manual
Page 20
... the COLOR GUIDE ON: Changes the button, display and USB input terminal illumination when settings are performed on the car headlights. *1 ; NIGHT COLOR . DISPLAY SETTINGS ALL ZONE Default: XX 1 Press and hold MENU. 2 Turn the volume knob to exit. OFF: Selects the day adjustments. DAY COLOR Store your car's headlight. OFF: Cancels. . [NIGHT COLOR] or [DAY COLOR] is required. (• 25) *2 Some characters or symbols wilt not be blanked). 18 PRESET You...
... the COLOR GUIDE ON: Changes the button, display and USB input terminal illumination when settings are performed on the car headlights. *1 ; NIGHT COLOR . DISPLAY SETTINGS ALL ZONE Default: XX 1 Press and hold MENU. 2 Turn the volume knob to exit. OFF: Selects the day adjustments. DAY COLOR Store your car's headlight. OFF: Cancels. . [NIGHT COLOR] or [DAY COLOR] is required. (• 25) *2 Some characters or symbols wilt not be blanked). 18 PRESET You...
Instruction Manual
Page 21
... services may not work with coloring on this product cannot be operated from this . Variable bit rate (VBR) files. • Maximum number of characters for: - WAV Tag: 64 characters • This unit can play back multi-ses1ion discs; Accordingly, compatibility may be impaired or some operations are subject to change without prior notice. ·Accordingly, compatibility may be impaired, or some Bluetooth devices. Sampling frequency...
... services may not work with coloring on this product cannot be operated from this . Variable bit rate (VBR) files. • Maximum number of characters for: - WAV Tag: 64 characters • This unit can play back multi-ses1ion discs; Accordingly, compatibility may be impaired or some operations are subject to change without prior notice. ·Accordingly, compatibility may be impaired, or some Bluetooth devices. Sampling frequency...
Instruction Manual
Page 22
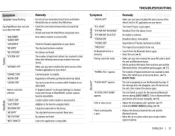
...; Playing time • Day/Clock• 1 (backto the beginn-in-g IHEART Station name • Track title*B• Track Artist*B• Day/Clock • (backto the beginning) *B If unavailable, station name appears. Sound cannot be selected. Correct characters are insulated properly, then reset the unit. Check the [SRC SElEU] setting. (• 4) • Connect the antenna firmly. • Pull the antenna out all the way. alternately. Source...
...; Playing time • Day/Clock• 1 (backto the beginn-in-g IHEART Station name • Track title*B• Track Artist*B• Day/Clock • (backto the beginning) *B If unavailable, station name appears. Sound cannot be selected. Correct characters are insulated properly, then reset the unit. Check the [SRC SElEU] setting. (• 4) • Connect the antenna firmly. • Pull the antenna out all the way. alternately. Source...
Instruction Manual
Page 23
... use too many hierarchical levels and folders. • Reload the disc or reattach the USB device. • Check the connection between the unit and the Bluetooth device. • Move the car to a place where you have entered the same PIN code to both the unit and Bluetooth device. • Delete pairing information from the Bluetooth device again. • Reset the unit. (• 3) Pairing cannot be selected.· :,.0c "CREATE ERR" ,ex: t: "SAVE ERROR...
... use too many hierarchical levels and folders. • Reload the disc or reattach the USB device. • Check the connection between the unit and the Bluetooth device. • Move the car to a place where you have entered the same PIN code to both the unit and Bluetooth device. • Delete pairing information from the Bluetooth device again. • Reset the unit. (• 3) Pairing cannot be selected.· :,.0c "CREATE ERR" ,ex: t: "SAVE ERROR...

Instruction Manual
Page 24
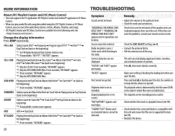
... to connect again. • Other Bluetooth devices might be controlled. If "ERROR" appears again, check if the device supports the function you have any troubles, try the operation again. If "H/W ERROR" appears again, consult your audio player.) • Disconnect and connect the Bluetooth Reset the unit and try the following: 1 Check TROUBLESHOOTING 2 Reset the unit(+ 3) 3 Contact (USA only) Call: 1-800-252-5722 (or) visit: http://www.jvc.com 22 FM Frequency Range...
... to connect again. • Other Bluetooth devices might be controlled. If "ERROR" appears again, check if the device supports the function you have any troubles, try the operation again. If "H/W ERROR" appears again, consult your audio player.) • Disconnect and connect the Bluetooth Reset the unit and try the following: 1 Check TROUBLESHOOTING 2 Reset the unit(+ 3) 3 Contact (USA only) Call: 1-800-252-5722 (or) visit: http://www.jvc.com 22 FM Frequency Range...
Instruction Manual
Page 26
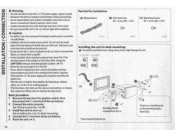
... make sure the wires are not touching car's chassis, then replace the old fuse with amaximum power of speakers to your vehicle. Using wrong screws might damage the unit. 8 mm (3/8') 8 mm (3/8") *Screw removed from the ignition switch, then disconnect the 8 terminal of less than 50 W. See Installing the unit (in-dash mounting). 4 co'nnect the 8 terminal qf the car battery. 5 Reset the unit. (+ 3) Part list for installation (A} Wiring harness (B) Flat head screw I : (C) Round head screw...
... make sure the wires are not touching car's chassis, then replace the old fuse with amaximum power of speakers to your vehicle. Using wrong screws might damage the unit. 8 mm (3/8') 8 mm (3/8") *Screw removed from the ignition switch, then disconnect the 8 terminal of less than 50 W. See Installing the unit (in-dash mounting). 4 co'nnect the 8 terminal qf the car battery. 5 Reset the unit. (+ 3) Part list for installation (A} Wiring harness (B) Flat head screw I : (C) Round head screw...

Instruction Manual
Page 30
... acarry-inbasis. Model No.. NEED HELP ON HOW TO HOOK UP? NEED TO LOCATE A JVC SERVICE CENTER? JVCAmericas Corp. (JVC) warrants this information lor future refere nce. Partsused for in shipment, duetoact of purchaseto verifypurchase date. WHAT YOU MUST DO FOR WARRANTY SERVICE: Please do not return your rights during the warranty period. Operational adjustments covered intheOwner's Manual, normal maintenance, video andaudio head cleaning; 4. Damage...
... acarry-inbasis. Model No.. NEED HELP ON HOW TO HOOK UP? NEED TO LOCATE A JVC SERVICE CENTER? JVCAmericas Corp. (JVC) warrants this information lor future refere nce. Partsused for in shipment, duetoact of purchaseto verifypurchase date. WHAT YOU MUST DO FOR WARRANTY SERVICE: Please do not return your rights during the warranty period. Operational adjustments covered intheOwner's Manual, normal maintenance, video andaudio head cleaning; 4. Damage...


