Instructions
Page 6
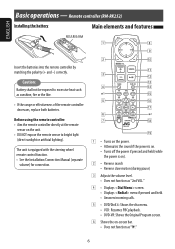
..., replace both batteries. ENGLISH Basic operations - The unit is equipped with the steering wheel remote control function. • See the Installation/Connection Manual (separate volume) for connection. 1 • Turns on the power. • Attenuates the sound if the power is on. • ...• Displays screen. • Displays menu if pressed and held. • Answers incoming calls. 5 • DVD/DivX 6: Shows the disc menu. • VCD: Resumes PBC playback. • DVD-VR: Shows the Original Program screen. 6 Shows the on the unit. • DO NOT expose the remote sensor...
..., replace both batteries. ENGLISH Basic operations - The unit is equipped with the steering wheel remote control function. • See the Installation/Connection Manual (separate volume) for connection. 1 • Turns on the power. • Attenuates the sound if the power is on. • ...• Displays screen. • Displays menu if pressed and held. • Answers incoming calls. 5 • DVD/DivX 6: Shows the disc menu. • VCD: Resumes PBC playback. • DVD-VR: Shows the Original Program screen. 6 Shows the on the unit. • DO NOT expose the remote sensor...
Instructions
Page 7
Press and hold : Manual Search For satellite tuner operations: • 5 / ∞: Selects the ... Makes selection/settings Skips back or forward by five minutes for DivX/MPEG1/MPEG2 Changes discs for audio player operation). DVD-VR: Selects the program/Playlist. Press and hold: Skips ten items at a time. e Changes the... INTRODUCTION Press briefly: Auto Search - Press briefly: Selects an item. - i*3 • Switches number entry mode for audio player operation) p • Forward search • Forward slow motion (during pause) q Selects the source. Press briefly: reverse skip...
Press and hold : Manual Search For satellite tuner operations: • 5 / ∞: Selects the ... Makes selection/settings Skips back or forward by five minutes for DivX/MPEG1/MPEG2 Changes discs for audio player operation). DVD-VR: Selects the program/Playlist. Press and hold: Skips ten items at a time. e Changes the... INTRODUCTION Press briefly: Auto Search - Press briefly: Selects an item. - i*3 • Switches number entry mode for audio player operation) p • Forward search • Forward slow motion (during pause) q Selects the source. Press briefly: reverse skip...
Instructions
Page 8
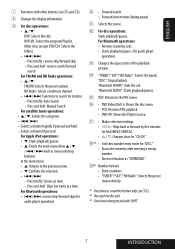
...) ~ Turn on the AV Menu screens. @ Set the clock settings. Moves to the previous screen. 8 Moves to the preceding menu page Indication language: In this manual, English indications are used for purpose of explanation. Select . ¤ Finish the procedure.
...) ~ Turn on the AV Menu screens. @ Set the clock settings. Moves to the previous screen. 8 Moves to the preceding menu page Indication language: In this manual, English indications are used for purpose of explanation. Select . ¤ Finish the procedure.
Instructions
Page 10
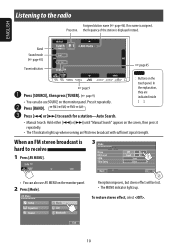
...Assigned station name (☞ page 46). In the explanation, they are indicated inside [ ]. • Manual Search: Hold either [4]or [¢] until "Manual Search" appears on the monitor panel. To restore stereo effect, select . 10 the frequency of the station is assigned, Preset no ...indicator lights up when receiving an FM stereo broadcast with sufficient signal strength. ENGLISH Listening to search for a station-Auto Search. : Buttons on the monitor panel. 2 Press [Mode]. Band Sound mode (☞ page 45) Tuner indicators ☞ page 45 ☞ page 9 ~ Press [SOURCE],...
...Assigned station name (☞ page 46). In the explanation, they are indicated inside [ ]. • Manual Search: Hold either [4]or [¢] until "Manual Search" appears on the monitor panel. To restore stereo effect, select . 10 the frequency of the station is assigned, Preset no ...indicator lights up when receiving an FM stereo broadcast with sufficient signal strength. ENGLISH Listening to search for a station-Auto Search. : Buttons on the monitor panel. 2 Press [Mode]. Band Sound mode (☞ page 45) Tuner indicators ☞ page 45 ☞ page 9 ~ Press [SOURCE],...

Instructions
Page 12
Selecting a preset station On the remote: 1 2 or Hold On the unit: • To select directly on the touch panel 2 Tune in to a station you want to preset. 3 Select a preset number. • To select from the Preset List 1 2 [Hold] The station selected in step 2 is now stored in preset number 4. 12 ENGLISH Manual presetting Ex.: Storing FM station of 92.5 MHz into preset number 4 of the FM1 band. 1 Display the Preset List.
Selecting a preset station On the remote: 1 2 or Hold On the unit: • To select directly on the touch panel 2 Tune in to a station you want to preset. 3 Select a preset number. • To select from the Preset List 1 2 [Hold] The station selected in step 2 is now stored in preset number 4. 12 ENGLISH Manual presetting Ex.: Storing FM station of 92.5 MHz into preset number 4 of the FM1 band. 1 Display the Preset List.
Instructions
Page 30
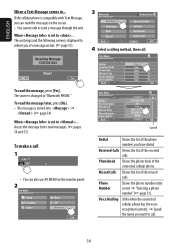
... is set to inform you want to read messages. (☞ pages 54 and 55) To make a call 1 • You can read the messages on the monitor panel. 2 Cancel Redial Shows the list of the connected cellular phone. To read the message, press [Yes]. When is changed to ... ENGLISH When a Text Message...
... is set to inform you want to read messages. (☞ pages 54 and 55) To make a call 1 • You can read the messages on the monitor panel. 2 Cancel Redial Shows the list of the connected cellular phone. To read the message, press [Yes]. When is changed to ... ENGLISH When a Text Message...
Instructions
Page 48
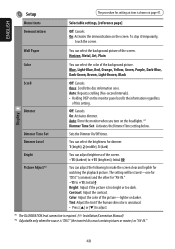
On: Activates the demonstration on the monitor panel scrolls the information regardless of this setting. Horizon, Metal, Art, Plain Color You can select... picture-lighter or darker. Color: Adjust the color of the screen. -15 (darkest) to +15 (brightest); Auto: Dims the monitor when you turn on page 47. Dimmer Time Set Sets the Dimmer On/Off times. To stop it temporarily, touch the screen.... for "AV-IN." -15 to adjust. *1 The ILLUMINATION lead connection is required. (☞ Installation/Connection Manual) *2 Adjustable only when the source is too bright or too dark.
On: Activates the demonstration on the monitor panel scrolls the information regardless of this setting. Horizon, Metal, Art, Plain Color You can select... picture-lighter or darker. Color: Adjust the color of the screen. -15 (darkest) to +15 (brightest); Auto: Dims the monitor when you turn on page 47. Dimmer Time Set Sets the Dimmer On/Off times. To stop it temporarily, touch the screen.... for "AV-IN." -15 to adjust. *1 The ILLUMINATION lead connection is required. (☞ Installation/Connection Manual) *2 Adjustable only when the source is too bright or too dark.
Instructions
Page 52
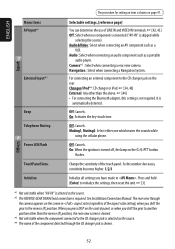
...sensitivity becomes higher. 1/2/3 Initialize all settings you shift the gear to the CD changer jack on the screen in . See Installation/Connection Manual. Initialize Selectable settings, [reference page] You can determine the use of the aspect ratio setting) when you have made in aspect ... Select when no component is connected ("AV-IN" is not required. Audio&Video: Select when connecting an AV component such as a portable audio player. Menu items AV Input*1 External Input*3 Beep Telephone Muting Power LED Flash TouchPanel Sens. Changer/iPod*4: CD changer or iPod. ☞ [34...
...sensitivity becomes higher. 1/2/3 Initialize all settings you shift the gear to the CD changer jack on the screen in . See Installation/Connection Manual. Initialize Selectable settings, [reference page] You can determine the use of the aspect ratio setting) when you have made in aspect ... Select when no component is connected ("AV-IN" is not required. Audio&Video: Select when connecting an AV component such as a portable audio player. Menu items AV Input*1 External Input*3 Beep Telephone Muting Power LED Flash TouchPanel Sens. Changer/iPod*4: CD changer or iPod. ☞ [34...
Instructions
Page 55
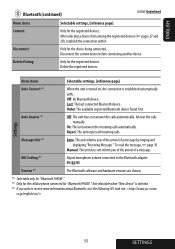
Delete Pairing Only for the registered devices. Manual: The unit does not inform you of the arrival of a message. MIC Setting *5 Adjust microphone volume connected to receive more information about Bluetooth, visit the following JVC web site: 55 SSEETTTININGGSS Auto Answer *5...PHONE." *5 Only for the cellular phone connected for the device being connected. Disconnect Only for "Bluetooth PHONE." Answer the calls manually. Off: No Bluetooth device. Order: The available registered Bluetooth device found first. On: The unit answers the incoming calls automatically...
Delete Pairing Only for the registered devices. Manual: The unit does not inform you of the arrival of a message. MIC Setting *5 Adjust microphone volume connected to receive more information about Bluetooth, visit the following JVC web site: 55 SSEETTTININGGSS Auto Answer *5...PHONE." *5 Only for the cellular phone connected for the device being connected. Disconnect Only for "Bluetooth PHONE." Answer the calls manually. Off: No Bluetooth device. Order: The available registered Bluetooth device found first. On: The unit answers the incoming calls automatically...
Instructions
Page 57
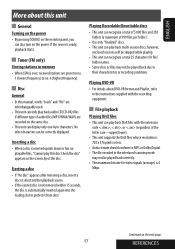
... Playing DVD-VR • For details about this manual, words "track" and "file" are interchangeably used. • This unit can only play back multi-session discs; Continued on the screen. No other characters can be played back due to no. 6 (highest frequency). ENGLISH More about DVD-VR format...8226; By pressing SOURCE on the power. however, unclosed sessions will be skipped while playing. • This unit can also turn on the monitor panel, you can recognize a total 25 characters for file/ folder names. • Some discs or files may not be played back correctly....
... Playing DVD-VR • For details about this manual, words "track" and "file" are interchangeably used. • This unit can only play back multi-session discs; Continued on the screen. No other characters can be played back due to no. 6 (highest frequency). ENGLISH More about DVD-VR format...8226; By pressing SOURCE on the power. however, unclosed sessions will be skipped while playing. • This unit can also turn on the monitor panel, you can recognize a total 25 characters for file/ folder names. • Some discs or files may not be played back correctly....
Instructions
Page 64
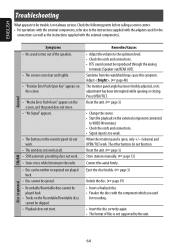
.... • Signal input is too weak. Sunshine from the windshield may cause this symptom. Reset the unit. (☞ page 3) Store stations manually. (☞ page 12) Connect the aerial firmly. General Symptoms • No sound comes out of files is open, only +/- (volume) and...8226; For operations with the external components, refer also to the instructions supplied with the external components). Adjust . (☞ page 48) The monitor panel angle has been forcibly adjusted, or its adjustment has been interrupted while opening or closing. Reset the unit. (☞ page 3) •...
.... • Signal input is too weak. Sunshine from the windshield may cause this symptom. Reset the unit. (☞ page 3) Store stations manually. (☞ page 12) Connect the aerial firmly. General Symptoms • No sound comes out of files is open, only +/- (volume) and...8226; For operations with the external components, refer also to the instructions supplied with the external components). Adjust . (☞ page 48) The monitor panel angle has been forcibly adjusted, or its adjustment has been interrupted while opening or closing. Reset the unit. (☞ page 3) •...
Instructions
Page 65
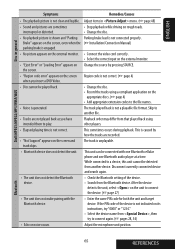
...(☞ Installation/Connection Manual) parking brake is engaged. • No picture appears on the external monitor. • Connect the video cord correctly. • Select the correct input on the external monitor. • "Eject ... or "1234." • Select the device name from that played back using other players. • Elapsed playing time is unplayable. • Bluetooth device does not detect the... Search from another file. • Tracks are not played back as you insert a DVD Video. Adjust items in general DivX/MPEG1/MPEG2/MP3/WMA/WAV Symptoms Remedies/Causes •...
...(☞ Installation/Connection Manual) parking brake is engaged. • No picture appears on the external monitor. • Connect the video cord correctly. • Select the correct input on the external monitor. • "Eject ... or "1234." • Select the device name from that played back using other players. • Elapsed playing time is unplayable. • Bluetooth device does not detect the... Search from another file. • Tracks are not played back as you insert a DVD Video. Adjust items in general DivX/MPEG1/MPEG2/MP3/WMA/WAV Symptoms Remedies/Causes •...
