

Instruction Manual
Page 1
... [J] INSTRUCTIONS MANUAL DE INSTRUCCIONES MANUEL D'INSTRUCTIONS For customer Use: Enter below the Model No. FRANÇAIS ESPAÑOL ENGLISH CD RECEIVER RECEPTOR CON CD RECEPTEUR CD KD-S6350/KD-S590 KD-S6350 DIRECT TRACK ACCESS FM KD-S6350 CD SSM S AM MO RPT RND MODE SCM KD-S590 SEL DISP DIRECT TRACK ACCESS 7 8 9 10 11 12 KD-S590 For installation and connections, refer...
... [J] INSTRUCTIONS MANUAL DE INSTRUCCIONES MANUEL D'INSTRUCTIONS For customer Use: Enter below the Model No. FRANÇAIS ESPAÑOL ENGLISH CD RECEIVER RECEPTOR CON CD RECEPTEUR CD KD-S6350/KD-S590 KD-S6350 DIRECT TRACK ACCESS FM KD-S6350 CD SSM S AM MO RPT RND MODE SCM KD-S590 SEL DISP DIRECT TRACK ACCESS 7 8 9 10 11 12 KD-S590 For installation and connections, refer...
Instruction Manual
Page 2
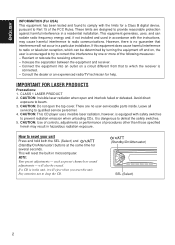
... is equipped with the instructions, may result in accordance with safety switches to prevent radiation emission when unloading CDs. Increase the separation between the equipment and receiver. - CAUTION: This CD player uses invisible laser radiation, however, is no user-serviceable parts inside. These limits are no guarantee that to which can radiate radio frequency energy and, if not installed and used in hazardous radiation...
... is equipped with the instructions, may result in accordance with safety switches to prevent radiation emission when unloading CDs. Increase the separation between the equipment and receiver. - CAUTION: This CD player uses invisible laser radiation, however, is no user-serviceable parts inside. These limits are no guarantee that to which can radiate radio frequency energy and, if not installed and used in hazardous radiation...
Instruction Manual
Page 3
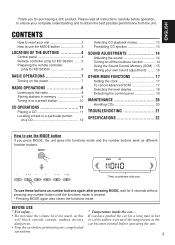
... volume level too much, as this will block outside sounds, making driving dangerous. • Stop the car before performing any number button until the temperature in to a preset station 10 CD OPERATIONS 11 Playing a CD 11 Locating a track or a particular portion on a CD 12 Selecting CD playback modes 12 Prohibiting CD ejection 13 SOUND ADJUSTMENTS 14 Adjusting the sound 14 Turning on/off the loudness function 14 Using the Sound Control Memory (SCM) .. 15 Storing your own sound adjustments ......... 16 OTHER MAIN FUNCTIONS 17 Setting...
... volume level too much, as this will block outside sounds, making driving dangerous. • Stop the car before performing any number button until the temperature in to a preset station 10 CD OPERATIONS 11 Playing a CD 11 Locating a track or a particular portion on a CD 12 Selecting CD playback modes 12 Prohibiting CD ejection 13 SOUND ADJUSTMENTS 14 Adjusting the sound 14 Turning on/off the loudness function 14 Using the Sound Control Memory (SCM) .. 15 Storing your own sound adjustments ......... 16 OTHER MAIN FUNCTIONS 17 Setting...

Instruction Manual
Page 4
...Main display l Volume level indicator a s d fg hj Display window 12 34 k 5 l 6789 DIRECT TRACK ACCESS MO RPT RND FM MODE CD SSM AM SCM pq w 1 (Standby/On/Attenuator) button 2 +/- ENGLISH LOCATION OF THE BUTTONS Control panel ; button 3 LOUD (Loudness) button 4 SEL (Select) button 5 Loading slot 6 AM button 7 0 (Eject) button 8 CD button 9 FM button p Remote sensor (only for KD-S6350) q DISP (Display) button w MO (Monaural) button e RPT (Repeat) button r RND (Random) button t Number buttons y MODE button u SCM (Sound Control Memory) button i (Control panel...
...Main display l Volume level indicator a s d fg hj Display window 12 34 k 5 l 6789 DIRECT TRACK ACCESS MO RPT RND FM MODE CD SSM AM SCM pq w 1 (Standby/On/Attenuator) button 2 +/- ENGLISH LOCATION OF THE BUTTONS Control panel ; button 3 LOUD (Loudness) button 4 SEL (Select) button 5 Loading slot 6 AM button 7 0 (Eject) button 8 CD button 9 FM button p Remote sensor (only for KD-S6350) q DISP (Display) button w MO (Monaural) button e RPT (Repeat) button r RND (Random) button t Number buttons y MODE button u SCM (Sound Control Memory) button i (Control panel...

Instruction Manual
Page 5
... listening to the FM broadcast. Each time you press the button, the band changes. 3 • Functions as the band button while listening to the radio. Each time you press the button, the preset station number increases, and the selected station is only for the clock (CLOCK H, CLOCK M), SCM LINK and LEVEL (see pages 17 and 18). 1 • Turns on the main unit. Each time you press the button, the mode changes. 5 Selects the source. S 4 Selects the sound mode.
... listening to the FM broadcast. Each time you press the button, the band changes. 3 • Functions as the band button while listening to the radio. Each time you press the button, the preset station number increases, and the selected station is only for the clock (CLOCK H, CLOCK M), SCM LINK and LEVEL (see pages 17 and 18). 1 • Turns on the main unit. Each time you press the button, the mode changes. 5 Selects the source. S 4 Selects the sound mode.

Instruction Manual
Page 6
Doing any of the remote controller decreases, replace the battery. 1 Remove the battery holder. 1) Push out the battery holder in the direction indicated by the arrow using the remote controller: • Aim the remote controller directly at the remote sensor on the main unit. Slide the battery into the holder with other metallic materials. CAUTION: DO NOT leave the remote controller in a fire. If a child accidentally swallows the battery, consult a doctor...
Doing any of the remote controller decreases, replace the battery. 1 Remove the battery holder. 1) Push out the battery holder in the direction indicated by the arrow using the remote controller: • Aim the remote controller directly at the remote sensor on the main unit. Slide the battery into the holder with other metallic materials. CAUTION: DO NOT leave the remote controller in a fire. If a child accidentally swallows the battery, consult a doctor...

Instruction Manual
Page 7
... use this button to turn off the power Press and hold appears on . CAUTION on the power. You do not have to any source. To increase the volume. 4 Adjust the sound as required during playback. If the volume level is adjusted for the tuner, for the first time, set the builtin clock correctly, see page 17. To operate the CD, see pages 8 - 10. "ATT" starts flashing on the display, and the volume level...
... use this button to turn off the power Press and hold appears on . CAUTION on the power. You do not have to any source. To increase the volume. 4 Adjust the sound as required during playback. If the volume level is adjusted for the tuner, for the first time, set the builtin clock correctly, see page 17. To operate the CD, see pages 8 - 10. "ATT" starts flashing on the display, and the volume level...

Instruction Manual
Page 8
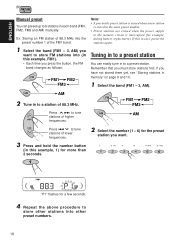
... automatic searching or manual searching to tune in to an FM broadcast. 2 Start searching a station. You can use any one of them to listen to a particular station. Searching a station manually: Manual search 1 Select the band (FM 1 - 3, AM). Press ¢ to search stations of higher frequencies. Searching a station automatically: Auto search 1 Select the band (FM 1 - 3, AM). Selected band appears 8 When a station is received, press the same button you have...
... automatic searching or manual searching to tune in to an FM broadcast. 2 Start searching a station. You can use any one of them to listen to a particular station. Searching a station manually: Manual search 1 Select the band (FM 1 - 3, AM). Press ¢ to search stations of higher frequencies. Searching a station automatically: Auto search 1 Select the band (FM 1 - 3, AM). Selected band appears 8 When a station is received, press the same button you have...
Instruction Manual
Page 9
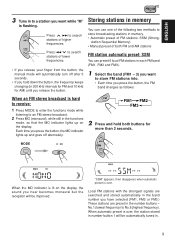
... on the display. station Sequential Memory) • Manual preset of both buttons for AM) until you hear becomes monaural but the reception will be automatically tuned in. 9 Each time you press the button, the MO indicator lights up on the display, the sound you release the button. Press 4 to search stations of lower frequencies. • If you have selected (FM1, FM2 or FM3.) These stations are preset in...
... on the display. station Sequential Memory) • Manual preset of both buttons for AM) until you hear becomes monaural but the reception will be automatically tuned in. 9 Each time you press the button, the MO indicator lights up on the display, the sound you release the button. Press 4 to search stations of lower frequencies. • If you have selected (FM1, FM2 or FM3.) These stations are preset in...
Instruction Manual
Page 10
... battery replacement). Ex: Storing an FM station of 88.3 MHz into the preset number 1 of the FM1 band. 1 Select the band (FM1 - 3, AM) you have not stored them yet, see "Storing stations in to tune AM AM stations of higher frequencies. Remember that you want to store FM stations into (in this occurs, preset the stations again. Press 4 to tune stations of 88.3 MHz. ENGLISH Manual preset...
... battery replacement). Ex: Storing an FM station of 88.3 MHz into the preset number 1 of the FM1 band. 1 Select the band (FM1 - 3, AM) you have not stored them yet, see "Storing stations in to tune AM AM stations of higher frequencies. Remember that you want to store FM stations into (in this occurs, preset the stations again. Press 4 to tune stations of 88.3 MHz. ENGLISH Manual preset...

Instruction Manual
Page 11
... the ejected disc is not removed for about 15 seconds, the disc is already in indicator flashes All tracks will not start this time). The CD-in indicator lights up Total playing time of the inserted disc Total track number of the inserted disc Elapsed playing time Current track Note on One-Touch Operation: When a CD is automatically inserted again into the loading slot. The unit turns on the unit...
... the ejected disc is not removed for about 15 seconds, the disc is already in indicator flashes All tracks will not start this time). The CD-in indicator lights up Total playing time of the inserted disc Total track number of the inserted disc Elapsed playing time Current track Note on One-Touch Operation: When a CD is automatically inserted again into the loading slot. The unit turns on the unit...
Instruction Manual
Page 14
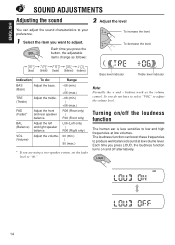
.... 1 Select the item you press the button, the adjustable items change as the volume control. Adjust the volume. So you are using a two-speaker system, set the fader level to "00." Each time you press LOUD, the loudness function turns on /off alternatively. @A 14 FAD (Fader)* BAL (Balance) VOL (Volume) Adjust the front and rear speaker balance. ENGLISH SOUND ADJUSTMENTS Adjusting the sound 2 Adjust the level You can boost these frequencies to produce well-balanced sound at low volumes. Each time you...
.... 1 Select the item you press the button, the adjustable items change as the volume control. Adjust the volume. So you are using a two-speaker system, set the fader level to "00." Each time you press LOUD, the loudness function turns on /off alternatively. @A 14 FAD (Fader)* BAL (Balance) VOL (Volume) Adjust the front and rear speaker balance. ENGLISH SOUND ADJUSTMENTS Adjusting the sound 2 Adjust the level You can boost these frequencies to produce well-balanced sound at low volumes. Each time you...
Instruction Manual
Page 15
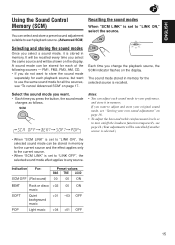
... use the same sound mode for all the sources, see "Storing your own sound adjustment" on page 16. • To adjust the bass and treble reinforcement levels or to turn on the display. FM Selecting and storing the sound modes Once you change the playback source, the SCM indicator flashes on /off the loudness function temporarily, see page 14. (Your adjustments will be stored in memory. CD AM Each time you select a sound mode, it in memory...
... use the same sound mode for all the sources, see "Storing your own sound adjustment" on page 16. • To adjust the bass and treble reinforcement levels or to turn on the display. FM Selecting and storing the sound modes Once you change the playback source, the SCM indicator flashes on /off the loudness function temporarily, see page 14. (Your adjustments will be stored in memory. CD AM Each time you select a sound mode, it in memory...
Instruction Manual
Page 16
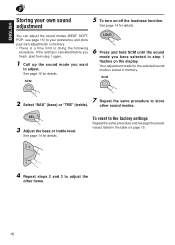
... 1 flashes on the display. See page 14 for details. See page 14 for details. Repeat the same procedure to store other items. 16 If the setting is cancelled before you finish, start from step 1 again. 1 Call up the sound mode you have selected in the table on /off the loudness function. See page 15 for the selected sound mode is a time...
... 1 flashes on the display. See page 14 for details. See page 14 for details. Repeat the same procedure to store other items. 16 If the setting is cancelled before you finish, start from step 1 again. 1 Call up the sound mode you have selected in the table on /off the loudness function. See page 15 for the selected sound mode is a time...
Instruction Manual
Page 17
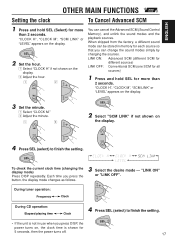
... from the factory, a different sound mode can be stored in use when you press DISP, the power turns on, the clock time is shown for 5 seconds, then the power turns off. 17 Each time you can cancel the Advanced SCM (Sound Control Memory), and unlink the sound modes and the playback sources. "LINK ON" or "LINK OFF". During tuner operation: Frequency Clock During CD operation: Elapsed playing time Clock 4 Press SEL (select) to finish the setting. LINK ON...
... from the factory, a different sound mode can be stored in use when you press DISP, the power turns on, the clock time is shown for 5 seconds, then the power turns off. 17 Each time you can cancel the Advanced SCM (Sound Control Memory), and unlink the sound modes and the playback sources. "LINK ON" or "LINK OFF". During tuner operation: Frequency Clock During CD operation: Elapsed playing time Clock 4 Press SEL (select) to finish the setting. LINK ON...

Instruction Manual
Page 18
... 1", "VOL 2" or "OFF". 4 Press SEL (select) to your preference. When shipped from the factory, "VOL 2" is selected. VOL 2 : Alternates "VOL 1" setting and illumination display. "CLOCK H", "CLOCK M", "SCM LINK" or "LEVEL" appears on the display. 3 Select the desired mode - ENGLISH Selecting the level display You can select the level display according to finish the setting. 2 Select "LEVEL" if not shown on the display. OFF : Erase the volume level indicator. 1 Press and hold SEL for...
... 1", "VOL 2" or "OFF". 4 Press SEL (select) to your preference. When shipped from the factory, "VOL 2" is selected. VOL 2 : Alternates "VOL 1" setting and illumination display. "CLOCK H", "CLOCK M", "SCM LINK" or "LEVEL" appears on the display. 3 Select the desired mode - ENGLISH Selecting the level display You can select the level display according to finish the setting. 2 Select "LEVEL" if not shown on the display. OFF : Erase the volume level indicator. 1 Press and hold SEL for...

Instruction Manual
Page 20
... playing back CD-Rs, read their disc characteristics, and of the following cases: • After starting the heater in a car. • Do not use . How to edge. Moisture condensation occurs on this unit may result from center to handle CDs When removing a CD from its recording surface. About mistracking: Mistracking may reject the CD. This unit is used, this receiver because of their instructions...
... playing back CD-Rs, read their disc characteristics, and of the following cases: • After starting the heater in a car. • Do not use . How to edge. Moisture condensation occurs on this unit may result from center to handle CDs When removing a CD from its recording surface. About mistracking: Mistracking may reject the CD. This unit is used, this receiver because of their instructions...

Instruction Manual
Page 21
...; Sound cannot be heard from The volume level is sometimes interrupted. CD is in memory are incorrect. No CD is inserted upside down. Connections are too weak. ENGLISH TROUBLESHOOTING What appears to be trouble is ejected. • The unit does not work . Sequential Memory) automatic preset does not work at all. Press and 0 at the same time for more than 2 seconds to reset the unit. (The clock setting and preset stations stored...
...; Sound cannot be heard from The volume level is sometimes interrupted. CD is in memory are incorrect. No CD is inserted upside down. Connections are too weak. ENGLISH TROUBLESHOOTING What appears to be trouble is ejected. • The unit does not work . Sequential Memory) automatic preset does not work at all. Press and 0 at the same time for more than 2 seconds to reset the unit. (The clock setting and preset stations stored...
Instruction Manual
Page 22
... Capture Ratio: 1.5 dB [AM Tuner] Sensitivity: 20 µV Selectivity: 35 dB CD PLAYER SECTION Type: Compact disc player Signal Detection System: Non-contact optical pickup (semiconductor laser) Number of channels: 2 channels (stereo) Frequency Response: 5 Hz to 20 000 Hz Dynamic Range: 90 dB Signal-to-Noise Ratio: 95 dB Wow and Flutter: Less than measurable limit GENERAL Power Requirement Operating Voltage: DC 14.4 volts...
... Capture Ratio: 1.5 dB [AM Tuner] Sensitivity: 20 µV Selectivity: 35 dB CD PLAYER SECTION Type: Compact disc player Signal Detection System: Non-contact optical pickup (semiconductor laser) Number of channels: 2 channels (stereo) Frequency Response: 5 Hz to 20 000 Hz Dynamic Range: 90 dB Signal-to-Noise Ratio: 95 dB Wow and Flutter: Less than measurable limit GENERAL Power Requirement Operating Voltage: DC 14.4 volts...

Instruction Manual
Page 23
US RESIDENTS ONLY Having TROUBLE with operation? USA ONLY Call 1-800-252-5722 http://www.jvc.com We can help you! EN, SP, FR VICTOR COMPANY OF JAPAN, LIMITED © 2002 VICTOR COMPANY OF JAPAN, LIMITED VJ C 1002KKSFLEJEIN h t t p : / / w w w . jvc m o b i le .c o m Visit us on-line for Technical Support & Customer Satisfaction Survey. Please reset your unit Refer to page of How to Reset Still having trouble??
US RESIDENTS ONLY Having TROUBLE with operation? USA ONLY Call 1-800-252-5722 http://www.jvc.com We can help you! EN, SP, FR VICTOR COMPANY OF JAPAN, LIMITED © 2002 VICTOR COMPANY OF JAPAN, LIMITED VJ C 1002KKSFLEJEIN h t t p : / / w w w . jvc m o b i le .c o m Visit us on-line for Technical Support & Customer Satisfaction Survey. Please reset your unit Refer to page of How to Reset Still having trouble??


