
Instructions
Page 3
... Bluetooth® devices 12 • Using the Bluetooth cellular phone 14 • Using the Bluetooth audio player 16 Listening to the HD Radio™ Broadcast ......... 17 Listening to the CD changer 18 Listening to the satellite radio 19 Listening to the iPod 22 Listening to drop the disc when it ejects. • If this does not work, reset your unit • Your preset adjustments will block outside sounds, making driving dangerous. • Stop the car before operating...
... Bluetooth® devices 12 • Using the Bluetooth cellular phone 14 • Using the Bluetooth audio player 16 Listening to the HD Radio™ Broadcast ......... 17 Listening to the CD changer 18 Listening to the satellite radio 19 Listening to the iPod 22 Listening to drop the disc when it ejects. • If this does not work, reset your unit • Your preset adjustments will block outside sounds, making driving dangerous. • Stop the car before operating...

Instructions
Page 6
... device. 2 • Turn on the power. • Turn off the power [Hold]. • Attenuate the sound (if the power is connected, the built-in tuner of this unit will be disable. q • TUNER/SIRIUS/XM: Select preset station/ channel. • CD/USB/CD-CH: Select folder/track/disc (for station/channel. • CD/USB/CD-CH/USB-iPod/iPod: Select track. • BT-AUDIO: Reverse skip/forward skip. 9 • Volume control [Turn]. 6 • Select the source [Press]*1. e Change the display information and pattern. w • Enter functions mode. • BT-PHONE: Activate Voice...
... device. 2 • Turn on the power. • Turn off the power [Hold]. • Attenuate the sound (if the power is connected, the built-in tuner of this unit will be disable. q • TUNER/SIRIUS/XM: Select preset station/ channel. • CD/USB/CD-CH: Select folder/track/disc (for station/channel. • CD/USB/CD-CH/USB-iPod/iPod: Select track. • BT-AUDIO: Reverse skip/forward skip. 9 • Volume control [Turn]. 6 • Select the source [Press]*1. e Change the display information and pattern. w • Enter functions mode. • BT-PHONE: Activate Voice...

Instructions
Page 7
... the sound when the power is on. • Turns the power off if pressed and held . • While listening to KS-PD100: - Changes the folder if pressed and held . 2 • Changes the FM/AM bands with 5 U. • Changes the preset stations with D ∞. - D ∞ : Confirms the selection. Connected to bright light (direct sunlight or artificial lighting). Continued on the next page OPERATIONS 7 Using the remote controller (RM-RK50) Installing...
... the sound when the power is on. • Turns the power off if pressed and held . • While listening to KS-PD100: - Changes the folder if pressed and held . 2 • Changes the FM/AM bands with 5 U. • Changes the preset stations with D ∞. - D ∞ : Confirms the selection. Connected to bright light (direct sunlight or artificial lighting). Continued on the next page OPERATIONS 7 Using the remote controller (RM-RK50) Installing...

Instructions
Page 8
... to an iPod (in menu selecting mode): Connected to listen-Auto Search. Start play back the selected folder directly if pressed and held . Skips 10 items at a time if pressed and held . • Reverse skip/forward skip for a station to KS-PD100: - Selects an item if pressed briefly. (Then, press D ∞ to the USB input jack: - ENGLISH 3 Adjusts the volume level. 4 Selects the sound mode (iEQ: intelligent equalizer). 5 Selects the source. 6 For Bluetooth cellular phone: -
... to an iPod (in menu selecting mode): Connected to listen-Auto Search. Start play back the selected folder directly if pressed and held . Skips 10 items at a time if pressed and held . • Reverse skip/forward skip for a station to KS-PD100: - Selects an item if pressed briefly. (Then, press D ∞ to the USB input jack: - ENGLISH 3 Adjusts the volume level. 4 Selects the sound mode (iEQ: intelligent equalizer). 5 Selects the source. 6 For Bluetooth cellular phone: -

Instructions
Page 12
... way you operate the files on the rear of this unit. • Refer also to the instructions supplied with a device. • Select "BT-PHONE" or "BT-AUDIO" as intended for some USB devices. • You cannot connect a computer to the USB input terminal of USB device. • Operation and power supply may not work immediately after you turn on the display, you need to the previous screen by operating the Bluetooth device. ENGLISH If a USB device has...
... way you operate the files on the rear of this unit. • Refer also to the instructions supplied with a device. • Select "BT-PHONE" or "BT-AUDIO" as intended for some USB devices. • You cannot connect a computer to the USB input terminal of USB device. • Operation and power supply may not work immediately after you turn on the display, you need to the previous screen by operating the Bluetooth device. ENGLISH If a USB device has...

Instructions
Page 15
... "Auto Answer" is shown on the display to call. 3 Select "Dial Menu." Making a call You can move back to the previous screen by pressing number button 3. 1 Select "BT-PHONE." • Redial*: Shows the list of the connected cellular phone. Go to the following step. • Received*: Shows the list of the cellular phone to this unit. (Refer to the instruction manual supplied with your cellular phone is automatically changed...
... "Auto Answer" is shown on the display to call. 3 Select "Dial Menu." Making a call You can move back to the previous screen by pressing number button 3. 1 Select "BT-PHONE." • Redial*: Shows the list of the connected cellular phone. Go to the following step. • Received*: Shows the list of the cellular phone to this unit. (Refer to the instruction manual supplied with your cellular phone is automatically changed...

Instructions
Page 17
... reception [Flashes] When holding the analog reception Auto: [Initial] Switch between digital and analog audio automatically Digital: Tuning to digital audio only Analog: Tuning to an HD Radio station... First four letters of Call Sign Channel number Select your area, visit www.hdradio.com . Refer also to the CD changer jack on the rear of programming. What is connected, it can be heard from the selected setting, change the setting to...
... reception [Flashes] When holding the analog reception Auto: [Initial] Switch between digital and analog audio automatically Digital: Tuning to digital audio only Analog: Tuning to an HD Radio station... First four letters of Call Sign Channel number Select your area, visit www.hdradio.com . Refer also to the CD changer jack on the rear of programming. What is connected, it can be heard from the selected setting, change the setting to...

Instructions
Page 22
... connected, press SOURCE to the top menu of the unit. For iPod connected to the USB input jack [Press] Go to the CD changer jack on the control panel. - Playback starts automatically from the unit Button For iPod connected through KS-PD100. - Connecting the Interface adapter for the external input setting, see page 29. • You can play songs in the main menu. • Pressing the number buttons (1 - 6) or holding 1 (7) and 2 (8) can also select the preset...
... connected, press SOURCE to the top menu of the unit. For iPod connected to the USB input jack [Press] Go to the CD changer jack on the control panel. - Playback starts automatically from the unit Button For iPod connected through KS-PD100. - Connecting the Interface adapter for the external input setting, see page 29. • You can play songs in the main menu. • Pressing the number buttons (1 - 6) or holding 1 (7) and 2 (8) can also select the preset...
Instructions
Page 24
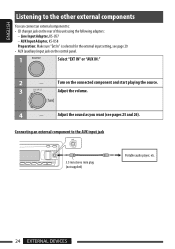
... start playing the source. 3 Adjust the volume. 4 - Line Input Adapter, KS-U57 - AUX Input Adapter, KS-U58 Preparation: Make sure "Ext In" is selected for the external input setting, see pages 25 and 26). Turn on the control panel. 1 Select "EXT IN" or "AUX IN." 2 - ENGLISH Listening to the other external components You can connect an external component to the AUX input jack 3.5 mm stereo mini plug (not supplied) Portable audio player, etc. 24 EXTERNAL DEVICES
... start playing the source. 3 Adjust the volume. 4 - Line Input Adapter, KS-U57 - AUX Input Adapter, KS-U58 Preparation: Make sure "Ext In" is selected for the external input setting, see pages 25 and 26). Turn on the control panel. 1 Select "EXT IN" or "AUX IN." 2 - ENGLISH Listening to the other external components You can connect an external component to the AUX input jack 3.5 mm stereo mini plug (not supplied) Portable audio player, etc. 24 EXTERNAL DEVICES

Instructions
Page 25
..." adjustment display. 2 Adjust the speaker output balance by pressing: 5 / ∞: between the front and rear speakers. [F6 to R6] 4 /¢ : between the left and right speakers. [L6 to R6] B Subwoofer 1 Press number button 1 ( ) to move back to the previous screen by pressing number button 3 or 6. 1 2 • For "EQ" setting, see page 26. * Displayed only when "L/O Mode" is shown on the next page SETTINGS 25 Selecting a preset sound mode You can move to the "Subwoofer" adjustment display. 2 Use...
..." adjustment display. 2 Adjust the speaker output balance by pressing: 5 / ∞: between the front and rear speakers. [F6 to R6] 4 /¢ : between the left and right speakers. [L6 to R6] B Subwoofer 1 Press number button 1 ( ) to move back to the previous screen by pressing number button 3 or 6. 1 2 • For "EQ" setting, see page 26. * Displayed only when "L/O Mode" is shown on the next page SETTINGS 25 Selecting a preset sound mode You can move to the "Subwoofer" adjustment display. 2 Use...

Instructions
Page 28
... Satellite radio is connected. *3 Adjustable only when "Clock Adj" is automatically adjusted using the clock data provided via the satellite radio channel. : Cancels. : Select your residential area is set to DST. : Cancels. : Scrolls the track information once. : Repeats scrolling (at 5-second intervals). : Cancels. (Holding DISP can scroll the display regardless of the time zones for clock adjustment. ENGLISH CLOCK Category Indication Clock Hr Hour adjustment Clock Min Minute adjustment 24H/12H Time display mode Clock Adj*2 Clock adjustment Time...
... Satellite radio is connected. *3 Adjustable only when "Clock Adj" is automatically adjusted using the clock data provided via the satellite radio channel. : Cancels. : Select your residential area is set to DST. : Cancels. : Scrolls the track information once. : Repeats scrolling (at 5-second intervals). : Cancels. (Holding DISP can scroll the display regardless of the time zones for clock adjustment. ENGLISH CLOCK Category Indication Clock Hr Hour adjustment Clock Min Minute adjustment 24H/12H Time display mode Clock Adj*2 Clock adjustment Time...

Instructions
Page 29
... SIRIUS identification number appears on the display, [19]. • Changer : To use a JVC CD changer, [18], or an Apple iPod, [22]. • Ext In : To use any other external component, [24]. • On : Activates the key-touch tone. • Off : Deactivates the key-touch tone. • Muting1/ : Select either one of each speaker is selected-TUNER, SIRIUS, XM, CD, USB, or Bluetooth. *11 Only for connecting the rear speakers (through an external amplifier). : Select...
... SIRIUS identification number appears on the display, [19]. • Changer : To use a JVC CD changer, [18], or an Apple iPod, [22]. • Ext In : To use any other external component, [24]. • On : Activates the key-touch tone. • Off : Deactivates the key-touch tone. • Muting1/ : Select either one of each speaker is selected-TUNER, SIRIUS, XM, CD, USB, or Bluetooth. *11 Only for connecting the rear speakers (through an external amplifier). : Select...

Instructions
Page 30
... Illumination switch • Green preference. *12 Depends on the "Dimmer" setting. Then, turn the control dial to set the dimmer start time. 1 Turn the control dial to the previous screen by pressing number button 3. 1 Follow steps 1 to your own colors, and select them for dimmer • When is shown on page 27. • In step 2, select "DISP." • In step 3, select "Dimmer." 2 Select "Time Set." 4 Exit from the setting. Setting the time for the display color, [31]. : User color...
... Illumination switch • Green preference. *12 Depends on the "Dimmer" setting. Then, turn the control dial to set the dimmer start time. 1 Turn the control dial to the previous screen by pressing number button 3. 1 Follow steps 1 to your own colors, and select them for dimmer • When is shown on page 27. • In step 2, select "DISP." • In step 3, select "Dimmer." 2 Select "Time Set." 4 Exit from the setting. Setting the time for the display color, [31]. : User color...

Instructions
Page 31
All Source*1 Ô CD Ô Changer*3 (or Ext In*2) Ô USB*3 Ô FM Ô AM Ô Sirius*3/XM*3 Ô iPod*3 Ô Aux In Ô BT Phone*3 Ô BT Audio*3 Ô (back to the beginning) Creating your own color-User Color You can create your own colors-"Day Color" or "NightColor." 1 Follow steps 1 to 3 on page 27. • In step 2, select "COLOR." • In step 3, select "Color Set." 2 Select "Day Color" or "NightColor...
All Source*1 Ô CD Ô Changer*3 (or Ext In*2) Ô USB*3 Ô FM Ô AM Ô Sirius*3/XM*3 Ô iPod*3 Ô Aux In Ô BT Phone*3 Ô BT Audio*3 Ô (back to the beginning) Creating your own color-User Color You can create your own colors-"Day Color" or "NightColor." 1 Follow steps 1 to 3 on page 27. • In step 2, select "COLOR." • In step 3, select "Color Set." 2 Select "Day Color" or "NightColor...

Instructions
Page 32
... by pressing number button 3. 1 Select "BT-PHONE" or "BT-AUDIO." ENGLISH Bluetooth settings You can move back to your preference. • When is compatible with ... Auto: The unit informs you can change the settings listed on , the connection is established automatically with text message. *3 Bluetooth Audio: Shows only "Version." Setting menu ( : Initial) Auto Connect When the unit is turned on the right column according to the previous screen by ringing and displaying "Received Message...
... by pressing number button 3. 1 Select "BT-PHONE" or "BT-AUDIO." ENGLISH Bluetooth settings You can move back to your preference. • When is compatible with ... Auto: The unit informs you can change the settings listed on , the connection is established automatically with text message. *3 Bluetooth Audio: Shows only "Version." Setting menu ( : Initial) Auto Connect When the unit is turned on the right column according to the previous screen by ringing and displaying "Received Message...

Instructions
Page 34
... unit Basic operations Turning on the power • By pressing SOURCE on the power. Press OPEN, then 0 to No. 6 (highest frequency). - Playing a CD-R or CD-RW • Use only "finalized" CD-Rs or CD-RWs. • This unit can only hear intermittent sounds. • File/folder list may not be skipped while playing. • Some CD-Rs or CD-RWs may not play back multi-session discs; Discs are stored anew. - Received stations...
... unit Basic operations Turning on the power • By pressing SOURCE on the power. Press OPEN, then 0 to No. 6 (highest frequency). - Playing a CD-R or CD-RW • Use only "finalized" CD-Rs or CD-RWs. • This unit can only hear intermittent sounds. • File/folder list may not be skipped while playing. • Some CD-Rs or CD-RWs may not play back multi-session discs; Discs are stored anew. - Received stations...
Instructions
Page 36
... Bluetooth audio player is established. Bluetooth operations General • While driving, do not perform complicated operation such as data security functions cannot be connected to this unit-MTP device and Mass storage class device. Bit rate: Linear PCM at a time. Channel: 1 ch/2 ch • This unit can connect two types of the device. • This unit may not be used with special functions such as dialing the numbers, using a USB extension cord. • This unit...
... Bluetooth audio player is established. Bluetooth operations General • While driving, do not perform complicated operation such as data security functions cannot be connected to this unit-MTP device and Mass storage class device. Bit rate: Linear PCM at a time. Channel: 1 ch/2 ch • This unit can connect two types of the device. • This unit may not be used with special functions such as dialing the numbers, using a USB extension cord. • This unit...

Instructions
Page 37
... connect the JVC SIRIUS radio PnP (Plug and Play), using it may also be used with this unit. • To know more about updating your iPod under "About" in the "Setting" menu of your iPod, visit . • While the unit is being turned on /off the power of the unit, you connect the iPod nano to use the Bluetooth function. If "Error" appears again, check if the device supports the function you cannot control it from this unit. - The unit...
... connect the JVC SIRIUS radio PnP (Plug and Play), using it may also be used with this unit. • To know more about updating your iPod under "About" in the "Setting" menu of your iPod, visit . • While the unit is being turned on /off the power of the unit, you connect the iPod nano to use the Bluetooth function. If "Error" appears again, check if the device supports the function you cannot control it from this unit. - The unit...

Instructions
Page 39
Connect the antenna firmly. • Disc cannot be recognized ("No Disc," Eject the disc forcibly (see page 3). • Disc sound is not always serious. Disc playback Continued on the display. Reset the unit (see page 4). • SSM automatic presetting does not work at all. Remove the control panel, wipe the connector, then attach it again (see page 3). • "Connect Error" appears on the display. Insert the disc correctly. • CD-R/CD-RW cannot be played back...
Connect the antenna firmly. • Disc cannot be recognized ("No Disc," Eject the disc forcibly (see page 3). • Disc sound is not always serious. Disc playback Continued on the display. Reset the unit (see page 4). • SSM automatic presetting does not work at all. Remove the control panel, wipe the connector, then attach it again (see page 3). • "Connect Error" appears on the display. Insert the disc correctly. • CD-R/CD-RW cannot be played back...

Instructions
Page 42
... the device detects the unit, select "Open..." While connecting a device, this unit cannot be controlled. on the unit to connect the device. (See page 13.) • The unit does not make pairing with one Bluetooth cellular phone and one Bluetooth audio device at a time. ENGLISH Bluetooth® Symptoms Remedies/Causes • Bluetooth device does not detect the unit. Disconnect currently connected device and search again. • The unit does not detect the Bluetooth device. • Check the Bluetooth setting of a Bluetooth audio player...
... the device detects the unit, select "Open..." While connecting a device, this unit cannot be controlled. on the unit to connect the device. (See page 13.) • The unit does not make pairing with one Bluetooth cellular phone and one Bluetooth audio device at a time. ENGLISH Bluetooth® Symptoms Remedies/Causes • Bluetooth device does not detect the unit. Disconnect currently connected device and search again. • The unit does not detect the Bluetooth device. • Check the Bluetooth setting of a Bluetooth audio player...


