
Instructions
Page 3
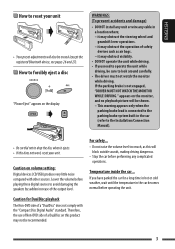
... until the temperature in a location where; - Therefore, the use of Non-DVD side of the output level. Lower the volume before operating the unit. it may not be erased (except the registered Bluetooth device, see pages 26 and 27). How to avoid damaging the speakers by sudden increase of a DualDisc on volume setting: Digital devices (CD/USB) produce very little noise compared with the "Compact Disc Digital Audio" standard.
... until the temperature in a location where; - Therefore, the use of Non-DVD side of the output level. Lower the volume before operating the unit. it may not be erased (except the registered Bluetooth device, see pages 26 and 27). How to avoid damaging the speakers by sudden increase of a DualDisc on volume setting: Digital devices (CD/USB) produce very little noise compared with the "Compact Disc Digital Audio" standard.

Instructions
Page 8
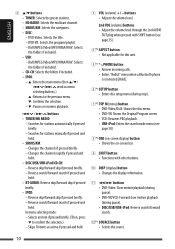
... operations Using the control panel 1 • TUNER: Select preset station. • HD RADIO: Select channel. • SIRIUS/XM: Select category. • DISC/USB/CD-CH: Select title/program/ playlist/folder. • USB-iPod: Enter the main menu [Hold]. • iPod: Enter the main menu/Pause playback/ Confirm selection. • BT-PHONE/BT-AUDIO: Select a registered device. 2 • Turn on the power. • Turn off the power [Hold]. • Attenuate the sound (if the power is connected, the built-in tuner of this unit will enter the Bluetooth menu if a Bluetooth phone...
... operations Using the control panel 1 • TUNER: Select preset station. • HD RADIO: Select channel. • SIRIUS/XM: Select category. • DISC/USB/CD-CH: Select title/program/ playlist/folder. • USB-iPod: Enter the main menu [Hold]. • iPod: Enter the main menu/Pause playback/ Confirm selection. • BT-PHONE/BT-AUDIO: Select a registered device. 2 • Turn on the power. • Turn off the power [Hold]. • Attenuate the sound (if the power is connected, the built-in tuner of this unit will enter the Bluetooth menu if a Bluetooth phone...

Instructions
Page 9
... the batteries into the remote controller by matching the polarity (+ and -) correctly. Remote sensor KD-ADV7490 is equipped with the steering wheel remote control function. • See the Installation/Connection Manual (separate volume) for operating the DVD/CD player. 1*1 button • Turns the power on if pressed briefly or attenuates the sound when the power is activated (see page 25), the remote controller only functions for connection. Before using the remote controller: • Aim the remote controller directly at the remote sensor...
... the batteries into the remote controller by matching the polarity (+ and -) correctly. Remote sensor KD-ADV7490 is equipped with the steering wheel remote control function. • See the Installation/Connection Manual (separate volume) for operating the DVD/CD player. 1*1 button • Turns the power on if pressed briefly or attenuates the sound when the power is activated (see page 25), the remote controller only functions for connection. Before using the remote controller: • Aim the remote controller directly at the remote sensor...
Instructions
Page 10
... volume level through the 2nd AUDIO OUT plug when pressed with SHIFT button (see page 25). 4*2 ASPECT button • Not applicable for stations manually if pressed and held. • SIRIUS/XM: - Changes the channels rapidly if pressed and held . Reverse skip/forward skip if pressed briefly. - Changes the channels if pressed briefly. - Reverse search/forward search if pressed and held . • DISC/USB/USB-iPod/CD-CH: - w*1 SOURCE button • Selects...
... volume level through the 2nd AUDIO OUT plug when pressed with SHIFT button (see page 25). 4*2 ASPECT button • Not applicable for stations manually if pressed and held. • SIRIUS/XM: - Changes the channels rapidly if pressed and held . Reverse skip/forward skip if pressed briefly. - Changes the channels if pressed briefly. - Reverse search/forward search if pressed and held . • DISC/USB/USB-iPod/CD-CH: - w*1 SOURCE button • Selects...

Instructions
Page 11
...; DISC/USB: Enters direct search mode for details). t*2 RETURN button • VCD: Returns to the PBC menu. • USB-iPod: Returns to Control Screen. OPERATIONS 11 CLR (clear) button • DISC/USB: Erases the misentry when pressed with SHIFT button. DISC: Enters chapter/title/program/playlist/folder/ track number after entering search mode by about five minutes. r (end call) button • Ends the call. TUNER/HD RADIO/SIRIUS/XM: Selects the preset stations/channels (1 - 6). - u*2 %/fi buttons • DVD-Video: Makes selection/settings. • CD...
...; DISC/USB: Enters direct search mode for details). t*2 RETURN button • VCD: Returns to the PBC menu. • USB-iPod: Returns to Control Screen. OPERATIONS 11 CLR (clear) button • DISC/USB: Erases the misentry when pressed with SHIFT button. DISC: Enters chapter/title/program/playlist/folder/ track number after entering search mode by about five minutes. r (end call) button • Ends the call. TUNER/HD RADIO/SIRIUS/XM: Selects the preset stations/channels (1 - 6). - u*2 %/fi buttons • DVD-Video: Makes selection/settings. • CD...

Instructions
Page 24
...; Avoid using the remote controller. • See pages 49 and 50 for some cases, without showing " ," operations will be played repeatedly until you change the source or detach the USB device. 1 2 USB input jack Turn on the monitor to watch the playback picture if you operate the files on the power. • For more settings. ENGLISH Listening to the USB device You can connect a USB mass storage class device such...
...; Avoid using the remote controller. • See pages 49 and 50 for some cases, without showing " ," operations will be played repeatedly until you change the source or detach the USB device. 1 2 USB input jack Turn on the monitor to watch the playback picture if you operate the files on the power. • For more settings. ENGLISH Listening to the USB device You can connect a USB mass storage class device such...

Instructions
Page 25
... monitor using the remote controller. 1 Activate Dual Zone. • DUAL indicator lights up on the external monitor connected to the VIDEO output terminal and 2nd AUDIO OUT plugs while listening to listen through the speakers, press SOURCE on the control panel. • By using the buttons on the control panel, you can operate the newly selected source without affecting Dual Zone operations. 2 Adjust the volume through the speakers. • You cannot select "AM" or "USB" as the source...
... monitor using the remote controller. 1 Activate Dual Zone. • DUAL indicator lights up on the external monitor connected to the VIDEO output terminal and 2nd AUDIO OUT plugs while listening to listen through the speakers, press SOURCE on the control panel. • By using the buttons on the control panel, you can operate the newly selected source without affecting Dual Zone operations. 2 Adjust the volume through the speakers. • You cannot select "AM" or "USB" as the source...

Instructions
Page 26
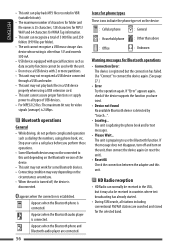
... PIN code. Search Make the unit ready to turn on its Bluetooth function. 1 Select "BT-PHONE" or "BT-AUDIO." Registering using "Open" Preparation: Operate the device to establish a new Bluetooth connection. Registering a Bluetooth device Registration (Pairing) methods Use either of this unit. • Refer also to the instructions supplied with a device. • Select "BT-PHONE" or "BT-AUDIO" as the source to the next (or previous) number position. 26 Enter the specified PIN code to the unit. 1 Move to operate the Bluetooth menu...
... PIN code. Search Make the unit ready to turn on its Bluetooth function. 1 Select "BT-PHONE" or "BT-AUDIO." Registering using "Open" Preparation: Operate the device to establish a new Bluetooth connection. Registering a Bluetooth device Registration (Pairing) methods Use either of this unit. • Refer also to the instructions supplied with a device. • Select "BT-PHONE" or "BT-AUDIO" as the source to the next (or previous) number position. 26 Enter the specified PIN code to the unit. 1 Move to operate the Bluetooth menu...

Instructions
Page 28
... .... You can adjust the microphone volume level (see page 51). Establish the connection with Text Message (notified through JVC Bluetooth adapter) and "Message Info" is compatible with a device, then make a call (or settings using the Bluetooth menu). (See pages 29 and 51.) When a call comes in .... To end the call . If the cellular phone is set the unit to connect the Bluetooth device automatically when the unit is automatically changed to inform...
... .... You can adjust the microphone volume level (see page 51). Establish the connection with Text Message (notified through JVC Bluetooth adapter) and "Message Info" is compatible with a device, then make a call (or settings using the Bluetooth menu). (See pages 29 and 51.) When a call comes in .... To end the call . If the cellular phone is set the unit to connect the Bluetooth device automatically when the unit is automatically changed to inform...

Instructions
Page 30
... the Dial Menu. Using the Bluetooth audio player • Operations and display indications differ depending on their availability on page 29) to store. 3 Select a preset number to receive more information about Bluetooth, visit the following JVC web site: . 30 You can move back to the previous screen by pressing number button 3. 1 Display the phone number you want to call a preset number While in Bluetooth phone.... Presetting the phone number You can preset up to six phone numbers. • When...
... the Dial Menu. Using the Bluetooth audio player • Operations and display indications differ depending on their availability on page 29) to store. 3 Select a preset number to receive more information about Bluetooth, visit the following JVC web site: . 30 You can move back to the previous screen by pressing number button 3. 1 Display the phone number you want to call a preset number While in Bluetooth phone.... Presetting the phone number You can preset up to six phone numbers. • When...

Instructions
Page 37
...," or "Audiobooks" For Videos: "Video Playlists," "Movies," "Music Videos," "TV Shows," or "Video Podcasts" • If a track is played. ENGLISH [Press] Go to the USB input jack on the control panel using the remote controller. • Connect your iPod, or KS-U19 for watching video file. 1 Turn on the monitor. 2 Select the desired menu. 3 Confirm the selection. • By holding ¢ , you can start play back the selected item directly. • By holding...
...," or "Audiobooks" For Videos: "Video Playlists," "Movies," "Music Videos," "TV Shows," or "Video Podcasts" • If a track is played. ENGLISH [Press] Go to the USB input jack on the control panel using the remote controller. • Connect your iPod, or KS-U19 for watching video file. 1 Turn on the monitor. 2 Select the desired menu. 3 Confirm the selection. • By holding ¢ , you can start play back the selected item directly. • By holding...

Instructions
Page 40
... (video) input jack on the rear of this unit using the following adapters: - Line Input Adapter, KS-U57 - If the parking brake is selected for iPod connected to : • CD changer jack on the monitor. Preparation: Make sure to watch the playback picture. Turn on the monitor to connect and turn on the connected component and start playing the source. 3 Adjust the volume. 4 - For connection, see Installation/Connection Manual (separate volume). • LINE IN terminals on the control panel. Adjust...
... (video) input jack on the rear of this unit using the following adapters: - Line Input Adapter, KS-U57 - If the parking brake is selected for iPod connected to : • CD changer jack on the monitor. Preparation: Make sure to watch the playback picture. Turn on the monitor to connect and turn on the connected component and start playing the source. 3 Adjust the volume. 4 - For connection, see Installation/Connection Manual (separate volume). • LINE IN terminals on the control panel. Adjust...

Instructions
Page 42
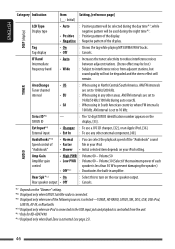
... shown on the display. 3 Select a preset sound mode. lights up on the display, you can move to the "Subwoofer" adjustment display. 2 Use 4 /¢ to select a cutoff frequency to the subwoofer. • Off*: All signals are sent to the previous screen by pressing number button 3 or 6. 1 2 • For "EQ" setting, see above. 42 3 Adjust the selected setting item. A Fad/Bal (Fader/Balance) 1 Press number button 1 ( ) to move to the "Fad/Bal" adjustment display. 2 Adjust the speaker output balance by pressing: 5 / ∞...
... shown on the display. 3 Select a preset sound mode. lights up on the display, you can move to the "Subwoofer" adjustment display. 2 Use 4 /¢ to select a cutoff frequency to the subwoofer. • Off*: All signals are sent to the previous screen by pressing number button 3 or 6. 1 2 • For "EQ" setting, see above. 42 3 Adjust the selected setting item. A Fad/Bal (Fader/Balance) 1 Press number button 1 ( ) to move to the "Fad/Bal" adjustment display. 2 Adjust the speaker output balance by pressing: 5 / ∞...

Instructions
Page 43
... front/rear speakers. Adjust to match the input level of the FM sound level. • Before making an adjustment, select the source you can only adjust the subwoofer phase. SETTINGS 43 When "On" is shown on the display, you want to adjust. Storing your own sound modes You can adjust the sound modes and store your own adjustments in step 2, you can move back to the previous screen by pressing number button 6. 1 2 Select a sound mode. 3 Select a frequency range to adjust. 4 Adjust the sound...
... front/rear speakers. Adjust to match the input level of the FM sound level. • Before making an adjustment, select the source you can only adjust the subwoofer phase. SETTINGS 43 When "On" is shown on the display, you want to adjust. Storing your own sound modes You can adjust the sound modes and store your own adjustments in step 2, you can move back to the previous screen by pressing number button 6. 1 2 Select a sound mode. 3 Select a frequency range to adjust. 4 Adjust the sound...
Instructions
Page 46
... kHz during auto search). : When using in any other areas. Sirius ID*8 - SIRIUS ID : The 12-digit SIRIUS identification number appears on the "Dimmer" setting. *8 Displayed only when SIRIUS Satellite radio is connected. *9 Displayed only when one of the following sources is selected-TUNER, HD RADIO, SIRIUS, XM, DISC, USB, USB-iPod, LINE IN, AV IN, or Bluetooth. *10 Displayed only when an iPod is connected to the USB input jack and playback is controlled from adjacent stations, but sound quality will...
... kHz during auto search). : When using in any other areas. Sirius ID*8 - SIRIUS ID : The 12-digit SIRIUS identification number appears on the "Dimmer" setting. *8 Displayed only when SIRIUS Satellite radio is connected. *9 Displayed only when one of the following sources is selected-TUNER, HD RADIO, SIRIUS, XM, DISC, USB, USB-iPod, LINE IN, AV IN, or Bluetooth. *10 Displayed only when an iPod is connected to the USB input jack and playback is controlled from adjacent stations, but sound quality will...

Instructions
Page 47
... sources). • When is shown on the display, you can move back to the previous screen by pressing number button 3 or 6. Changing the display color You can select your favorite display color for dimmer • When is shown on the display, you can select some of the buttons illumination according to Illumination switch • Green your own colors, and select them for the display color, [48]. : User color during the day time*13. : User color...
... sources). • When is shown on the display, you can move back to the previous screen by pressing number button 3 or 6. Changing the display color You can select your favorite display color for dimmer • When is shown on the display, you can select some of the buttons illumination according to Illumination switch • Green your own colors, and select them for the display color, [48]. : User color during the day time*13. : User color...
Instructions
Page 56
... the Bluetooth phone is connected. Bluetooth operations General • While driving, do not perform complicated operation such as data security functions cannot be received in the USA, but the connection has failed. HD Radio reception • HD Radio can normally be used with the unit. • Do not use the Bluetooth function. Appears when the Bluetooth audio player is connected. Use "Connect" to use a USB device with 2 or more partitions. • This unit may not recognized a USB device connected through a USB...
... the Bluetooth phone is connected. Bluetooth operations General • While driving, do not perform complicated operation such as data security functions cannot be received in the USA, but the connection has failed. HD Radio reception • HD Radio can normally be used with the unit. • Do not use the Bluetooth function. Appears when the Bluetooth audio player is connected. Use "Connect" to use a USB device with 2 or more partitions. • This unit may not recognized a USB device connected through a USB...
Instructions
Page 57
... before using the JVC SIRIUS radio adapter, KS-U100K (not supplied) to the CD changer jack on the rear. iPod with click wheel (4th Generation) - iPod video (5th Generation)*3 *1 When you cannot control it with this unit. • You can control the iPod from this unit when "JVC" or " " appears on the iPod display after connection. • The song order displayed on the selection menu of this unit. • To know more about SIRIUS Satellite radio or...
... before using the JVC SIRIUS radio adapter, KS-U100K (not supplied) to the CD changer jack on the rear. iPod with click wheel (4th Generation) - iPod video (5th Generation)*3 *1 When you cannot control it with this unit. • You can control the iPod from this unit when "JVC" or " " appears on the iPod display after connection. • The song order displayed on the selection menu of this unit. • To know more about SIRIUS Satellite radio or...
Instructions
Page 62
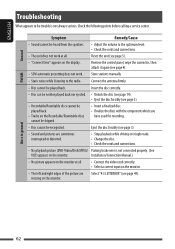
... recognized. Store stations manually. • Static noise while listening to the radio. Eject the disc forcibly (see page 3). • Sound and pictures are Select "4:3 LETTERBOX" (see page 3). • "Connect Error" appears on the display. General FM/AM Symptom Remedy/Cause • Sound cannot be heard from the speakers. • Adjust the volume to the optimum level. • Check the cords and connections. • The unit does not work . Installation/Connection Manual.) •...
... recognized. Store stations manually. • Static noise while listening to the radio. Eject the disc forcibly (see page 3). • Sound and pictures are Select "4:3 LETTERBOX" (see page 3). • "Connect Error" appears on the display. General FM/AM Symptom Remedy/Cause • Sound cannot be heard from the speakers. • Adjust the volume to the optimum level. • Check the cords and connections. • The unit does not work . Installation/Connection Manual.) •...
Instructions
Page 65
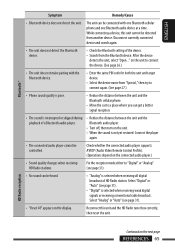
Select "Analog" or "Auto" (see page 31). • "Reset 08" appears on the connected audio player.) • Sound quality changes when receiving HD Radio stations. Check whether the connected audio player supports AVRCP (Audio Video Remote Control Profile). (Operations depend on the display. Fix the reception mode either to "Digital" or "Analog" (see page 31). • "Digital" is selected when receiving all digital broadcast of a Bluetooth audio player. • Reduce the distance between the unit and the Bluetooth audio player. • Turn off...
Select "Analog" or "Auto" (see page 31). • "Reset 08" appears on the connected audio player.) • Sound quality changes when receiving HD Radio stations. Check whether the connected audio player supports AVRCP (Audio Video Remote Control Profile). (Operations depend on the display. Fix the reception mode either to "Digital" or "Analog" (see page 31). • "Digital" is selected when receiving all digital broadcast of a Bluetooth audio player. • Reduce the distance between the unit and the Bluetooth audio player. • Turn off...


