Instructions
Page 2
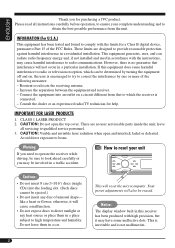
... the unit. Reorient or relocate the receiving antenna. - leave all instructions carefully before operation, to radio communications. This is inevitable and is encouraged to try to which can radiate radio frequency energy and, if not installed and used in a residential installation. Avoid direct exposure to qualified service personnel. 3. Please read all servicing to beam. Increase the separation between the equipment and receiver. - Your preset adjustments will reset the...
... the unit. Reorient or relocate the receiving antenna. - leave all instructions carefully before operation, to radio communications. This is inevitable and is encouraged to try to which can radiate radio frequency energy and, if not installed and used in a residential installation. Avoid direct exposure to qualified service personnel. 3. Please read all servicing to beam. Increase the separation between the equipment and receiver. - Your preset adjustments will reset the...
Instructions
Page 3
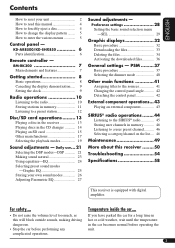
...23 Using equalizer-EQ 24 Selecting preset sound modes -Graphic EQ 25 Storing your unit 2 How to enter the various menus 5 Control panel - KD-AR8500/KD-SHX850 6 Parts identification 6 Remote controller - RM-RK300 7 Main elements and features 7 Getting started 8 Basic operations 8 Canceling the display demonstration..... 9 Setting the clock 9 Radio operations 10 Listening to the radio 10 Storing stations in memory 11 Listening to a preset station 12 Disc/SD card operations ......... 13 Playing a disc in the receiver 13 Playing discs in memory .......... 46 Listening to a user...
...23 Using equalizer-EQ 24 Selecting preset sound modes -Graphic EQ 25 Storing your unit 2 How to enter the various menus 5 Control panel - KD-AR8500/KD-SHX850 6 Parts identification 6 Remote controller - RM-RK300 7 Main elements and features 7 Getting started 8 Basic operations 8 Canceling the display demonstration..... 9 Setting the clock 9 Radio operations 10 Listening to the radio 10 Storing stations in memory 11 Listening to a preset station 12 Disc/SD card operations ......... 13 Playing a disc in the receiver 13 Playing discs in memory .......... 46 Listening to a user...
Instructions
Page 4
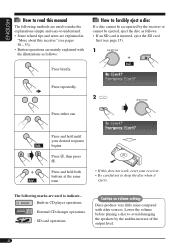
... and notes are explained in CD player operations. : External CD changer operations. : SD card operations. Press and hold both buttons at the same time. • If this does not work, reset your desired response begins. Press repeatedly. 2 Press either one. ENGLISH How to read this receiver" (see pages 50 - 53). • Button operations are mainly explained with other sources. Caution on volume setting: Discs produce very little noise...
... and notes are explained in CD player operations. : External CD changer operations. : SD card operations. Press and hold both buttons at the same time. • If this does not work, reset your desired response begins. Press repeatedly. 2 Press either one. ENGLISH How to read this receiver" (see pages 50 - 53). • Button operations are mainly explained with other sources. Caution on volume setting: Discs produce very little noise...
Instructions
Page 6
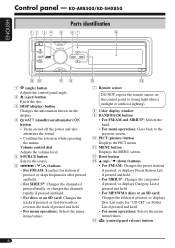
q MENU button Displays the MENU screen. KD-AR8500/KD-SHX850 Parts identification ENGLISH DISP BACK BAND PICT SOURCE MENU 1 (angle) button Adjusts the control panel angle. 2 0 (eject) button Ejects the disc. 3 DISP (display) button Changes the information shown on the display. 4 (standby/on/attenuator)/OK button • Turns on the control panel to strong light (direct sunlight or artificial lighting). 8 Color display window 9 BAND/BACK button • For FM/AM and SIRIUS®: Selects the band. • For menu operations: Goes back to the previous screen. r...
q MENU button Displays the MENU screen. KD-AR8500/KD-SHX850 Parts identification ENGLISH DISP BACK BAND PICT SOURCE MENU 1 (angle) button Adjusts the control panel angle. 2 0 (eject) button Ejects the disc. 3 DISP (display) button Changes the information shown on the display. 4 (standby/on/attenuator)/OK button • Turns on the control panel to strong light (direct sunlight or artificial lighting). 8 Color display window 9 BAND/BACK button • For FM/AM and SIRIUS®: Selects the band. • For menu operations: Goes back to the previous screen. r...
Instructions
Page 7
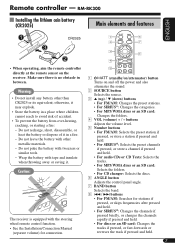
...; When operating, aim the remote controller directly at the remote sensor on and off the power and also attenuates the sound. 2 SOURCE button Selects the source. 3 5 (up) / ∞ (down) buttons • For FM/AM: Changes the preset stations. • For SIRIUS®: Changes the categories. • For MP3/WMA discs or an SD card: Changes the folders. 4 VOL (volume) + / - Warning: • Do not install any battery other metallic materials. - Caution: The receiver is...
...; When operating, aim the remote controller directly at the remote sensor on and off the power and also attenuates the sound. 2 SOURCE button Selects the source. 3 5 (up) / ∞ (down) buttons • For FM/AM: Changes the preset stations. • For SIRIUS®: Changes the categories. • For MP3/WMA discs or an SD card: Changes the folders. 4 VOL (volume) + / - Warning: • Do not install any battery other metallic materials. - Caution: The receiver is...
Instructions
Page 10
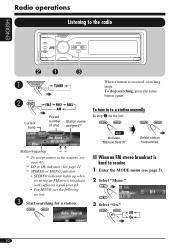
...... Preset number (if any) Station name assigned*1 To tune in to the stations, see page 41. *2 LO or DX indicator: See page 11. *3 STEREO or MONO indicator: • STEREO indicator lights up when receiving an FM stereo broadcast with sufficient signal strength. • For MONO, see page 5). 2 Select "Mono." 3 Select "On." Activate "Manual Search" Select station frequencies When an FM stereo broadcast is hard to the radio SOURCE BACK BAND ~ SOURCE...
...... Preset number (if any) Station name assigned*1 To tune in to the stations, see page 41. *2 LO or DX indicator: See page 11. *3 STEREO or MONO indicator: • STEREO indicator lights up when receiving an FM stereo broadcast with sufficient signal strength. • For MONO, see page 5). 2 Select "Mono." 3 Select "On." Activate "Manual Search" Select station frequencies When an FM stereo broadcast is hard to the radio SOURCE BACK BAND ~ SOURCE...
Instructions
Page 11
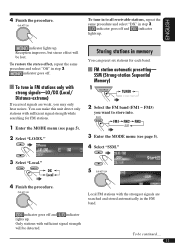
... 3 Enter the MODE menu (see page 5). 2 Select "LO/DX." To restore the stereo effect, repeat the same procedure and select "Off" in to store into. ENGLISH 4 Finish the procedure. To tune in the FM band. FM station automatic presetting- FM3) you want to all receivable stations, repeat the same procedure and select "DX" in memory You can make this unit detect only stations with the...
... 3 Enter the MODE menu (see page 5). 2 Select "LO/DX." To restore the stereo effect, repeat the same procedure and select "Off" in to store into. ENGLISH 4 Finish the procedure. To tune in the FM band. FM station automatic presetting- FM3) you want to all receivable stations, repeat the same procedure and select "DX" in memory You can make this unit detect only stations with the...
Instructions
Page 14
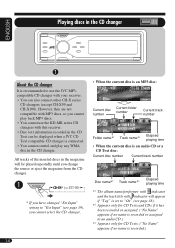
... change the source or eject the magazine from the CD changer. ~ SOURCE * If you have changed "Ext Input" setting to "Ext Input" (see page 39), you cannot play back MP3 discs. • You cannot use the KD-MK series CD changers with indicator will be displayed when a JVC CD Text compatible CD changer is connected. • You cannot control and play any WMA disc in the CD changer. However, they are not compatible with MP3 discs, so you cannot select the CD changer...
... change the source or eject the magazine from the CD changer. ~ SOURCE * If you have changed "Ext Input" setting to "Ext Input" (see page 39), you cannot play back MP3 discs. • You cannot use the KD-MK series CD changers with indicator will be displayed when a JVC CD Text compatible CD changer is connected. • You cannot control and play any WMA disc in the CD changer. However, they are not compatible with MP3 discs, so you cannot select the CD changer...
Instructions
Page 22
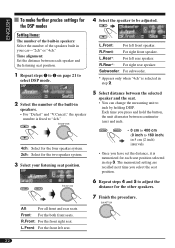
... be adjusted. L.Front: For the front left rear speaker. R.Rear*: For right rear speaker. All: For all front and rear seats. L.Front: For left front speaker. Time alignment: Set the distance between the selected speaker and the seat. • You can change the measuring unit to inch by holding DISP. Subwoofer: For subwoofer. * Appears only when "4ch" is selected in step 2. 2 Select the number of the speakers built in speakers. •...
... be adjusted. L.Front: For the front left rear speaker. R.Rear*: For right rear speaker. All: For all front and rear seats. L.Front: For left front speaker. Time alignment: Set the distance between the selected speaker and the seat. • You can change the measuring unit to inch by holding DISP. Subwoofer: For subwoofer. * Appears only when "4ch" is selected in step 2. 2 Select the number of the speakers built in speakers. •...

Instructions
Page 24
... can select a preset sound mode suitable to match the reproducible frequency range of the connected speakers; You can adjust the enhanced level, bandwidth, and center frequencies at the same time. ! • To select preset sound modes \ See page 25. • To adjust the sound mode and store your own adjustments in memory \ See page 26. • To adjust Parametric EQ \ See page 27. 24 Parametric EQ: You can make more precise settings than using...
... can select a preset sound mode suitable to match the reproducible frequency range of the connected speakers; You can adjust the enhanced level, bandwidth, and center frequencies at the same time. ! • To select preset sound modes \ See page 25. • To adjust the sound mode and store your own adjustments in memory \ See page 26. • To adjust Parametric EQ \ See page 27. 24 Parametric EQ: You can make more precise settings than using...
Instructions
Page 28
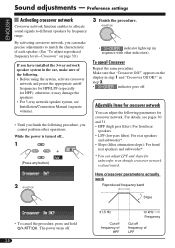
Preference settings Activating crossover network Crossover network function enables to allocate sound signals to match the characteristic of each speaker. (See "To adjust reproduced frequency level-Crossover" on the display in the car, make sure of LPF By activating crossover network, you can make precise adjustments to different speakers by frequency range. Make sure that "Crossover Off?" For details, see Installation/Connection Manual (separate volume). • Until you finish the following procedure...
Preference settings Activating crossover network Crossover network function enables to allocate sound signals to match the characteristic of each speaker. (See "To adjust reproduced frequency level-Crossover" on the display in the car, make sure of LPF By activating crossover network, you can make precise adjustments to different speakers by frequency range. Make sure that "Crossover Off?" For details, see Installation/Connection Manual (separate volume). • Until you finish the following procedure...
Instructions
Page 30
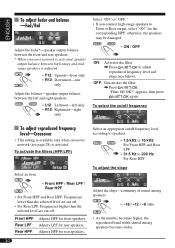
... adjust fader and balance -Fad/Bal Adjust the fader*-speaker output balance between the front and rear speakers. * When crossover network is activated, speaker output balance between the left and right speakers. • L12: Leftmost-left only • R12: Rightmost-right only Select "ON" or "OFF." • If you connect high-range speakers to Front or Rear output, select "ON" for rear speakers. To select the cutoff frequency To adjust reproduced frequency level-Crossover • This setting...
... adjust fader and balance -Fad/Bal Adjust the fader*-speaker output balance between the front and rear speakers. * When crossover network is activated, speaker output balance between the left and right speakers. • L12: Leftmost-left only • R12: Rightmost-right only Select "ON" or "OFF." • If you connect high-range speakers to Front or Rear output, select "ON" for rear speakers. To select the cutoff frequency To adjust reproduced frequency level-Crossover • This setting...
Instructions
Page 31
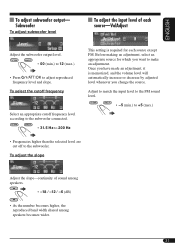
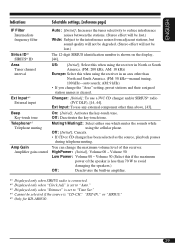
... FM. To select the cutoff frequency Select an appropriate cutoff frequency level according to the subwoofer connected. • 31.5 Hz to the subwoofer. ENGLISH To adjust subwoofer output- Adjust to match the input level to the FM sound level. • -5 (min.) to +5 (max.) • Frequencies higher than the selected level are cut off to 200 Hz This setting is memorized, and the volume level will automatically increase or decrease by adjusted level whenever you...
... FM. To select the cutoff frequency Select an appropriate cutoff frequency level according to the subwoofer connected. • 31.5 Hz to the subwoofer. ENGLISH To adjust subwoofer output- Adjust to match the input level to the FM sound level. • -5 (min.) to +5 (max.) • Frequencies higher than the selected level are cut off to 200 Hz This setting is memorized, and the volume level will automatically increase or decrease by adjusted level whenever you...
Instructions
Page 39
US: [Initial]; Changer: [Initial]; Ext Input: To use a JVC CD changer and/or SIRIUS® radio (JVC DLP), [14, 44]. Activates the key-touch tone. Volume 00 - To use any external component other than 70 W to avoid damaging the speakers.) Off: Deactivates the built-in amplifier. *1 Displayed only when SIRIUS radio is connected. *2 Displayed only when "Clock Adj" is set to "Auto." *3 Displayed only when "Dimmer" is set to the interference noises from adjacent stations, but sound quality...
US: [Initial]; Changer: [Initial]; Ext Input: To use a JVC CD changer and/or SIRIUS® radio (JVC DLP), [14, 44]. Activates the key-touch tone. Volume 00 - To use any external component other than 70 W to avoid damaging the speakers.) Off: Deactivates the built-in amplifier. *1 Displayed only when SIRIUS radio is connected. *2 Displayed only when "Clock Adj" is set to "Auto." *3 Displayed only when "Dimmer" is set to the interference noises from adjacent stations, but sound quality...
Instructions
Page 43
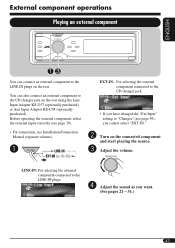
... pages 21 - 31.) 43 Before operating the external component, select the external input correctly (see page 39). • For connection, see Installation/Connection Manual (separate volume). ~ SOURCE EXT-IN: For selecting the external component connected to the CD changer jack. • If you have changed the "Ext Input" setting to the LINE IN plugs on the rear using the Line Input Adapter KS-U57 (optionally purchased) or Aux Input Adapter KS-U58 (optionally purchased).
... pages 21 - 31.) 43 Before operating the external component, select the external input correctly (see page 39). • For connection, see Installation/Connection Manual (separate volume). ~ SOURCE EXT-IN: For selecting the external component connected to the CD changer jack. • If you have changed the "Ext Input" setting to the LINE IN plugs on the rear using the Line Input Adapter KS-U57 (optionally purchased) or Aux Input Adapter KS-U58 (optionally purchased).

Instructions
Page 44
... display once subscription has been completed. Tune in to the preset channel, CH184 (channel for updating your SIRIUS radio. * Changes every 20% of sports, news, and entertainment programs. You can deliver digital-quality sound. SIRIUS has 65 music channels which are updated after connection: • If the power is turned off before subscription is a satellite radio that can enjoy and control the SIRIUS radio digital entertainment channels from the beginning. 1 Turn on the power. 2 SOURCE JVC DLP starts updating...
... display once subscription has been completed. Tune in to the preset channel, CH184 (channel for updating your SIRIUS radio. * Changes every 20% of sports, news, and entertainment programs. You can deliver digital-quality sound. SIRIUS has 65 music channels which are updated after connection: • If the power is turned off before subscription is a satellite radio that can enjoy and control the SIRIUS radio digital entertainment channels from the beginning. 1 Turn on the power. 2 SOURCE JVC DLP starts updating...
Instructions
Page 50
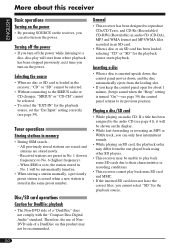
... SD players. • This receiver may not be recommended. Tuner operations Storing stations in No. 1 (lowest frequency) to the SIRIUS radio or CD changer, "SIRIUS" or "CD-CH" cannot be unable to play back some SD cards due to their characteristics or recording conditions. • This receiver cannot play will start from where playback has been stopped previously, next time you turn off the power while listening to a disc, disc play...
... SD players. • This receiver may not be recommended. Tuner operations Storing stations in No. 1 (lowest frequency) to the SIRIUS radio or CD changer, "SIRIUS" or "CD-CH" cannot be unable to play back some SD cards due to their characteristics or recording conditions. • This receiver cannot play will start from where playback has been stopped previously, next time you turn off the power while listening to a disc, disc play...
Instructions
Page 52
... change the input level- Monaural sources such as WAVE, ATRAC3, etc. • The search function works but only to apply the adjustment to the current playback source, press MENU to go back to the operation screen of the current source. Sound adjustments - If no file is activated. - WMA files encoded with Layer 1/2. - ENGLISH • This receiver cannot play back the following sources you try to adjust it. 52 Ejecting a disc...
... change the input level- Monaural sources such as WAVE, ATRAC3, etc. • The search function works but only to apply the adjustment to the current playback source, press MENU to go back to the operation screen of the current source. Sound adjustments - If no file is activated. - WMA files encoded with Layer 1/2. - ENGLISH • This receiver cannot play back the following sources you try to adjust it. 52 Ejecting a disc...
Instructions
Page 53
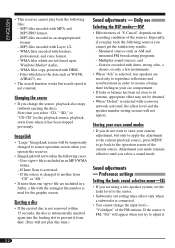
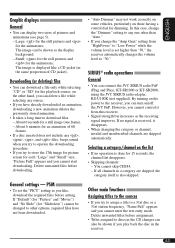
...; "Auto Dimmer" may not work correctly on some vehicles, particularly on the power to download files. - About 6 minutes for the playback source; In this receiver. • Signal strength bar increases as you cannot enter the text entry mode. If no operation is also skipped. ENGLISH Graphic displays General • You can connect the JVC SIRIUS radio PnP (Plug and Play), KT-SR1000 or KT-SR2000, using the JVC SIRIUS radio adapter...
...; "Auto Dimmer" may not work correctly on some vehicles, particularly on the power to download files. - About 6 minutes for the playback source; In this receiver. • Signal strength bar increases as you cannot enter the text entry mode. If no operation is also skipped. ENGLISH Graphic displays General • You can connect the JVC SIRIUS radio PnP (Plug and Play), KT-SR1000 or KT-SR2000, using the JVC SIRIUS radio adapter...
Instructions
Page 54
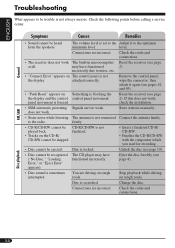
... CD-R/ CD-RW. • Finalize the CD-R/CD-RW with the component which you used for recording. • Disc cannot be ejected. may have functioned 2). Reset the receiver (see page 19). • Disc cannot be recognized ("No Disc," "Loading Error," or "Eject Error" appears). Store stations manually. • Static noise while listening The antenna is not played back. to the radio. Change the disc. Check the cords and connections. Disc playback 54 Connections are driving on The control panel...
... CD-R/ CD-RW. • Finalize the CD-R/CD-RW with the component which you used for recording. • Disc cannot be ejected. may have functioned 2). Reset the receiver (see page 19). • Disc cannot be recognized ("No Disc," "Loading Error," or "Eject Error" appears). Store stations manually. • Static noise while listening The antenna is not played back. to the radio. Change the disc. Check the cords and connections. Disc playback 54 Connections are driving on The control panel...


