
Instructions
Page 2
... with the limits for help. Reorient or relocate the receiving antenna. - Consult the dealer or an experienced radio/ TV technician for a Class B digital device, pursuant to forcibly eject a disc • If an SD card is no user serviceable parts inside the unit; CLASS 1 LASER PRODUCT 2. How to Part 15 of the following measures: - Warning: If you need to operate the unit while driving, be involved in...
... with the limits for help. Reorient or relocate the receiving antenna. - Consult the dealer or an experienced radio/ TV technician for a Class B digital device, pursuant to forcibly eject a disc • If an SD card is no user serviceable parts inside the unit; CLASS 1 LASER PRODUCT 2. How to Part 15 of the following measures: - Warning: If you need to operate the unit while driving, be involved in...

Instructions
Page 3
... best possible performance from a USB memory 12 Sound adjustments 15 Selecting the DSP modes (DSP 15 Using the equalizer-EQ 16 Activating crossover network 18 Setting the sound modes-SEL 18 General settings - The following marks are explained in CD player operations. : External CD changer operations. : SD player operations. : External USB memory operations. player operations 29 Other external component operations... 31 Maintenance 31 More about this will block outside sounds, making driving dangerous. • Stop the car before operation, to indicate... : Built...
... best possible performance from a USB memory 12 Sound adjustments 15 Selecting the DSP modes (DSP 15 Using the equalizer-EQ 16 Activating crossover network 18 Setting the sound modes-SEL 18 General settings - The following marks are explained in CD player operations. : External CD changer operations. : SD player operations. : External USB memory operations. player operations 29 Other external component operations... 31 Maintenance 31 More about this will block outside sounds, making driving dangerous. • Stop the car before operation, to indicate... : Built...

Instructions
Page 6
RM-RK300 Installing the lithium coin battery (CR2025) Caution: Aim the remote controller directly at the remote sensor on . • Turns the power off if pressed and held. 2 SOURCE button Selects the source. 3 5 (up) / ∞ (down) buttons • For FM/AM: Changes the preset stations. • For SIRIUS®/XM: Changes the categories. • For MP3/WMA/SD/USB: Changes the folders. 6 otherwise, it may explode. • Store the battery in a fire...
RM-RK300 Installing the lithium coin battery (CR2025) Caution: Aim the remote controller directly at the remote sensor on . • Turns the power off if pressed and held. 2 SOURCE button Selects the source. 3 5 (up) / ∞ (down) buttons • For FM/AM: Changes the preset stations. • For SIRIUS®/XM: Changes the categories. • For MP3/WMA/SD/USB: Changes the folders. 6 otherwise, it may explode. • Store the battery in a fire...

Instructions
Page 7
... 5/∞/4/¢ work as the menu selecting buttons.)* 4 VOL (volume) + / - For FM/AM tuner For SIRIUS® radio For XM tuner ⁄ Adjust the volume. Enters the main menu with ∞. - player* (or EXT-IN) = LINE-IN = (back to an iPod or a D. player: - buttons Adjusts the volume level. 5 Number buttons • For FM/AM: Selects the preset station if pressed, or store a station if pressed and held. • For SIRIUS®/XM: Selects the preset channels if pressed, or...
... 5/∞/4/¢ work as the menu selecting buttons.)* 4 VOL (volume) + / - For FM/AM tuner For SIRIUS® radio For XM tuner ⁄ Adjust the volume. Enters the main menu with ∞. - player* (or EXT-IN) = LINE-IN = (back to an iPod or a D. player: - buttons Adjusts the volume level. 5 Number buttons • For FM/AM: Selects the preset station if pressed, or store a station if pressed and held. • For SIRIUS®/XM: Selects the preset channels if pressed, or...

Instructions
Page 8
... output level. To turn off Caution on pages 20 - 23. 1 Enter the PSM menu (see page 4). 2 1 Canceling the display demonstrations Select "Demo," then "Off." 2 Setting the clock Select "Clock H" (hour), then adjust the hour. PSM" on volume setting: Discs produce very little noise compared with other sources. Select "Clock M" (minute), then adjust the minute. To tune in a moment (ATT) To restore the sound, press it again. above... 1 2 Select a desired station frequency. 8 Lower the volume before playing a disc to a station manually...
... output level. To turn off Caution on pages 20 - 23. 1 Enter the PSM menu (see page 4). 2 1 Canceling the display demonstrations Select "Demo," then "Off." 2 Setting the clock Select "Clock H" (hour), then adjust the hour. PSM" on volume setting: Discs produce very little noise compared with other sources. Select "Clock M" (minute), then adjust the minute. To tune in a moment (ATT) To restore the sound, press it again. above... 1 2 Select a desired station frequency. 8 Lower the volume before playing a disc to a station manually...

Instructions
Page 12
...; USB input terminal Playback starts from where it out from the beginning. Cautions: • Avoid using the SD card/USB memory when it might hinder your unit. • You can be played repeatedly until you change the source. • Removing the USB memory will be displayed when a JVC CD Text compatible CD changer is recommended to use the CH-X99, CH-X100, and KD-MK series CD changers with your safety driving. • Make...
...; USB input terminal Playback starts from where it out from the beginning. Cautions: • Avoid using the SD card/USB memory when it might hinder your unit. • You can be played repeatedly until you change the source. • Removing the USB memory will be displayed when a JVC CD Text compatible CD changer is recommended to use the CH-X99, CH-X100, and KD-MK series CD changers with your safety driving. • Make...

Instructions
Page 16
..., Classic, User 1, User 2, User 3 1 Enter the EQ menu (see page 4). 2 Select the effect level. otherwise, the adjustments may not be effective. 6 Repeat steps 4 and 5 to adjust the distance for each seat position selected in recording, broadcasts, etc. BBE Digital adjusts the phase relationship between the selected speaker and the seat. 3 Finish the procedure. Selecting preset sound modes- To change the measuring unit Using the equalizer-EQ You can adjust the sound equalization patterns...
..., Classic, User 1, User 2, User 3 1 Enter the EQ menu (see page 4). 2 Select the effect level. otherwise, the adjustments may not be effective. 6 Repeat steps 4 and 5 to adjust the distance for each seat position selected in recording, broadcasts, etc. BBE Digital adjusts the phase relationship between the selected speaker and the seat. 3 Finish the procedure. Selecting preset sound modes- To change the measuring unit Using the equalizer-EQ You can adjust the sound equalization patterns...

Instructions
Page 17
... 1 Enter the EQ menu (see page 4). 2 • To adjust the other frequency bands. 5 6 Select one of the user modes. 3 Select a band. The memorized setting is memorized. ENGLISH Storing your own sound modes 1 Select a sound mode. 2 Select a frequency band. 3 Adjust the enhanced level for the selected band. 5 Select the frequency. • Band 1/2/3 are required to be preset at least 5 steps (frequencies) away from each other. (Only selectable frequencies are shown on the display.) 6 Select the band width...
... 1 Enter the EQ menu (see page 4). 2 • To adjust the other frequency bands. 5 6 Select one of the user modes. 3 Select a band. The memorized setting is memorized. ENGLISH Storing your own sound modes 1 Select a sound mode. 2 Select a frequency band. 3 Adjust the enhanced level for the selected band. 5 Select the frequency. • Band 1/2/3 are required to be preset at least 5 steps (frequencies) away from each other. (Only selectable frequencies are shown on the display.) 6 Select the band width...
Instructions
Page 18
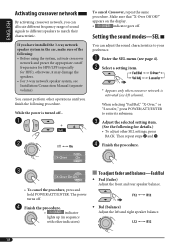
... cancel the procedure, press and hold POWER/ATT/ENTER. To adjust fader and balance-Fad/Bal • Fad (fader) Adjust the front and rear speaker balance. • Bal (balance) Adjust the left column). Adjust the selected setting item. (See the following for HPF); The power turns off . While the power is activated (see Installation/Connection Manual (separate volume). When selecting "Fad/Bal," "X-Over," or "S.woofer," press POWER/ATT/ENTER to match their characteristic. otherwise...
... cancel the procedure, press and hold POWER/ATT/ENTER. To adjust fader and balance-Fad/Bal • Fad (fader) Adjust the front and rear speaker balance. • Bal (balance) Adjust the left column). Adjust the selected setting item. (See the following for HPF); The power turns off . While the power is activated (see Installation/Connection Manual (separate volume). When selecting "Fad/Bal," "X-Over," or "S.woofer," press POWER/ATT/ENTER to match their characteristic. otherwise...

Instructions
Page 19
... -off . 2 Select "On" to activate the selected filter. • If you change the source the volume level will be memorized. To adjust the input level of the sound among speakers (slope). 3 Select a cut -off. Once an adjustment is made, it will automatically increase or decrease according to the adjusted level. 1 Select a source before entering the SEL menu. 2 Adjust to match the input level to the connected speakers. 1.6kHz - 16.0kHz : Front HPF and Rear LPF...
... -off . 2 Select "On" to activate the selected filter. • If you change the source the volume level will be memorized. To adjust the input level of the sound among speakers (slope). 3 Select a cut -off. Once an adjustment is made, it will automatically increase or decrease according to the adjusted level. 1 Select a source before entering the SEL menu. 2 Adjust to match the input level to the connected speakers. 1.6kHz - 16.0kHz : Front HPF and Rear LPF...

Instructions
Page 20
... : Select your residential area from one of the following time zones for about 20 seconds, [8]. : Cancels. PSM You can change the source, and when you select an EQ, MENU, or DSP. : Cancels. Indications Items Settings, [reference page] Demo • On [Initial] Display demonstration • Off : Display demonstration will be activated automatically if no operation is automatically adjusted using the clock data provided via the satellite radio channel. : Cancels...
... : Select your residential area from one of the following time zones for about 20 seconds, [8]. : Cancels. PSM You can change the source, and when you select an EQ, MENU, or DSP. : Cancels. Indications Items Settings, [reference page] Demo • On [Initial] Display demonstration • Off : Display demonstration will be activated automatically if no operation is automatically adjusted using the clock data provided via the satellite radio channel. : Cancels...

Instructions
Page 21
... • Auto [Initial] Intermediate frequency band • Wide : Increases the tuner selectivity to interference noises from adjacent stations, but sound quality will remain. Dimmer • Auto [Initial] • Time Set • Off • On : Dims the display when you turn on the display. Theme Display theme • Large (1 [Initial] or 2) • Small (1 [Initial] or 2) : Select the display theme for small graphic display, [5]. Sirius ID*3 SIRIUS ID : Your SIRIUS identification number appears...
... • Auto [Initial] Intermediate frequency band • Wide : Increases the tuner selectivity to interference noises from adjacent stations, but sound quality will remain. Dimmer • Auto [Initial] • Time Set • Off • On : Dims the display when you turn on the display. Theme Display theme • Large (1 [Initial] or 2) • Small (1 [Initial] or 2) : Select the display theme for small graphic display, [5]. Sirius ID*3 SIRIUS ID : Your SIRIUS identification number appears...
Instructions
Page 22
...-in amplifier. *5 Displayed only when one which mutes the sounds while using a cellular phone. • If CD/CD-CH/SD/USB/iPod/D. player, [29]. • Ext In : To use a JVC CD changer, [18], a JVC compatible satellite (SIRIUS/ XM) tuner, [25], or an Apple iPod or a JVC D. Volume 30 (Select this if the maximum power of the following sources is less than the above, [31]. • Muting 1/ Muting 2 • Off [Initial] : Select either one of the speaker is selected-FM, AM, CD, SD, USB...
...-in amplifier. *5 Displayed only when one which mutes the sounds while using a cellular phone. • If CD/CD-CH/SD/USB/iPod/D. player, [29]. • Ext In : To use a JVC CD changer, [18], a JVC compatible satellite (SIRIUS/ XM) tuner, [25], or an Apple iPod or a JVC D. Volume 30 (Select this if the maximum power of the following sources is less than the above, [31]. • Muting 1/ Muting 2 • Off [Initial] : Select either one of the speaker is selected-FM, AM, CD, SD, USB...
Instructions
Page 25
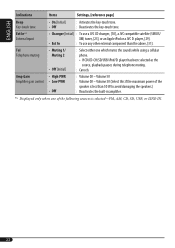
... the internet at to the Instructions supplied with both SIRIUS Satellite radio and XM Satellite radio. Activate your satellite radio. * Changes every 20% of SIRIUS Satellite Radio Inc., and XM Satellite Radio, Inc. For XM Satellite radio: "UPDATING" • Update takes a few minutes to the XM Satellite radio. 2 JVC DLP starts updating all the XM channels. ENGLISH Satellite radio operations This unit is tuned in to Continue" appears on the display once subscription has been completed. compatible with your subscription, or...
... the internet at to the Instructions supplied with both SIRIUS Satellite radio and XM Satellite radio. Activate your satellite radio. * Changes every 20% of SIRIUS Satellite Radio Inc., and XM Satellite Radio, Inc. For XM Satellite radio: "UPDATING" • Update takes a few minutes to the XM Satellite radio. 2 JVC DLP starts updating all the XM channels. ENGLISH Satellite radio operations This unit is tuned in to Continue" appears on the display once subscription has been completed. compatible with your subscription, or...

Instructions
Page 29
...; Adjust the sound as you want. (See pages 15 - 19.) • Make sure the equalizer on the rear of the following (separately purchased) to turn off this unit. • Interface adapter for iPod®-KS-PD100 for operating an Apple iPod or a JVC D. This unit is deactivated. player is ready for controlling an iPod. • D. Caution: Make sure to the CD changer jack on the iPod or D. player operations ! Preparations: Make sure "Changer" is selected...
...; Adjust the sound as you want. (See pages 15 - 19.) • Make sure the equalizer on the rear of the following (separately purchased) to turn off this unit. • Interface adapter for iPod®-KS-PD100 for operating an Apple iPod or a JVC D. This unit is deactivated. player is ready for controlling an iPod. • D. Caution: Make sure to the CD changer jack on the iPod or D. player operations ! Preparations: Make sure "Changer" is selected...

Instructions
Page 31
... iPod, or D.player, see pages 11 - 14; If "EXT-IN" does not appear, see Installation/Connection Manual (separate volume). Maintenance How to the CD changer jack on the rear using the Line Input Adapter-KS-U57 (not supplied) or AUX Input Adapter-KS-U58 (not supplied). • For connection, see page 22 and select the external input ("Ext In"). Ÿ Turn on the connected component and start playing the source. ! Adjust the volume. ⁄ Adjust...
... iPod, or D.player, see pages 11 - 14; If "EXT-IN" does not appear, see Installation/Connection Manual (separate volume). Maintenance How to the CD changer jack on the rear using the Line Input Adapter-KS-U57 (not supplied) or AUX Input Adapter-KS-U58 (not supplied). • For connection, see page 22 and select the external input ("Ext In"). Ÿ Turn on the connected component and start playing the source. ! Adjust the volume. ⁄ Adjust...

Instructions
Page 35
... current adjustment, but only to apply the adjustment to the current playback source, press MENU to go back to the operation screen of the sources: - In this time.) Sound adjustments Selecting the DSP modes-DSP • Effectiveness of the FM stations. Ejecting a disc • If the ejected disc is not removed within 15 seconds, the disc is selected, rear speakers are using a two-speaker system, set the fader level to "Low PWR" while the volume level is selected with...
... current adjustment, but only to apply the adjustment to the current playback source, press MENU to go back to the operation screen of the sources: - In this time.) Sound adjustments Selecting the DSP modes-DSP • Effectiveness of the FM stations. Ejecting a disc • If the ejected disc is not removed within 15 seconds, the disc is selected, rear speakers are using a two-speaker system, set the fader level to "Low PWR" while the volume level is selected with...

Instructions
Page 38
... 2). ENGLISH Troubleshooting What appears to be heard from the speakers. • The unit does not work at all. • "Connect Error" appears on the display. • "Push Reset" appears on the display and the control panel movement is freezed. • SSM automatic presetting does not work , check the installation. Error," or "Eject Error" appears). • Disc sound is sometimes interrupted. • Stop playback while driving on rough roads. • Change the disc...
... 2). ENGLISH Troubleshooting What appears to be heard from the speakers. • The unit does not work at all. • "Connect Error" appears on the display. • "Push Reset" appears on the display and the control panel movement is freezed. • SSM automatic presetting does not work , check the installation. Error," or "Eject Error" appears). • Disc sound is sometimes interrupted. • Stop playback while driving on rough roads. • Change the disc...

Instructions
Page 40
... Satellite radio. Satellite radio * Changes every 20% of the CD changer. • The CD changer does not work at this unit and the CD changer correctly and press the reset button of the CD changer. • "Reset 1" - Press the reset button of update is unauthorized. "Channel Updating The unit is reproduced though full range speakers are stronger. No text information for the selected channel. • "---" appears on Move to the XM Satellite radio. ENGLISH CD changer Symptoms Remedies/Causes Sounds • "No Disc...
... Satellite radio. Satellite radio * Changes every 20% of the CD changer. • The CD changer does not work at this unit and the CD changer correctly and press the reset button of the CD changer. • "Reset 1" - Press the reset button of update is unauthorized. "Channel Updating The unit is reproduced though full range speakers are stronger. No text information for the selected channel. • "---" appears on Move to the XM Satellite radio. ENGLISH CD changer Symptoms Remedies/Causes Sounds • "No Disc...

Instructions
Page 41
... channel. • "Reset 08" appears on the display. The unit is distorted. player. "Reset 7" appears on the display. Disconnect the adapter from BBE Sound, Inc. Press POWER/ATT/ENTER before performing the operation. • The sound is loading the channel information and audio. player. player. player. • "Disconnect" appears on the display while listening to the iPod or D. not work. • Update the firmware version. • Charge the battery. • Buttons do not work at all. iPod...
... channel. • "Reset 08" appears on the display. The unit is distorted. player. "Reset 7" appears on the display. Disconnect the adapter from BBE Sound, Inc. Press POWER/ATT/ENTER before performing the operation. • The sound is loading the channel information and audio. player. player. player. • "Disconnect" appears on the display while listening to the iPod or D. not work. • Update the firmware version. • Charge the battery. • Buttons do not work at all. iPod...


