Instructions
Page 2
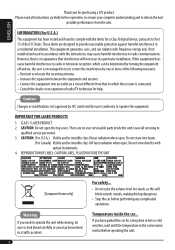
... B digital device, pursuant to Part 15 of the following measures: - CAUTION: Do not open . Consult the dealer or an experienced radio/TV technician for a long time in hot or cold weather, wait until the temperature in the car becomes normal before operating the unit. CLASS 1 LASER PRODUCT 2. Do not view directly with the instructions, may be involved in a particular installation. If...
... B digital device, pursuant to Part 15 of the following measures: - CAUTION: Do not open . Consult the dealer or an experienced radio/TV technician for a long time in hot or cold weather, wait until the temperature in the car becomes normal before operating the unit. CLASS 1 LASER PRODUCT 2. Do not view directly with the instructions, may be involved in a particular installation. If...
Instructions
Page 3
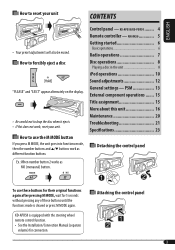
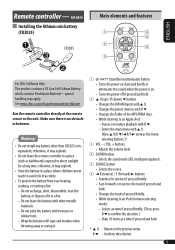
... assignment 15 More about this does not work as MO (monaural) button. Ex.:When number button 2 works as different function buttons. RM-RK50 5 Getting started 6 Basic operations 6 Radio operations 7 Disc operations 8 Playing a disc in the unit 8 iPod operations 10 Sound adjustments 12 General settings - How to use these buttons until the functions mode is cleared or press M MODE again. Control panel - KD-APD58 is equipped with the steering wheel remote control function. • See the Installation/Connection Manual (separate volume) for 5 seconds without pressing any of...
... assignment 15 More about this does not work as MO (monaural) button. Ex.:When number button 2 works as different function buttons. RM-RK50 5 Getting started 6 Basic operations 6 Radio operations 7 Disc operations 8 Playing a disc in the unit 8 iPod operations 10 Sound adjustments 12 General settings - How to use these buttons until the functions mode is cleared or press M MODE again. Control panel - KD-APD58 is equipped with the steering wheel remote control function. • See the Installation/Connection Manual (separate volume) for 5 seconds without pressing any of...
Instructions
Page 4
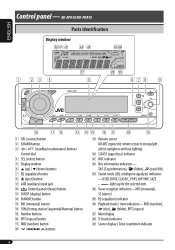
... dial 4 SEL (select) button 5 Display window 6 5 (up for the selected item. TAG (Tag information), (folder), (track/file) d Sound mode (iEQ: intelligent equalizer) indicators -USER, ROCK, CLASSIC, POPS, HIP HOP, JAZZ • lights up ) / ∞ (down) buttons 7 EQ (equalizer) button 8 0 (eject) button 9 AUX (auxiliary) input jack p (control panel release) button q D DISP (display) button w M MODE button e MO (monaural) button r SSM (Strong-station Sequential Memory) button t Number buttons y RPT (repeat) button u RND (random) button i 4/¢ buttons o Remote sensor DO NOT...
... dial 4 SEL (select) button 5 Display window 6 5 (up for the selected item. TAG (Tag information), (folder), (track/file) d Sound mode (iEQ: intelligent equalizer) indicators -USER, ROCK, CLASSIC, POPS, HIP HOP, JAZZ • lights up ) / ∞ (down) buttons 7 EQ (equalizer) button 8 0 (eject) button 9 AUX (auxiliary) input jack p (control panel release) button q D DISP (display) button w M MODE button e MO (monaural) button r SSM (Strong-station Sequential Memory) button t Number buttons y RPT (repeat) button u RND (random) button i 4/¢ buttons o Remote sensor DO NOT...
Instructions
Page 5
... to an iPod (in a place (such as the menu selecting buttons.)* 3 VOL - / VOL + buttons • Adjusts the volume level. 4 SOUND button • Selects the sound mode (iEQ: intelligent equalizer). 5 SOURCE button • Selects the source. 6 2 R (reverse) / F (forward) 3 buttons • Searches for a long time; Do not leave the battery with tape and insulate when throwing away or saving it may apply. Skips 10 items at the remote sensor on . • Turns the power off if...
... to an iPod (in a place (such as the menu selecting buttons.)* 3 VOL - / VOL + buttons • Adjusts the volume level. 4 SOUND button • Selects the sound mode (iEQ: intelligent equalizer). 5 SOURCE button • Selects the source. 6 2 R (reverse) / F (forward) 3 buttons • Searches for a long time; Do not leave the battery with tape and insulate when throwing away or saving it may apply. Skips 10 items at the remote sensor on . • Turns the power off if...
Instructions
Page 6
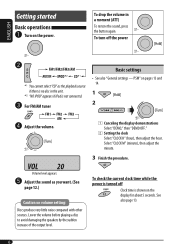
... Select "DEMO," then "DEMO OFF." 2 Setting the clock Select "CLOCK H" (hour), then adjust the hour. ENGLISH Getting started Basic operations ~ Turn on the display for about 5 seconds. For FM/AM tuner Basic settings • See also "General settings - See also page 13. 6 Lower the volume before playing a disc to avoid damaging the speakers by the sudden increase of the output level. Volume level appears. @ Adjust the sound as the playback source if there is not connected...
... Select "DEMO," then "DEMO OFF." 2 Setting the clock Select "CLOCK H" (hour), then adjust the hour. ENGLISH Getting started Basic operations ~ Turn on the display for about 5 seconds. For FM/AM tuner Basic settings • See also "General settings - See also page 13. 6 Lower the volume before playing a disc to avoid damaging the speakers by the sudden increase of the output level. Volume level appears. @ Adjust the sound as the playback source if there is not connected...
Instructions
Page 7
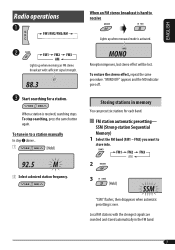
... is activated. Local FM stations with sufficient signal strength. ! "MONO OFF" appears and the MO indicator goes off. When a station is over. To restore the stereo effect, repeat the same procedure. FM3) you want to store into. 2 2 Select a desired station frequency. 3 "SSM" flashes, then disappears when automatic presetting is received, searching stops. ENGLISH Radio operations ~ Ÿ Lights up when monaural mode is hard to a station manually...
... is activated. Local FM stations with sufficient signal strength. ! "MONO OFF" appears and the MO indicator goes off. When a station is over. To restore the stereo effect, repeat the same procedure. FM3) you want to store into. 2 2 Select a desired station frequency. 3 "SSM" flashes, then disappears when automatic presetting is received, searching stops. ENGLISH Radio operations ~ Ÿ Lights up when monaural mode is hard to a station manually...
Instructions
Page 8
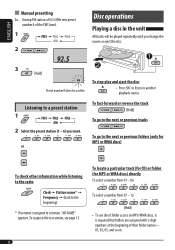
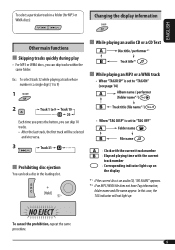
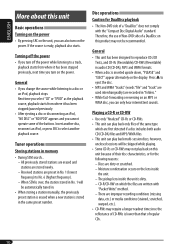
... track To go to the next or previous tracks 2 Select the preset station (1 - 6) you change the source or eject the disc. 3 Preset number flashes for a while. To assign a title to a station, see page 15. 8 To locate a particular track (for CD) or folder (for MP3 or WMA discs) To check other information while listening to the radio Clock = Station name* = Frequency = (back to the beginning) * If no name is...
... track To go to the next or previous tracks 2 Select the preset station (1 - 6) you change the source or eject the disc. 3 Preset number flashes for a while. To assign a title to a station, see page 15. 8 To locate a particular track (for CD) or folder (for MP3 or WMA discs) To check other information while listening to the radio Clock = Station name* = Frequency = (back to the beginning) * If no name is...
Instructions
Page 9
..." is set to "TAG ON" (see page 14) 2 Each time you press the button, you can lock a disc in the loading slot. : Clock with the current track number : Elapsed playing time with the current track number : Corresponding indicator lights up . To cancel the prohibition, repeat the same procedure. 9 ENGLISH To select a particular track in a folder (for MP3 or WMA discs): Changing the display information...
..." is set to "TAG ON" (see page 14) 2 Each time you press the button, you can lock a disc in the loading slot. : Clock with the current track number : Elapsed playing time with the current track number : Corresponding indicator lights up . To cancel the prohibition, repeat the same procedure. 9 ENGLISH To select a particular track in a folder (for MP3 or WMA discs): Changing the display information...
Instructions
Page 10
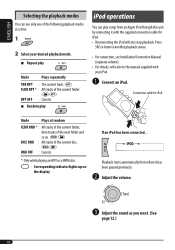
...; Adjust the volume. ! ENGLISH Selecting the playback modes You can play songs from where it with your desired playback mode. 7 Repeat play iPod operations You can use only one of the current folder. Press SRC to listen to another playback source. • For connection, see Installation/Connection Manual (separate volume). • For details, refer also to the manual supplied with the supplied connection cable for iPod Mode Plays at a time. 1 2 Select your iPod. ~ Connect an iPod. If...
...; Adjust the volume. ! ENGLISH Selecting the playback modes You can play songs from where it with your desired playback mode. 7 Repeat play iPod operations You can use only one of the current folder. Press SRC to listen to another playback source. • For connection, see Installation/Connection Manual (separate volume). • For details, refer also to the manual supplied with the supplied connection cable for iPod Mode Plays at a time. 1 2 Select your iPod. ~ Connect an iPod. If...

Instructions
Page 12
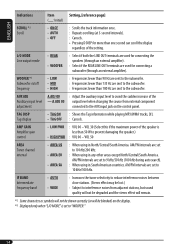
... and rear speaker balance. MID *2 (mid-range), [-06 to 08, initial: 04] Adjust the subwoofer output level. SUB.W *1 (subwoofer), [00 to +06] Adjust the mid-range frequencies sound level. VOL (volume), [00 to 30 or 50 *6] Adjust the volume. *1 Displayed only when "L/O MODE" is set to "WOOFER" (see page 14). *2 When you adjust the bass, mid-range, treble, or super bass, the adjustment you have made is stored for the currently selected sound mode (iEQ) including "USER." *3 If...
... and rear speaker balance. MID *2 (mid-range), [-06 to 08, initial: 04] Adjust the subwoofer output level. SUB.W *1 (subwoofer), [00 to +06] Adjust the mid-range frequencies sound level. VOL (volume), [00 to 30 or 50 *6] Adjust the volume. *1 Displayed only when "L/O MODE" is set to "WOOFER" (see page 14). *2 When you adjust the bass, mid-range, treble, or super bass, the adjustment you have made is stored for the currently selected sound mode (iEQ) including "USER." *3 If...
Instructions
Page 13
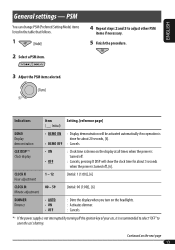
...; DEMO ON : Display demonstration will show the clock time for about 5 seconds when the power is turned off the ignition key of your car, it is done for about 20 seconds, [6]. • DEMO OFF : Cancels. ENGLISH General settings - PSM You can change PSM (Preferred Setting Mode) items listed in the table that follows. 1 2 Select a PSM item. 4 Repeat steps 2 and 3 to save the car's battery. CLOCK H Hour adjustment...
...; DEMO ON : Display demonstration will show the clock time for about 5 seconds when the power is turned off the ignition key of your car, it is done for about 20 seconds, [6]. • DEMO OFF : Cancels. ENGLISH General settings - PSM You can change PSM (Preferred Setting Mode) items listed in the table that follows. 1 2 Select a PSM item. 4 Repeat steps 2 and 3 to save the car's battery. CLOCK H Hour adjustment...
Instructions
Page 14
... connecting a subwoofer (through an external amplifier). : Select if the REAR LINE OUT terminals are set to 10 kHz/200 kHz. : When using in North/Central/South America. L/O MODE Line output mode • REAR • WOOFER : Select if both the LINE OUT terminals are used for more than one second can scroll the display regardless of the setting. VOL 30 (Select this if the maximum power of the Auxiliary input level...
... connecting a subwoofer (through an external amplifier). : Select if the REAR LINE OUT terminals are set to 10 kHz/200 kHz. : When using in North/Central/South America. L/O MODE Line output mode • REAR • WOOFER : Select if both the LINE OUT terminals are used for more than one second can scroll the display regardless of the setting. VOL 30 (Select this if the maximum power of the Auxiliary input level...
Instructions
Page 15
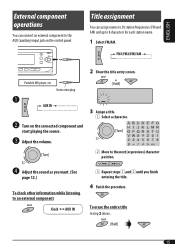
.... ⁄ Adjust the sound as you want. (See page 12.) To check other information while listening to the AUX (auxiliary) input jack on the connected component and start playing the source. ! To erase the entire title In step 2 above... 15 Portable MD player, etc Stereo mini plug ~ Ÿ Turn on the control panel. ENGLISH External component operations You can assign names to 30 station frequencies (FM and...
.... ⁄ Adjust the sound as you want. (See page 12.) To check other information while listening to the AUX (auxiliary) input jack on the connected component and start playing the source. ! To erase the entire title In step 2 above... 15 Portable MD player, etc Stereo mini plug ~ Ÿ Turn on the control panel. ENGLISH External component operations You can assign names to 30 station frequencies (FM and...
Instructions
Page 16
..., the station stored in the same preset number. Moisture condensation occurs on the lens inside the unit is ready, playback also starts. General • If you change the source while listening to select another disc, reconnect an iPod, or press SRC to a disc or an iPod, playback stops. The pickup lens inside the unit. - Disc operations Caution for the following reasons: - Discs are preset in audio CD (CD-DA...
..., the station stored in the same preset number. Moisture condensation occurs on the lens inside the unit is ready, playback also starts. General • If you change the source while listening to select another disc, reconnect an iPod, or press SRC to a disc or an iPod, playback stops. The pickup lens inside the unit. - Disc operations Caution for the following reasons: - Discs are preset in audio CD (CD-DA...
Instructions
Page 17
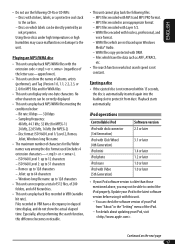
... iPod to control the iPod properly. Disc format: ISO 9660 Level 1/ Level 2, Romeo, Joliet, Windows long file name • The maximum number of the iPod. - Especially, after performing the search function, this unit. - MP3 files encoded with MP3i and MP3 PRO format. - WMA files which have a discrepancy in elapsed time display, and do not show the names of 8 hierarchies. • This unit can play...
... iPod to control the iPod properly. Disc format: ISO 9660 Level 1/ Level 2, Romeo, Joliet, Windows long file name • The maximum number of the iPod. - Especially, after performing the search function, this unit. - MP3 files encoded with MP3i and MP3 PRO format. - WMA files which have a discrepancy in elapsed time display, and do not show the names of 8 hierarchies. • This unit can play...
Instructions
Page 18
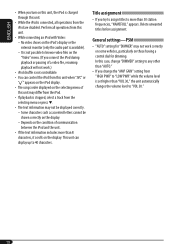
... a control dial for "DIMMER" may not be shown correctly on the display. Delete unwanted titles before assignment. General settings-PSM • "AUTO" setting for dimming. No video shows on the iPod's display or the external monitor (only the audio part is connected, all operations from this unit when "JVC" or " " appears on the iPod display. • The songs order displayed on the selecting menu of communication between the iPod and the unit...
... a control dial for "DIMMER" may not be shown correctly on the display. Delete unwanted titles before assignment. General settings-PSM • "AUTO" setting for dimming. No video shows on the iPod's display or the external monitor (only the audio part is connected, all operations from this unit when "JVC" or " " appears on the iPod display. • The songs order displayed on the selecting menu of communication between the iPod and the unit...

Instructions
Page 20
... center holder of the case and lift the disc out, holding it with the printed surface facing up). • Make sure to store discs into its case, gently insert the disc around the inner and outer edges. ENGLISH Maintenance How to clean discs. To minimize this case, eject the disc and leave the unit turned on label Unusual shape Single...
... center holder of the case and lift the disc out, holding it with the printed surface facing up). • Make sure to store discs into its case, gently insert the disc around the inner and outer edges. ENGLISH Maintenance How to clean discs. To minimize this case, eject the disc and leave the unit turned on label Unusual shape Single...
Instructions
Page 21
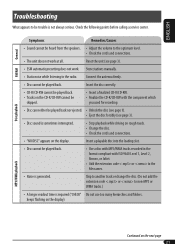
... not work at all. Insert the disc correctly. • CD-R/CD-RW cannot be played back. • Tracks on the display. Skip to another track or change the disc. (Do not add the extension code or to be played back. Reset the unit (see page 3). • Disc sound is sometimes interrupted. • Stop playback while driving on rough roads. • Change the disc. • Check the cords and connections...
... not work at all. Insert the disc correctly. • CD-R/CD-RW cannot be played back. • Tracks on the display. Skip to another track or change the disc. (Do not add the extension code or to be played back. Reset the unit (see page 3). • Disc sound is sometimes interrupted. • Stop playback while driving on rough roads. • Change the disc. • Check the cords and connections...
Instructions
Page 22
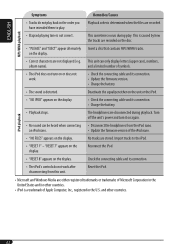
... the unit's power and turn on the display. Reset the iPod. • Microsoft and Windows Media are recorded on the display. • Check the connecting cable and its connection. • The iPod's controls do not play back in the U.S. ENGLISH MP3/WMA playback Symptoms Remedies/Causes • Tracks do not work . • Check the connecting cable and its connection. • Update the firmware version. • Charge the battery. • The sound...
... the unit's power and turn on the display. Reset the iPod. • Microsoft and Windows Media are recorded on the display. • Check the connecting cable and its connection. • The iPod's controls do not play back in the U.S. ENGLISH MP3/WMA playback Symptoms Remedies/Causes • Tracks do not work . • Check the connecting cable and its connection. • Update the firmware version. • Charge the battery. • The sound...
Instructions
Page 23
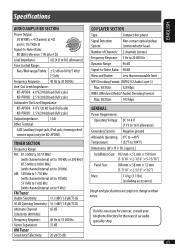
... Line-Out Level/Impedance: KD-APD58: 4.0 V/20 kΩ load (full scale) KD-PDR50: 2.5 V/20 kΩ load (full scale) Subwoofer-Out Level/Impedance: KD-APD58: 4.0 V /20 kΩ load (full scale) KD-PDR50: 2.5 V/20 kΩ load (full scale) Output Impedance: 1 kΩ Other Terminal: AUX (auxiliary) input jack, iPod jack, steering wheel remote input (only for the nearest car audio speciality shop. 23 Bit Rate: 192 kbps GENERAL Power Requirement: Operating Voltage: DC...
... Line-Out Level/Impedance: KD-APD58: 4.0 V/20 kΩ load (full scale) KD-PDR50: 2.5 V/20 kΩ load (full scale) Subwoofer-Out Level/Impedance: KD-APD58: 4.0 V /20 kΩ load (full scale) KD-PDR50: 2.5 V/20 kΩ load (full scale) Output Impedance: 1 kΩ Other Terminal: AUX (auxiliary) input jack, iPod jack, steering wheel remote input (only for the nearest car audio speciality shop. 23 Bit Rate: 192 kbps GENERAL Power Requirement: Operating Voltage: DC...


