Separate volume1
Page 1
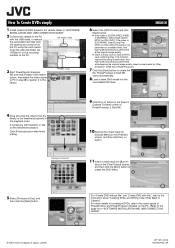
...] screen, and then click the [Burn] button to PC in the playback order. For details, Refer to "SOFTWARE INSTALLATION AND USB CONNECTION GUIDE". 2 Connect the camera to the PC with title", refer to the instruction sheet "Creating DVDs and Writing Video Files Back to the library. PowerProducer 2 Gold NE starts automatically...
...] screen, and then click the [Burn] button to PC in the playback order. For details, Refer to "SOFTWARE INSTALLATION AND USB CONNECTION GUIDE". 2 Connect the camera to the PC with title", refer to the instruction sheet "Creating DVDs and Writing Video Files Back to the library. PowerProducer 2 Gold NE starts automatically...
Separate volume1
Page 1
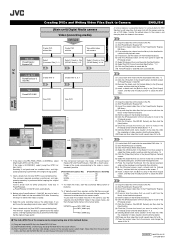
...NE starts automatically. Be sure to create the DVDVideo. EXTMOV MOV_0001.mpg MOV_0002.mpg : MOV_9999.mpg ■ The video MOD file of the camera can be sure to make ] in the [Produce] screen and click [Next] button. *4, 5 (9) Clicking [Start] button starts creation of... files] button in the [Import/Capture Content] screen. (6) Select the video file that were shot with camera Select [Produce a Disc] *1, 2 A Select [Create a File (GZ-MC Series)] *4, 5 C Select [Create a File (GZ-MC Series)] *4, 5, 8 E Write back A brief procedure is presented below . After the completion of...
...NE starts automatically. Be sure to create the DVDVideo. EXTMOV MOV_0001.mpg MOV_0002.mpg : MOV_9999.mpg ■ The video MOD file of the camera can be sure to make ] in the [Produce] screen and click [Next] button. *4, 5 (9) Clicking [Start] button starts creation of... files] button in the [Import/Capture Content] screen. (6) Select the video file that were shot with camera Select [Produce a Disc] *1, 2 A Select [Create a File (GZ-MC Series)] *4, 5 C Select [Create a File (GZ-MC Series)] *4, 5, 8 E Write back A brief procedure is presented below . After the completion of...

Separate volume2
Page 1
...image is displayed. ● If [CHECK SETTINGS] is selected to turn on the index screen. Removable hard disks: Microdrive® from Hitachi, JVC Microdrive® (CUMD04) CompactFlash cards: By LEXAR, SanDisk and Hagiwara Sys-com SD memory cards: By Panasonic, TOSHIBA and SanDisk ● If... recording Do not cover the area near the lens, stereo microphone, camera sensor, flash, or flash sensor with caution. Operation is restored once any object while recording. when recording. GZ-MC200 MENU Power Switch r 49 GZ-MC100 wr MENU Lock Button Power Switch 49 te 8 Take care to...
...image is displayed. ● If [CHECK SETTINGS] is selected to turn on the index screen. Removable hard disks: Microdrive® from Hitachi, JVC Microdrive® (CUMD04) CompactFlash cards: By LEXAR, SanDisk and Hagiwara Sys-com SD memory cards: By Panasonic, TOSHIBA and SanDisk ● If... recording Do not cover the area near the lens, stereo microphone, camera sensor, flash, or flash sensor with caution. Operation is restored once any object while recording. when recording. GZ-MC200 MENU Power Switch r 49 GZ-MC100 wr MENU Lock Button Power Switch 49 te 8 Take care to...

Separate volume1
Page 1
... (recording media) USB transfer Create DVD without title Create DVD with title View edited video with camera Select [Produce a Disc] *1, 2 A Select [Create a File (GZ-MC Series)] *4, 5 C Select [Create a File (GZ-MC Series)] *4, 5, 8 E Write back A brief procedure is presented below for using CyberLink DVD Solution to edit video files that were shot with the...
... (recording media) USB transfer Create DVD without title Create DVD with title View edited video with camera Select [Produce a Disc] *1, 2 A Select [Create a File (GZ-MC Series)] *4, 5 C Select [Create a File (GZ-MC Series)] *4, 5, 8 E Write back A brief procedure is presented below for using CyberLink DVD Solution to edit video files that were shot with the...

Instructions
Page 1
.... EN LYT1332-001B See page 32 for future reference. which is located on the bottom of the camera. Model No. Retain this information for details. and Serial No. Serial No. Basic Edition DIGITAL MEDIA CAMERA GZ-MC200 GETTING STARTED ENGLISH 6 BASIC OPERATIONS (RECORDING & PLAYBACK) 19 MENU SETTINGS 26 REFERENCES 32 To deactivate the demonstration...
.... EN LYT1332-001B See page 32 for future reference. which is located on the bottom of the camera. Model No. Retain this information for details. and Serial No. Serial No. Basic Edition DIGITAL MEDIA CAMERA GZ-MC200 GETTING STARTED ENGLISH 6 BASIC OPERATIONS (RECORDING & PLAYBACK) 19 MENU SETTINGS 26 REFERENCES 32 To deactivate the demonstration...
Instructions
Page 2
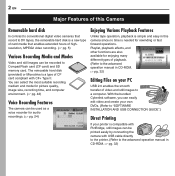
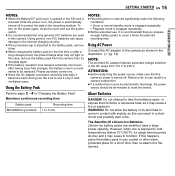
...printer is compatible with USB cable directly to the printer. (Refer to the advanced operation manual in this Camera Removable hard disk In contrast to conventional digital video cameras that record to DV tapes, the removable hard disk is a new type of card media that enables...needed for picture quality, image size, recording time, and computer environment. (੬ pg. 42) Voice Recording Features The camera can be printed easily by connecting the camera with PictBridge, still images can be recorded to "SOFTWARE INSTALLATION AND USB CONNECTION GUIDE".) Direct Printing If your PC USB ...
...printer is compatible with USB cable directly to the printer. (Refer to the advanced operation manual in this Camera Removable hard disk In contrast to conventional digital video cameras that record to DV tapes, the removable hard disk is a new type of card media that enables...needed for picture quality, image size, recording time, and computer environment. (੬ pg. 42) Voice Recording Features The camera can be printed easily by connecting the camera with PictBridge, still images can be recorded to "SOFTWARE INSTALLATION AND USB CONNECTION GUIDE".) Direct Printing If your PC USB ...

Instructions
Page 3
...point within the product's enclosure that may be caused.) However, live recording and LCD monitor playback are possible anywhere. ● Use the JVC BN-VM200U battery pack and, to recharge it has sufficient space on all sides to the presence of important operating and maintenance (servicing) instructions...rear). Do not use the provided multi-voltage AC adapter. (An appropriate conversion adapter may be exposed to the camera from an AC outlet, use this digital media camera. Also do not place any containers filled with water or liquids (such as lighted candles, should be used ...
...point within the product's enclosure that may be caused.) However, live recording and LCD monitor playback are possible anywhere. ● Use the JVC BN-VM200U battery pack and, to recharge it has sufficient space on all sides to the presence of important operating and maintenance (servicing) instructions...rear). Do not use the provided multi-voltage AC adapter. (An appropriate conversion adapter may be exposed to the camera from an AC outlet, use this digital media camera. Also do not place any containers filled with water or liquids (such as lighted candles, should be used ...
Instructions
Page 4
...to avoid injury from tip-over , causing serious damage to qualified service personnel. The following notes concern possible physical damage to the camera and to 39. Heed all instructions. 5. Use only with the cart, stand, tripod, bracket, or table specified by the manufacturer...exhibition for personal enjoyment, it on unsteady or unlevel surfaces. Follow all warnings. 4. Any commercial use a tripod on top of time. 12. Read these instructions. 3. Do not use caution when moving the cart/ apparatus combination to rain or moisture, does not operate normally, ...
...to avoid injury from tip-over , causing serious damage to qualified service personnel. The following notes concern possible physical damage to the camera and to 39. Heed all instructions. 5. Use only with the cart, stand, tripod, bracket, or table specified by the manufacturer...exhibition for personal enjoyment, it on unsteady or unlevel surfaces. Follow all warnings. 4. Any commercial use a tripod on top of time. 12. Read these instructions. 3. Do not use caution when moving the cart/ apparatus combination to rain or moisture, does not operate normally, ...

Instructions
Page 5
... disk in this only modifies the file management information, and the data is a precision electronic device. Cautions for temperature ● The camera's protection circuit may be unable to break down during shooting, playback, or when otherwise accessing the recording medium. ● Do not ...responsibility to physically or magnetically destroy the data on . ● Manufactured under license from the camera, store it by the release of sensitive information, it cannot be read. JVC shall not be responsible for an extended period. Use a USB cable to completely delete data ...
... disk in this only modifies the file management information, and the data is a precision electronic device. Cautions for temperature ● The camera's protection circuit may be unable to break down during shooting, playback, or when otherwise accessing the recording medium. ● Do not ...responsibility to physically or magnetically destroy the data on . ● Manufactured under license from the camera, store it by the release of sensitive information, it cannot be read. JVC shall not be responsible for an extended period. Use a USB cable to completely delete data ...

Instructions
Page 7
.... 21) Y LCD Monitor Z Battery/CF Card Cover (੬ pg. 14, 16) a Flash Sensor b Camera Sensor c Flash d Lens e SD Card Cover [MEMORY CARD] (੬ pg. 16) f Tripod Mounting Socket g Hand Strap Eyelet (੬ pg. 12) h Lens Cap Eyelet (੬ pg. 12) Connectors The connectors are located beneath the covers. O USB (Universal Serial Bus) Connector...
.... 21) Y LCD Monitor Z Battery/CF Card Cover (੬ pg. 14, 16) a Flash Sensor b Camera Sensor c Flash d Lens e SD Card Cover [MEMORY CARD] (੬ pg. 16) f Tripod Mounting Socket g Hand Strap Eyelet (੬ pg. 12) h Lens Cap Eyelet (੬ pg. 12) Connectors The connectors are located beneath the covers. O USB (Universal Serial Bus) Connector...

Instructions
Page 11
.../Audio/Video Cable Medium: USB cable Small: audio extension cable and AC adapter's cord NOTES: ● In order to maintain optimum performance of the camera, provided cables may be equipped with one or more core filter. x 4 If a cable has only one core filter, the end that is closest... S-Video/Audio/Video Cable D USB Cable E Removable Hard Disk (4 GB) F Protective Case for Removable Hard Disk G Hand Strap (See page 12 for attachment) H Lens Cap (See page 12 for attachment) I CD-ROM J Audio Extension Cable (for optional headphone, see page 13 for attachment) K Core Filter for cables (See page...
.../Audio/Video Cable Medium: USB cable Small: audio extension cable and AC adapter's cord NOTES: ● In order to maintain optimum performance of the camera, provided cables may be equipped with one or more core filter. x 4 If a cable has only one core filter, the end that is closest... S-Video/Audio/Video Cable D USB Cable E Removable Hard Disk (4 GB) F Protective Case for Removable Hard Disk G Hand Strap (See page 12 for attachment) H Lens Cap (See page 12 for attachment) I CD-ROM J Audio Extension Cable (for optional headphone, see page 13 for attachment) K Core Filter for cables (See page...

Instructions
Page 12
Tighten the strap at your arm through the loop. NOTE: To confirm the lens cap is on correctly make sure the cap is flush to the camera as shown in the illustration. Attaching the Lens Cap To protect the lens, attach the provided lens cap to the camera. NOTE: When carrying the camera, pass your wrist by sliding the buckle. 12 EN GETTING STARTED Attaching the Hand Strap 1 Thread the end of the strap through the eyelet. 2 Pass the other end through the strap to prevent dropping the camera.
Tighten the strap at your arm through the loop. NOTE: To confirm the lens cap is on correctly make sure the cap is flush to the camera as shown in the illustration. Attaching the Lens Cap To protect the lens, attach the provided lens cap to the camera. NOTE: When carrying the camera, pass your wrist by sliding the buckle. 12 EN GETTING STARTED Attaching the Hand Strap 1 Thread the end of the strap through the eyelet. 2 Pass the other end through the strap to prevent dropping the camera.

Instructions
Page 13
... care not to damage the cable. ● When connecting a cable, attach the end with a core filter attached), then connect the audio extension cable to the camera. How to Use the Audio Extension Cable When using optional headphones, connect to the provided audio extension cable (with the core filter to the cables... on both ends of cable between the cable plug and the core filter. GETTING STARTED Attaching the Core Filter Attach the core filters to the camera. GETTING STARTED EN 13 3 Close the core filter until it is not slack.
... care not to damage the cable. ● When connecting a cable, attach the end with a core filter attached), then connect the audio extension cable to the camera. How to Use the Audio Extension Cable When using optional headphones, connect to the provided audio extension cable (with the core filter to the cables... on both ends of cable between the cable plug and the core filter. GETTING STARTED Attaching the Core Filter Attach the core filters to the camera. GETTING STARTED EN 13 3 Close the core filter until it is not slack.

Instructions
Page 14
... to indicate charging has started. 7 When the power/charge lamp goes out, charging is finished. Unplug the AC adapter from the camera. 14 EN GETTING STARTED Power This camera's 2-way power supply system lets you choose the most appropriate source of the arrow A, then open the battery/CF card cover. 3 ...locks into space as shown in the illustration. 4 Close the battery/CF card cover firmly until it locks. 5 Connect the AC adapter to the camera. 6 Plug the AC adapter into an AC outlet. Do not use provided power supply units with other equipment. Disconnect the AC adapter from the AC...
... to indicate charging has started. 7 When the power/charge lamp goes out, charging is finished. Unplug the AC adapter from the camera. 14 EN GETTING STARTED Power This camera's 2-way power supply system lets you choose the most appropriate source of the arrow A, then open the battery/CF card cover. 3 ...locks into space as shown in the illustration. 4 Close the battery/CF card cover firmly until it locks. 5 Connect the AC adapter to the camera. 6 Plug the AC adapter into an AC outlet. Do not use provided power supply units with other equipment. Disconnect the AC adapter from the AC...
Instructions
Page 15
...shown in the illustration. (੬ pg. 14) NOTE: The provided AC adapter features automatic voltage selection in the AC range from the camera, then try charging again. ● If the battery operation time remains extremely short even after a long storage period, the power/charge lamp... When charging the battery pack for a short time, then re-attach it is recommended that you prepare enough battery packs to the camera. Using generic non-JVC batteries can result in "Charging the Battery Pack". NOTES: ● Recording time is reduced significantly under the following conditions: •...
...shown in the illustration. (੬ pg. 14) NOTE: The provided AC adapter features automatic voltage selection in the AC range from the camera, then try charging again. ● If the battery operation time remains extremely short even after a long storage period, the power/charge lamp... When charging the battery pack for a short time, then re-attach it is recommended that you prepare enough battery packs to the camera. Using generic non-JVC batteries can result in "Charging the Battery Pack". NOTES: ● Recording time is reduced significantly under the following conditions: •...
Instructions
Page 16
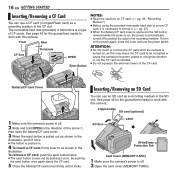
... CF card (CompactFlash card) as a recording medium in the recording medium. SD Slot Label Write/Erase Protection Tab Card Cover (MEMORY CARD) 1 Make sure the camera's power is turned on CF card. (੬ pg. 38, "Recording Medium") ● Before using the provided removable hard disk or a new CF card, ...pushed in the CF slot. To remove a CF card, push the eject button twice. ● The eject button comes out by pushing it as this camera. The removable hard disk (provided) or Microdrive is a type of the arrow A, then open the battery/CF card cover. 3 When the eject button...
... CF card (CompactFlash card) as a recording medium in the recording medium. SD Slot Label Write/Erase Protection Tab Card Cover (MEMORY CARD) 1 Make sure the camera's power is turned on CF card. (੬ pg. 38, "Recording Medium") ● Before using the provided removable hard disk or a new CF card, ...pushed in the CF slot. To remove a CF card, push the eject button twice. ● The eject button comes out by pushing it as this camera. The removable hard disk (provided) or Microdrive is a type of the arrow A, then open the battery/CF card cover. 3 When the eject button...

Instructions
Page 17
...card cover. To record on this may cause the SD card to be corrupted or cause the camera to become unable to recognize whether or not the SD card is installed. To protect valuable files... Slide the write/erase protection tab on the reverse side of "LOCK". DIS CAMERA SETTING BASIC SETTING MEMORY CARD SETTING DISPLAY QUALITY WIDE MODE 4 Press rt to select [IMAGE MODE], and...the card. (੬ pg. 26, 27) ATTENTION: Do not insert or remove the SD card while the camera is turned on the switch. 2 Press MENU. COPY/MOVE NO. This prevents the SD card from being ...
...card cover. To record on this may cause the SD card to be corrupted or cause the camera to become unable to recognize whether or not the SD card is installed. To protect valuable files... Slide the write/erase protection tab on the reverse side of "LOCK". DIS CAMERA SETTING BASIC SETTING MEMORY CARD SETTING DISPLAY QUALITY WIDE MODE 4 Press rt to select [IMAGE MODE], and...the card. (੬ pg. 26, 27) ATTENTION: Do not insert or remove the SD card while the camera is turned on the switch. 2 Press MENU. COPY/MOVE NO. This prevents the SD card from being ...

Instructions
Page 18
...pg. 26, 27) 1 Set the power switch to or while pressing down the lock button located on the picture at the most convenient angle. CAMERA SETTING BASIC SETTEING MEMORY CARD SETTING DISPLAY QUALITY WIDE MODE WIND CUT 4 Press rt to select [DISPLAY], and press 49. Then perform the date/...battery will become discharged and the date/time stored in memory will be used without setting the date/time. When this occurs, first connect the camera to charge the clock's rechargeable lithium battery. The lens part can be lost. The menu screen appears. 3 Press rt to select [CLOCK ADJUST...
...pg. 26, 27) 1 Set the power switch to or while pressing down the lock button located on the picture at the most convenient angle. CAMERA SETTING BASIC SETTEING MEMORY CARD SETTING DISPLAY QUALITY WIDE MODE WIND CUT 4 Press rt to select [DISPLAY], and press 49. Then perform the date/...battery will become discharged and the date/time stored in memory will be used without setting the date/time. When this occurs, first connect the camera to charge the clock's rechargeable lithium battery. The lens part can be lost. The menu screen appears. 3 Press rt to select [CLOCK ADJUST...

Instructions
Page 19
...mode (੬ pg. 24) 3 Auto/Manual Mode Mode Lamp Press e ( ) to or while pressing down the lock button. Playback Recording Power off the camera, set the power switch to switch the auto/manual recording mode. Auto mode: You can record using the power switch, MODE and e ( ) buttons. ...Manual mode: Manual recording is selected, the indicator appears on the camera, set the power switch to OFF. 1 Power Switch 2 Recording/Playback Mode Press MODE to your preference using no special effects or manual adjustments.
...mode (੬ pg. 24) 3 Auto/Manual Mode Mode Lamp Press e ( ) to or while pressing down the lock button. Playback Recording Power off the camera, set the power switch to switch the auto/manual recording mode. Auto mode: You can record using the power switch, MODE and e ( ) buttons. ...Manual mode: Manual recording is selected, the indicator appears on the camera, set the power switch to OFF. 1 Power Switch 2 Recording/Playback Mode Press MODE to your preference using no special effects or manual adjustments.

Instructions
Page 20
... If you cannot delete the file. In this case, turn off automatically to the [EXTMOV] folder used for 5 minutes when using AC adapter, the camera enters the sleep mode (the access lamp lights and the LCD monitor turns off , see page 26. ● For approximate recording time, see pages ...instantaneous change the picture quality, see page 42. The tally lamp lights while recording is shot. ● To turn the camera on the PC. When using the battery pack, the camera is turned off and on again after recording, you press during recording or playback (video, still image or voice) for...
... If you cannot delete the file. In this case, turn off automatically to the [EXTMOV] folder used for 5 minutes when using AC adapter, the camera enters the sleep mode (the access lamp lights and the LCD monitor turns off , see page 26. ● For approximate recording time, see pages ...instantaneous change the picture quality, see page 42. The tally lamp lights while recording is shot. ● To turn the camera on the PC. When using the battery pack, the camera is turned off and on again after recording, you press during recording or playback (video, still image or voice) for...


