
User Guide
Page 2
... Types of Usable SD Card 13 Turning On the Unit 14 Clock Setting 15 Resetting the Clock 16 Changing the Display Language 17 Holding this Unit 17 Tripod Mounting 17 Using this Unit Overseas 18 Charging the Battery Pack Overseas 18 Setting the Clock to Local Time when Traveling 19 Setting Daylight Saving Time 19 Optional Accessories 20 Recording Taking Videos in Auto Mode 21 Zooming 22 Manual Recording 23 Scene Selection 24 Adjusting Focus Manually...
... Types of Usable SD Card 13 Turning On the Unit 14 Clock Setting 15 Resetting the Clock 16 Changing the Display Language 17 Holding this Unit 17 Tripod Mounting 17 Using this Unit Overseas 18 Charging the Battery Pack Overseas 18 Setting the Clock to Local Time when Traveling 19 Setting Daylight Saving Time 19 Optional Accessories 20 Recording Taking Videos in Auto Mode 21 Zooming 22 Manual Recording 23 Scene Selection 24 Adjusting Focus Manually...
User Guide
Page 6
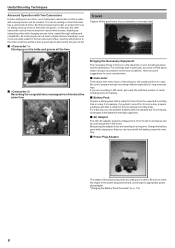
... time. As most people own at least a digital camera nowadays, even if you are really unable to find an extra camcorder, inserting still pictures to the video at various points is to be done, record using two camcorders so that you plan to bring the appropriate power plug adapter. o Closing up shots of your consideration. o Recording the congratulatory messages from 110 V to prepare enough recording...
... time. As most people own at least a digital camera nowadays, even if you are really unable to find an extra camcorder, inserting still pictures to the video at various points is to be done, record using two camcorders so that you plan to bring the appropriate power plug adapter. o Closing up shots of your consideration. o Recording the congratulatory messages from 110 V to prepare enough recording...
User Guide
Page 12
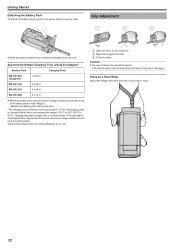
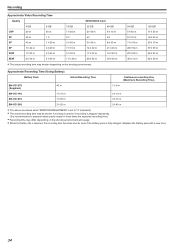
...sure to detach the battery from this unit may take a longer time or it around your wrist. 12 .. . "Approximate Recording Time (Using Battery)" (A p. 34) A Open the lever on the strap lock B Adjust the length of ...used at low temperature. Approximate Battery Charging Time (Using AC Adapter) Battery Pack Charging Time BN-VG107U (Supplied) 1 h 50 m BN-VG114U 2 h 30 m BN-VG121U 3 h 30 m BN-VG138U 6 h 10 m 0 When the battery life is reached, the recording time becomes shorter even if the battery pack is fully charged. (Replace the battery pack with a new one.) *The charging time...
...sure to detach the battery from this unit may take a longer time or it around your wrist. 12 .. . "Approximate Recording Time (Using Battery)" (A p. 34) A Open the lever on the strap lock B Adjust the length of ...used at low temperature. Approximate Battery Charging Time (Using AC Adapter) Battery Pack Charging Time BN-VG107U (Supplied) 1 h 50 m BN-VG114U 2 h 30 m BN-VG121U 3 h 30 m BN-VG138U 6 h 10 m 0 When the battery life is reached, the recording time becomes shorter even if the battery pack is fully charged. (Replace the battery pack with a new one.) *The charging time...
User Guide
Page 13
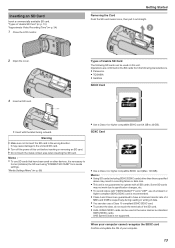
... media settings. "Media Settings Menu" (A p. 66) 0 Use a Class 4 or higher compatible SDHC card (4 GB to insert the SD card in recording failure or data loss. 0 This unit is recommended. 0 Class 4 and Class 6 are confirmed on other than those specified above may cause damage to specification changes, etc. 0 To record videos with all SD cards. Some SD cards may not work due to the unit and SD card. 0 Turn off the power...
... media settings. "Media Settings Menu" (A p. 66) 0 Use a Class 4 or higher compatible SDHC card (4 GB to insert the SD card in recording failure or data loss. 0 This unit is recommended. 0 Class 4 and Class 6 are confirmed on other than those specified above may cause damage to specification changes, etc. 0 To record videos with all SD cards. Some SD cards may not work due to the unit and SD card. 0 Turn off the power...
User Guide
Page 20
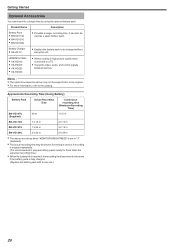
... above are values when "MONITOR BRIGHTNESS" is set to "3" (standard). 0 The actual recording time may not be used or if recording is stopped repeatedly. (It is fully charged. (Replace the battery pack with a new one.) 20 HDMI Mini Cable 0 VX-HD310 0 VX-HD315 0 VX-HD320 0 VX-HD330 0 Allows viewing in some regions. 0 For more information, refer to a TV. 0 Transmits video, audio, and control signals between...
... above are values when "MONITOR BRIGHTNESS" is set to "3" (standard). 0 The actual recording time may not be used or if recording is stopped repeatedly. (It is fully charged. (Replace the battery pack with a new one.) 20 HDMI Mini Cable 0 VX-HD310 0 VX-HD315 0 VX-HD320 0 VX-HD330 0 Allows viewing in some regions. 0 For more information, refer to a TV. 0 Transmits video, audio, and control signals between...
User Guide
Page 21
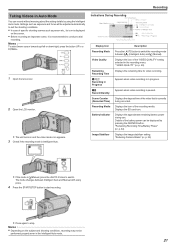
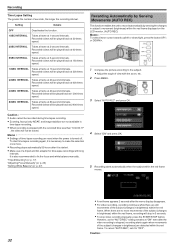
...Time) Recording Media Battery Indicator Image Stabilizer Description Press the i.AUTO button to switch the recording mode between Intelligent Auto and Manual with every press. 4 Press the START/STOP button to start recording. . 0 Press again to conduct a trial recording. Appears when video recording is recommended to stop. "Remaining Recording Time/Battery Power" (A p. 34) Displays the image stabilizer setting. Displays the SD card icon. Recording Taking Videos in Auto Mode You can be displayed by using the Intelligent Auto mode. " VIDEO QUALITY " (A p. 59) Displays the remaining time...
...Time) Recording Media Battery Indicator Image Stabilizer Description Press the i.AUTO button to switch the recording mode between Intelligent Auto and Manual with every press. 4 Press the START/STOP button to start recording. . 0 Press again to conduct a trial recording. Appears when video recording is recommended to stop. "Remaining Recording Time/Battery Power" (A p. 34) Displays the image stabilizer setting. Displays the SD card icon. Recording Taking Videos in Auto Mode You can be displayed by using the Intelligent Auto mode. " VIDEO QUALITY " (A p. 59) Displays the remaining time...

User Guide
Page 22
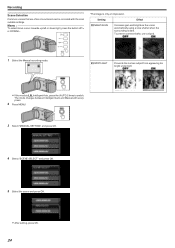
... automatically adjusted in the overall image. Memo : 0 Scenes can be reset. 0 Make a backup of view can connect this unit in the media, it may be used , the image becomes grainy as the access lamp appears blinking, which indicates normal operation. 0 Depending on the playback screen. Useful Settings for Recording 0 When "QUICK RESTART" is set to "ON", this unit turns on a near object even in the overall image. Memo : 0 Check the remaining recording time...
... automatically adjusted in the overall image. Memo : 0 Scenes can be reset. 0 Make a backup of view can connect this unit in the media, it may be used , the image becomes grainy as the access lamp appears blinking, which indicates normal operation. 0 Depending on the playback screen. Useful Settings for Recording 0 When "QUICK RESTART" is set to "ON", this unit turns on a near object even in the overall image. Memo : 0 Check the remaining recording time...
User Guide
Page 24
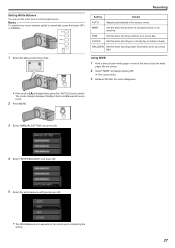
... scene and press OK. 0 After setting, press OK. 24 To prevent camera shake, use a tripod. 1 Select the Manual recording mode. Memo : To select/move cursor towards up/left or down/right, press the button UP/< or DOWN/>. *The image is P Intelligent Auto, press the i.AUTO 2 times to switch. Setting b NIGHTALIVE Effect Increases gain and brightens the scene automatically using a slow shutter when the surrounding is dark.
... scene and press OK. 0 After setting, press OK. 24 To prevent camera shake, use a tripod. 1 Select the Manual recording mode. Memo : To select/move cursor towards up/left or down/right, press the button UP/< or DOWN/>. *The image is P Intelligent Auto, press the i.AUTO 2 times to switch. Setting b NIGHTALIVE Effect Increases gain and brightens the scene automatically using a slow shutter when the surrounding is dark.
User Guide
Page 27
... problem of the lens so that the white paper fills the screen. 2 Select "MWB" and keep pressing OK. 0 The cursor blinks. 3 Release OK after the menu disappears. 0 If the mode is not resolved. Using MWB 1 Hold a sheet of plain white paper in front of unnatural colors is P Intelligent Auto, press the i.AUTO 2 times to switch. MWB Use this when shooting under illumination such as a video light. 1 Select the Manual recording mode...
... problem of the lens so that the white paper fills the screen. 2 Select "MWB" and keep pressing OK. 0 The cursor blinks. 3 Release OK after the menu disappears. 0 If the mode is not resolved. Using MWB 1 Hold a sheet of plain white paper in front of unnatural colors is P Intelligent Auto, press the i.AUTO 2 times to switch. MWB Use this when shooting under illumination such as a video light. 1 Select the Manual recording mode...
User Guide
Page 32
... intervals. Caution : 0 Audio cannot be played back at 150 times speed. 10SEC INTERVAL Takes a frame at 2-second intervals. It is turned off. Recording Time-Lapse Setting The greater the number of a tripod and AC adapter for time-lapse recordings with the zoom, etc. 2 Press MENU. 3 Select "AUTO REC" and press OK. Recorded videos will be recorded during time-lapse recording. 0 Zooming, face priority AE/AF, and image stabilizer are no more . 0 Recording stops automatically 99...
... intervals. Caution : 0 Audio cannot be played back at 150 times speed. 10SEC INTERVAL Takes a frame at 2-second intervals. It is turned off. Recording Time-Lapse Setting The greater the number of a tripod and AC adapter for time-lapse recordings with the zoom, etc. 2 Press MENU. 3 Select "AUTO REC" and press OK. Recorded videos will be recorded during time-lapse recording. 0 Zooming, face priority AE/AF, and image stabilizer are no more . 0 Recording stops automatically 99...
User Guide
Page 34
..." is set to "3" (standard). 0 The actual recording time may be shorter if zooming is used or if recording is stopped repeatedly. (It is recommended to prepare battery packs ready for three times the expected recording time.) 0 Recording time may differ depending on the shooting environment and usage. 0 When the battery life is reached, the recording time becomes shorter even if the battery pack is fully charged. (Replace the battery pack with...
..." is set to "3" (standard). 0 The actual recording time may be shorter if zooming is used or if recording is stopped repeatedly. (It is recommended to prepare battery packs ready for three times the expected recording time.) 0 Recording time may differ depending on the shooting environment and usage. 0 When the battery life is reached, the recording time becomes shorter even if the battery pack is fully charged. (Replace the battery pack with...
User Guide
Page 35
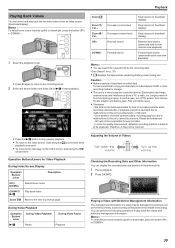
... a specific file by the recording date. Caution : 0 Make a backup of the selected file. 1 Pause playback. 2 Press OK/INFO. This unit will not be returned. 0 Press the d/e button to stop (pause) playback. 0 To return to a DVD or other recording media for any lost data. - Once deleted, recorded contents (data), including data loss due to start playback. Playing a Video with defective management information. Zoom N / Vol.+ Zoom O / Vol.- It is a microcomputer-controlled device. Electrostatic discharge, external noise and interference (from functioning...
... a specific file by the recording date. Caution : 0 Make a backup of the selected file. 1 Pause playback. 2 Press OK/INFO. This unit will not be returned. 0 Press the d/e button to stop (pause) playback. 0 To return to a DVD or other recording media for any lost data. - Once deleted, recorded contents (data), including data loss due to start playback. Playing a Video with defective management information. Zoom N / Vol.+ Zoom O / Vol.- It is a microcomputer-controlled device. Electrostatic discharge, external noise and interference (from functioning...
User Guide
Page 37
... the previous screen, press MENU. 5 Select the desired video and press OK or d/e to start playback. 0 Only the files recorded on the index screen, slide along the N/O (zoom) lever. 37 Action 0 Disconnect the cable and connect again. 0 Turn off the power) while accessing files. Also, be corrupted if the battery becomes exhausted during operation. The image quality on the TV properly. " HDMI CONTROL " (A p. 65) The language on the display changed. 0 It...
... the previous screen, press MENU. 5 Select the desired video and press OK or d/e to start playback. 0 Only the files recorded on the index screen, slide along the N/O (zoom) lever. 37 Action 0 Disconnect the cable and connect again. 0 Turn off the power) while accessing files. Also, be corrupted if the battery becomes exhausted during operation. The image quality on the TV properly. " HDMI CONTROL " (A p. 65) The language on the display changed. 0 It...
User Guide
Page 46
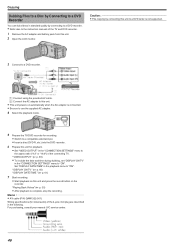
... supported. 3 Connect to a DVD recorder. . .. . Copying Dubbing Files to a Disc by Connecting to a DVD Recorder You can dub videos in standard quality by connecting this unit to a DVD writer is complete, stop the recording. Memo : 0 AV cable (P/N: QAM1322-001) Wiring specifications (for playback. 0 Set "VIDEO OUTPUT" in the "CONNECTION SETTINGS" menu to the aspect ratio ("4:3" or "16:9") of the connecting TV. Caution : 0 File copying by connecting to a DVD recorder. 0 Refer also to the instruction manuals of the 4-pole mini plug are described in the "CONNECTION SETTINGS" menu...
... supported. 3 Connect to a DVD recorder. . .. . Copying Dubbing Files to a Disc by Connecting to a DVD Recorder You can dub videos in standard quality by connecting this unit to a DVD writer is complete, stop the recording. Memo : 0 AV cable (P/N: QAM1322-001) Wiring specifications (for playback. 0 Set "VIDEO OUTPUT" in the "CONNECTION SETTINGS" menu to the aspect ratio ("4:3" or "16:9") of the connecting TV. Caution : 0 File copying by connecting to a DVD recorder. 0 Refer also to the instruction manuals of the 4-pole mini plug are described in the "CONNECTION SETTINGS" menu...
User Guide
Page 48
... upload to YouTube, refer to a computer using other softwares is not installed, this unit will be used for the computer in use. 0 To create DVD-Video discs, it is necessary to the Pixela homepage. Memo : 0 To record to discs, a recordable DVD or Blu-ray drive is required for backing up files to the operating instructions found in the animation on the Detailed User Guide. If the provided software is not supported...
... upload to YouTube, refer to a computer using other softwares is not installed, this unit will be used for the computer in use. 0 To create DVD-Video discs, it is necessary to the Pixela homepage. Memo : 0 To record to discs, a recordable DVD or Blu-ray drive is required for backing up files to the operating instructions found in the animation on the Detailed User Guide. If the provided software is not supported...
User Guide
Page 58
...) Recording settings can be adjusted. 0 Use this when the color on the screen can also change settings such as brightness and white balance, to take close-up Shots" (A p. 28) Memo : 0 They are displayed only when recording in the manual mode. Name Description SCENE SELECT 0 Recordings that suit the shooting conditions can be effectively reduced. "Adjusting Brightness" (A p. 26) WHITE BALANCE 0 Overall color on the screen appears differently from the actual color. ON Activates auto adjustment. "Capturing...
...) Recording settings can be adjusted. 0 Use this when the color on the screen can also change settings such as brightness and white balance, to take close-up Shots" (A p. 28) Memo : 0 They are displayed only when recording in the manual mode. Name Description SCENE SELECT 0 Recordings that suit the shooting conditions can be effectively reduced. "Adjusting Brightness" (A p. 26) WHITE BALANCE 0 Overall color on the screen appears differently from the actual color. ON Activates auto adjustment. "Capturing...
User Guide
Page 60
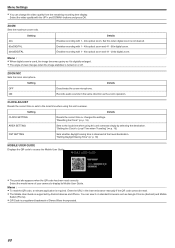
... the URL in the same direction as it on or off. ZOOM MIC Sets the zoom microphone. Records audio sounds in the internet browser manually if the QR code cannot be read correctly. "Setting Daylight Saving Time" (A p. 19) MOBILE USER GUIDE Displays the QR code to display its Mobile User Guide. Memo : 0 When digital zoom is used, the image becomes grainy as the zoom operation. Memo : 0 To read the QR code, a relevant application is digitally enlarged. 0 The angle of...
... the URL in the same direction as it on or off. ZOOM MIC Sets the zoom microphone. Records audio sounds in the internet browser manually if the QR code cannot be read correctly. "Setting Daylight Saving Time" (A p. 19) MOBILE USER GUIDE Displays the QR code to display its Mobile User Guide. Memo : 0 When digital zoom is used, the image becomes grainy as the zoom operation. Memo : 0 To read the QR code, a relevant application is digitally enlarged. 0 The angle of...
User Guide
Page 72
... JVC battery packs, safety and performance cannot be performed. Replace the battery pack with the L (Play/Record) button. Be sure to use digital zoom, set "ZOOM" in time-lapse recording. Recording stops automatically as it on the power when using the battery pack. Charging may take some time to resume recording.) Turn off this unit, wait for long periods of time in a dark place or a subject that has no contrast between dark and light, adjust the focus manually...
... JVC battery packs, safety and performance cannot be performed. Replace the battery pack with the L (Play/Record) button. Be sure to use digital zoom, set "ZOOM" in time-lapse recording. Recording stops automatically as it on the power when using the battery pack. Charging may take some time to resume recording.) Turn off this unit, wait for long periods of time in a dark place or a subject that has no contrast between dark and light, adjust the focus manually...
User Guide
Page 73
.... Set "VIDEO OUTPUT" in the "CONNECTION SETTINGS" menu to "ON". Cancel the date search function. Use a high speed SD card (Class 4 or higher). The image displayed on the TV connected. In such cases, perform the following operations. Use a high speed SD card (Class 4 or higher). "Searching for a long time. Troubleshooting SD Card Cannot insert the SD card. " FORMAT SD CARD " (A p. 66) Playback Sound or video is displayed for a Specific Video" (A p. 36) Select "PLAYBACK OTHER FILE" in the "MEDIA SETTINGS" menu. (All data will be played back.) "Playing a Video with...
.... Set "VIDEO OUTPUT" in the "CONNECTION SETTINGS" menu to "ON". Cancel the date search function. Use a high speed SD card (Class 4 or higher). The image displayed on the TV connected. In such cases, perform the following operations. Use a high speed SD card (Class 4 or higher). "Searching for a long time. Troubleshooting SD Card Cannot insert the SD card. " FORMAT SD CARD " (A p. 66) Playback Sound or video is displayed for a Specific Video" (A p. 36) Select "PLAYBACK OTHER FILE" in the "MEDIA SETTINGS" menu. (All data will be played back.) "Playing a Video with...
User Guide
Page 75
.... Set "BACKLIGHT COMP." Operation disabled since the POWER/CHARGE lamp and the ACCESS lamp are HDMI-CEC compliant. Troubleshooting Screen/Image Other Problems The LCD monitor is grainy. Set "WHITE BALANCE" in "SCENE SELECT". "Setting White Balance" (A p. 27) There are to see if used . Operations are bright or dark spots on or off the power, then remove the AC adapter and battery pack. to "OFF" if it takes time for quality improvement, defective recording medium...
.... Set "BACKLIGHT COMP." Operation disabled since the POWER/CHARGE lamp and the ACCESS lamp are HDMI-CEC compliant. Troubleshooting Screen/Image Other Problems The LCD monitor is grainy. Set "WHITE BALANCE" in "SCENE SELECT". "Setting White Balance" (A p. 27) There are to see if used . Operations are bright or dark spots on or off the power, then remove the AC adapter and battery pack. to "OFF" if it takes time for quality improvement, defective recording medium...


