
User Guide
Page 2
... Local Time when Traveling 19 Setting Daylight Saving Time 19 Optional Accessories 20 Recording Taking Videos in Auto Mode 21 Zooming 22 Manual Recording 23 Scene Selection 24 Adjusting Focus Manually 25 Adjusting Brightness 26 Setting White Balance 27 Setting Backlight Compensation 28 Taking Close-up Shots 28 Capturing Human Subjects Clearly...
... Local Time when Traveling 19 Setting Daylight Saving Time 19 Optional Accessories 20 Recording Taking Videos in Auto Mode 21 Zooming 22 Manual Recording 23 Scene Selection 24 Adjusting Focus Manually 25 Adjusting Brightness 26 Setting White Balance 27 Setting Backlight Compensation 28 Taking Close-up Shots 28 Capturing Human Subjects Clearly...
User Guide
Page 17
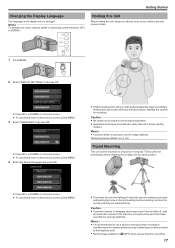
... : 0 To prevent injuries or damages which may result if this unit, keep your elbows close attention when this unit from falling off , read the instruction manual of the tripod (or monopod) to the previous screen, press MENU. 0 To prevent this unit is securely attached. Memo : To select/move the cursor. 0 To...
... : 0 To prevent injuries or damages which may result if this unit, keep your elbows close attention when this unit from falling off , read the instruction manual of the tripod (or monopod) to the previous screen, press MENU. 0 To prevent this unit is securely attached. Memo : To select/move the cursor. 0 To...
User Guide
Page 21
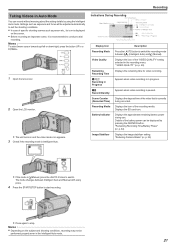
... remaining time for video recording. Appears when video recording is recommended to stop. The mode changes between P (Intelligent Auto) and H (Manual). Details of the "VIDEO QUALITY" setting selected in Progress a Record-Standby Scene Counter (Recorded Time) Recording Media Battery Indicator Image Stabilizer ...Description Press the i.AUTO button to switch the recording mode between Intelligent Auto and Manual with every press. 4 Press the START/STOP button to start recording. . 0 Press again to conduct a trial recording...
... remaining time for video recording. Appears when video recording is recommended to stop. The mode changes between P (Intelligent Auto) and H (Manual). Details of the "VIDEO QUALITY" setting selected in Progress a Record-Standby Scene Counter (Recorded Time) Recording Media Battery Indicator Image Stabilizer ...Description Press the i.AUTO button to switch the recording mode between Intelligent Auto and Manual with every press. 4 Press the START/STOP button to start recording. . 0 Press again to conduct a trial recording...
User Guide
Page 23
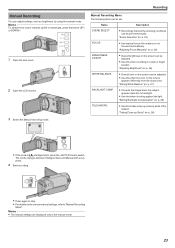
...appears dark due to backlight. 0 Use this to stop. 0 For details on the screen appears differently from the actual color. Memo : 0 The manual settings are displayed only in a dark or bright location. Memo : To select/move cursor towards up Shots" (A p. 28) 0 If the mode... is not focused automatically. "Scene Selection" (A p. 24) FOCUS 0 Use manual focus if the subject is P Intelligent Auto, press the i.AUTO 2 times to "Manual Recording Menu". "Adjusting Brightness" (A p. 26) WHITE BALANCE 0 Overall color on the screen can be adjusted. 0 Use this...
...appears dark due to backlight. 0 Use this to stop. 0 For details on the screen appears differently from the actual color. Memo : 0 The manual settings are displayed only in a dark or bright location. Memo : To select/move cursor towards up Shots" (A p. 28) 0 If the mode... is not focused automatically. "Scene Selection" (A p. 24) FOCUS 0 Use manual focus if the subject is P Intelligent Auto, press the i.AUTO 2 times to "Manual Recording Menu". "Adjusting Brightness" (A p. 26) WHITE BALANCE 0 Overall color on the screen can be adjusted. 0 Use this...
User Guide
Page 24
Recording Scene Selection Common scenes that are often encountered can be recorded with every press. 2 Press MENU. 3 Select "MANUAL SETTING" and press OK. 4 Select "SCENE SELECT" and press OK. 5 Select the scene and press OK. 0 After setting, press OK. 24 Memo ... is P Intelligent Auto, press the i.AUTO 2 times to switch. To prevent camera shake, use a tripod. 1 Select the Manual recording mode. The mode changes between Intelligent Auto and Manual with the most suitable settings. g SPOTLIGHT Prevents the human subject from appearing too bright under light. 0 If the mode is only...
Recording Scene Selection Common scenes that are often encountered can be recorded with every press. 2 Press MENU. 3 Select "MANUAL SETTING" and press OK. 4 Select "SCENE SELECT" and press OK. 5 Select the scene and press OK. 0 After setting, press OK. 24 Memo ... is P Intelligent Auto, press the i.AUTO 2 times to switch. To prevent camera shake, use a tripod. 1 Select the Manual recording mode. The mode changes between Intelligent Auto and Manual with the most suitable settings. g SPOTLIGHT Prevents the human subject from appearing too bright under light. 0 If the mode is only...
User Guide
Page 25
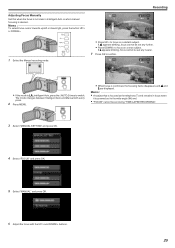
...cannot be set any nearer. 7 Press OK to confirm. 0 If the mode is P Intelligent Auto, press the i.AUTO 2 times to switch. Recording 1 Select the Manual recording mode. 0 Press UP/< to focus on a near subject. If p appears blinking, focus cannot be set any further. 0 Press DOWN/> to focus on a .... 2 Press MENU. 0 When focus is confirmed, the focusing frame disappears and E and p are displayed. The mode changes between Intelligent Auto and Manual with the UP/< and DOWN/> buttons. 25 Memo : To select/move cursor towards up/left or down/right, press the button UP/< or DOWN/>.
...cannot be set any nearer. 7 Press OK to confirm. 0 If the mode is P Intelligent Auto, press the i.AUTO 2 times to switch. Recording 1 Select the Manual recording mode. 0 Press UP/< to focus on a near subject. If p appears blinking, focus cannot be set any further. 0 Press DOWN/> to focus on a .... 2 Press MENU. 0 When focus is confirmed, the focusing frame disappears and E and p are displayed. The mode changes between Intelligent Auto and Manual with the UP/< and DOWN/> buttons. 25 Memo : To select/move cursor towards up/left or down/right, press the button UP/< or DOWN/>.
User Guide
Page 26
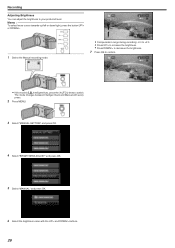
Memo : To select/move cursor towards up/left or down/right, press the button UP/< or DOWN/>. 1 Select the Manual recording mode. 0 Compensation range during recording: -2.0 to +2.0 0 Press UP/< to increase the brightness. 0 Press DOWN/> to decrease the brightness. 7 Press OK... Brightness You can adjust the brightness to switch. The mode changes between Intelligent Auto and Manual with every press. 2 Press MENU. 3 Select "MANUAL SETTING" and press OK. 4 Select "BRIGHTNESS ADJUST" and press OK. 5 Select "MANUAL" and press OK. 6 Select the brightness value with the UP/< and DOWN/> buttons...
Memo : To select/move cursor towards up/left or down/right, press the button UP/< or DOWN/>. 1 Select the Manual recording mode. 0 Compensation range during recording: -2.0 to +2.0 0 Press UP/< to increase the brightness. 0 Press DOWN/> to decrease the brightness. 7 Press OK... Brightness You can adjust the brightness to switch. The mode changes between Intelligent Auto and Manual with every press. 2 Press MENU. 3 Select "MANUAL SETTING" and press OK. 4 Select "BRIGHTNESS ADJUST" and press OK. 5 Select "MANUAL" and press OK. 6 Select the brightness value with the UP/< and DOWN/> buttons...
User Guide
Page 27
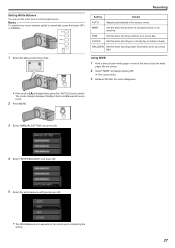
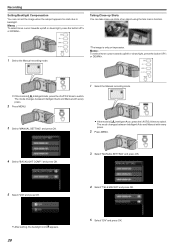
... upon completing the setting. 27 FINE Set this when shooting under illumination such as a video light. 1 Select the Manual recording mode. The mode changes between Intelligent Auto and Manual with every press. 2 Press MENU. 3 Select "MANUAL SETTING" and press OK. 4 Select "WHITE BALANCE" and press OK. 5 Select the white balance setting and press...
... upon completing the setting. 27 FINE Set this when shooting under illumination such as a video light. 1 Select the Manual recording mode. The mode changes between Intelligent Auto and Manual with every press. 2 Press MENU. 3 Select "MANUAL SETTING" and press OK. 4 Select "WHITE BALANCE" and press OK. 5 Select the white balance setting and press...
User Guide
Page 28
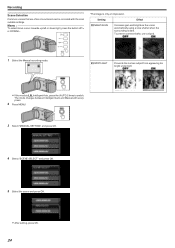
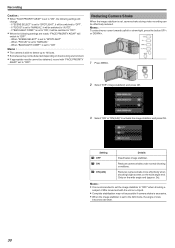
...press the i.AUTO 2 times to switch. Memo : To select/move cursor towards up shots of an object using the tele macro function. 1 Select the Manual recording mode. *The image is P Intelligent Auto, press the i.AUTO 2 times to switch. Memo : To select/move cursor towards up/left or down... Taking Close-up Shots You can correct the image when the subject appears too dark due to backlight. The mode changes between Intelligent Auto and Manual with every press. 2 Press MENU. 4 Select "BACKLIGHT COMP." Recording Setting Backlight Compensation You can take close-up /left or down /right...
...press the i.AUTO 2 times to switch. Memo : To select/move cursor towards up shots of an object using the tele macro function. 1 Select the Manual recording mode. *The image is P Intelligent Auto, press the i.AUTO 2 times to switch. Memo : To select/move cursor towards up/left or down... Taking Close-up Shots You can correct the image when the subject appears too dark due to backlight. The mode changes between Intelligent Auto and Manual with every press. 2 Press MENU. 4 Select "BACKLIGHT COMP." Recording Setting Backlight Compensation You can take close-up /left or down /right...
User Guide
Page 30
... "SCENE SELECT" is set to "ON", it will change. - When "FOCUS" is set to "OFF". Reducing Camera Shake When the image stabilizer is set to "MANUAL", it will switch to "OFF". - If "FOCUS" is recommended to set the image stabilizer to "OFF" when shooting a subject of view becomes narrower. 30 Reduces... the wide angle end (approx. 5x). Only on the wide angle end. Memo : 0 It is set , camera shake during video recording can be switched to "MANUAL" -
... "SCENE SELECT" is set to "ON", it will change. - When "FOCUS" is set to "OFF". Reducing Camera Shake When the image stabilizer is set to "MANUAL", it will switch to "OFF". - If "FOCUS" is recommended to set the image stabilizer to "OFF" when shooting a subject of view becomes narrower. 30 Reduces... the wide angle end (approx. 5x). Only on the wide angle end. Memo : 0 It is set , camera shake during video recording can be switched to "MANUAL" -
User Guide
Page 32
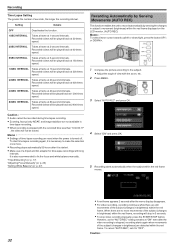
Recorded videos will be played back at 80-second intervals. Recorded videos will not be saved. "Tripod Mounting" (A p. 17) "Adjusting Focus Manually" (A p. 25) "Setting White Balance" (A p. 27) 4 Select "ON" and press OK. 5 Recording starts automatically when the subject within the red frame moves. 0 ...by Sensing Movements (AUTO REC) This function enables the unit to record automatically by sensing the changes in 5 seconds. 0 To stop video recording manually, press the START/STOP button. Memo : 0 Settings of view with the recorded time less than "0:00:00:17" , the video will be...
Recorded videos will be played back at 80-second intervals. Recorded videos will not be saved. "Tripod Mounting" (A p. 17) "Adjusting Focus Manually" (A p. 25) "Setting White Balance" (A p. 27) 4 Select "ON" and press OK. 5 Recording starts automatically when the subject within the red frame moves. 0 ...by Sensing Movements (AUTO REC) This function enables the unit to record automatically by sensing the changes in 5 seconds. 0 To stop video recording manually, press the START/STOP button. Memo : 0 Settings of view with the recorded time less than "0:00:00:17" , the video will be...
User Guide
Page 37
... use the medium again. 0 To cancel and return to the previous screen, press MENU. 5 Select the desired video and press OK or d/e to the instruction manual of this unit again. 0 Images may not appear properly when the remaining battery power is low. Use an AC adapter. Caution : 0 Do not remove the...
... use the medium again. 0 To cancel and return to the previous screen, press MENU. 5 Select the desired video and press OK or d/e to the instruction manual of this unit again. 0 Images may not appear properly when the remaining battery power is low. Use an AC adapter. Caution : 0 Do not remove the...
User Guide
Page 38
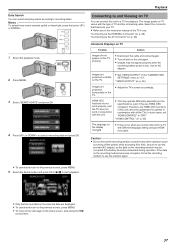
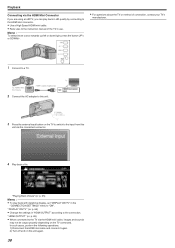
... method of the TV in HD quality by connecting to the HDMI mini connector. 0 Use a High Speed HDMI mini cable. 0 Refer also to the instruction manual of connection, contact your TV's manufacturer. 1 Connect to a TV. 2 Connect the AC adapter to this unit. 3 Press the external input button on the TV connected...
... method of the TV in HD quality by connecting to the HDMI mini connector. 0 Use a High Speed HDMI mini cable. 0 Refer also to the instruction manual of connection, contact your TV's manufacturer. 1 Connect to a TV. 2 Connect the AC adapter to this unit. 3 Press the external input button on the TV connected...
User Guide
Page 39
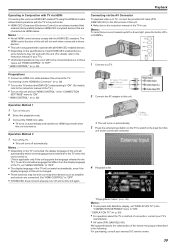
...playback videos on TV, connect the provided AV cable (P/N QAM1322-001) to the AV terminal of this unit. 0 Refer also to the instruction manual of each HDMI-CEC enabled device, some connected devices. Memo : 0 Not all HDMI-CEC enabled devices. 0 Depending on the specifications of ...". "Playing Back Videos" (A p. 35) Memo : 0 To play back with date/time display, set "HDMI CONTROL" to the instruction manual of connection, contact your nearest JVC service center. 39 Set "HDMI CONTROL" to "OFF". 0 If HDMI-CEC does not work correctly when devices such as amplifier and selector ...
...playback videos on TV, connect the provided AV cable (P/N QAM1322-001) to the AV terminal of this unit. 0 Refer also to the instruction manual of each HDMI-CEC enabled device, some connected devices. Memo : 0 Not all HDMI-CEC enabled devices. 0 Depending on the specifications of ...". "Playing Back Videos" (A p. 35) Memo : 0 To play back with date/time display, set "HDMI CONTROL" to the instruction manual of connection, contact your nearest JVC service center. 39 Set "HDMI CONTROL" to "OFF". 0 If HDMI-CEC does not work correctly when devices such as amplifier and selector ...
User Guide
Page 46
... and time during dubbing, set "DISPLAY ON TV" in the "CONNECTION SETTINGS" menu to this unit. 2 Open the LCD monitor. For purchasing, consult your nearest JVC service center. 46 Caution : 0 File copying by connecting to a DVD recorder. 0 Refer also to a compatible external input. 0 Insert a disc (DVD-R, etc.) into the DVD recorder... is connected. 0 Be sure to use the supplied AC adapter. 4 Select the playback mode. 5 Prepare the TV/DVD recorder for recording. 0 Switch to the instruction manuals of the 4-pole mini plug are described in the playback menu to "ON".
... and time during dubbing, set "DISPLAY ON TV" in the "CONNECTION SETTINGS" menu to this unit. 2 Open the LCD monitor. For purchasing, consult your nearest JVC service center. 46 Caution : 0 File copying by connecting to a DVD recorder. 0 Refer also to a compatible external input. 0 Insert a disc (DVD-R, etc.) into the DVD recorder... is connected. 0 Be sure to use the supplied AC adapter. 4 Select the playback mode. 5 Prepare the TV/DVD recorder for recording. 0 Switch to the instruction manuals of the 4-pole mini plug are described in the playback menu to "ON".

User Guide
Page 47
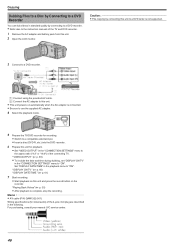
... unit until the USB cable is disconnected. 1 Remove the AC adapter and battery pack from this unit. 2 Open the LCD monitor. 3 Connect to the instruction manual of the Blu-ray recorder. 47 Copying 0 After dubbing is connected. 0 Be sure to use the supplied AC adapter. Creating a Disc Using a Connected Blu-ray...
... unit until the USB cable is disconnected. 1 Remove the AC adapter and battery pack from this unit. 2 Open the LCD monitor. 3 Connect to the instruction manual of the Blu-ray recorder. 47 Copying 0 After dubbing is connected. 0 Be sure to use the supplied AC adapter. Creating a Disc Using a Connected Blu-ray...
User Guide
Page 58
... OFF Deactivates auto adjustment. "Reducing Camera Shake" (A p. 30) GAIN UP Makes the subject appear bright automatically when recording in the manual mode. "Capturing Human Subjects Clearly (Face Detection AE/AF)" (A p. 29) Details DIS Camera shake during video recording can be performed...shake under normal shooting conditions. ON Electrically brightens the scene when it is dark. 58 "Scene Selection" (A p. 24) FOCUS 0 Use manual focus if the subject is dark. b OFF Setting Deactivates image stabilizer. "Taking Close-up (macro) shots of the subject. ON Activates ...
... OFF Deactivates auto adjustment. "Reducing Camera Shake" (A p. 30) GAIN UP Makes the subject appear bright automatically when recording in the manual mode. "Capturing Human Subjects Clearly (Face Detection AE/AF)" (A p. 29) Details DIS Camera shake during video recording can be performed...shake under normal shooting conditions. ON Electrically brightens the scene when it is dark. 58 "Scene Selection" (A p. 24) FOCUS 0 Use manual focus if the subject is dark. b OFF Setting Deactivates image stabilizer. "Taking Close-up (macro) shots of the subject. ON Activates ...
User Guide
Page 60
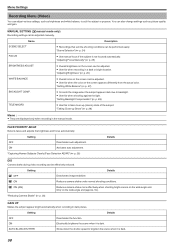
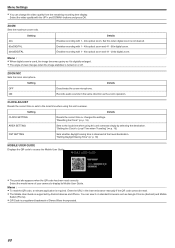
Records audio sounds in the internet browser manually if the QR code cannot be read. 0 The Mobile User Guide is observed at the travel destination. ZOOM Sets the maximum zoom ratio. Enables recording ...
Records audio sounds in the internet browser manually if the QR code cannot be read. 0 The Mobile User Guide is observed at the travel destination. ZOOM Sets the maximum zoom ratio. Enables recording ...
User Guide
Page 62
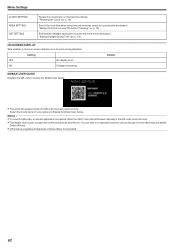
...) and Mobile Safari (iPhone). 0 QR Code is observed at all. Setting OFF No display at the travel destination. Enter the URL in the internet browser manually if the QR code cannot be read correctly. ON Displays everything. Select the model name of Denso Wave Incorporated. 62 Memo : 0 To read the QR...
...) and Mobile Safari (iPhone). 0 QR Code is observed at all. Setting OFF No display at the travel destination. Enter the URL in the internet browser manually if the QR code cannot be read correctly. ON Displays everything. Select the model name of Denso Wave Incorporated. 62 Memo : 0 To read the QR...
User Guide
Page 68
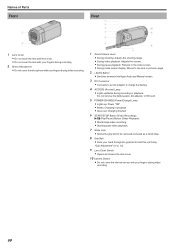
... pause playback: Returns to the index screen. 0 During index screen display: Moves to the next or previous page. 2 i.AUTO Button 0 Switches between Intelligent Auto and Manual modes. 3 DC Connector 0 Connects to an AC adapter to hold this unit firmly. Names of Parts Front Rear .. 1 Lens Cover 0 Do not touch the lens...
... pause playback: Returns to the index screen. 0 During index screen display: Moves to the next or previous page. 2 i.AUTO Button 0 Switches between Intelligent Auto and Manual modes. 3 DC Connector 0 Connects to an AC adapter to hold this unit firmly. Names of Parts Front Rear .. 1 Lens Cover 0 Do not touch the lens...


