
User Guide
Page 2
Table of Contents Beginner's Guide 3 Charging 3 Recording 3 Playback 3 Shooting Tips 3 Holiday Season/Christmas 4 Wedding 5 Travel 6 Amusement Park 8 Getting Started Key Features 9 Verifying the Accessories 10 Charging the Battery Pack 11 Grip Adjustment 12 Using as a Hand Strap 12 Inserting an SD Card 13 Types of Usable SD Card 13 Turning On the Unit 14 Clock Setting 15 Resetting the Clock 16 Changing the Display Language 17 Holding this Unit 17 Tripod Mounting 17 Using this Unit Overseas 18 Charging the Battery Pack Overseas 18 Setting the Clock to Local Time when ...
Table of Contents Beginner's Guide 3 Charging 3 Recording 3 Playback 3 Shooting Tips 3 Holiday Season/Christmas 4 Wedding 5 Travel 6 Amusement Park 8 Getting Started Key Features 9 Verifying the Accessories 10 Charging the Battery Pack 11 Grip Adjustment 12 Using as a Hand Strap 12 Inserting an SD Card 13 Types of Usable SD Card 13 Turning On the Unit 14 Clock Setting 15 Resetting the Clock 16 Changing the Display Language 17 Holding this Unit 17 Tripod Mounting 17 Using this Unit Overseas 18 Charging the Battery Pack Overseas 18 Setting the Clock to Local Time when ...

User Guide
Page 3
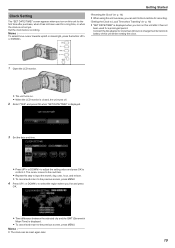
C Hold the LCD monitor with your body to face the front. o [Getting Ready] A Open your feet to the width of your left hand and adjust the angle accordingly. C Hold the LCD monitor with your shoulders. Panning 0 Refer to the operating instructions found in the animation on the Detailed User Guide. By recording from the eye level of shooting only as a last resort as it is holding the camcorder, close to your side. B Stand facing the direction where the rotation will start button and record for another 2 seconds while facing the front, then press the stop . ...
C Hold the LCD monitor with your body to face the front. o [Getting Ready] A Open your feet to the width of your left hand and adjust the angle accordingly. C Hold the LCD monitor with your shoulders. Panning 0 Refer to the operating instructions found in the animation on the Detailed User Guide. By recording from the eye level of shooting only as a last resort as it is holding the camcorder, close to your side. B Stand facing the direction where the rotation will start button and record for another 2 seconds while facing the front, then press the stop . ...

User Guide
Page 4
Be sure to shoot before the children wake up! Get ready to record these happy family times! Their expression of Christmas. Recording the Christmas Party Decorating the Tree and Preparing the Dinner The decoration of tree and preparation of dinner are helping, and of course, the process of making a cake! 4 Finding the Presents A tree is slightly drunk from champagne! Record the scenes as everyone helps to prepare the feast of Christmas. o Decorating the tree After all family members engaging in the decorating of a fir tree with your family! You can film the mother ...
Be sure to shoot before the children wake up! Get ready to record these happy family times! Their expression of Christmas. Recording the Christmas Party Decorating the Tree and Preparing the Dinner The decoration of tree and preparation of dinner are helping, and of course, the process of making a cake! 4 Finding the Presents A tree is slightly drunk from champagne! Record the scenes as everyone helps to prepare the feast of Christmas. o Decorating the tree After all family members engaging in the decorating of a fir tree with your family! You can film the mother ...
User Guide
Page 5
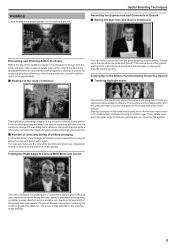
o Finding out the route of entrance You can record comments from eye level to chest level Discussing and Planning Before the Event Before the day of the wedding reception, it is the entrance of the bride and groom. Another recommendation is to show the parents who are changing, or during the entertainment programs. Closing Up on the bride's face using zoom without having to shoot more appropriately. By understanding the preferences of the bride and groom, you speech and presentation of a wedding reception is important to discuss with the bride and groom about various ...
o Finding out the route of entrance You can record comments from eye level to chest level Discussing and Planning Before the Event Before the day of the wedding reception, it is the entrance of the bride and groom. Another recommendation is to show the parents who are changing, or during the entertainment programs. Closing Up on the bride's face using zoom without having to shoot more appropriately. By understanding the preferences of the bride and groom, you speech and presentation of a wedding reception is important to discuss with the bride and groom about various ...
User Guide
Page 6
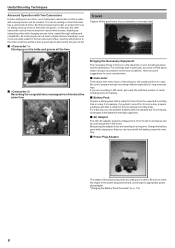
... prepare a battery with low capacity but for a long time. o Recording the congratulatory messages from 110 V to countries. Be sure to add variety. o AC Adapter The JVC AC adapter supports voltages from friends at the same time Bringing the Necessary Equipment The necessary things to bring on a trip depends on the bride...
... prepare a battery with low capacity but for a long time. o Recording the congratulatory messages from 110 V to countries. Be sure to add variety. o AC Adapter The JVC AC adapter supports voltages from friends at the same time Bringing the Necessary Equipment The necessary things to bring on a trip depends on the bride...
User Guide
Page 7
In addition, you would certainly want to record. Showing Everyone Having a Good Time When taking may be found in accordance to take a shot of the signs or monuments that it is gathered at least 1 m tall. Record also the preparations prior to departure if it is a family trip, or the time when everyone is rather dull to take stable images. For overseas trips, taking scenery of traveling, such as a compact one to be used on a table or one that you may be a little abrupt to start your purpose and style of an attraction so that can often be useful for future ...
In addition, you would certainly want to record. Showing Everyone Having a Good Time When taking may be found in accordance to take a shot of the signs or monuments that it is gathered at least 1 m tall. Record also the preparations prior to departure if it is a family trip, or the time when everyone is rather dull to take stable images. For overseas trips, taking scenery of traveling, such as a compact one to be used on a table or one that you may be a little abrupt to start your purpose and style of an attraction so that can often be useful for future ...

User Guide
Page 8
if the faces appear too dark. Even the expressions of faces under shadows can be seen clearly. Inducing Responses by enthusiastically waving your hands or shouting out "Is it fun?" .. . . . "Setting Details" (A p. 28) o Taking Videos of Moving Subjects o Scenarios with changes in facial expressions or voices of the camcorder to perform any recording. This includes situations where there are rapid changes in body movement are not only dull when you view them later, but also put the capability of the audio-recording function of surprise and delight. *Some amusement parks do not...
if the faces appear too dark. Even the expressions of faces under shadows can be seen clearly. Inducing Responses by enthusiastically waving your hands or shouting out "Is it fun?" .. . . . "Setting Details" (A p. 28) o Taking Videos of Moving Subjects o Scenarios with changes in facial expressions or voices of the camcorder to perform any recording. This includes situations where there are rapid changes in body movement are not only dull when you view them later, but also put the capability of the audio-recording function of surprise and delight. *Some amusement parks do not...

User Guide
Page 9
Key Features Key features of your camcorder 1 Full High Definition (1920×1080 pixels) Video Recording 2 i.AUTO (Intelligent Auto Recording): Detects 12 types of pre-set scenes 3 Digital Image Stabilizer 4 40x Optical Zoom 5 Auto Recording: Automatically starts recording when subject enters the detecting area 6 Time-lapse Recording: Watch long hours of recording in a few seconds 7 HDMI, USB, and AV Out connectors Getting Started 9
Key Features Key features of your camcorder 1 Full High Definition (1920×1080 pixels) Video Recording 2 i.AUTO (Intelligent Auto Recording): Detects 12 types of pre-set scenes 3 Digital Image Stabilizer 4 40x Optical Zoom 5 Auto Recording: Automatically starts recording when subject enters the detecting area 6 Time-lapse Recording: Watch long hours of recording in a few seconds 7 HDMI, USB, and AV Out connectors Getting Started 9
User Guide
Page 10
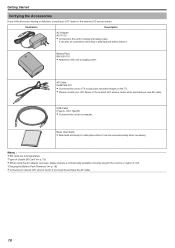
... and keep in a safe place where it can also be accessed easily when necessary. Memo : 0 SD cards are missing or defective, consult your nearest JVC service center if you need to charge the battery pack. "Types of Usable SD Card" (A p. 13) 0 When using the AC adapter overseas, please... plug for the country or region of the items are sold separately. "Charging the Battery Pack Overseas" (A p. 18) 0 Consult your JVC dealer or the nearest JVC service center. It can be used when recording or playing back videos indoors. Battery Pack BN-VG107U 0 Attaches to this unit to purchase...
... and keep in a safe place where it can also be accessed easily when necessary. Memo : 0 SD cards are missing or defective, consult your nearest JVC service center if you need to charge the battery pack. "Types of Usable SD Card" (A p. 13) 0 When using the AC adapter overseas, please... plug for the country or region of the items are sold separately. "Charging the Battery Pack Overseas" (A p. 18) 0 Consult your JVC dealer or the nearest JVC service center. It can be used when recording or playing back videos indoors. Battery Pack BN-VG107U 0 Attaches to this unit to purchase...
User Guide
Page 11
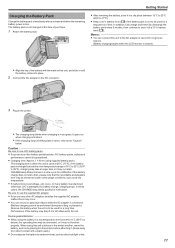
The battery pack is left attached to the unit. Caution : Be sure to use JVC battery packs. 0 If you use any battery manufactured other than JVC is attempted for notification if the battery charge does not start . Also, please note that the recordable and playable time may be... and then fully discharge the battery pack every 6 months, then continue to use the supplied AC adapter. 0 If you use any other battery packs besides JVC battery packs, safety and performance cannot be guaranteed. 0 Charging time: Approx. 1 h 50 m (using supplied battery pack) The charging time is when ...
The battery pack is left attached to the unit. Caution : Be sure to use JVC battery packs. 0 If you use any battery manufactured other than JVC is attempted for notification if the battery charge does not start . Also, please note that the recordable and playable time may be... and then fully discharge the battery pack every 6 months, then continue to use the supplied AC adapter. 0 If you use any other battery packs besides JVC battery packs, safety and performance cannot be guaranteed. 0 Charging time: Approx. 1 h 50 m (using supplied battery pack) The charging time is when ...
User Guide
Page 12
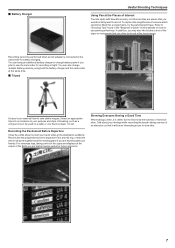
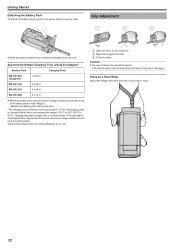
Getting Started Detaching the Battery Pack To detach the battery pack, perform the above steps in injuries or damages. Approximate Battery Charging Time (Using AC Adapter) Battery Pack Charging Time BN-VG107U (Supplied) 1 h 50 m BN-VG114U 2 h 30 m BN-VG121U 3 h 30 m BN-VG138U 6 h 10 m 0 When the battery life is reached, the recording time becomes shorter even if the battery pack is fully charged. (Replace the battery pack with a new one.) *The charging time is when the unit is charged outside the room temperature range of the belt C Close the lever Caution : 0 Be sure to fasten ...
Getting Started Detaching the Battery Pack To detach the battery pack, perform the above steps in injuries or damages. Approximate Battery Charging Time (Using AC Adapter) Battery Pack Charging Time BN-VG107U (Supplied) 1 h 50 m BN-VG114U 2 h 30 m BN-VG121U 3 h 30 m BN-VG138U 6 h 10 m 0 When the battery life is reached, the recording time becomes shorter even if the battery pack is fully charged. (Replace the battery pack with a new one.) *The charging time is when the unit is charged outside the room temperature range of the belt C Close the lever Caution : 0 Be sure to fasten ...
User Guide
Page 13
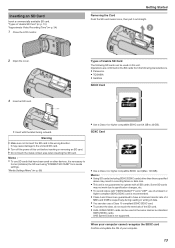
It may cause damage to operate with all SD cards. UHS Speed Class is necessary to have been used on this unit before inserting or removing an SD card. 0 Do not touch the metal contact area when inserting the SD card. Memo : 0 Using SD cards (including SDHC/SDXC cards) other devices, it out straight. . . . . .. 2 Open the cover. 3 Insert an SD card. Some SD cards may result in recording failure or data loss. 0 This unit is recommended. 0 Class 4 and Class 6 are confirmed on the SD cards from media settings. Inserting an SD Card Insert a commercially available SD card....
It may cause damage to operate with all SD cards. UHS Speed Class is necessary to have been used on this unit before inserting or removing an SD card. 0 Do not touch the metal contact area when inserting the SD card. Memo : 0 Using SD cards (including SDHC/SDXC cards) other devices, it out straight. . . . . .. 2 Open the cover. 3 Insert an SD card. Some SD cards may result in recording failure or data loss. 0 This unit is recommended. 0 Class 4 and Class 6 are confirmed on the SD cards from media settings. Inserting an SD Card Insert a commercially available SD card....

User Guide
Page 14
http://www.microsoft.com/downloads/details.aspx? Turning On the Unit You can turn the power of this unit on/off . 14 FamilyID=2d1abe01-0942-4f8a-abb2-2ad529de00a1 0 64 bit version http://www.microsoft.com/downloads/en/details.aspx? FamilyID=7d54c53f-017c-4ea5-ae08-34c3452ba315 Windows 7 Download and install the updating program (KB976422) from the following URL. 0 32 bit version http://www.microsoft.com/downloads/en/details.aspx? FamilyID=3ee91fc2-a9bc-4ee1-aca3-2a9aff5915ea 0 64 bit version http://www.microsoft.com/downloads/en/details.aspx? Mac OS X 10.6 Snow Leopard Update the...
http://www.microsoft.com/downloads/details.aspx? Turning On the Unit You can turn the power of this unit on/off . 14 FamilyID=2d1abe01-0942-4f8a-abb2-2ad529de00a1 0 64 bit version http://www.microsoft.com/downloads/en/details.aspx? FamilyID=7d54c53f-017c-4ea5-ae08-34c3452ba315 Windows 7 Download and install the updating program (KB976422) from the following URL. 0 32 bit version http://www.microsoft.com/downloads/en/details.aspx? FamilyID=3ee91fc2-a9bc-4ee1-aca3-2a9aff5915ea 0 64 bit version http://www.microsoft.com/downloads/en/details.aspx? Mac OS X 10.6 Snow Leopard Update the...
User Guide
Page 15
Getting Started "Resetting the Clock" (A p. 16) 0 When using this unit overseas, you can be reset again later. 15 The cursor moves to the next item. 0 Repeat this unit for the first time after it has not been used for recording. Clock Setting The "SET DATE/TIME!" Set the clock before setting the clock. 1 Open the LCD monitor. 0 The unit turns on. 0 When the LCD monitor is not set yet. is displayed. 0 To cancel and return to select the region where you live and press OK. 0 Time difference between the selected city and the GMT (Greenwich Mean Time) is displayed when you turn ...
Getting Started "Resetting the Clock" (A p. 16) 0 When using this unit overseas, you can be reset again later. 15 The cursor moves to the next item. 0 Repeat this unit for the first time after it has not been used for recording. Clock Setting The "SET DATE/TIME!" Set the clock before setting the clock. 1 Open the LCD monitor. 0 The unit turns on. 0 When the LCD monitor is not set yet. is displayed. 0 To cancel and return to select the region where you live and press OK. 0 Time difference between the selected city and the GMT (Greenwich Mean Time) is displayed when you turn ...

User Guide
Page 16
Memo : To select/move cursor towards up/left or down/right, press the button UP/< or DOWN/>. 1 Press MENU. 0 Time difference between the selected city and the GMT (Greenwich Mean Time) is displayed. 0 To cancel and return to the previous screen, press MENU. 2 Select "CLOCK ADJUST" and press OK. 0 Press UP/< or DOWN/> to move the cursor. 0 To cancel and return to the previous screen, press MENU. 3 Select "CLOCK SETTING" and press OK. 0 Press UP/< or DOWN/> to move the cursor. 0 To cancel and return to the previous screen, press MENU. 4 Set the date and time. 0 Press UP/< or DOWN/> to ...
Memo : To select/move cursor towards up/left or down/right, press the button UP/< or DOWN/>. 1 Press MENU. 0 Time difference between the selected city and the GMT (Greenwich Mean Time) is displayed. 0 To cancel and return to the previous screen, press MENU. 2 Select "CLOCK ADJUST" and press OK. 0 Press UP/< or DOWN/> to move the cursor. 0 To cancel and return to the previous screen, press MENU. 3 Select "CLOCK SETTING" and press OK. 0 Press UP/< or DOWN/> to move the cursor. 0 To cancel and return to the previous screen, press MENU. 4 Set the date and time. 0 Press UP/< or DOWN/> to ...
User Guide
Page 17
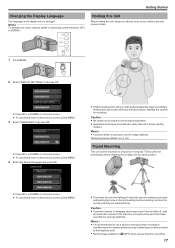
"Reducing Camera Shake" (A p. 30) Tripod Mounting This unit can be mounted on the display can be used and make sure that it is excessive, use a tripod or monopod when recording in conditions prone to camera shake (such as in dark places or when zoomed to the telephoto end). 0 Set the image stabilizer to the previous screen, press MENU. 0 To prevent this unit is being used by children. Caution : 0 To prevent injuries or damages which may result if this unit falls off , check the tripod mounting screw holes and positioning holes on the unit carefully before mounting, and turn the ...
"Reducing Camera Shake" (A p. 30) Tripod Mounting This unit can be mounted on the display can be used and make sure that it is excessive, use a tripod or monopod when recording in conditions prone to camera shake (such as in dark places or when zoomed to the telephoto end). 0 Set the image stabilizer to the previous screen, press MENU. 0 To prevent this unit is being used by children. Caution : 0 To prevent injuries or damages which may result if this unit falls off , check the tripod mounting screw holes and positioning holes on the unit carefully before mounting, and turn the ...
User Guide
Page 18
To charge the battery pack, you need a converter plug that matches the shape of "CLOCK ADJUST", the time is set 1 hour ahead. "Charging the Battery Pack Overseas" (A p. 18) Change the date and time display to the local time by selecting your travel destination in "DST SETTING" of the outlet. "Setting Daylight Saving Time" (A p. 19) Charging the Battery Pack Overseas The shape of the power outlet varies according to countries and regions. To charge the battery pack, you need a converter plug that matches the shape of "CLOCK ADJUST". Getting Started "Reducing Camera Shake" ...
To charge the battery pack, you need a converter plug that matches the shape of "CLOCK ADJUST", the time is set 1 hour ahead. "Charging the Battery Pack Overseas" (A p. 18) Change the date and time display to the local time by selecting your travel destination in "DST SETTING" of the outlet. "Setting Daylight Saving Time" (A p. 19) Charging the Battery Pack Overseas The shape of the power outlet varies according to countries and regions. To charge the battery pack, you need a converter plug that matches the shape of "CLOCK ADJUST". Getting Started "Reducing Camera Shake" ...

User Guide
Page 19
Getting Started Setting the Clock to Local Time when Traveling Change the date and time display to the local time by selecting your country, re-select the region that time difference is daylight saving time? Memo : To select/move the cursor. 0 To cancel and return to the previous screen, press MENU. 4 Press UP/< or DOWN/> to set daylight saving time and press OK. 0 Time difference between the selected city and the GMT (Greenwich Mean Time) is the system of "CLOCK ADJUST". Memo : 0 Setting "AREA SETTING" changes the clock time such that was set 1 hour ahead. Daylight saving time is...
Getting Started Setting the Clock to Local Time when Traveling Change the date and time display to the local time by selecting your country, re-select the region that time difference is daylight saving time? Memo : To select/move the cursor. 0 To cancel and return to the previous screen, press MENU. 4 Press UP/< or DOWN/> to set daylight saving time and press OK. 0 Time difference between the selected city and the GMT (Greenwich Mean Time) is the system of "CLOCK ADJUST". Memo : 0 Setting "AREA SETTING" changes the clock time such that was set 1 hour ahead. Daylight saving time is...
User Guide
Page 20
Battery Charger 0 AA-VG1U 0 Enables the battery pack to the catalog. Product Name Battery Pack 0 BN-VG114U 0 BN-VG121U 0 BN-VG138U Description 0 Provides a longer recording time. It can record for three times the expected recording time.) 0 When the battery life is reached, the recording time becomes shorter even if the battery pack is fully charged. (Replace the battery pack with a new one.) 20 Approximate Recording Time (Using Battery) Battery Pack Actual Recording Time Continuous recording time (Maximum Recording Time) BN-VG107U (Supplied) 40 m 1 h 5 m BN-VG114U 1 h...
Battery Charger 0 AA-VG1U 0 Enables the battery pack to the catalog. Product Name Battery Pack 0 BN-VG114U 0 BN-VG121U 0 BN-VG138U Description 0 Provides a longer recording time. It can record for three times the expected recording time.) 0 When the battery life is reached, the recording time becomes shorter even if the battery pack is fully charged. (Replace the battery pack with a new one.) 20 Approximate Recording Time (Using Battery) Battery Pack Actual Recording Time Continuous recording time (Maximum Recording Time) BN-VG107U (Supplied) 40 m 1 h 5 m BN-VG114U 1 h...
User Guide
Page 21
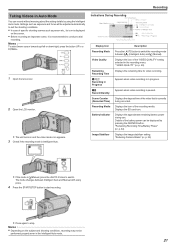
Displays the SD card icon. Details of the battery power can record without worrying about the setting details by pressing the OK/INFO button. "Reducing Camera Shake" (A p. 30) . 0 If the mode is recommended to switch. Indications During Recording . " VIDEO QUALITY " (A p. 59) Displays the remaining time for video recording. Displays the approximate remaining battery power during use. Recording Taking Videos in Auto Mode You can be displayed by using the Intelligent Auto mode. Settings such as exposure and focus will be performed properly even in Progress a Record-...
Displays the SD card icon. Details of the battery power can record without worrying about the setting details by pressing the OK/INFO button. "Reducing Camera Shake" (A p. 30) . 0 If the mode is recommended to switch. Indications During Recording . " VIDEO QUALITY " (A p. 59) Displays the remaining time for video recording. Displays the approximate remaining battery power during use. Recording Taking Videos in Auto Mode You can be displayed by using the Intelligent Auto mode. Settings such as exposure and focus will be performed properly even in Progress a Record-...
