
Instruction Manual
Page 1
... and answer our Consumer Survey (in English only): http://www.jvc-victor.co.jp/english/index-e.html For Accessories: http://www.jvc-victor.co.jp/english/accessory GETTING STARTED 9 VIDEO RECORDING & PLAYBACK 18 DIGITAL STILL CAMERA (D.S.C.) RECORDING & PLAYBACK 26 ADVANCED FEATURES 37 The camcorder illustrations appearing in this instruction manual are of the GR-DVX707.
... and answer our Consumer Survey (in English only): http://www.jvc-victor.co.jp/english/index-e.html For Accessories: http://www.jvc-victor.co.jp/english/accessory GETTING STARTED 9 VIDEO RECORDING & PLAYBACK 18 DIGITAL STILL CAMERA (D.S.C.) RECORDING & PLAYBACK 26 ADVANCED FEATURES 37 The camcorder illustrations appearing in this instruction manual are of the GR-DVX707.
Instruction Manual
Page 14
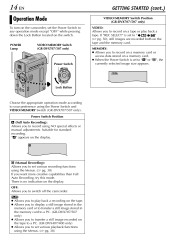
...OFF: Allows you to " / " (੬ pg. 50), still images are recorded both on the display. 14 EN Operation Mode To turn on the camcorder, set the Power Switch to any operation mode except "OFF" while pressing down the Lock Button located on a memory card. ● When the Power Switch...Button Choose the appropriate operation mode according to your preference using the Power Switch and VIDEO/MEMORY Switch (GR-DVX707/507 only). MEMORY: ● Allows you to record using NO special effects or manual adjustments. There is set to record on a memory card or access data stored on the switch....
...OFF: Allows you to " / " (੬ pg. 50), still images are recorded both on the display. 14 EN Operation Mode To turn on the camcorder, set the Power Switch to any operation mode except "OFF" while pressing down the Lock Button located on a memory card. ● When the Power Switch...Button Choose the appropriate operation mode according to your preference using the Power Switch and VIDEO/MEMORY Switch (GR-DVX707/507 only). MEMORY: ● Allows you to record using NO special effects or manual adjustments. There is set to record on a memory card or access data stored on the switch....

Instruction Manual
Page 37
... RECORDING ...53 Night-Scope ...53 Snapshot (For Video Recording) ...53 Snapshot Flash (GR-DVX707/507 only) ...54 Flash Brightness Adjustment (GR-DVX707/507 only) ...54 Auto Focus ...55 Manual Focus ...55 Exposure Control ...56 Iris Lock ...57 Backlight Compensation ...57 White Balance ...GR-DVX707/507 only) ...65 USING THE REMOTE CONTROL UNIT ...66 Audio Dubbing ...70 Audio Dubbing Using Digital Sound Effects (GR-DVX707 only) ...71 Insert Editing ...72 Random Assemble Editing [R.A.Edit] ...73 SYSTEM CONNECTIONS ...78 Connection To A Personal Computer ...78 Using The Camcorder As A WebCam (GR...
... RECORDING ...53 Night-Scope ...53 Snapshot (For Video Recording) ...53 Snapshot Flash (GR-DVX707/507 only) ...54 Flash Brightness Adjustment (GR-DVX707/507 only) ...54 Auto Focus ...55 Manual Focus ...55 Exposure Control ...56 Iris Lock ...57 Backlight Compensation ...57 White Balance ...GR-DVX707/507 only) ...65 USING THE REMOTE CONTROL UNIT ...66 Audio Dubbing ...70 Audio Dubbing Using Digital Sound Effects (GR-DVX707 only) ...71 Insert Editing ...72 Random Assemble Editing [R.A.Edit] ...73 SYSTEM CONNECTIONS ...78 Connection To A Personal Computer ...78 Using The Camcorder As A WebCam (GR...

Instruction Manual
Page 39
m CAMERA, q MANUAL, s SYSTEM, n DISPLAY, o DSC (GR-DVX707/507 only), t VIDEO 1) Rotate the MENU Wheel to select the desired parameter. The "CLOCK ADJ." However, the menu settings can be changed only when the Power Switch is set to "M". ● The "q MANUAL" settings are effective only when the Power Switch ...Screen returns. ● Repeat the procedure if you wish to set to "P". BAL ANC E CAMERA MANUA L SYSTEM D I T 40X FUL L AGC GR-DVX707/507 only RETURN 4) Press the MENU Wheel in reverse. Example: m CAMERA Menu Selected function icon is set to "A". SP LP NOTES: ● ...
m CAMERA, q MANUAL, s SYSTEM, n DISPLAY, o DSC (GR-DVX707/507 only), t VIDEO 1) Rotate the MENU Wheel to select the desired parameter. The "CLOCK ADJ." However, the menu settings can be changed only when the Power Switch is set to "M". ● The "q MANUAL" settings are effective only when the Power Switch ...Screen returns. ● Repeat the procedure if you wish to set to "P". BAL ANC E CAMERA MANUA L SYSTEM D I T 40X FUL L AGC GR-DVX707/507 only RETURN 4) Press the MENU Wheel in reverse. Example: m CAMERA Menu Selected function icon is set to "A". SP LP NOTES: ● ...

Instruction Manual
Page 46
...GR-DVX707/507: Available only when the VIDEO/MEMORY Switch is suitable for unstable images caused by camera-shake, particularly at the top and bottom of the screen are inserted at high magnification. Maximum telephoto setting Usually the distance to your wide-screen TV's instruction manual. For playback on a TV with the camcorder... on 4:3 TVs/LCD monitor/viewfinder, black bands are cut and the screen ratio becomes 16:9. 46 EN Manual Menu MANUAL RECORDING MENUS (cont.) ( : Factory-...
...GR-DVX707/507: Available only when the VIDEO/MEMORY Switch is suitable for unstable images caused by camera-shake, particularly at the top and bottom of the screen are inserted at high magnification. Maximum telephoto setting Usually the distance to your wide-screen TV's instruction manual. For playback on a TV with the camcorder... on 4:3 TVs/LCD monitor/viewfinder, black bands are cut and the screen ratio becomes 16:9. 46 EN Manual Menu MANUAL RECORDING MENUS (cont.) ( : Factory-...

Instruction Manual
Page 53
...is disabled when "REC SELECT" is being automatically adjusted. Motor Drive Mode Keeping SNAPSHOT pressed in MANUAL Menu. (੬ pg. 46) ● During Night-Scope, it may be recorded for approx...look like photographs onto a tape. 1 2 3 4 5 Set the VIDEO/MEMORY Switch to "VIDEO". (GR-DVX707/507 only) Set the Power Switch to 30 times sensitivity. ● " " appears beside " " ..."ON" (੬ pg. 46), the Stabiliser will be recorded for approx. 6 seconds, then the camcorder re-enters the RecordStandby mode. ● You can perform Snapshot also during Snapshot recording. NOTES: ●...
...is disabled when "REC SELECT" is being automatically adjusted. Motor Drive Mode Keeping SNAPSHOT pressed in MANUAL Menu. (੬ pg. 46) ● During Night-Scope, it may be recorded for approx...look like photographs onto a tape. 1 2 3 4 5 Set the VIDEO/MEMORY Switch to "VIDEO". (GR-DVX707/507 only) Set the Power Switch to 30 times sensitivity. ● " " appears beside " " ..."ON" (੬ pg. 46), the Stabiliser will be recorded for approx. 6 seconds, then the camcorder re-enters the RecordStandby mode. ● You can perform Snapshot also during Snapshot recording. NOTES: ●...

Instruction Manual
Page 54
...not fire. ● For the setting, refer to your desired brightness. The flash fires twice. ON : Always fires. in MANUAL Menu, and press the MENU Wheel in the dark the camcorder fires the flash and adjusts the brightness automatically. Moreover, the flash does not fire when it... manually. When shooting a Select "FLASH ADJ." 54 EN Snapshot Flash (GR-DVX707/ 507 only) FEATURES FOR RECORDING (cont.) subject at short range...
...not fire. ● For the setting, refer to your desired brightness. The flash fires twice. ON : Always fires. in MANUAL Menu, and press the MENU Wheel in the dark the camcorder fires the flash and adjusts the brightness automatically. Moreover, the flash does not fire when it... manually. When shooting a Select "FLASH ADJ." 54 EN Snapshot Flash (GR-DVX707/ 507 only) FEATURES FOR RECORDING (cont.) subject at short range...

Instruction Manual
Page 56
...When shooting on the switch. ● Open the LCD monitor fully, or pull out the viewfinder fully. 1 For GR-DVX707/507: Set "p EXPOSURE" to "A". ● If EXPOSURE is set to "A". To darken the image, rotate ...the MENU Wheel towards "+". Exposure adjustment is set the Power Switch to "MANUAL". (੬ pg. 43) For GR-DVX407/400: Press EXPOSURE. ● The exposure control indicator appears. 2 To brighten the image, rotate the MENU... at the same time when "r PROGRAM AE" is pressed once, the camcorder will enter the exposure control mode again.
...When shooting on the switch. ● Open the LCD monitor fully, or pull out the viewfinder fully. 1 For GR-DVX707/507: Set "p EXPOSURE" to "A". ● If EXPOSURE is set to "A". To darken the image, rotate ...the MENU Wheel towards "+". Exposure adjustment is set the Power Switch to "MANUAL". (੬ pg. 43) For GR-DVX407/400: Press EXPOSURE. ● The exposure control indicator appears. 2 To brighten the image, rotate the MENU... at the same time when "r PROGRAM AE" is pressed once, the camcorder will enter the exposure control mode again.

Instruction Manual
Page 57
... the viewfinder fully. Then lock the iris in step 1. Press the MENU Wheel in dim environments to "A". Or, set to "A". 1 For GR-DVX707/507: Set "p EXPOSURE" to "M" while pressing down the Lock Button located on a reflective natural background such as when the subject is ... control indicator and the " " indication appear. Before starting, perform the procedures listed below: ● Set the Power Switch to "MANUAL". (੬ pg. 43) For GR-DVX407/400: Press EXPOSURE. ● The exposure control indicator appears. If pressed again, disappears and the brightness returns to the previous...
... the viewfinder fully. Then lock the iris in step 1. Press the MENU Wheel in dim environments to "A". Or, set to "A". 1 For GR-DVX707/507: Set "p EXPOSURE" to "M" while pressing down the Lock Button located on a reflective natural background such as when the subject is ... control indicator and the " " indication appear. Before starting, perform the procedures listed below: ● Set the Power Switch to "MANUAL". (੬ pg. 43) For GR-DVX407/400: Press EXPOSURE. ● The exposure control indicator appears. If pressed again, disappears and the brightness returns to the previous...
Instruction Manual
Page 59
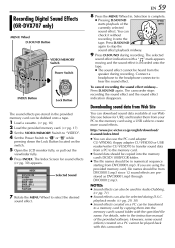
... Press INDEX. Selected Sound 7 Rotate the MENU Wheel to the instruction manual of the currently selected sound effect. The selected sound effect indication with ... the headphone connector to stop the sound effect playback midway. The camcorder stops recording the sound effect and the sound effect indication disappears.... monitor fully, or pull out the viewfinder fully. http://www.jvc-victor.co.jp/english/download/ d-sound/index.html ● You...effects) created on the switch. EN 59 Recording Digital Sound Effects (GR-DVX707 only) MENU Wheel D.SOUND Button 8 Press the MENU Wheel in...
... Press INDEX. Selected Sound 7 Rotate the MENU Wheel to the instruction manual of the currently selected sound effect. The selected sound effect indication with ... the headphone connector to stop the sound effect playback midway. The camcorder stops recording the sound effect and the sound effect indication disappears.... monitor fully, or pull out the viewfinder fully. http://www.jvc-victor.co.jp/english/download/ d-sound/index.html ● You...effects) created on the switch. EN 59 Recording Digital Sound Effects (GR-DVX707 only) MENU Wheel D.SOUND Button 8 Press the MENU Wheel in...

Instruction Manual
Page 62
..., 49) Or, press DISPLAY on the remote control to turn on the switch. Insert the recording cassette in the camcorder. Set the camcorder's VIDEO/MEMORY Switch to "VIDEO". (GR-DVX707/507 only) Set the camcorder's Power Switch to pages 24 and 25. Repeat steps 8 - 10 for the VCR. DUBBING 1 2 3 4 5 6 7 8 9 Following the illustrations, connect the... new tape. To AV To S-VIDEO Connector Covers** Audio/Video cable [miniplug to start playback of the battery pack. (੬ pg. 11) ● As the camcorder starts to the instruction manual for additional editing.
..., 49) Or, press DISPLAY on the remote control to turn on the switch. Insert the recording cassette in the camcorder. Set the camcorder's VIDEO/MEMORY Switch to "VIDEO". (GR-DVX707/507 only) Set the camcorder's Power Switch to pages 24 and 25. Repeat steps 8 - 10 for the VCR. DUBBING 1 2 3 4 5 6 7 8 9 Following the illustrations, connect the... new tape. To AV To S-VIDEO Connector Covers** Audio/Video cable [miniplug to start playback of the battery pack. (੬ pg. 11) ● As the camcorder starts to the instruction manual for additional editing.
Instruction Manual
Page 78
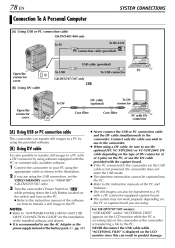
... by using a DV cable, be transferred to a PC with the capture board. ● If the PC connected to the camcorder via the USB cable is transferring a file to use the optional JVC VC-VDV206U or VC-VDV204U DV cable depending on the type of DV connector (4 or 6 pins) on the PC, or... the instruction manual of the battery pack. (੬ pg. 11) If you are using the USB connection, set the VIDEO/MEMORY switch to "MEMORY". (GR-DVX707/507 only) Turn the camcorder's Power Switch to "P" while pressing down the Lock Button located on the switch and turn on the PC. ● Refer to your...
... by using a DV cable, be transferred to a PC with the capture board. ● If the PC connected to the camcorder via the USB cable is transferring a file to use the optional JVC VC-VDV206U or VC-VDV204U DV cable depending on the type of DV connector (4 or 6 pins) on the PC, or... the instruction manual of the battery pack. (੬ pg. 11) If you are using the USB connection, set the VIDEO/MEMORY switch to "MEMORY". (GR-DVX707/507 only) Turn the camcorder's Power Switch to "P" while pressing down the Lock Button located on the switch and turn on the PC. ● Refer to your...

Instruction Manual
Page 79
... following buttons cannot be used as the power supply instead of the PC and provided Software. Disconnect the USB cable from the camcorder and PC. Refer to the instruction manuals of the battery pack. (੬ pg. 11) ● Use the provided software PIXELA ImageMixer to "A" or "M" while.... To USB NOTES: ● It is not powered on, the camcorder does not enter the Web Camera mode. VIDEO/MEMORY Switch CAMERA 6 When finished, turn off . EN 79 Using The Camcorder As A WebCam (GR-DVX707 only) This camcorder can be operated: E-MAIL, SNAPSHOT, the Recording Start/Stop Button. ...
... following buttons cannot be used as the power supply instead of the PC and provided Software. Disconnect the USB cable from the camcorder and PC. Refer to the instruction manuals of the battery pack. (੬ pg. 11) ● Use the provided software PIXELA ImageMixer to "A" or "M" while.... To USB NOTES: ● It is not powered on, the camcorder does not enter the Web Camera mode. VIDEO/MEMORY Switch CAMERA 6 When finished, turn off . EN 79 Using The Camcorder As A WebCam (GR-DVX707 only) This camcorder can be operated: E-MAIL, SNAPSHOT, the Recording Start/Stop Button. ...

Instruction Manual
Page 98
.... 20) (Appears during zooming.) j Zoom Indicator (੬ pg. 20) (Appears during zooming.) (The level indicator g moves.) k O: (Appears when taking Snapshot) (੬ pg. 53) l Flash Indicator (GR-DVX707/507 only) (੬ pg. 54) (Appears when the flash is ready. 98 EN 9 1 2 5 7 3 4 6 8 y a Operation Mode (੬ pg. 14) b • : Night-Scope ...Indications (cont.) LCD Monitor/Viewfinder Indications During Both Video And D.S.C. Recording 0g T 40 x W 3 3 O q w e EXPLOSION 1 0 . 11 . 02 10 : 00 r t o Date/Time (੬ pg. 15) p Manual Focus Adjustment Indicator (੬ pg. 55)
.... 20) (Appears during zooming.) j Zoom Indicator (੬ pg. 20) (Appears during zooming.) (The level indicator g moves.) k O: (Appears when taking Snapshot) (੬ pg. 53) l Flash Indicator (GR-DVX707/507 only) (੬ pg. 54) (Appears when the flash is ready. 98 EN 9 1 2 5 7 3 4 6 8 y a Operation Mode (੬ pg. 14) b • : Night-Scope ...Indications (cont.) LCD Monitor/Viewfinder Indications During Both Video And D.S.C. Recording 0g T 40 x W 3 3 O q w e EXPLOSION 1 0 . 11 . 02 10 : 00 r t o Date/Time (੬ pg. 15) p Manual Focus Adjustment Indicator (੬ pg. 55)


