Instruction Manual
Page 3
...control panel angle 32 Detaching the control panel 33 CD CHANGER OPERATIONS (Only for KD-AR800/KD-G800 34 Playing discs 34 Selecting the playback modes 37 EXTERNAL COMPONENT OPERATIONS (Only for KD-AR800/KD-G800 39 Playing an external component 39 ADDITIONAL INFORMATION ...JVC product. Time countdown indicator To use the MODE button 3 LOCATION OF THE BUTTONS 4 Control panel 4 Remote controller 5 Preparing the remote controller 6 BASIC OPERATIONS 7 Turning on the power 7 Canceling the display demonstration ........ 8 Setting the clock 9 RADIO OPERATIONS 10 Listening to the radio...
...control panel angle 32 Detaching the control panel 33 CD CHANGER OPERATIONS (Only for KD-AR800/KD-G800 34 Playing discs 34 Selecting the playback modes 37 EXTERNAL COMPONENT OPERATIONS (Only for KD-AR800/KD-G800 39 Playing an external component 39 ADDITIONAL INFORMATION ...JVC product. Time countdown indicator To use the MODE button 3 LOCATION OF THE BUTTONS 4 Control panel 4 Remote controller 5 Preparing the remote controller 6 BASIC OPERATIONS 7 Turning on the power 7 Canceling the display demonstration ........ 8 Setting the clock 9 RADIO OPERATIONS 10 Listening to the radio...
Instruction Manual
Page 4
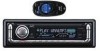
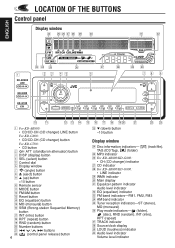
... ghjk l / z x cv b n 1 2 3 45 KD-AR800 m 6 KD-G800 KD-G700 , .P 78 9 pq we r 1 For KD-AR800: • CD/CD-CH (CD changer) LINE button For KD-G800: • CD/CD-CH (CD changer) button For KD-G700: • CD button 2 (standby/on attenuator) button 3 DISP (display) button 4... f Disc information indicators- (track/file), TAG (ID3 Tag), g MP3 indicator (folder) h For KD-AR800/KD-G800: • CH (CD changer) indicator j CD indicator k For KD-AR800/KD-G800: • LINE indicator l WMA indicator / Main display z Equalizer pattern indicator Audio level indicator x ...
... ghjk l / z x cv b n 1 2 3 45 KD-AR800 m 6 KD-G800 KD-G700 , .P 78 9 pq we r 1 For KD-AR800: • CD/CD-CH (CD changer) LINE button For KD-G800: • CD/CD-CH (CD changer) button For KD-G700: • CD button 2 (standby/on attenuator) button 3 DISP (display) button 4... f Disc information indicators- (track/file), TAG (ID3 Tag), g MP3 indicator (folder) h For KD-AR800/KD-G800: • CH (CD changer) indicator j CD indicator k For KD-AR800/KD-G800: • LINE indicator l WMA indicator / Main display z Equalizer pattern indicator Audio level indicator x ...
Instruction Manual
Page 5
...folder and start playing the first file. • For KD-AR800/KD-G800: While playing an MP3 disc on the main unit. Each time you can move to the next disc. 4 Functions the same as the control dial on an MP3compatible CD changer; - Skips to the next folder if pressed and... held. Skips to the previous disc if pressed briefly. - Note: These buttons do not function for stations while listening to the radio. • Fast-forwards or reverses the track/file...
...folder and start playing the first file. • For KD-AR800/KD-G800: While playing an MP3 disc on the main unit. Each time you can move to the next disc. 4 Functions the same as the control dial on an MP3compatible CD changer; - Skips to the next folder if pressed and... held. Skips to the previous disc if pressed briefly. - Note: These buttons do not function for stations while listening to the radio. • Fast-forwards or reverses the track/file...

Instruction Manual
Page 7
...see pages 18 - 22. • For KD-AR800/KD-G800 To operate the CD changer, see pages 13 - 16. You do not have to press this button to turn on the power. 3 Adjust the volume. "ATT" starts flashing on the power. 2 Select the source. (For KD-AR800) (For KD-G800) Volume level appears. "SEE YOU" appears...pages 10 - 12. To increase the volume To decrease the volume Note on One-Touch Operation: When you can also restore the sound. To play a CD, see pages 34 - 38. To turn the control dial, you select a source in a moment Press briefly while listening to a disc, disc play ...
...see pages 18 - 22. • For KD-AR800/KD-G800 To operate the CD changer, see pages 13 - 16. You do not have to press this button to turn on the power. 3 Adjust the volume. "ATT" starts flashing on the power. 2 Select the source. (For KD-AR800) (For KD-G800) Volume level appears. "SEE YOU" appears...pages 10 - 12. To increase the volume To decrease the volume Note on One-Touch Operation: When you can also restore the sound. To play a CD, see pages 34 - 38. To turn the control dial, you select a source in a moment Press briefly while listening to a disc, disc play ...
Instruction Manual
Page 13
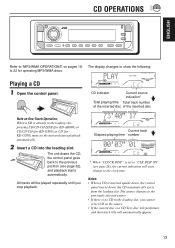
... "CLOCK DISP" is set to the previously selected source. • If there is no CD in the loading slot, pressing CD/CD-CH LINE (for KD-AR800) or CD/CD-CH (for KD-G800) or CD (for operating MP3/WMA discs. Notes: • When a CD is a CD Text, disc title/performer and then track title will soon change to the previous...
... "CLOCK DISP" is set to the previously selected source. • If there is no CD in the loading slot, pressing CD/CD-CH LINE (for KD-AR800) or CD/CD-CH (for KD-G800) or CD (for operating MP3/WMA discs. Notes: • When a CD is a CD Text, disc title/performer and then track title will soon change to the previous...
Instruction Manual
Page 16
...lower part of the display. To cancel the prohibition and unlock the disc While pressing CD/CD-CH LINE (for KD-AR800) or CD/CD-CH (for KD-G800) or CD (for KD-G700), press and hold for more than 2 seconds. (For KD-AR800) or Track title ( lights up on the display. • If no...OK" flashes on page 29. ENGLISH Playing a CD Text Prohibiting disc ejection In a CD Text, some information about the disc (its disc title, performer, and track title) is unlocked. 16 While pressing CD/CD-CH LINE (for KD-AR800) or CD/CD-CH (for KD-G800) or CD (for KD-G700), press and hold again for about 5...
...lower part of the display. To cancel the prohibition and unlock the disc While pressing CD/CD-CH LINE (for KD-AR800) or CD/CD-CH (for KD-G800) or CD (for KD-G700), press and hold for more than 2 seconds. (For KD-AR800) or Track title ( lights up on the display. • If no...OK" flashes on page 29. ENGLISH Playing a CD Text Prohibiting disc ejection In a CD Text, some information about the disc (its disc title, performer, and track title) is unlocked. 16 While pressing CD/CD-CH LINE (for KD-AR800) or CD/CD-CH (for KD-G800) or CD (for KD-G700), press and hold again for about 5...
Instruction Manual
Page 18
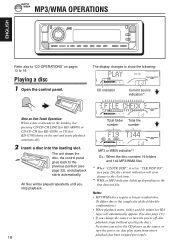
..."CLK DISP ON" (see page 32), and playback starts automatically. Playing a disc 1 Open the control panel. MP3/WMA OPERATIONS ENGLISH Refer also to "CD OPERATIONS" on the unit and starts playback automatically. 2 Insert a disc into the loading slot. Next time you stop playback. 18 Total folder Total file number...disc contains 19 folders and 144 MP3/WMA files *1 When "CLOCK DISP" is already in the loading slot, pressing CD/CD-CH LINE (for KD-AR800) or CD/CD-CH (for KD-G800) or CD (for KD-G700) turns on pages 13 to 16. The unit draws the disc, the control panel goes back to the previous...
..."CLK DISP ON" (see page 32), and playback starts automatically. Playing a disc 1 Open the control panel. MP3/WMA OPERATIONS ENGLISH Refer also to "CD OPERATIONS" on the unit and starts playback automatically. 2 Insert a disc into the loading slot. Next time you stop playback. 18 Total folder Total file number...disc contains 19 folders and 144 MP3/WMA files *1 When "CLOCK DISP" is already in the loading slot, pressing CD/CD-CH LINE (for KD-AR800) or CD/CD-CH (for KD-G800) or CD (for KD-G700) turns on pages 13 to 16. The unit draws the disc, the control panel goes back to the previous...
Instruction Manual
Page 23
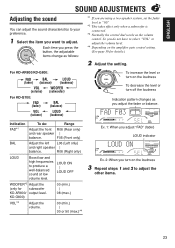
... the control dial works as you adjust the fader or balance. So you do : Range Adjust the front R06 (Rear only) and rear speaker | balance. KD-G800) 00 (min.) | 08 (max.) VOL*3 Adjust the volume. 00 (min.) | 30 or 50 (max.)*4 Ex. 1: When you adjust "FAD" (fader) LOUD indicator Ex. 2: When you...
... the control dial works as you adjust the fader or balance. So you do : Range Adjust the front R06 (Rear only) and rear speaker | balance. KD-G800) 00 (min.) | 08 (max.) VOL*3 Adjust the volume. 00 (min.) | 30 or 50 (max.)*4 Ex. 1: When you adjust "FAD" (fader) LOUD indicator Ex. 2: When you...
Instruction Manual
Page 27
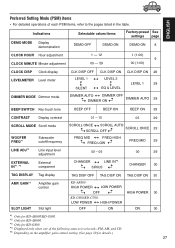
GAIN*5 Amplifier gain control SLOT LIGHT Slot light KD-AR800: HIGH POWER LOW POWER OFF HIGH POWER 30 KD-G800/KD-G700: LOW POWER HIGH POWER OFF ON ON 30 *1 Only for KD-AR800/KD-G800. *2 Only for KD-AR800. *3 Only for details.) 27 Indications DEMO MODE Display demonstration Selectable values/items ...Preferred Setting Mode (PSM) items • For detailed operations of the following sources is selected-FM, AM, and CD. *5 Depending on the amplifier gain control setting. (See page 30 for KD-G800. *4 Displayed only when one of each PSM items, refer to the pages listed in the table.
GAIN*5 Amplifier gain control SLOT LIGHT Slot light KD-AR800: HIGH POWER LOW POWER OFF HIGH POWER 30 KD-G800/KD-G700: LOW POWER HIGH POWER OFF ON ON 30 *1 Only for KD-AR800/KD-G800. *2 Only for KD-AR800. *3 Only for details.) 27 Indications DEMO MODE Display demonstration Selectable values/items ...Preferred Setting Mode (PSM) items • For detailed operations of the following sources is selected-FM, AM, and CD. *5 Depending on the amplifier gain control setting. (See page 30 for KD-G800. *4 Displayed only when one of each PSM items, refer to the pages listed in the table.

Instruction Manual
Page 28
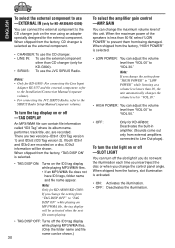
... appears for about 5 seconds. When shipped from the factory, Auto Dimmer mode is turned on . When "CLOCK DISP" is selected as the source-for KD-AR800/KD-G800). When "CLOCK DISP" is set the clock to be shown on the lower part of the clock display (except when "LINE IN" or "SIRIUS"... is set to "CLK DISP OFF": Source Initial indication Pressing DISP (display) Tuner CD or CD-CH Band CD, folder number, or disc number Clock appears for about 5...
... appears for about 5 seconds. When shipped from the factory, Auto Dimmer mode is turned on . When "CLOCK DISP" is selected as the source-for KD-AR800/KD-G800). When "CLOCK DISP" is set the clock to be shown on the lower part of the clock display (except when "LINE IN" or "SIRIUS"... is set to "CLK DISP OFF": Source Initial indication Pressing DISP (display) Tuner CD or CD-CH Band CD, folder number, or disc number Clock appears for about 5...

Instruction Manual
Page 29
... level is connected to the LINE IN plugs. To select the subwoofer cutoff frequency -WOOFER FREQ (Only for KD-AR800/KD-G800) When a subwoofer is connected to this unit, select an appropriate cutoff frequency level for KD-AR800) Adjust the line input level properly when an external component is set to "SCROLL ONCE." •...
... level is connected to the LINE IN plugs. To select the subwoofer cutoff frequency -WOOFER FREQ (Only for KD-AR800/KD-G800) When a subwoofer is connected to this unit, select an appropriate cutoff frequency level for KD-AR800) Adjust the line input level properly when an external component is set to "SCROLL ONCE." •...
Instruction Manual
Page 30
... component, refer to the Installation/Connection Manual (separate volume). • For connecting the JVC SIRIUS Radio, refer to "LOW POWER" while listening at a volume level more than CD changer (only for KD-G800). • SIRIUS: To use the external component other than 30, the unit automatically ...changes the volume level to "VOL 30." • HIGH POWER: You can change the setting from "HIGH POWER" to the SIRIUS Radio Setup Manual (separate ...
... component, refer to the Installation/Connection Manual (separate volume). • For connecting the JVC SIRIUS Radio, refer to "LOW POWER" while listening at a volume level more than CD changer (only for KD-G800). • SIRIUS: To use the external component other than 30, the unit automatically ...changes the volume level to "VOL 30." • HIGH POWER: You can change the setting from "HIGH POWER" to the SIRIUS Radio Setup Manual (separate ...
Instruction Manual
Page 31
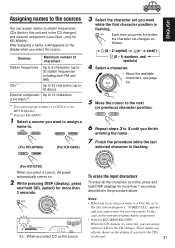
... select a source, the power automatically comes on. 2 While pressing DISP (display), press and hold DISP (display) for KD-AR800/KD-G800: When the CD changer is flashing. Ex.: When you select CD as the source To erase the input characters To erase all the characters at a time, press and hold SEL (select...position is connected, you can assign names to . (For KD-AR800) (For KD-G800) 3 Select the character set changes as described in this unit. 31 Notes: • When you try to assign a name to a 41st disc or to station frequencies, CDs (both FM and AM) Up to 32 characters (up...
... select a source, the power automatically comes on. 2 While pressing DISP (display), press and hold DISP (display) for KD-AR800/KD-G800: When the CD changer is flashing. Ex.: When you select CD as the source To erase the input characters To erase all the characters at a time, press and hold SEL (select...position is connected, you can assign names to . (For KD-AR800) (For KD-G800) 3 Select the character set changes as described in this unit. 31 Notes: • When you try to assign a name to a 41st disc or to station frequencies, CDs (both FM and AM) Up to 32 characters (up...
Instruction Manual
Page 34
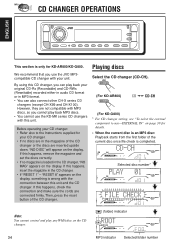
... discs We recommend that you use the JVC MP3compatible CD changer with your original CD-Rs (Recordable) and CD-RWs (Rewritable) recorded either in audio CD format or in the CD changer, "NO MAG" appears on the display, something is only for KD-AR800/KD-G800. "RESET 8" appears on the display....) indicator 34 MP3 indicator Selected folder number If this happens, insert the magazine in the magazine of the CD changer. (For KD-AR800) CD CD-CH (For KD-G800) * For CD changer setting, see "To select the external component to the Instructions supplied for details. • When the...
... discs We recommend that you use the JVC MP3compatible CD changer with your original CD-Rs (Recordable) and CD-RWs (Rewritable) recorded either in audio CD format or in the CD changer, "NO MAG" appears on the display, something is only for KD-AR800/KD-G800. "RESET 8" appears on the display....) indicator 34 MP3 indicator Selected folder number If this happens, insert the magazine in the magazine of the CD changer. (For KD-AR800) CD CD-CH (For KD-G800) * For CD changer setting, see "To select the external component to the Instructions supplied for details. • When the...
Instruction Manual
Page 35
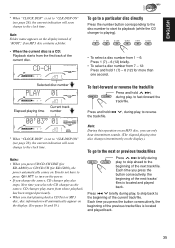
... select a disc number from 1 - 6: Press 1 (7) - 6 (12) briefly. • To select a disc number from 7 - 12: Press and hold 1 (7) - 6 (12) for KD-G800), the power automatically comes on the power. • If you press the button consecutively, the beginning of the next tracks/ files is located and played ...back. Each time you press CD/CD-CH LINE (for KD-AR800) or CD/CD-CH (for more than one second. Selected disc number Current track Elapsed playing time number To fast-forward or reverse the...
... select a disc number from 1 - 6: Press 1 (7) - 6 (12) briefly. • To select a disc number from 7 - 12: Press and hold 1 (7) - 6 (12) for KD-G800), the power automatically comes on the power. • If you press the button consecutively, the beginning of the next tracks/ files is located and played ...back. Each time you press CD/CD-CH LINE (for KD-AR800) or CD/CD-CH (for more than one second. Selected disc number Current track Elapsed playing time number To fast-forward or reverse the...
Instruction Manual
Page 39
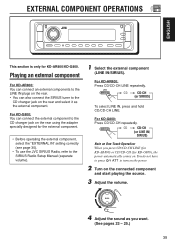
... SIRIUS tuner to the SIRIUS Radio Setup Manual (separate volume). 1 Select the external component (LINE IN/SIRIUS). For KD-G800: Press CD/CD-CH repeatedly. CD CD-CH (or LINE IN/ SIRIUS) Note on One-Touch Operation: When you want. (See pages 23 - 25.) 39 CD CD-CH (or SIRIUS) To select... • Before operating the external component, select the "EXTERNAL IN" setting correctly (see page 30). • To use the JVC SIRIUS Radio, refer to the CD changer jack on the connected component and start playing the source. 3 Adjust the volume. 4 Adjust the sound as the external component...
... SIRIUS tuner to the SIRIUS Radio Setup Manual (separate volume). 1 Select the external component (LINE IN/SIRIUS). For KD-G800: Press CD/CD-CH repeatedly. CD CD-CH (or LINE IN/ SIRIUS) Note on One-Touch Operation: When you want. (See pages 23 - 25.) 39 CD CD-CH (or SIRIUS) To select... • Before operating the external component, select the "EXTERNAL IN" setting correctly (see page 30). • To use the JVC SIRIUS Radio, refer to the CD changer jack on the connected component and start playing the source. 3 Adjust the volume. 4 Adjust the sound as the external component...
Instruction Manual
Page 40
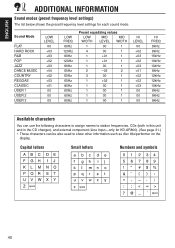
... modes (preset frequency level settings) The list below shows the preset frequency level settings for KD-AR800). (See page 31.) • These characters can be also used to station frequencies, CDs (both in this unit and in the CD changer), and external component (Line Input-only for each sound mode. Sound Mode FLAT...
... modes (preset frequency level settings) The list below shows the preset frequency level settings for KD-AR800). (See page 31.) • These characters can be also used to station frequencies, CDs (both in this unit and in the CD changer), and external component (Line Input-only for each sound mode. Sound Mode FLAT...
Instruction Manual
Page 41
Signals are incorrect. rough roads. Disc Playback Connections are too weak. While pressing CD/CD-CH LINE (for KD-AR800) or CD/CD-CH (for KD-G800) or CD (for KDG700), press and hold SEL (select) for recording. • Disc cannot be ejected. General Connections are erased.) (See... is sometimes You are driving on rough roads. Check the following points before calling a service center. minimum level. Adjust it to the radio. Check the cords and connections. • This unit does not work , check the Installation/ Connection Manual (separate volume). (Ex.:...
Signals are incorrect. rough roads. Disc Playback Connections are too weak. While pressing CD/CD-CH LINE (for KD-AR800) or CD/CD-CH (for KD-G800) or CD (for KDG700), press and hold SEL (select) for recording. • Disc cannot be ejected. General Connections are erased.) (See... is sometimes You are driving on rough roads. Check the following points before calling a service center. minimum level. Adjust it to the radio. Check the cords and connections. • This unit does not work , check the Installation/ Connection Manual (separate volume). (Ex.:...
Instruction Manual
Page 43
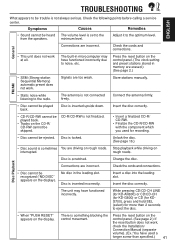
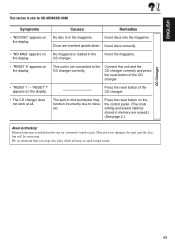
...discs correctly. • "NO MAG" appears on such rough roads. 43 Connect this unit and the CD changer correctly and press the reset button of the CD changer. • The CD changer does not work at all. Press the reset button on the the control panel. (The clock ... in the magazine. Discs are erased.) (See page 2.) About mistracking: Mistracking may function incorrectly due to the CD changer correctly. ENGLISH CD Changer This section is only for KD-AR800/KD-G800 Symptoms Causes Remedies • "NO DISC" appears on extremely rough roads. This does not damage the unit and...
...discs correctly. • "NO MAG" appears on such rough roads. 43 Connect this unit and the CD changer correctly and press the reset button of the CD changer. • The CD changer does not work at all. Press the reset button on the the control panel. (The clock ... in the magazine. Discs are erased.) (See page 2.) About mistracking: Mistracking may function incorrectly due to the CD changer correctly. ENGLISH CD Changer This section is only for KD-AR800/KD-G800 Symptoms Causes Remedies • "NO DISC" appears on extremely rough roads. This does not damage the unit and...
Instruction Manual
Page 45
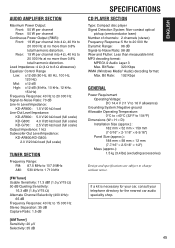
... Line-In Level/Impedance: KD-AR800: 1.5 V/20 kΩ load Line-Out Level/Impedance: KD-AR800: 5.0 V/20 kΩ load (full scale) KD-G800: 4.0 V/20 kΩ load (full scale) KD-G700: 2.5 V/20 kΩ load (full scale) Output Impedance: 1 kΩ Subwoofer-Out Level/Impedance: KD-AR800/KD-G800: 2.0 V/20 kΩ... 15 000 Hz Stereo Separation: 35 dB Capture Ratio: 1.5 dB [AM Tuner] Sensitivity: 20 µV Selectivity: 35 dB SPECIFICATIONS CD PLAYER SECTION Type: Compact disc player Signal Detection System: Non-contact optical pickup (semiconductor laser) Number of channels: 2 channels (stereo)...
... Line-In Level/Impedance: KD-AR800: 1.5 V/20 kΩ load Line-Out Level/Impedance: KD-AR800: 5.0 V/20 kΩ load (full scale) KD-G800: 4.0 V/20 kΩ load (full scale) KD-G700: 2.5 V/20 kΩ load (full scale) Output Impedance: 1 kΩ Subwoofer-Out Level/Impedance: KD-AR800/KD-G800: 2.0 V/20 kΩ... 15 000 Hz Stereo Separation: 35 dB Capture Ratio: 1.5 dB [AM Tuner] Sensitivity: 20 µV Selectivity: 35 dB SPECIFICATIONS CD PLAYER SECTION Type: Compact disc player Signal Detection System: Non-contact optical pickup (semiconductor laser) Number of channels: 2 channels (stereo)...


