
Instruction Manual
Page 2
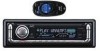
... servicing to which can radiate radio frequency energy and, if not installed and used in microcomputer. CAUTION on , the user is connected. - Avoid direct exposure to correct the interference by turning the equipment off and on Volume Setting: Discs produce very little noise compared with the instructions, may get caught or hurt. (See page 32.) Note: Your preset adjustments-such as preset channels or sound adjustments-will block outside sounds, making driving...
... servicing to which can radiate radio frequency energy and, if not installed and used in microcomputer. CAUTION on , the user is connected. - Avoid direct exposure to correct the interference by turning the equipment off and on Volume Setting: Discs produce very little noise compared with the instructions, may get caught or hurt. (See page 32.) Note: Your preset adjustments-such as preset channels or sound adjustments-will block outside sounds, making driving...
Instruction Manual
Page 3
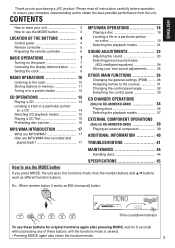
... also clears the functions mode. 3 Time countdown indicator To use the MODE button 3 LOCATION OF THE BUTTONS 4 Control panel 4 Remote controller 5 Preparing the remote controller 6 BASIC OPERATIONS 7 Turning on the power 7 Canceling the display demonstration ........ 8 Setting the clock 9 RADIO OPERATIONS 10 Listening to the radio 10 Storing stations in memory 11 Tuning in to a preset station 12 CD OPERATIONS 13 Playing a CD 13 Locating a track or a particular portion on a CD 14 Selecting CD playback modes 15 Playing a CD Text 16 Prohibiting disc ejection 16 MP3/WMA...
... also clears the functions mode. 3 Time countdown indicator To use the MODE button 3 LOCATION OF THE BUTTONS 4 Control panel 4 Remote controller 5 Preparing the remote controller 6 BASIC OPERATIONS 7 Turning on the power 7 Canceling the display demonstration ........ 8 Setting the clock 9 RADIO OPERATIONS 10 Listening to the radio 10 Storing stations in memory 11 Tuning in to a preset station 12 CD OPERATIONS 13 Playing a CD 13 Locating a track or a particular portion on a CD 14 Selecting CD playback modes 15 Playing a CD Text 16 Prohibiting disc ejection 16 MP3/WMA...
Instruction Manual
Page 4
... panel Display window f ghjk l / z x cv b n 1 2 3 45 KD-AR800 m 6 KD-G800 KD-G700 , .P 78 9 pq we r 1 For KD-AR800: • CD/CD-CH (CD changer) LINE button For KD-G800: • CD/CD-CH (CD changer) button For KD-G700: • CD button 2 (standby/on attenuator) button 3 DISP (display) button 4 SEL (select) button 5 Control dial 6 Display window 7 (angle) button 8 0 (eject) button 9 5 (up) button +10 button p Remote sensor q MODE button w FM/AM button e Reset button r EQ (equalizer) button t MO (monaural) button y SSM (Strong-station Sequential Memory...
... panel Display window f ghjk l / z x cv b n 1 2 3 45 KD-AR800 m 6 KD-G800 KD-G700 , .P 78 9 pq we r 1 For KD-AR800: • CD/CD-CH (CD changer) LINE button For KD-G800: • CD/CD-CH (CD changer) button For KD-G700: • CD button 2 (standby/on attenuator) button 3 DISP (display) button 4 SEL (select) button 5 Control dial 6 Display window 7 (angle) button 8 0 (eject) button 9 5 (up) button +10 button p Remote sensor q MODE button w FM/AM button e Reset button r EQ (equalizer) button t MO (monaural) button y SSM (Strong-station Sequential Memory...
Instruction Manual
Page 5
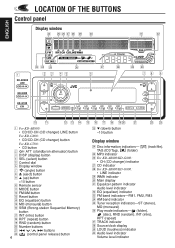
... or a WMA disc. Note: While playing a CD on a CD changer, this always skips to the next disc. 4 Functions the same as the control dial on an MP3compatible CD changer; - Note: While playing a CD on a CD changer, this always skips to the previous disc. 1 • Turns on an MP3compatible CD changer; - Each time you press the button, you press the button, the preset station number increases, and the selected station is turned off. • Turns off the unit if pressed...
... or a WMA disc. Note: While playing a CD on a CD changer, this always skips to the next disc. 4 Functions the same as the control dial on an MP3compatible CD changer; - Note: While playing a CD on a CD changer, this always skips to the previous disc. 1 • Turns on an MP3compatible CD changer; - Each time you press the button, you press the button, the preset station number increases, and the selected station is turned off. • Turns off the unit if pressed...
Instruction Manual
Page 6
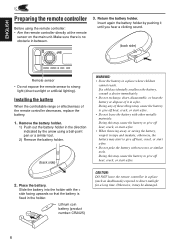
... facing upwards so that the battery is no obstacle in the holder. ENGLISH Preparing the remote controller Before using a ball-point pen or a similar tool. 2) Remove the battery holder. (back side) 2. Remove the battery holder. 1) Push out the battery holder in the direction indicated by pushing it in a place where children cannot reach. Lithium coin battery (product number: CR2025) WARNING: • Store the battery...
... facing upwards so that the battery is no obstacle in the holder. ENGLISH Preparing the remote controller Before using a ball-point pen or a similar tool. 2) Remove the battery holder. (back side) 2. Remove the battery holder. 1) Push out the battery holder in the direction indicated by pushing it in a place where children cannot reach. Lithium coin battery (product number: CR2025) WARNING: • Store the battery...

Instruction Manual
Page 7
... the unit turns off the power Press and hold for more than one second. To play an MP3/WMA disc, see pages 18 - 22. • For KD-AR800/KD-G800 To operate the CD changer, see page 39. "ATT" starts flashing on the display, and the volume level will start from where playback has been stopped previously, next time you can also restore the sound. To operate the external...
... the unit turns off the power Press and hold for more than one second. To play an MP3/WMA disc, see pages 18 - 22. • For KD-AR800/KD-G800 To operate the CD changer, see page 39. "ATT" starts flashing on the display, and the volume level will start from where playback has been stopped previously, next time you can also restore the sound. To operate the external...
Instruction Manual
Page 11
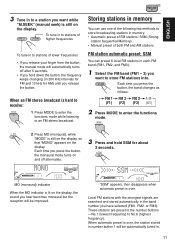
... can use one of the following two methods to store broadcasting stations in memory. • Automatic preset of lower frequencies • If you release your finger from the button, the manual mode will be improved. Each time you press the button, the monaural mode turns on the display. Storing stations in memory You can preset 6 local FM stations in each FM band (FM1, FM2, and FM3). 1 Select the...
... can use one of the following two methods to store broadcasting stations in memory. • Automatic preset of lower frequencies • If you release your finger from the button, the manual mode will be improved. Each time you press the button, the monaural mode turns on the display. Storing stations in memory You can preset 6 local FM stations in each FM band (FM1, FM2, and FM3). 1 Select the...
Instruction Manual
Page 13
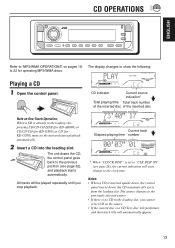
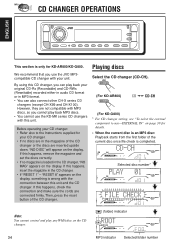
...; When a CD is set to "CLK DISP ON" (see page 32), and playback starts automatically. Current track Elapsed playing time number * When "CLOCK DISP" is inserted upside down, the control panel moves down, the CD automatically ejects from the loading slot. All tracks will automatically appear. 13 The source changes to 22 for operating MP3/WMA discs. CD indicator Current source indication* Total playing time Total track number of...
...; When a CD is set to "CLK DISP ON" (see page 32), and playback starts automatically. Current track Elapsed playing time number * When "CLOCK DISP" is inserted upside down, the control panel moves down, the CD automatically ejects from the loading slot. All tracks will automatically appear. 13 The source changes to 22 for operating MP3/WMA discs. CD indicator Current source indication* Total playing time Total track number of...
Instruction Manual
Page 14
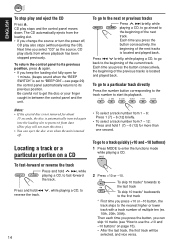
... the functions mode while playing a CD. Press and hold 4 , while playing a CD, to get the disc or your finger caught in between the control panel and the unit. Locating a track or a particular portion on a CD To go to the next or previous tracks Press ¢ briefly, while playing a CD, to go to a particular track directly Press the number button corresponding to the track number to start this time.) •...
... the functions mode while playing a CD. Press and hold 4 , while playing a CD, to get the disc or your finger caught in between the control panel and the unit. Locating a track or a particular portion on a CD To go to the next or previous tracks Press ¢ briefly, while playing a CD, to go to a particular track directly Press the number button corresponding to the track number to start this time.) •...
Instruction Manual
Page 23
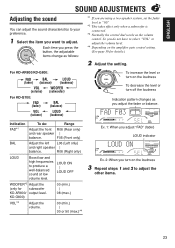
...) (balance) LOUD (loudness) VOL WOOFER (volume) (subwoofer) For KD-G700: FAD (fader) VOL (volume) BAL (balance) LOUD (loudness) To increase the level or turn on the loudness To decrease the level or turn on the amplifier gain control setting. (See page 30 for subwoofer KD-AR800/ output level. So you do : Range Adjust the front R06 (Rear only) and rear speaker | balance. ENGLISH SOUND ADJUSTMENTS Adjusting the sound You can adjust the sound characteristics to your preference. 1 Select the...
...) (balance) LOUD (loudness) VOL WOOFER (volume) (subwoofer) For KD-G700: FAD (fader) VOL (volume) BAL (balance) LOUD (loudness) To increase the level or turn on the loudness To decrease the level or turn on the amplifier gain control setting. (See page 30 for subwoofer KD-AR800/ output level. So you do : Range Adjust the front R06 (Rear only) and rear speaker | balance. ENGLISH SOUND ADJUSTMENTS Adjusting the sound You can adjust the sound characteristics to your preference. 1 Select the...
Instruction Manual
Page 24
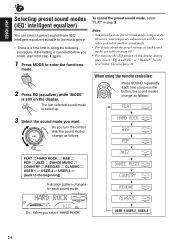
....: When you select another sound mode. • For details about the preset settings of each sound mode. When using the remote controller: ATT SOUND U R SOURCE F D Press SOUND repeatedly. As you turn the control dial, the sound modes change as follows: FLAT O HARD ROCK O R&B O POP O JAZZ O DANCE MUSIC O COUNTRY O REGGAE O CLASSIC O USER 1 O USER 2 O USER 3 O (back to enter the functions mode. 2 Press EQ (equalizer) while "MODE" is still on the display during play, select "EQ & LEVEL" or "SILENT" for each sound mode, see table on...
....: When you select another sound mode. • For details about the preset settings of each sound mode. When using the remote controller: ATT SOUND U R SOURCE F D Press SOUND repeatedly. As you turn the control dial, the sound modes change as follows: FLAT O HARD ROCK O R&B O POP O JAZZ O DANCE MUSIC O COUNTRY O REGGAE O CLASSIC O USER 1 O USER 2 O USER 3 O (back to enter the functions mode. 2 Press EQ (equalizer) while "MODE" is still on the display during play, select "EQ & LEVEL" or "SILENT" for each sound mode, see table on...
Instruction Manual
Page 27
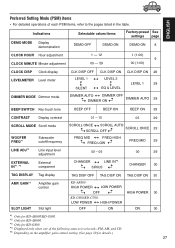
.... GAIN*5 Amplifier gain control SLOT LIGHT Slot light KD-AR800: HIGH POWER LOW POWER OFF HIGH POWER 30 KD-G800/KD-G700: LOW POWER HIGH POWER OFF ON ON 30 *1 Only for KD-AR800/KD-G800. *2 Only for KD-AR800. *3 Only for details.) 27 Indications DEMO MODE Display demonstration Selectable values/items DEMO OFF DEMO ON Factory-preset See settings page DEMO ON 8 CLOCK HOUR Hour adjustment CLOCK MINUTE Minute adjustment 1 - 12 00 - 59 1 (1:00) 9 00 (1:00) CLOCK DISP Clock display LEVELMETER Level meter DIMMER MODE Dimmer mode CLK...
.... GAIN*5 Amplifier gain control SLOT LIGHT Slot light KD-AR800: HIGH POWER LOW POWER OFF HIGH POWER 30 KD-G800/KD-G700: LOW POWER HIGH POWER OFF ON ON 30 *1 Only for KD-AR800/KD-G800. *2 Only for KD-AR800. *3 Only for details.) 27 Indications DEMO MODE Display demonstration Selectable values/items DEMO OFF DEMO ON Factory-preset See settings page DEMO ON 8 CLOCK HOUR Hour adjustment CLOCK MINUTE Minute adjustment 1 - 12 00 - 59 1 (1:00) 9 00 (1:00) CLOCK DISP Clock display LEVELMETER Level meter DIMMER MODE Dimmer mode CLK...

Instruction Manual
Page 28
... selected, the current source name, station band, or disc number appears instead of the display when the unit is selected as the source-for about 5 seconds. Disc number, or track/ file/folder number appears for dimming. To select the dimmer mode -DIMMER MODE When you turn on those having a control dial for about 5 seconds. In this mode is set to "LEVEL 1." • CLK DISP ON: Clock display is activated. • DIMMER AUTO: Activates Auto Dimmer. • DIMMER OFF: Cancels Auto Dimmer. • DIMMER ON...
... selected, the current source name, station band, or disc number appears instead of the display when the unit is selected as the source-for about 5 seconds. Disc number, or track/ file/folder number appears for dimming. To select the dimmer mode -DIMMER MODE When you turn on those having a control dial for about 5 seconds. In this mode is set to "LEVEL 1." • CLK DISP ON: Clock display is activated. • DIMMER AUTO: Activates Auto Dimmer. • DIMMER OFF: Cancels Auto Dimmer. • DIMMER ON...

Instruction Manual
Page 29
... between). • SCROLL OFF: Cancels scroll mode. To select the subwoofer cutoff frequency -WOOFER FREQ (Only for more than 120 Hz are cut off -BEEP SWITCH You can scroll the display by pressing DISP (display) for KD-AR800/KD-G800) When a subwoofer is set to another source. If the input level of the connected component is activated. • BEEP ON: Activates the key-touch tone. • BEEP OFF...
... between). • SCROLL OFF: Cancels scroll mode. To select the subwoofer cutoff frequency -WOOFER FREQ (Only for more than 120 Hz are cut off -BEEP SWITCH You can scroll the display by pressing DISP (display) for KD-AR800/KD-G800) When a subwoofer is set to another source. If the input level of the connected component is activated. • BEEP ON: Activates the key-touch tone. • BEEP OFF...
Instruction Manual
Page 30
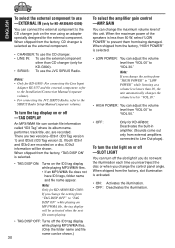
... display will be shown.) 30 To select the amplifier gain control -AMP.GAIN You can adjust the volume level from external amplifiers connected to "VOL 30." Notes: • Only for KD-G800: For connecting the Line Input Adapter KS-U57 and the external component, refer to the Installation/Connection Manual (separate volume). • For connecting the JVC SIRIUS Radio, refer to the CD changer jack on a disc, ID3v2 information will be activated when the next file starts playing...
... display will be shown.) 30 To select the amplifier gain control -AMP.GAIN You can adjust the volume level from external amplifiers connected to "VOL 30." Notes: • Only for KD-G800: For connecting the Line Input Adapter KS-U57 and the external component, refer to the Installation/Connection Manual (separate volume). • For connecting the JVC SIRIUS Radio, refer to the CD changer jack on a disc, ID3v2 information will be activated when the next file starts playing...
Instruction Manual
Page 31
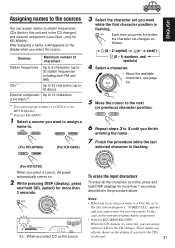
... procedure while the last selected character is flashing. (For KD-G700) When you select a source, the power automatically comes on the display when you can also be shown on the display if you cannot enter the text entry mode. Sources Maximum number of characters Station frequencies CDs*1 Up to 9 characters (up to 40 discs) External component Up to 12 characters (Line Input)*2 *1 You cannot assign a name...
... procedure while the last selected character is flashing. (For KD-G700) When you select a source, the power automatically comes on the display when you can also be shown on the display if you cannot enter the text entry mode. Sources Maximum number of characters Station frequencies CDs*1 Up to 9 characters (up to 40 discs) External component Up to 12 characters (Line Input)*2 *1 You cannot assign a name...
Instruction Manual
Page 34
.../KD-G800. "RESET 8" appears on the display. Then, press the reset button of the CD changer. (For KD-AR800) CD CD-CH (For KD-G800) * For CD changer setting, see "To select the external component to the Instructions supplied for details. • When the current disc is an MP3 disc: Playback starts from the first folder of the CD changer or the discs are connected firmly. Before operating your CD changer. • If no magazine is completed. CD CHANGER OPERATIONS...
.../KD-G800. "RESET 8" appears on the display. Then, press the reset button of the CD changer. (For KD-AR800) CD CD-CH (For KD-G800) * For CD changer setting, see "To select the external component to the Instructions supplied for details. • When the current disc is an MP3 disc: Playback starts from the first folder of the CD changer or the discs are connected firmly. Before operating your CD changer. • If no magazine is completed. CD CHANGER OPERATIONS...
Instruction Manual
Page 36
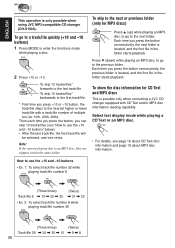
... vice versa. Note: If the current playing disc is possible only when connecting a JVC CD changer equipped with a track/file number of multiple ten (ex. 10th, 20th, 30th). Press ∞ (down) while playing an MP3 disc, to go to use the +10 and -10 buttons • Ex. 1: To select track/file number 32 while playing track/file number 6 (Three times) (Twice) Track/file 6 \ 10 \ 20 \ 30...
... vice versa. Note: If the current playing disc is possible only when connecting a JVC CD changer equipped with a track/file number of multiple ten (ex. 10th, 20th, 30th). Press ∞ (down) while playing an MP3 disc, to go to use the +10 and -10 buttons • Ex. 1: To select track/file number 32 while playing track/file number 6 (Three times) (Twice) Track/file 6 \ 10 \ 20 \ 30...
Instruction Manual
Page 39
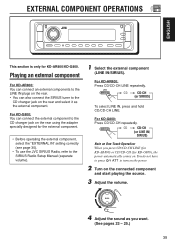
..." setting correctly (see page 30). • To use the JVC SIRIUS Radio, refer to the SIRIUS Radio Setup Manual (separate volume). 1 Select the external component (LINE IN/SIRIUS). For KD-G800: Press CD/CD-CH repeatedly. CD CD-CH (or LINE IN/ SIRIUS) Note on One-Touch Operation: When you want. (See pages 23 - 25.) 39 For KD-G800: You can also connect the SIRIUS tuner to turn on the power. 2 Turn on the connected component and start playing the source. 3 Adjust...
..." setting correctly (see page 30). • To use the JVC SIRIUS Radio, refer to the SIRIUS Radio Setup Manual (separate volume). 1 Select the external component (LINE IN/SIRIUS). For KD-G800: Press CD/CD-CH repeatedly. CD CD-CH (or LINE IN/ SIRIUS) Note on One-Touch Operation: When you want. (See pages 23 - 25.) 39 For KD-G800: You can also connect the SIRIUS tuner to turn on the power. 2 Turn on the connected component and start playing the source. 3 Adjust...
Instruction Manual
Page 41
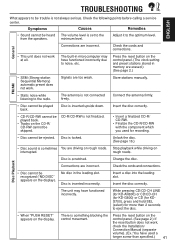
... a service center. Adjust it to the radio. Press the reset button on the control panel. (The clock setting and preset stations stored in memory are driving on the control movement. FM/AM • Static noise while listening to the optimum level. Disc is something blocking the Press the reset button on rough roads. Insert the disc correctly. There is locked. control panel. (See page 2.) If the reset button does not work, check the Installation/ Connection Manual (separate volume...
... a service center. Adjust it to the radio. Press the reset button on the control panel. (The clock setting and preset stations stored in memory are driving on the control movement. FM/AM • Static noise while listening to the optimum level. Disc is something blocking the Press the reset button on rough roads. Insert the disc correctly. There is locked. control panel. (See page 2.) If the reset button does not work, check the Installation/ Connection Manual (separate volume...


