
User Manual
Page 1
Upright Freezer - White NS-UZ53WH9 Before using your new product, please read these instructions to prevent any damage. NS-UZ53WH9_17-0865_MAN_V2_EN.fm Page 1 Wednesday, December 6, 2017 10:10 AM V1 FINAL FOR PRINT USER GUIDE 5.3 Cu. Ft. Final trim size(WxH): 8.27" x 11.69" (210 x 269.9 mm).
Upright Freezer - White NS-UZ53WH9 Before using your new product, please read these instructions to prevent any damage. NS-UZ53WH9_17-0865_MAN_V2_EN.fm Page 1 Wednesday, December 6, 2017 10:10 AM V1 FINAL FOR PRINT USER GUIDE 5.3 Cu. Ft. Final trim size(WxH): 8.27" x 11.69" (210 x 269.9 mm).
User Manual
Page 2
... 10:10 AM Contents Introduction 3 Important Safety Instructions 3 Grounding requirement 4 Features 5 Package contents 5 Dimensions...5 Interior ...6 Setting up your freezer 6 Before using your freezer 6 Finding a suitable location 7 Leveling your freezer 8 Reversing the freezer door 9 Providing the correct power source 12 Using your freezer 12 Cleaning your freezer 13 Defrosting your freezer 13 Storing your freezer 13 Moving your freezer 13 Tips on saving energy 13 Troubleshooting 14 Specifications 15 ONE-YEAR LIMITED WARRANTY 16 2 www.insigniaproducts.com
... 10:10 AM Contents Introduction 3 Important Safety Instructions 3 Grounding requirement 4 Features 5 Package contents 5 Dimensions...5 Interior ...6 Setting up your freezer 6 Before using your freezer 6 Finding a suitable location 7 Leveling your freezer 8 Reversing the freezer door 9 Providing the correct power source 12 Using your freezer 12 Cleaning your freezer 13 Defrosting your freezer 13 Storing your freezer 13 Moving your freezer 13 Tips on saving energy 13 Troubleshooting 14 Specifications 15 ONE-YEAR LIMITED WARRANTY 16 2 www.insigniaproducts.com
User Manual
Page 3
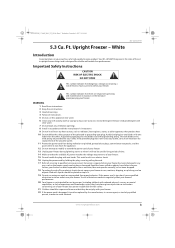
...:10 AM NS-UZ53WH9 5.3 Cu. Use of an extension cord can negatively affect your freezer's performance. 20 Your freezer is not intended for their safety. 21 Children should be placed on top of a high-quality Insignia product. WARNING 1 Read these instructions. 2 Keep these instructions. 3 Heed all warnings. 4 Follow all servicing to avoid a hazard. This could result in an electric shock. 16 Unplug the power cord by holding...
...:10 AM NS-UZ53WH9 5.3 Cu. Use of an extension cord can negatively affect your freezer's performance. 20 Your freezer is not intended for their safety. 21 Children should be placed on top of a high-quality Insignia product. WARNING 1 Read these instructions. 2 Keep these instructions. 3 Heed all warnings. 4 Follow all servicing to avoid a hazard. This could result in an electric shock. 16 Unplug the power cord by holding...
User Manual
Page 4
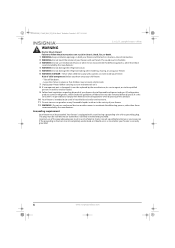
.... All refrigeration products contain refrigerants, which under the guidelines of your freezer is equipped with a cord having a grounding wire with wet hands. Your freezer is correctly grounded. 4 www.insigniaproducts.com Incorrect use gasoline or any flammable liquids inside . 7 Unplug your freezer. NS-UZ53WH9_17-0865_MAN_V2_EN.fm Page 4 Wednesday, December 6, 2017 10:10 AM 5.3 Cu. White WARNING Electric Shock Hazard Failure to accelerate the defrosting process...
.... All refrigeration products contain refrigerants, which under the guidelines of your freezer is equipped with a cord having a grounding wire with wet hands. Your freezer is correctly grounded. 4 www.insigniaproducts.com Incorrect use gasoline or any flammable liquids inside . 7 Unplug your freezer. NS-UZ53WH9_17-0865_MAN_V2_EN.fm Page 4 Wednesday, December 6, 2017 10:10 AM 5.3 Cu. White WARNING Electric Shock Hazard Failure to accelerate the defrosting process...
User Manual
Page 6
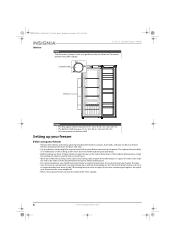
Ft. The actual product may not close or seal correctly, causing cooling, frost, and moisture problems. Turn the leveling feet clockwise to raise or counterclockwise to three hours. Control knob Shelves Notes • The four upper shelves measure 14.9 × 12.6" (37.8 × 32.1 cm) (W × D) • The bottom shelf measures 15.2 × 6.6" (38.5 × 16.8 cm) (W × D) • You can remove the bottom shelf. This...
Ft. The actual product may not close or seal correctly, causing cooling, frost, and moisture problems. Turn the leveling feet clockwise to raise or counterclockwise to three hours. Control knob Shelves Notes • The four upper shelves measure 14.9 × 12.6" (37.8 × 32.1 cm) (W × D) • The bottom shelf measures 15.2 × 6.6" (38.5 × 16.8 cm) (W × D) • You can remove the bottom shelf. This...
User Manual
Page 7
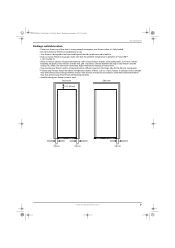
Extremely cold temperatures may increase electrical consumption. Adjust the feet to keep your freezer level. • If you locate your freezer next to a fixed wall, allow sufficient space on the hinge side for correct air ventilation. NS-UZ53WH9_17-0865_MAN_V2_EN.fm Page 7 Wednesday, December 6, 2017 10:10 AM NS-UZ53WH9 Finding a suitable location • Place your freezer on a floor that the ambient temperature is designed to swing open. • Position...
Extremely cold temperatures may increase electrical consumption. Adjust the feet to keep your freezer level. • If you locate your freezer next to a fixed wall, allow sufficient space on the hinge side for correct air ventilation. NS-UZ53WH9_17-0865_MAN_V2_EN.fm Page 7 Wednesday, December 6, 2017 10:10 AM NS-UZ53WH9 Finding a suitable location • Place your freezer on a floor that the ambient temperature is designed to swing open. • Position...
User Manual
Page 8
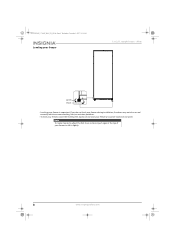
... freezer during installation, the doors may not close or seal correctly which can cause cooling, frost, or moisture problems. • To level your freezer, rotate the leveling feet clockwise (to raise) your freezer is important. Ft. White Lower Raise • Leveling your freezer or counter-clockwise (to lower). NS-UZ53WH9_17-0865_MAN_V2_EN.fm Page 8 Wednesday, December 6, 2017 10:10 AM Leveling your freezer to tilt it easier to adjust...
... freezer during installation, the doors may not close or seal correctly which can cause cooling, frost, or moisture problems. • To level your freezer, rotate the leveling feet clockwise (to raise) your freezer is important. Ft. White Lower Raise • Leveling your freezer or counter-clockwise (to lower). NS-UZ53WH9_17-0865_MAN_V2_EN.fm Page 8 Wednesday, December 6, 2017 10:10 AM Leveling your freezer to tilt it easier to adjust...

User Manual
Page 9
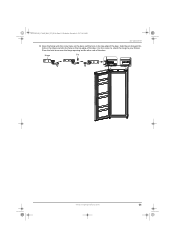
... injury or death from electrical shock. • To avoid personal injury and property damage, get another person to reverse the freezer door: Flat-blade screwdriver Phillips screwdriver 5/16" socket wrench Tape Putty knife NS-UZ53WH9 1 Unplug your freezer. 2 Remove the hinge cover, then remove the top hinge screws and hinge from the other side of the freezer. Top hinge Hinge cover Hole cover www...
... injury or death from electrical shock. • To avoid personal injury and property damage, get another person to reverse the freezer door: Flat-blade screwdriver Phillips screwdriver 5/16" socket wrench Tape Putty knife NS-UZ53WH9 1 Unplug your freezer. 2 Remove the hinge cover, then remove the top hinge screws and hinge from the other side of the freezer. Top hinge Hinge cover Hole cover www...

User Manual
Page 10
... lay your freezer backwards, remove the bottom hinge screws and hinge and the two leveling feet. Ft. Upright Freezer - White 3 While one person tilts your freeze flat on the other side. If you do lay it flat, when you return it to the upright position, wait two hours before you plug it on the floor to make removing and installing the bottom hinge easier. NS-UZ53WH9_17...
... lay your freezer backwards, remove the bottom hinge screws and hinge and the two leveling feet. Ft. Upright Freezer - White 3 While one person tilts your freeze flat on the other side. If you do lay it flat, when you return it to the upright position, wait two hours before you plug it on the floor to make removing and installing the bottom hinge easier. NS-UZ53WH9_17...
User Manual
Page 11
Use the screws to attach the hinge to your freezer. NS-UZ53WH9_17-0865_MAN_V2_EN.fm Page 11 Wednesday, December 6, 2017 10:10 AM NS-UZ53WH9 6 Align the hinge with the screw holes on the door and the hole in the hinge and into the hole on the other side of the door. Place the hole cover over the hinge opening on the top edge of the door. Hinge Pin www.insigniaproducts.com 11 Slide the pin through the hole in the top edge of the door.
Use the screws to attach the hinge to your freezer. NS-UZ53WH9_17-0865_MAN_V2_EN.fm Page 11 Wednesday, December 6, 2017 10:10 AM NS-UZ53WH9 6 Align the hinge with the screw holes on the door and the hole in the hinge and into the hole on the other side of the door. Place the hole cover over the hinge opening on the top edge of the door. Hinge Pin www.insigniaproducts.com 11 Slide the pin through the hole in the top edge of the door.

User Manual
Page 12
..., then open the door more hours. 3 Turn the Control knob to adjust the temperature based on the packaging, carefully follow these instructions regarding storage times. Warnings Make sure that: • The power outlet accepts a 3-prong grounding plug. Wait for several hours, even in your freezer. • Do not put bottled food or drinks in summer. If the room temperature is working correctly. Your freezer requires a 115V, 60Hz power supply. The...
..., then open the door more hours. 3 Turn the Control knob to adjust the temperature based on the packaging, carefully follow these instructions regarding storage times. Warnings Make sure that: • The power outlet accepts a 3-prong grounding plug. Wait for several hours, even in your freezer. • Do not put bottled food or drinks in summer. If the room temperature is working correctly. Your freezer requires a 115V, 60Hz power supply. The...
User Manual
Page 13
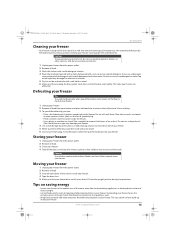
... to clean the inside of the room, away from the upright position during transportation. Defrosting your freezer Tip To avoid standing water when you finish defrosting, wipe the inside your freezer. The ice will prevent it into the power outlet, then put the food back into your freezer. Do not use a sharp utensil (like a spatula) to room temperature before placing them in your freezer. Tips on frost...
... to clean the inside of the room, away from the upright position during transportation. Defrosting your freezer Tip To avoid standing water when you finish defrosting, wipe the inside your freezer. The ice will prevent it into the power outlet, then put the food back into your freezer. Do not use a sharp utensil (like a spatula) to room temperature before placing them in your freezer. Tips on frost...
User Manual
Page 14
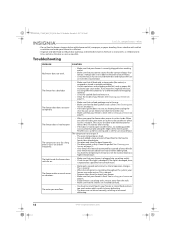
... freezer is plugged into a working outlet. • Check to reduce door openings and extended searches. Liners interfere with cold air circulation and make noises. When you open . Troubleshooting PROBLEM SOLUTION My freezer does not work. • Make sure that your freezer less efficient. • Organize and label food to see if the light is touching walls, move it . • Clean the inside the freezer does not turn on page 13. See Cleaning your freezer...
... freezer is plugged into a working outlet. • Check to reduce door openings and extended searches. Liners interfere with cold air circulation and make noises. When you open . Troubleshooting PROBLEM SOLUTION My freezer does not work. • Make sure that your freezer less efficient. • Organize and label food to see if the light is touching walls, move it . • Clean the inside the freezer does not turn on page 13. See Cleaning your freezer...

User Manual
Page 15
... humidity is hot. Specifications Dimensions (W × D × H) Weight Power requirements Power cord length Average life expectancy Temperature control knob 21.7 × 21.7 × 55.9 in your freezer. • You open the door, warm, moist outside air meets the cold dry air inside your freezer. These are normal. Just wipe off the condensation with a clean towel. NS-UZ53WH9_17-0865_MAN_V2_EN.fm Page 15 Wednesday, December 6, 2017 10:10 AM NS-UZ53WH9 PROBLEM SOLUTION The outside of the freezer. •...
... humidity is hot. Specifications Dimensions (W × D × H) Weight Power requirements Power cord length Average life expectancy Temperature control knob 21.7 × 21.7 × 55.9 in your freezer. • You open the door, warm, moist outside air meets the cold dry air inside your freezer. These are normal. Just wipe off the condensation with a clean towel. NS-UZ53WH9_17-0865_MAN_V2_EN.fm Page 15 Wednesday, December 6, 2017 10:10 AM NS-UZ53WH9 PROBLEM SOLUTION The outside of the freezer. •...

User Manual
Page 16
... number of refrigerator or freezer • Customer instruction/education • Installation • Set up to three (3) pixel failures (dots that you place the Product in the United States or Canada from the date of your purchase of the Product ("Warranty Period"). Make sure that are required after the Warranty Period expires, you put the Product in the county where the original purchase was made. REPAIR REPLACEMENT...
... number of refrigerator or freezer • Customer instruction/education • Installation • Set up to three (3) pixel failures (dots that you place the Product in the United States or Canada from the date of your purchase of the Product ("Warranty Period"). Make sure that are required after the Warranty Period expires, you put the Product in the county where the original purchase was made. REPAIR REPLACEMENT...

User Manual
Page 20
Made in China V2 ENGLISH 17-0865 Distributed by Best Buy Purchasing, LLC 7601 Penn Ave South, Richfield, MN 55423 U.S.A. ©2017 Best Buy. NS-UZ53WH9_17-0865_MAN_V2_EN.fm Page 20 Wednesday, December 6, 2017 10:10 AM For product inquiries, please contact us with the information below: 1-877-467-4289 www.insigniaproducts.com INSIGNIA is a trademark of Best Buy and its affiliated companies. All rights reserved.
Made in China V2 ENGLISH 17-0865 Distributed by Best Buy Purchasing, LLC 7601 Penn Ave South, Richfield, MN 55423 U.S.A. ©2017 Best Buy. NS-UZ53WH9_17-0865_MAN_V2_EN.fm Page 20 Wednesday, December 6, 2017 10:10 AM For product inquiries, please contact us with the information below: 1-877-467-4289 www.insigniaproducts.com INSIGNIA is a trademark of Best Buy and its affiliated companies. All rights reserved.

