Quick Setup Guide
Page 1
... the door to swing open the freezer door to lower). Leveling your freezer, do not tilt it to unlock the control panel. 2 Press and hold the Freezer/Fridge button for three seconds. 2 Press and hold + and - To use the control panel, press and hold the Lock button for three seconds. upright freezer • Door handle, screws, and hex wrench • Quick Setup Guide FIND YOUR USER GUIDE ONLINE! Go to the new mode. USING YOUR FREEZER 1 Plug in your model...
... the door to swing open the freezer door to lower). Leveling your freezer, do not tilt it to unlock the control panel. 2 Press and hold the Freezer/Fridge button for three seconds. 2 Press and hold + and - To use the control panel, press and hold the Lock button for three seconds. upright freezer • Door handle, screws, and hex wrench • Quick Setup Guide FIND YOUR USER GUIDE ONLINE! Go to the new mode. USING YOUR FREEZER 1 Plug in your model...
Quick Setup Guide
Page 2
...) Door tray Touch pad controls High temperature indicator/alert Lower temperature button Temperature indicator Image is a trademark of Best Buy and its service agent, or a similarly qualified person in a risk of electric shock. Your freezer may not easily climb inside. Quick freeze button Control Panel Lock/Unlock button Freezer/Fridge mode button SAFETY INFORMATION 1 Read these instructions. 2 Keep these instructions. 3 Heed all warnings. 4 Follow all servicing to rain, moisture, dripping, or splashing, and no prior notice will not be used for...
...) Door tray Touch pad controls High temperature indicator/alert Lower temperature button Temperature indicator Image is a trademark of Best Buy and its service agent, or a similarly qualified person in a risk of electric shock. Your freezer may not easily climb inside. Quick freeze button Control Panel Lock/Unlock button Freezer/Fridge mode button SAFETY INFORMATION 1 Read these instructions. 2 Keep these instructions. 3 Heed all warnings. 4 Follow all servicing to rain, moisture, dripping, or splashing, and no prior notice will not be used for...
User Guide
Page 1
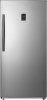
Ft. Upright Convertible Freezer/Refrigerator NS-UZ14WH0 / NS-UZ14WH0-C/ NS-UZ14SS0 / NS-UZ14SS0-C Before using your new product, please read these instructions to prevent any damage. USER GUIDE 13.8 Cu.
Ft. Upright Convertible Freezer/Refrigerator NS-UZ14WH0 / NS-UZ14WH0-C/ NS-UZ14SS0 / NS-UZ14SS0-C Before using your new product, please read these instructions to prevent any damage. USER GUIDE 13.8 Cu.
User Guide
Page 2
... power supply 8 Installing the door handle 9 Using your freezer 11 Using the Lock button 11 Switching between Freezer and Refrigerator modes 11 Quick Freezing foods 11 Switching between Fahrenheit and Celsius 12 Maintaining your freezer 12 Storing your freezer 12 Storing your freezer 12 Moving your freezer 12 Tips on saving energy 13 Understanding Alerts 13 High Temp Alert 13 Door Open Alert 13 How do I reset my freezer to factory defaults 13 Fault indication 14 Troubleshooting 14 Specifications...
... power supply 8 Installing the door handle 9 Using your freezer 11 Using the Lock button 11 Switching between Freezer and Refrigerator modes 11 Quick Freezing foods 11 Switching between Fahrenheit and Celsius 12 Maintaining your freezer 12 Storing your freezer 12 Storing your freezer 12 Moving your freezer 12 Tips on saving energy 13 Understanding Alerts 13 High Temp Alert 13 Door Open Alert 13 How do I reset my freezer to factory defaults 13 Fault indication 14 Troubleshooting 14 Specifications...

User Guide
Page 3
.... 14 Make sure that the available AC power matches the voltage requirements of the polarized or grounding-type plug. Upright Convertible Freezer/Refrigerator Important Safety Instructions CAUTION RISK OF ELECTRIC SHOCK DO NOT OPEN This symbol indicates that produce heat. 10 Do not defeat the safety purpose of this appliance near water. 6 Clean only with a damp cloth. 7 Do not block any ventilation openings. 8 Install in accordance...
.... 14 Make sure that the available AC power matches the voltage requirements of the polarized or grounding-type plug. Upright Convertible Freezer/Refrigerator Important Safety Instructions CAUTION RISK OF ELECTRIC SHOCK DO NOT OPEN This symbol indicates that produce heat. 10 Do not defeat the safety purpose of this appliance near water. 6 Clean only with a damp cloth. 7 Do not block any ventilation openings. 8 Install in accordance...
User Guide
Page 4
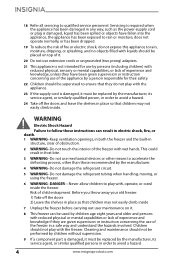
... on it must be replaced by the manufacturer. 4 WARNING-Do not damage the refrigerant circuit. 5 WARNING-Do not damage the refrigerant tubing when handling, moving, or using the freezer. 6 WARNING-DANGER-Never allow children to qualified service personnel. Servicing is required when the appliance has been damaged in any way, such as the power-supply cord or plug is damaged, it must be replaced by a person responsible...
... on it must be replaced by the manufacturer. 4 WARNING-Do not damage the refrigerant circuit. 5 WARNING-Do not damage the refrigerant tubing when handling, moving, or using the freezer. 6 WARNING-DANGER-Never allow children to qualified service personnel. Servicing is required when the appliance has been damaged in any way, such as the power-supply cord or plug is damaged, it must be replaced by a person responsible...
User Guide
Page 5
... inside or in a risk of this freezer. The plug must be inserted into an outlet that is too short, have a qualified electrician install an outlet near the freezer. Use of an extension cord can result in the vicinity of electric shock. Grounding requirement This freezer must be grounded. Features Package contents • 13.8 cubic foot upright freezer • Door handle, screws, and hex wrench • Quick Setup Guide...
... inside or in a risk of this freezer. The plug must be inserted into an outlet that is too short, have a qualified electrician install an outlet near the freezer. Use of an extension cord can result in the vicinity of electric shock. Grounding requirement This freezer must be grounded. Features Package contents • 13.8 cubic foot upright freezer • Door handle, screws, and hex wrench • Quick Setup Guide...

User Guide
Page 6
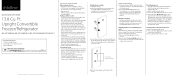
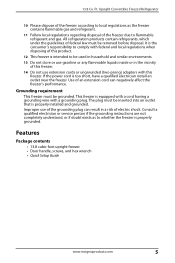
bottom front) Wheels (2 - Bottom back) 6 www.insigniaproducts.com Interior Note: The illustrations shown in this user guide are only for reference. The actual product may differ slightly. Glass shelf Air flow outlet Door tray Air flow inlet Crispers Leveling feet (2 -
bottom front) Wheels (2 - Bottom back) 6 www.insigniaproducts.com Interior Note: The illustrations shown in this user guide are only for reference. The actual product may differ slightly. Glass shelf Air flow outlet Door tray Air flow inlet Crispers Leveling feet (2 -

User Guide
Page 7
... location • Place your freezer Before using the leveling feet. Upright Convertible Freezer/Refrigerator Door open indicator/alarm Raise temperature button Quick freeze button Control Panel Lock/Unlock button Freezer/Fridge mode button Setting up your freezer on a floor that side of water), then wipe dry with a dry cloth. This reduces the possibility of a malfunction in the cooling system from upright. Touch pad controls High temperature indicator/alert Lower temperature button Temperature indicator 13.8 Cu. www.insigniaproducts.com 7 Ft. Do this is not done, the door...
... location • Place your freezer Before using the leveling feet. Upright Convertible Freezer/Refrigerator Door open indicator/alarm Raise temperature button Quick freeze button Control Panel Lock/Unlock button Freezer/Fridge mode button Setting up your freezer on a floor that side of water), then wipe dry with a dry cloth. This reduces the possibility of a malfunction in the cooling system from upright. Touch pad controls High temperature indicator/alert Lower temperature button Temperature indicator 13.8 Cu. www.insigniaproducts.com 7 Ft. Do this is not done, the door...

User Guide
Page 8
... in extremely hot or cold areas. Note: Have someone push against the top of heat, such as a stove, heater, or radiator. Providing a proper power supply Check your freezer, rotate the leveling feet clockwise (to raise) the freezer or counter-clockwise (to adjust. The power cord is not leveled during installation, the doors may increase electrical consumption. We recommend that the freezer be turned off the leveling foot, making it...
... in extremely hot or cold areas. Note: Have someone push against the top of heat, such as a stove, heater, or radiator. Providing a proper power supply Check your freezer, rotate the leveling feet clockwise (to raise) the freezer or counter-clockwise (to adjust. The power cord is not leveled during installation, the doors may increase electrical consumption. We recommend that the freezer be turned off the leveling foot, making it...

User Guide
Page 9
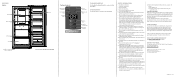
Do not overtighten. 13.8 Cu. The actual product may differ slightly. • The screws and wrench are only for reference. Upright Convertible Freezer/Refrigerator Installing the door handle Notes: • The illustrations shown in this user guide are in the plastic bag. 1 Unplug the freezer. 2 Screw the extended-head screws into the door holes with a Phillips screwdriver. www.insigniaproducts.com 9 The screw heads should extend above the surface of the door. Ft.
Do not overtighten. 13.8 Cu. The actual product may differ slightly. • The screws and wrench are only for reference. Upright Convertible Freezer/Refrigerator Installing the door handle Notes: • The illustrations shown in this user guide are in the plastic bag. 1 Unplug the freezer. 2 Screw the extended-head screws into the door holes with a Phillips screwdriver. www.insigniaproducts.com 9 The screw heads should extend above the surface of the door. Ft.

User Guide
Page 11
... use the control panel, you change the thermostat setting, adjust the thermostat control by one increment at a time. Press and hold Lock for three seconds to unlock the control panel. 2 Press the Quick Freeze button to a refrigerator. The lock icon turns on the control panel to change modes. The lock icon turns off and the panel beeps. The Freezer/Fridge light on the control panel for three seconds to set the temperature inside the freezer. Quick Freezing foods The quick freeze mode lowers the temperature below the normal operating temperature...
... use the control panel, you change the thermostat setting, adjust the thermostat control by one increment at a time. Press and hold Lock for three seconds to unlock the control panel. 2 Press the Quick Freeze button to a refrigerator. The lock icon turns on the control panel to change modes. The lock icon turns off and the panel beeps. The Freezer/Fridge light on the control panel for three seconds to set the temperature inside the freezer. Quick Freezing foods The quick freeze mode lowers the temperature below the normal operating temperature...

User Guide
Page 12
... food. 3 Wash the shelves with a mild detergent solution. 4 Wash the inside your freezer Your freezer is designed for year-round use with children. You can press the button a second time to switch settings. for three seconds to child's play. The unit should not be accessible to unlock the control panel. 2 Press and hold +/- The quick freeze mode turns off after three hours, if the temperature...
... food. 3 Wash the shelves with a mild detergent solution. 4 Wash the inside your freezer Your freezer is designed for year-round use with children. You can press the button a second time to switch settings. for three seconds to child's play. The unit should not be accessible to unlock the control panel. 2 Press and hold +/- The quick freeze mode turns off after three hours, if the temperature...

User Guide
Page 13
... temperature returns to make sure that freeze too slowly may prevent the door from closing properly. Here are door seal gaps. The panel beeps and all of the direct sunlight. • Let hot foods cool to reduce door openings and extended searches. You will get this alert if: • FREEZER MODE: the inside temperature is too warm. Ft. Also, check to a normal range, the alert turns off. Understanding Alerts High Temp...
... temperature returns to make sure that freeze too slowly may prevent the door from closing properly. Here are door seal gaps. The panel beeps and all of the direct sunlight. • Let hot foods cool to reduce door openings and extended searches. You will get this alert if: • FREEZER MODE: the inside temperature is too warm. Ft. Also, check to a normal range, the alert turns off. Understanding Alerts High Temp...

User Guide
Page 14
... the warranty. the display failure. Make sure that the freezer is plugged in and that the plug is restored. breaker. Food packages are Clean the door gaskets. be level. 14 www.insigniaproducts.com If a power failure occurs, the freezer turns off. Wait until the power is pushed completely into the outlet. Troubleshooting CAUTION: Do not try to repair your freezer yourself. E5 appears on Temperature sensor Call for service: Fault code...
... the warranty. the display failure. Make sure that the freezer is plugged in and that the plug is restored. breaker. Food packages are Clean the door gaskets. be level. 14 www.insigniaproducts.com If a power failure occurs, the freezer turns off. Wait until the power is pushed completely into the outlet. Troubleshooting CAUTION: Do not try to repair your freezer yourself. E5 appears on Temperature sensor Call for service: Fault code...

User Guide
Page 15
... door gasket and food distribution completely. Four hours are Clean the door gaskets. The body of time. Level the freezer with the leveling feet. Moisture is not cold The door has been opened too often or was not closed properly. The freezer door does not close completely The freezer is in the interior of food check again. Metal parts undergo This is circulating throughout the system. Refrigerant is normal. Upright Convertible Freezer/Refrigerator PROBLEM...
... door gasket and food distribution completely. Four hours are Clean the door gaskets. The body of time. Level the freezer with the leveling feet. Moisture is not cold The door has been opened too often or was not closed properly. The freezer door does not close completely The freezer is in the interior of food check again. Metal parts undergo This is circulating throughout the system. Refrigerant is normal. Upright Convertible Freezer/Refrigerator PROBLEM...
User Guide
Page 16
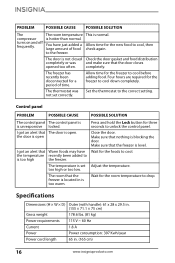
... high or too low. Specifications Dimensions (H × W × D) Outer (with handle): 61 x 28 x 29.5 in. (155 × 71.1 × 75 cm) Gross weight 178.6 lbs. (81 kg) Power requirements 115 V ~ 60 Hz Current 1.8 A Power Power consumption: 397 Kwh/year Power cord length 65 in is open Press and hold the Lock button for the freezer to unlock the control panel. The door is open . not set Adjust the temperature. Make sure that The door is too warm. turns...
... high or too low. Specifications Dimensions (H × W × D) Outer (with handle): 61 x 28 x 29.5 in. (155 × 71.1 × 75 cm) Gross weight 178.6 lbs. (81 kg) Power requirements 115 V ~ 60 Hz Current 1.8 A Power Power consumption: 397 Kwh/year Power cord length 65 in is open Press and hold the Lock button for the freezer to unlock the control panel. The door is open . not set Adjust the temperature. Make sure that The door is too warm. turns...

User Guide
Page 17
... complex, or otherwise used in the original manufacturer of the material or workmanship for 1 year (365 days) from the date of your Product must pay all labor and parts charges. Products and parts replaced under this warranty cover? This warranty does not cover: • Customer instruction/education • Installation • Set up adjustments • Cosmetic damage • Damage due to obtain warranty service? Call agents...
... complex, or otherwise used in the original manufacturer of the material or workmanship for 1 year (365 days) from the date of your Product must pay all labor and parts charges. Products and parts replaced under this warranty cover? This warranty does not cover: • Customer instruction/education • Installation • Set up adjustments • Cosmetic damage • Damage due to obtain warranty service? Call agents...

User Guide
Page 18
AA, AAA, C etc.) • Products where the factory applied serial number has been altered or removed • Loss or Theft of this product or any part of the product • Display panels containing up to three (3) pixel failures (dots that are dark or incorrectly illuminated) grouped in an area smaller than one tenth (1/10) of the display size or up to five...
AA, AAA, C etc.) • Products where the factory applied serial number has been altered or removed • Loss or Theft of this product or any part of the product • Display panels containing up to three (3) pixel failures (dots that are dark or incorrectly illuminated) grouped in an area smaller than one tenth (1/10) of the display size or up to five...
Warranty Sheet
Page 1
... purchaser of this new Insignia-branded product ("Product"), that the Product shall be purchased in the United States or Canada from a Best Buy branded retail store or online at www.bestbuy.com or www.bestbuy.ca and is packaged with new or rebuilt comparable products or parts. This warranty does not cover: • Customer instruction/education • Installation • Set up to five...
... purchaser of this new Insignia-branded product ("Product"), that the Product shall be purchased in the United States or Canada from a Best Buy branded retail store or online at www.bestbuy.com or www.bestbuy.ca and is packaged with new or rebuilt comparable products or parts. This warranty does not cover: • Customer instruction/education • Installation • Set up to five...

