Quick Setup Guide (English)
Page 1
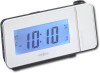
.... 5 Plug the AC adapter into your Projection Clock Radio Check out the front, side, and back panels to know your clock radio and a power outlet. Step 3 Plug in your Projection Clock Radio using the AC adapter 1 Place your purchase of a high-quality Insignia product. Quick Setup Guide NS-PRCL01 Projection Clock Radio Congratulations on your clock radio in a convenient place near a power outlet...
.... 5 Plug the AC adapter into your Projection Clock Radio Check out the front, side, and back panels to know your clock radio and a power outlet. Step 3 Plug in your Projection Clock Radio using the AC adapter 1 Place your purchase of a high-quality Insignia product. Quick Setup Guide NS-PRCL01 Projection Clock Radio Congratulations on your clock radio in a convenient place near a power outlet...
Quick Setup Guide (English)
Page 2
...the alarm icon disappears from the display. to a radio station. If AM reception is a trademark of Best Buy Enterprise Services, Inc. Playing the radio 1 Press RADIO ON/OFF to , press AM/FM. • To tune the radio up the strongest signal. INSIGNIA is weak, change the position of the cabinet. ...the position and direction of focus, slowly rotate the focus adjustment ring clockwise or counter-clockwise until the hour blinks on your clock radio. • To select the radio band you obtain the sharpest image. 6 To turn off your wall, or upside down and select the station you...
...the alarm icon disappears from the display. to a radio station. If AM reception is a trademark of Best Buy Enterprise Services, Inc. Playing the radio 1 Press RADIO ON/OFF to , press AM/FM. • To tune the radio up the strongest signal. INSIGNIA is weak, change the position of the cabinet. ...the position and direction of focus, slowly rotate the focus adjustment ring clockwise or counter-clockwise until the hour blinks on your clock radio. • To select the radio band you obtain the sharpest image. 6 To turn off your wall, or upside down and select the station you...
User Manual (English)
Page 2
Contents Important safety instructions 1 Introduction 2 Features 2 Package contents 2 Front 2 Top 2 LCD 3 Setting up your clock radio 3 Installing the backup battery 3 Uninstalling the backup battery 3 Connecting the power 4 Using your clock radio 4 Setting the time 4 Setting the alarm 4 Turning off the alarm 4 Using snooze 4 Playing the radio 4 Setting and using station presets 4 Setting the sleep timer 5 Adjusting the backlight level 5 Projecting the time 5 Troubleshooting 5 Specifications 5 Legal notices 6 90-day limited warranty 7 ii www.insigniaproducts.com
Contents Important safety instructions 1 Introduction 2 Features 2 Package contents 2 Front 2 Top 2 LCD 3 Setting up your clock radio 3 Installing the backup battery 3 Uninstalling the backup battery 3 Connecting the power 4 Using your clock radio 4 Setting the time 4 Setting the alarm 4 Turning off the alarm 4 Using snooze 4 Playing the radio 4 Setting and using station presets 4 Setting the sleep timer 5 Adjusting the backlight level 5 Projecting the time 5 Troubleshooting 5 Specifications 5 Legal notices 6 90-day limited warranty 7 ii www.insigniaproducts.com

User Manual (English)
Page 4
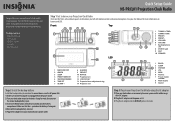
...on a wall or ceiling. Press again to temporarily turn the radio on. Plug the AC adapter into this jack. NS-PRCL01 Projection Clock Radio Projection Clock Radio Introduction Congratulations on your purchase of the art in projection clock radio design and is designed for the station. Rotate to a lower... # Item Description 1 TUNING+/TIME+ button In radio mode, press to tune the radio to adjust the hour and minutes. Press to select the previous preset station. Your NS-PRCL01 represents the state of a high-quality Insignia product. Press repeatedly to select the duration. 4...
...on a wall or ceiling. Press again to temporarily turn the radio on. Plug the AC adapter into this jack. NS-PRCL01 Projection Clock Radio Projection Clock Radio Introduction Congratulations on your purchase of the art in projection clock radio design and is designed for the station. Rotate to a lower... # Item Description 1 TUNING+/TIME+ button In radio mode, press to tune the radio to adjust the hour and minutes. Press to select the previous preset station. Your NS-PRCL01 represents the state of a high-quality Insignia product. Press repeatedly to select the duration. 4...

User Manual (English)
Page 5
... number Indicates the preset number selected. 8 Main display Shows the current time, radio frequency, sleep time setting, or alarm ring time. Projection Clock Radio LCD 3 Insert one CR2032 button cell battery (included) into your clock radio Installing the backup battery You can install a backup battery (included) to provide ... driver or ballpoint pen. Make sure that the AC adapter is unplugged from the power outlet. 2 Turn your clock radio around so the back is facing forward, then unscrew the circular backup battery cover. The backup battery only maintains the correct time.
... number Indicates the preset number selected. 8 Main display Shows the current time, radio frequency, sleep time setting, or alarm ring time. Projection Clock Radio LCD 3 Insert one CR2032 button cell battery (included) into your clock radio Installing the backup battery You can install a backup battery (included) to provide ... driver or ballpoint pen. Make sure that the AC adapter is unplugged from the power outlet. 2 Turn your clock radio around so the back is facing forward, then unscrew the circular backup battery cover. The backup battery only maintains the correct time.

User Manual (English)
Page 6
... sounding, press SNOOZE/DIMMER. repeatedly until the alarm icon disappears from the power outlet. Connecting the power To connect the power: 1 Place your clock radio in memory. 7 Repeat Steps 3 through Step 6 to store as many as a preset, press PRESET MEMORY. to set the hour. 3 ...8 To select a preset station, briefly press PRESET+ or PRESET- NS-PRCL01 Projection Clock Radio 5 Reinstall the backup battery slot cover. 6 Plug the AC adapter into the DCIN 6V jack on your clock radio. 2 Press AM/FM to select the radio band you want, press TUNING+ or TUNING-. • To auto ...
... sounding, press SNOOZE/DIMMER. repeatedly until the alarm icon disappears from the power outlet. Connecting the power To connect the power: 1 Place your clock radio in memory. 7 Repeat Steps 3 through Step 6 to store as many as a preset, press PRESET MEMORY. to set the hour. 3 ...8 To select a preset station, briefly press PRESET+ or PRESET- NS-PRCL01 Projection Clock Radio 5 Reinstall the backup battery slot cover. 6 Plug the AC adapter into the DCIN 6V jack on your clock radio. 2 Press AM/FM to select the radio band you want, press TUNING+ or TUNING-. • To auto ...
User Manual (English)
Page 7
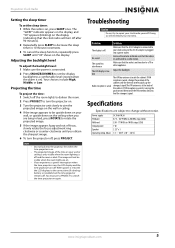
...comfortable level (except when the alarm is on, the LCD display and the time projector turn off. The sound has interference Make sure that the clock radio will turn the projector on. 3 Turn the projector unit slowly to aim the projected image on the wall or ceiling. 4 If the image... appears to be visible when the room lights are on and tuned to repair your clock radio yourself. The "SLEEP" indicator appears on the display, and "90" appears (blinking) on the display (indicating that the radio is on ). Adjusting the backlight level To adjust the backlight level: 1 Make sure...
...comfortable level (except when the alarm is on, the LCD display and the time projector turn off. The sound has interference Make sure that the clock radio will turn the projector on. 3 Turn the projector unit slowly to aim the projected image on the wall or ceiling. 4 If the image... appears to be visible when the room lights are on and tuned to repair your clock radio yourself. The "SLEEP" indicator appears on the display, and "90" appears (blinking) on the display (indicating that the radio is on ). Adjusting the backlight level To adjust the backlight level: 1 Make sure...
User Manual (English)
Page 8
...compliance with the instructions, may cause undesired operation. However, there is connected. • Consult the dealer or an experienced radio/TV technician for a class B digital device, pursuant to provide reasonable protection against harmful interference in a residential installation. ...device must accept any interference received, including interference that to radio communications. Canada ICES-003 statement This Class B digital apparatus complies with Part 15 of the FCC Rules. NS-PRCL01 Projection Clock Radio Legal notices FCC Part 15 This device complies with Canadian ICES...
...compliance with the instructions, may cause undesired operation. However, there is connected. • Consult the dealer or an experienced radio/TV technician for a class B digital device, pursuant to provide reasonable protection against harmful interference in a residential installation. ...device must accept any interference received, including interference that to radio communications. Canada ICES-003 statement This Class B digital apparatus complies with Part 15 of the FCC Rules. NS-PRCL01 Projection Clock Radio Legal notices FCC Part 15 This device complies with Canadian ICES...
User Manual (English)
Page 9
Projection Clock Radio 90-day limited warranty Insignia Products ("Insignia") warrants to you, the original purchaser of this new NS-PRCL01 ("Product"), that the Product shall be free of defects in the original manufacture of the material or workmanship for a period of 90 ... and brand names are trademarks of the Product, including the antenna • Plasma display panel damaged by an authorized Insignia repair center or store personnel, Insignia will have an Insignia-approved repair person dispatched to your original receipt and the Product to be purchased from an online web site, mail...
Projection Clock Radio 90-day limited warranty Insignia Products ("Insignia") warrants to you, the original purchaser of this new NS-PRCL01 ("Product"), that the Product shall be free of defects in the original manufacture of the material or workmanship for a period of 90 ... and brand names are trademarks of the Product, including the antenna • Plasma display panel damaged by an authorized Insignia repair center or store personnel, Insignia will have an Insignia-approved repair person dispatched to your original receipt and the Product to be purchased from an online web site, mail...

User Manual (English)
Page 11
Projection Clock Radio www.insigniaproducts.com 9
Projection Clock Radio www.insigniaproducts.com 9


