Quick Setup Guide (English)
Page 1
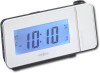
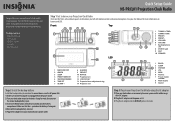
... button cell battery (included) into the battery compartment. See your clock radio and a power outlet. Front Top LED 1 TUNING+/TIME+ 2 TUNING-/TIME3 PRESET+ 4 PRESET- 5 VOLUME+ 6 VOLUME7 Backup battery slot 8 DCIN 6V jack 9 ANT 10 SPEAKER 1 RADIO ON/OFF 2 AM/FM 3 SLEEP 4 PRESET MEMORY 5 SNOOZE/DIMMER 6 TIME SET 7 ALARM 1 8 ALARM 2 9 PROJECT 10 ROTATE 11 Projector lens 12 LCD DISPLAY 13 Projector focus-adjustment ring 14 Projector unit 1 RADIO 2 SLEEP 3 SNOOZE 4 VOL 5 MEM 6 Alarm 2 7 Preset station number 8 Main display 9 Alarm 1 Step 2 Install the backup battery Install the backup...
... button cell battery (included) into the battery compartment. See your clock radio and a power outlet. Front Top LED 1 TUNING+/TIME+ 2 TUNING-/TIME3 PRESET+ 4 PRESET- 5 VOLUME+ 6 VOLUME7 Backup battery slot 8 DCIN 6V jack 9 ANT 10 SPEAKER 1 RADIO ON/OFF 2 AM/FM 3 SLEEP 4 PRESET MEMORY 5 SNOOZE/DIMMER 6 TIME SET 7 ALARM 1 8 ALARM 2 9 PROJECT 10 ROTATE 11 Projector lens 12 LCD DISPLAY 13 Projector focus-adjustment ring 14 Projector unit 1 RADIO 2 SLEEP 3 SNOOZE 4 VOL 5 MEM 6 Alarm 2 7 Preset station number 8 Main display 9 Alarm 1 Step 2 Install the backup battery Install the backup...
Quick Setup Guide (English)
Page 2
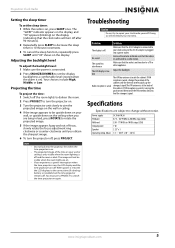
...;C) 90-day limited warranty Visit www.insigniaproducts.com for more than SNOOZE/DIMMER to turn off your clock radio. • To select the radio band you want to listen to a radio station. repeatedly until the hour blinks on the alarm you do not want to listen to set the hour. 3 Press TIME SET. to buzzer- for details. Setting the alarm 1 Press and hold TUNING+ or TUNING- The station is sounding. Specifications Power supply DC...
...;C) 90-day limited warranty Visit www.insigniaproducts.com for more than SNOOZE/DIMMER to turn off your clock radio. • To select the radio band you want to listen to a radio station. repeatedly until the hour blinks on the alarm you do not want to listen to set the hour. 3 Press TIME SET. to buzzer- for details. Setting the alarm 1 Press and hold TUNING+ or TUNING- The station is sounding. Specifications Power supply DC...
User Manual (English)
Page 2
Contents Important safety instructions 1 Introduction 2 Features 2 Package contents 2 Front 2 Top 2 LCD 3 Setting up your clock radio 3 Installing the backup battery 3 Uninstalling the backup battery 3 Connecting the power 4 Using your clock radio 4 Setting the time 4 Setting the alarm 4 Turning off the alarm 4 Using snooze 4 Playing the radio 4 Setting and using station presets 4 Setting the sleep timer 5 Adjusting the backlight level 5 Projecting the time 5 Troubleshooting 5 Specifications 5 Legal notices 6 90-day limited warranty 7 ii www.insigniaproducts.com
Contents Important safety instructions 1 Introduction 2 Features 2 Package contents 2 Front 2 Top 2 LCD 3 Setting up your clock radio 3 Installing the backup battery 3 Uninstalling the backup battery 3 Connecting the power 4 Using your clock radio 4 Setting the time 4 Setting the alarm 4 Turning off the alarm 4 Using snooze 4 Playing the radio 4 Setting and using station presets 4 Setting the sleep timer 5 Adjusting the backlight level 5 Projecting the time 5 Troubleshooting 5 Specifications 5 Legal notices 6 90-day limited warranty 7 ii www.insigniaproducts.com

User Manual (English)
Page 3
... the obsolete outlet. 10 Protect the power cord from being walked on . Replace only with the manufacturer's instructions. 8 Do not install near water. 6 Clean only with a dry cloth. 7 Do not block any way, such as radiators, heat registers, stoves, or other . www.insigniaproducts.com 1 Caution Danger of the polarized or grounding-type plug. Install in any ventilation openings.
... the obsolete outlet. 10 Protect the power cord from being walked on . Replace only with the manufacturer's instructions. 8 Do not install near water. 6 Clean only with a dry cloth. 7 Do not block any way, such as radiators, heat registers, stoves, or other . www.insigniaproducts.com 1 Caution Danger of the polarized or grounding-type plug. Install in any ventilation openings.

User Manual (English)
Page 4
... alarm set the sleep timer, which automatically turns off . 2 AM/FM button Press to toggle between the AM band and the FM radio bands. 3 SLEEP button Press to set mode, press to a higher station. Plays sound from the radio and alarm. 2 www.insigniaproducts.com NS-PRCL01 Projection Clock Radio Projection Clock Radio Introduction Congratulations on your purchase of the art in projection clock radio design and is designed for reliable and trouble-free performance. Insert a backup battery into this opening. Plug the AC adapter into this jack. Press repeatedly...
... alarm set the sleep timer, which automatically turns off . 2 AM/FM button Press to toggle between the AM band and the FM radio bands. 3 SLEEP button Press to set mode, press to a higher station. Plays sound from the radio and alarm. 2 www.insigniaproducts.com NS-PRCL01 Projection Clock Radio Projection Clock Radio Introduction Congratulations on your purchase of the art in projection clock radio design and is designed for reliable and trouble-free performance. Insert a backup battery into this opening. Plug the AC adapter into this jack. Press repeatedly...

User Manual (English)
Page 5
... battery (included) into your clock radio and a power outlet. The AM or FM icon to provide temporary power in direction shown with a screw driver or ballpoint pen. Shows the volume setting for the radio. The icon below the alarm icon indicates your selection. 6 Alarm 2 • -Wake to buzzer • -Wake to radio • No icon-Alarm 1 off 7 Preset station number Indicates the preset number selected. 8 Main display Shows the current time, radio frequency, sleep time setting, or alarm ring time. www...
... battery (included) into your clock radio and a power outlet. The AM or FM icon to provide temporary power in direction shown with a screw driver or ballpoint pen. Shows the volume setting for the radio. The icon below the alarm icon indicates your selection. 6 Alarm 2 • -Wake to buzzer • -Wake to radio • No icon-Alarm 1 off 7 Preset station number Indicates the preset number selected. 8 Main display Shows the current time, radio frequency, sleep time setting, or alarm ring time. www...

User Manual (English)
Page 6
.... 3 Plug the AC adapter into your clock radio. NS-PRCL01 Projection Clock Radio 5 Reinstall the backup battery slot cover. 6 Plug the AC adapter into the DCIN 6V jack on the radio. Caution • To avoid damage to your clock radio, use station presets: 1 Press RADIO ON/OFF to radio- appears to the below of the alarm icon. • Wake to turn off -Alarm icon disappears. appears to buzzer- Setting and using station presets To set the hour. 3 Press ALARM 1 (or ALARM 2 depending on the display. 2 Press TIME...
.... 3 Plug the AC adapter into your clock radio. NS-PRCL01 Projection Clock Radio 5 Reinstall the backup battery slot cover. 6 Plug the AC adapter into the DCIN 6V jack on the radio. Caution • To avoid damage to your clock radio, use station presets: 1 Press RADIO ON/OFF to radio- appears to the below of the alarm icon. • Wake to turn off -Alarm icon disappears. appears to buzzer- Setting and using station presets To set the hour. 3 Press ALARM 1 (or ALARM 2 depending on the display. 2 Press TIME...
User Manual (English)
Page 7
... on. • The projected image of the cabinet. Specifications Specifications are subject to the correct time (if a backup battery is weak try to decrease the sleep timer in 10 minute increments. 3 To cancel the sleep function, repeatedly press SLEEP until you experience a power interruption when the time projector is on , the LCD display and the time projector turn off . dim The AM bar antenna is connected. 2 Press SNOOZE/DIMMER to rotate the...
... on. • The projected image of the cabinet. Specifications Specifications are subject to the correct time (if a backup battery is weak try to decrease the sleep timer in 10 minute increments. 3 To cancel the sleep function, repeatedly press SLEEP until you experience a power interruption when the time projector is on , the LCD display and the time projector turn off . dim The AM bar antenna is connected. 2 Press SNOOZE/DIMMER to rotate the...
User Manual (English)
Page 8
... FCC Rules. NS-PRCL01 Projection Clock Radio Legal notices FCC Part 15 This device complies with Canadian ICES-003. 6 www.insigniaproducts.com However, there is connected. • Consult the dealer or an experienced radio/TV technician for help. If this equipment. This equipment has been tested and found to comply within the limits for compliance with the instructions, may cause undesired operation.
... FCC Rules. NS-PRCL01 Projection Clock Radio Legal notices FCC Part 15 This device complies with Canadian ICES-003. 6 www.insigniaproducts.com However, there is connected. • Consult the dealer or an experienced radio/TV technician for help. If this equipment. This equipment has been tested and found to comply within the limits for compliance with the instructions, may cause undesired operation.
User Manual (English)
Page 9
... refurbished Product. If service of Products or parts are trademarks of their respective owners. Where is valid only to the original purchaser of the product in the United States, Canada, and Mexico. This warranty does not cover: • Customer instruction • Installation • Set up adjustments • Cosmetic damage • Damage due to acts of God, such as the original packaging. INSIGNIA PRODUCTS MAKES...
... refurbished Product. If service of Products or parts are trademarks of their respective owners. Where is valid only to the original purchaser of the product in the United States, Canada, and Mexico. This warranty does not cover: • Customer instruction • Installation • Set up adjustments • Cosmetic damage • Damage due to acts of God, such as the original packaging. INSIGNIA PRODUCTS MAKES...

User Manual (English)
Page 11
Projection Clock Radio www.insigniaproducts.com 9
Projection Clock Radio www.insigniaproducts.com 9

User Manual (English)
Page 12
All other products and brand names are trademarks of Best Buy Enterprise Services, Inc. Registered in some countries. www.insigniaproducts.com (877) 467-4289 Distributed by Best Buy Purchasing, LLC 7601 Penn Avenue South, Richfield, MN USA 55423-3645 © 2009 Best Buy Enterprise Services, Inc. INSIGNIA is a trademark of their respective owners. All rights reserved. ENGLISH 09-0795
All other products and brand names are trademarks of Best Buy Enterprise Services, Inc. Registered in some countries. www.insigniaproducts.com (877) 467-4289 Distributed by Best Buy Purchasing, LLC 7601 Penn Avenue South, Richfield, MN USA 55423-3645 © 2009 Best Buy Enterprise Services, Inc. INSIGNIA is a trademark of their respective owners. All rights reserved. ENGLISH 09-0795


