Quick Setup Guide (English)
Page 1
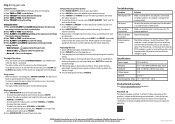
... 6V jack on the radio. See your purchase of a high-quality Insignia product. Package contents • Projection clock radio • AC-DC adapter • CR2032 x 1 battery • User Guide • Quick Setup Guide Step 1 Get to maintain the correct time in projection clock radio design and is designed for more information on buttons and LED. Your NS-PRCL01 represents the state...
... 6V jack on the radio. See your purchase of a high-quality Insignia product. Package contents • Projection clock radio • AC-DC adapter • CR2032 x 1 battery • User Guide • Quick Setup Guide Step 1 Get to maintain the correct time in projection clock radio design and is designed for more information on buttons and LED. Your NS-PRCL01 represents the state...
Quick Setup Guide (English)
Page 2
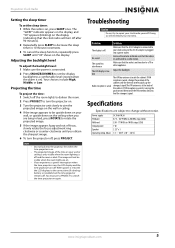
... power outlet. The LCD display is inside the cabinet. FCC Part 15 This device complies with the preset number selected and the station frequency. INSIGNIA is sounding. Registered in memory. 7 Repeat Steps 3 through Step 6 to be set for more than SNOOZE/DIMMER. ENGLISH 09-0796 to ...until you reach the station you want. Projecting the time 1 Switch off the room lights to darken the room. 2 Press PROJECT to turn the projector on. 3 Turn the projector unit slowly to aim the projected image on your clock radio. • To select the radio band you want to listen to rotate ...
... power outlet. The LCD display is inside the cabinet. FCC Part 15 This device complies with the preset number selected and the station frequency. INSIGNIA is sounding. Registered in memory. 7 Repeat Steps 3 through Step 6 to be set for more than SNOOZE/DIMMER. ENGLISH 09-0796 to ...until you reach the station you want. Projecting the time 1 Switch off the room lights to darken the room. 2 Press PROJECT to turn the projector on. 3 Turn the projector unit slowly to aim the projected image on your clock radio. • To select the radio band you want to listen to rotate ...
User Manual (English)
Page 2
Contents Important safety instructions 1 Introduction 2 Features 2 Package contents 2 Front 2 Top 2 LCD 3 Setting up your clock radio 3 Installing the backup battery 3 Uninstalling the backup battery 3 Connecting the power 4 Using your clock radio 4 Setting the time 4 Setting the alarm 4 Turning off the alarm 4 Using snooze 4 Playing the radio 4 Setting and using station presets 4 Setting the sleep timer 5 Adjusting the backlight level 5 Projecting the time 5 Troubleshooting 5 Specifications 5 Legal notices 6 90-day limited warranty 7 ii www.insigniaproducts.com
Contents Important safety instructions 1 Introduction 2 Features 2 Package contents 2 Front 2 Top 2 LCD 3 Setting up your clock radio 3 Installing the backup battery 3 Uninstalling the backup battery 3 Connecting the power 4 Using your clock radio 4 Setting the time 4 Setting the alarm 4 Turning off the alarm 4 Using snooze 4 Playing the radio 4 Setting and using station presets 4 Setting the sleep timer 5 Adjusting the backlight level 5 Projecting the time 5 Troubleshooting 5 Specifications 5 Legal notices 6 90-day limited warranty 7 ii www.insigniaproducts.com

User Manual (English)
Page 4
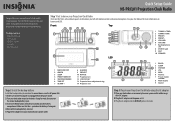
.... NS-PRCL01 Projection Clock Radio Projection Clock Radio Introduction Congratulations on a wall or ceiling. Features Package contents • Projection clock radio • AC-DC adapter • Battery (CR2032 x 1) • User Guide • Quick Setup Guide Front # Item 11 Projector lens 12 LCD DISPLAY 13 Projector focus-adjustment ring 14 Projector unit Description Projects the time on your purchase of the art in projection clock radio design...
.... NS-PRCL01 Projection Clock Radio Projection Clock Radio Introduction Congratulations on a wall or ceiling. Features Package contents • Projection clock radio • AC-DC adapter • Battery (CR2032 x 1) • User Guide • Quick Setup Guide Front # Item 11 Projector lens 12 LCD DISPLAY 13 Projector focus-adjustment ring 14 Projector unit Description Projects the time on your purchase of the art in projection clock radio design...

User Manual (English)
Page 5
... set. The backup battery only maintains the correct time. The AM or FM icon to provide temporary power in direction shown with a screw driver or ballpoint pen. www.insigniaproducts.com 3 Projection Clock Radio LCD 3 Insert one CR2032 button cell battery (included) into your clock radio and a power outlet. Make sure that the back is facing forward...
... set. The backup battery only maintains the correct time. The AM or FM icon to provide temporary power in direction shown with a screw driver or ballpoint pen. www.insigniaproducts.com 3 Projection Clock Radio LCD 3 Insert one CR2032 button cell battery (included) into your clock radio and a power outlet. Make sure that the back is facing forward...

User Manual (English)
Page 6
...nine minutes later. • To cancel snooze (the alarm will not turn on your clock radio Setting the time To set the minutes. 5 Press TIME SET to , press AM/FM. • To tune the radio up or down and select the station you want, press TUNING+ or TUNING-. •...- repeatedly until the alarm icon disappears from the power outlet. NS-PRCL01 Projection Clock Radio 5 Reinstall the backup battery slot cover. 6 Plug the AC adapter into the DCIN 6V jack on the radio. Connecting the power To connect the power: 1 Place your clock radio in memory. 7 Repeat Steps 3 through Step 6 to the...
...nine minutes later. • To cancel snooze (the alarm will not turn on your clock radio Setting the time To set the minutes. 5 Press TIME SET to , press AM/FM. • To tune the radio up or down and select the station you want, press TUNING+ or TUNING-. •...- repeatedly until the alarm icon disappears from the power outlet. NS-PRCL01 Projection Clock Radio 5 Reinstall the backup battery slot cover. 6 Plug the AC adapter into the DCIN 6V jack on the radio. Connecting the power To connect the power: 1 Place your clock radio in memory. 7 Repeat Steps 3 through Step 6 to the...
User Manual (English)
Page 7
...look into a power outlet. The image will not be upside down on your clock radio and the AC-DC adapter is plugged into the projector lens when the time projector is on. • The projected image of focus, slowly rotate the focus adjustment ring clockwise or counter-clockwise until... lighting is off . You must press PROJECT to switch the time projector on your warranty. The "SLEEP" indicator appears on the display, and "90" appears (blinking) on the display (indicating that the radio is not too close to a radio station. Projection Clock Radio Setting the sleep timer To set the ...
...look into a power outlet. The image will not be upside down on your clock radio and the AC-DC adapter is plugged into the projector lens when the time projector is on. • The projected image of focus, slowly rotate the focus adjustment ring clockwise or counter-clockwise until... lighting is off . You must press PROJECT to switch the time projector on your warranty. The "SLEEP" indicator appears on the display, and "90" appears (blinking) on the display (indicating that the radio is not too close to a radio station. Projection Clock Radio Setting the sleep timer To set the ...


