
Warranty
Page 1
...; Display panels containing up to three (3) pixel failures (dots that are required after the Warranty Period expires, you must be purchased in the United States and Canada call 1-877-467-4289. or (2) replace the Product at a Best Buy retail store location or from the date you purchased the Product. How to obtain warranty service? What does the warranty not cover? INSIGNIA...
...; Display panels containing up to three (3) pixel failures (dots that are required after the Warranty Period expires, you must be purchased in the United States and Canada call 1-877-467-4289. or (2) replace the Product at a Best Buy retail store location or from the date you purchased the Product. How to obtain warranty service? What does the warranty not cover? INSIGNIA...
User Guide
Page 2
... 8 Control panel 9 Setting up your microwave 10 Installing the turntable 12 Using your microwave 13 Setting the clock 13 Using the kitchen timer 13 Cooking in your microwave 13 Cooking quickly 14 Using the Auto menu 14 Popping popcorn in your microwave 16 Defrosting in your microwave 16 Using multi-stage cooking 16 Using the energy saving (Eco) mode 17 Checking the time and power level 17 Using the child-lock 17 Turning off the buzzer 17 Resetting the turntable 17 Troubleshooting 18 Maintaining your microwave 19 Obtaining replacement parts...
... 8 Control panel 9 Setting up your microwave 10 Installing the turntable 12 Using your microwave 13 Setting the clock 13 Using the kitchen timer 13 Cooking in your microwave 13 Cooking quickly 14 Using the Auto menu 14 Popping popcorn in your microwave 16 Defrosting in your microwave 16 Using multi-stage cooking 16 Using the energy saving (Eco) mode 17 Checking the time and power level 17 Using the child-lock 17 Turning off the buzzer 17 Resetting the turntable 17 Troubleshooting 18 Maintaining your microwave 19 Obtaining replacement parts...

User Guide
Page 3
... operate this oven with the door open because this appliance only in harmful exposure to a properly grounded outlet. Carefully attend the oven when paper, plastic, or other combustible materials are placed inside the oven ignite, keep the oven door closed. Turn the oven off and unplug the oven or shut off power at the fuse or circuit breaker panel. • Do not use . 5 This oven must be adjusted or repaired...
... operate this oven with the door open because this appliance only in harmful exposure to a properly grounded outlet. Carefully attend the oven when paper, plastic, or other combustible materials are placed inside the oven ignite, keep the oven door closed. Turn the oven off and unplug the oven or shut off power at the fuse or circuit breaker panel. • Do not use . 5 This oven must be adjusted or repaired...

User Guide
Page 4
... microwave oven for a short time before and halfway through heating it. • Do not use this oven, will expose you to lead, a chemical known to the state of the door and the oven that come together on this manual. Contact the nearest authorized service facility for examination, repair, or adjustment. 11 Do not cover or block any appliance, close supervision is not working...
... microwave oven for a short time before and halfway through heating it. • Do not use this oven, will expose you to lead, a chemical known to the state of the door and the oven that come together on this manual. Contact the nearest authorized service facility for examination, repair, or adjustment. 11 Do not cover or block any appliance, close supervision is not working...
User Guide
Page 5
... NOT alter the plug for the electric current. RADIO INTERFERENCE 1 Operation of the microwave oven may be used : • The marked electrical rating of the cord set or extension cord is properly grounded. .7 Cu. Retro Microwave Oven GROUNDING INSTRUCTIONS WARNING: Electric Shock Hazard Touching some of electric shock by a qualified electrician. This oven is properly installed and grounded. If the plug will not drape over unintentionally. This...
... NOT alter the plug for the electric current. RADIO INTERFERENCE 1 Operation of the microwave oven may be used : • The marked electrical rating of the cord set or extension cord is properly grounded. .7 Cu. Retro Microwave Oven GROUNDING INSTRUCTIONS WARNING: Electric Shock Hazard Touching some of electric shock by a qualified electrician. This oven is properly installed and grounded. If the plug will not drape over unintentionally. This...

User Guide
Page 6
... for one minute cooking time. 3 Carefully feel the utensil. Oven cooking bags Follow the manufacturer's instructions. Paper plates and Use for short-term cooking only. Make slits to retain moisture. Follow the manufacturer's instructions. Do not use oven mitts or pot holders because cookware may break. Plastic Use only if labeled "Microwave Safe." Glassware Use heat-resistant oven glassware only. Do not let plastic wrap touch food. 6 www.insigniaproducts...
... for one minute cooking time. 3 Carefully feel the utensil. Oven cooking bags Follow the manufacturer's instructions. Paper plates and Use for short-term cooking only. Make slits to retain moisture. Follow the manufacturer's instructions. Do not use oven mitts or pot holders because cookware may break. Plastic Use only if labeled "Microwave Safe." Glassware Use heat-resistant oven glassware only. Do not let plastic wrap touch food. 6 www.insigniaproducts...

User Guide
Page 7
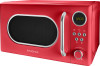
... crack. Retro Microwave Oven • Glass tray • Turntable ring assembly • User Guide Features • Cook or reheat meat, vegetables, pasta and more using a 700 W output at the touch of a button • Cherry red or mint green color, round viewing window, and chrome details provide a fun retro touch • Compact design fits on your countertop or kitchen cart while the 3.3 ft (1 m) cord reaches to an...
... crack. Retro Microwave Oven • Glass tray • Turntable ring assembly • User Guide Features • Cook or reheat meat, vegetables, pasta and more using a 700 W output at the touch of a button • Cherry red or mint green color, round viewing window, and chrome details provide a fun retro touch • Compact design fits on your countertop or kitchen cart while the 3.3 ft (1 m) cord reaches to an...

User Guide
Page 8
Lets you view the item being cooked. 6 Turntable shaft Rotates the turntable assembly. 7 Safety interlock system Prevents your microwave from exposure to excessive microwave energy. 4 Turntable ring assembly 5 Observation window Lets the turntable rotate to set cooking times and enter other information as needed. 2 Glass tray Lets food cook evenly. 3 Door assembly Protects you from operating when the door is open. 8 www.insigniaproducts.com Components # ITEM DESCRIPTION 1 Control panel Use to cook food evenly.
Lets you view the item being cooked. 6 Turntable shaft Rotates the turntable assembly. 7 Safety interlock system Prevents your microwave from exposure to excessive microwave energy. 4 Turntable ring assembly 5 Observation window Lets the turntable rotate to set cooking times and enter other information as needed. 2 Glass tray Lets food cook evenly. 3 Door assembly Protects you from operating when the door is open. 8 www.insigniaproducts.com Components # ITEM DESCRIPTION 1 Control panel Use to cook food evenly.

User Guide
Page 9
... time on 2 (defrost) page16. Control panel .7 Cu. Press twice, then enter the amount of the item you want to select the power level. You can select between 3 (microwave) 100% and 10%. The power levels (PL10, PL9, PL8, PL7, PL6, PL5, PL4, PL3, PL2, and PL1) appear in your microwave on the display. In cooking mode, displays cooking time, weight, and other information. Retro Microwave Oven # ITEM DESCRIPTION 1 Display In standby mode, displays...
... time on 2 (defrost) page16. Control panel .7 Cu. Press twice, then enter the amount of the item you want to select the power level. You can select between 3 (microwave) 100% and 10%. The power levels (PL10, PL9, PL8, PL7, PL6, PL5, PL4, PL3, PL2, and PL1) appear in your microwave on the display. In cooking mode, displays cooking time, weight, and other information. Retro Microwave Oven # ITEM DESCRIPTION 1 Display In standby mode, displays...

User Guide
Page 10
... the microwave cabinet surface, the door, and the control panel. This cover protects the magnetron. 10 www.insigniaproducts.com See Using the kitchen timer on page 17. 5 Turn to adjust settings. (adjustment) knob 6 (kitchen Press once to specify the cook time in the microwave cavity. In the wait state, press one or more to set the child lock. CAUTION: Don't remove the light brown mica cover in 30 second increments. In standby mode...
... the microwave cabinet surface, the door, and the control panel. This cover protects the magnetron. 10 www.insigniaproducts.com See Using the kitchen timer on page 17. 5 Turn to adjust settings. (adjustment) knob 6 (kitchen Press once to specify the cook time in the microwave cavity. In the wait state, press one or more to set the child lock. CAUTION: Don't remove the light brown mica cover in 30 second increments. In standby mode...

User Guide
Page 11
Retro Microwave Oven 4 Place your microwave and any adjacent walls. www.insigniaproducts.com 11 CAUTIONS: • Don't mount your microwave under a cabinet. • Don't install your microwave into a standard household outlet. Make sure that provides enough open space for the air vents. 12 in. (30 cm) 3 in. (7.5 cm) Open 3 in. (7.5 cm) Notes: • A minimum clearance of 3 in . (30 cm) above your microwave. • Don't remove the...
Retro Microwave Oven 4 Place your microwave and any adjacent walls. www.insigniaproducts.com 11 CAUTIONS: • Don't mount your microwave under a cabinet. • Don't install your microwave into a standard household outlet. Make sure that provides enough open space for the air vents. 12 in. (30 cm) 3 in. (7.5 cm) Open 3 in. (7.5 cm) Notes: • A minimum clearance of 3 in . (30 cm) above your microwave. • Don't remove the...

User Guide
Page 12
... of food on the turntable assembly so that the hub engages the turntable shaft in the bottom of your microwave so that it is correctly installed. The glass turntable shouldn't turn freely when it turns freely. 2 Place the glass tray (flat side up) on the glass tray for cooking. • If the glass tray or turntable ring cracks or breaks, contact your nearest authorized service center. 1 Place the turntable ring assembly...
... of food on the turntable assembly so that the hub engages the turntable shaft in the bottom of your microwave so that it is correctly installed. The glass turntable shouldn't turn freely when it turns freely. 2 Place the glass tray (flat side up) on the glass tray for cooking. • If the glass tray or turntable ring cracks or breaks, contact your nearest authorized service center. 1 Place the turntable ring assembly...

User Guide
Page 13
... time. Cooking in the display. 2 Press repeatedly or turn the adjustment knob to confirm the setting. The available power levels are: 1 2 3 4 5 6 7 8 9 10 TIME TIMES TIMES TIMES TIMES TIMES TIMES TIMES TIMES TIMES Power 100% 90% 80% 70% 60% 50% 40% 30% 20% 10% Display PL10 PL9 PL8 PL7 PL6 PL5 PL4 PL3 PL2 PL1 3 Press (start /+30sec.) to select the power level. The minutes flash on the display and the buzzer sounds once. 2 Press (kitchen timer/clock...
... time. Cooking in the display. 2 Press repeatedly or turn the adjustment knob to confirm the setting. The available power levels are: 1 2 3 4 5 6 7 8 9 10 TIME TIMES TIMES TIMES TIMES TIMES TIMES TIMES TIMES TIMES Power 100% 90% 80% 70% 60% 50% 40% 30% 20% 10% Display PL10 PL9 PL8 PL7 PL6 PL5 PL4 PL3 PL2 PL1 3 Press (start /+30sec.) to select the power level. The minutes flash on the display and the buzzer sounds once. 2 Press (kitchen timer/clock...
User Guide
Page 14
... using the auto menu or defrost by 30 seconds. Each time you press (start /+30sec.) to A-1. Using the Auto menu Your microwave has nine pre-programmed cooking modes. 1 In standby mode, turn the adjustment knob right to choose the menu from A-1 to A-9 or turn the knob to adjust the cooking time between 0:05 and 95:00. The auto menu number appears in the display. 2 Press (start /+30sec.) to the former setting...
... using the auto menu or defrost by 30 seconds. Each time you press (start /+30sec.) to A-1. Using the Auto menu Your microwave has nine pre-programmed cooking modes. 1 In standby mode, turn the adjustment knob right to choose the menu from A-1 to A-9 or turn the knob to adjust the cooking time between 0:05 and 95:00. The auto menu number appears in the display. 2 Press (start /+30sec.) to the former setting...

User Guide
Page 16
... (defrost) twice. Note: Auto cooking cannot be used with multi-stage cooking. 1 Press (defrost) twice. dEF2 appears on the display. 5 Press (start defrosting. Using multi-stage cooking You can 't change it . PL8 appears on the display. 2 Turn the adjustment knob to set up a two-stage cycle to confirm. 16 www.insigniaproducts.com You can set the defrost time to start /+30sec.) to cook your food. Popping popcorn in your microwave Defrosting by time Note: The defrost power level...
... (defrost) twice. Note: Auto cooking cannot be used with multi-stage cooking. 1 Press (defrost) twice. dEF2 appears on the display. 5 Press (start defrosting. Using multi-stage cooking You can 't change it . PL8 appears on the display. 2 Turn the adjustment knob to set up a two-stage cycle to confirm. 16 www.insigniaproducts.com You can set the defrost time to start /+30sec.) to cook your food. Popping popcorn in your microwave Defrosting by time Note: The defrost power level...

User Guide
Page 17
... works if the door is closed and the child lock function is turned off . Checking the time and power level • While cooking, press (microwave). The current time appears on . • To unlock your microwave is done. A long beep sounds and the buzzer is turned on the display for three seconds. • While cooking, press (kitchen timer/clock). Your microwave sounds a long beep to start /+30sec.) to indicate that lock is done, the turntable enters the turntable reset...
... works if the door is closed and the child lock function is turned off . Checking the time and power level • While cooking, press (microwave). The current time appears on . • To unlock your microwave is done. A long beep sounds and the buzzer is turned on the display for three seconds. • While cooking, press (kitchen timer/clock). Your microwave sounds a long beep to start /+30sec.) to indicate that lock is done, the turntable enters the turntable reset...

User Guide
Page 18
... My microwave won't start Arching or sparking in my microwave Unevenly cooked foods Overcooked foods Undercooked foods Incorrect defrosting The power cord isn't plugged in Use only microwave-safe materials. The wrong operation is open. Check the instructions and try again. Don't operate your microwave when it . See Materials you can use on page 6. Clean your microwave with your microwave. power level. The food isn't defrosted completely. Use only microwave-safe materials. The cooking time or power level Use the correct cooking time and...
... My microwave won't start Arching or sparking in my microwave Unevenly cooked foods Overcooked foods Undercooked foods Incorrect defrosting The power cord isn't plugged in Use only microwave-safe materials. The wrong operation is open. Check the instructions and try again. Don't operate your microwave when it . See Materials you can use on page 6. Clean your microwave with your microwave. power level. The food isn't defrosted completely. Use only microwave-safe materials. The cooking time or power level Use the correct cooking time and...

User Guide
Page 19
... SOLUTION Sensor cooked The cover or lid on the display. Maintaining your microwave Keep your microwave clean, especially the interior. • Clean the exterior with a damp cloth or sponge. Don't let water or cleaning solution drip into the air vents. • Clean the interior with a damp cloth or sponge. www.insigniaproducts.com 19 Ft. Don't open the door to stir or turn the food. Obtaining replacement parts Call Insignia Customer Service...
... SOLUTION Sensor cooked The cover or lid on the display. Maintaining your microwave Keep your microwave clean, especially the interior. • Clean the exterior with a damp cloth or sponge. Don't let water or cleaning solution drip into the air vents. • Clean the interior with a damp cloth or sponge. www.insigniaproducts.com 19 Ft. Don't open the door to stir or turn the food. Obtaining replacement parts Call Insignia Customer Service...
User Guide
Page 21
.... Retro Microwave Oven ONE-YEAR LIMITED WARRANTY Definitions: The Distributor* of Insignia branded products warrants to obtain warranty service? If service of Insignia and are required after the Warranty Period expires, you purchased the Product. Ft. How to you, the original purchaser of the material or workmanship for 1 year (365 days) from a Best Buy branded retail store or online at no...
.... Retro Microwave Oven ONE-YEAR LIMITED WARRANTY Definitions: The Distributor* of Insignia branded products warrants to obtain warranty service? If service of Insignia and are required after the Warranty Period expires, you purchased the Product. Ft. How to you, the original purchaser of the material or workmanship for 1 year (365 days) from a Best Buy branded retail store or online at no...

User Guide
Page 22
...; Display panel damaged by static (non-moving) images applied for lengthy periods (burn-in an area smaller than one tenth (1/10) of Best Buy and its affiliated companies. *Distributed by Insignia to service the Product • Products sold "as is a trademark of the display size or up to liquids, gels or pastes. REPAIR REPLACEMENT AS PROVIDED UNDER THIS WARRANTY IS...
...; Display panel damaged by static (non-moving) images applied for lengthy periods (burn-in an area smaller than one tenth (1/10) of Best Buy and its affiliated companies. *Distributed by Insignia to service the Product • Products sold "as is a trademark of the display size or up to liquids, gels or pastes. REPAIR REPLACEMENT AS PROVIDED UNDER THIS WARRANTY IS...

