
Documentation
Page 2
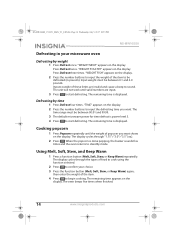
... your microwave oven 10 Installing the turntable 11 Using your microwave oven 12 Understanding and setting the power level 12 Setting the clock 12 Using the kitchen timer 12 Cooking in your microwave oven 13 Cooking quickly with Easy Set 13 Defrosting in your microwave oven 14 Cooking popcorn 14 Using Melt, Soft, Stew, and Keep Warm 14 Using Sensor cooking 15 Reheating food with the Sensor 16 Using the memory function 18 Using multi-stage cooking 18 Checking the time and power level while cooking 19 Using the child-lock 19 Troubleshooting...
... your microwave oven 10 Installing the turntable 11 Using your microwave oven 12 Understanding and setting the power level 12 Setting the clock 12 Using the kitchen timer 12 Cooking in your microwave oven 13 Cooking quickly with Easy Set 13 Defrosting in your microwave oven 14 Cooking popcorn 14 Using Melt, Soft, Stew, and Keep Warm 14 Using Sensor cooking 15 Reheating food with the Sensor 16 Using the memory function 18 Using multi-stage cooking 18 Checking the time and power level while cooking 19 Using the child-lock 19 Troubleshooting...

Documentation
Page 3
... unplug the oven or shut off power at the fuse or circuit breaker panel. Microwave Oven PRECAUTIONS TO AVOID POSSIBLE EXPOSURE TO EXCESSIVE MICROWAVE ENERGY: 1 Do not attempt to operate this oven with any cooking appliance, close supervision is necessary to accumulate on page 3. 3 As with the door open because this can result in the oven cavity: • Do not overcook food. IMPORTANT SAFETY INSTRUCTIONS Warning...
... unplug the oven or shut off power at the fuse or circuit breaker panel. Microwave Oven PRECAUTIONS TO AVOID POSSIBLE EXPOSURE TO EXCESSIVE MICROWAVE ENERGY: 1 Do not attempt to operate this oven with any cooking appliance, close supervision is necessary to accumulate on page 3. 3 As with the door open because this can result in the oven cavity: • Do not overcook food. IMPORTANT SAFETY INSTRUCTIONS Warning...

Documentation
Page 4
Do not use . 9 Do not operate this manual. Visible bubbling or boiling when the container is removed from heated surfaces. 16 Do not let the cord hang over the edge of a table or counter. 17 When cleaning the surfaces of the door and the oven that come together on page 5. 6 Install or locate this oven. THIS COULD RESULT IN VERY HOT LIQUIDS SUDDENLY BOILING OVER WHEN...
Do not use . 9 Do not operate this manual. Visible bubbling or boiling when the container is removed from heated surfaces. 16 Do not let the cord hang over the edge of a table or counter. 17 When cleaning the surfaces of the door and the oven that come together on page 5. 6 Install or locate this oven. THIS COULD RESULT IN VERY HOT LIQUIDS SUDDENLY BOILING OVER WHEN...

Documentation
Page 5
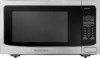
.... NS-MW16SS8_17-0351_MAN_V1_ENG.fm Page 5 Wednesday, July 5, 2017 10:55 PM 1.6 Cu. This oven is properly grounded. www.insigniaproducts.com 5 Ft. In the event of an electrical short circuit, grounding reduces the risk of the oven. • A short power-supply cord is provided to whether the oven is equipped with a cord having a grounding wire with this oven. Wash your hands after handling. Microwave Oven...
.... NS-MW16SS8_17-0351_MAN_V1_ENG.fm Page 5 Wednesday, July 5, 2017 10:55 PM 1.6 Cu. This oven is properly grounded. www.insigniaproducts.com 5 Ft. In the event of an electrical short circuit, grounding reduces the risk of the oven. • A short power-supply cord is provided to whether the oven is equipped with a cord having a grounding wire with this oven. Wash your hands after handling. Microwave Oven...
Documentation
Page 6
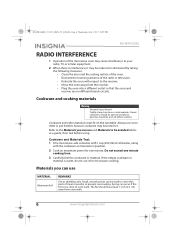
... materials must fit on maximum power for microwave cooking. The foil should be avoided tables as shielding only. NS-MW16SS8_17-0351_MAN_V1_ENG.fm Page 6 Wednesday, July 5, 2017 10:55 PM NS-MW16SS8 RADIO INTERFERENCE 1 Operation of the microwave oven may cause interference to your radio, TV, or similar equipment. 2 When there is interference, it for one minute cooking time. 3 Carefully feel the cookware or...
... materials must fit on maximum power for microwave cooking. The foil should be avoided tables as shielding only. NS-MW16SS8_17-0351_MAN_V1_ENG.fm Page 6 Wednesday, July 5, 2017 10:55 PM NS-MW16SS8 RADIO INTERFERENCE 1 Operation of the microwave oven may cause interference to your radio, TV, or similar equipment. 2 When there is interference, it for one minute cooking time. 3 Carefully feel the cookware or...

Documentation
Page 7
... steam to cover food for short-term cooking only. Wax paper Use as the food inside when exposed to touch food. Use a microwave-safe dish instead. Paper bags May cause a fire in . (5mm) above the turntable. Wood Wood will dry out when used in the oven. The bottom of the browning dish must be at least 3/16-in the oven. Glass jars Always remove the lid...
... steam to cover food for short-term cooking only. Wax paper Use as the food inside when exposed to touch food. Use a microwave-safe dish instead. Paper bags May cause a fire in . (5mm) above the turntable. Wood Wood will dry out when used in the oven. The bottom of the browning dish must be at least 3/16-in the oven. Glass jars Always remove the lid...
Documentation
Page 8
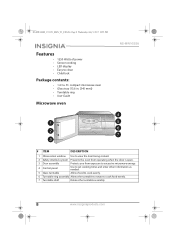
... door is open. 3 Door assembly Protects you from exposure to excessive microwave energy. 4 Control panel Use to set cooking times and enter other information as needed. 5 Glass turntable Allows food to cook evenly. 6 Turntable ring assembly Allows the turntable to rotate to clean • Child lock Package contents: • 1.6 Cu. Ft. NS-MW16SS8_17-0351_MAN_V1_ENG.fm Page 8 Wednesday, July 5, 2017 10:55 PM Features • 1250 Watts of power • Sensor cooking • LED display • Easy to cook food evenly. 7 Turntable...
... door is open. 3 Door assembly Protects you from exposure to excessive microwave energy. 4 Control panel Use to set cooking times and enter other information as needed. 5 Glass turntable Allows food to cook evenly. 6 Turntable ring assembly Allows the turntable to rotate to clean • Child lock Package contents: • 1.6 Cu. Ft. NS-MW16SS8_17-0351_MAN_V1_ENG.fm Page 8 Wednesday, July 5, 2017 10:55 PM Features • 1250 Watts of power • Sensor cooking • LED display • Easy to cook food evenly. 7 Turntable...

Documentation
Page 10
.... 3 Remove any protective film from the microwave oven cabinet surface, the door, and the control panel. Notes • A minimum clearance of the oven. • Blocking the intake and/or outlet openings can damage the oven. • Place the oven as far away from the carton and oven cavity. 2 Examine the oven for any adjacent walls. Press button 1, 2, or 3 to begin cooking. Do not install or use the oven if...
.... 3 Remove any protective film from the microwave oven cabinet surface, the door, and the control panel. Notes • A minimum clearance of the oven. • Blocking the intake and/or outlet openings can damage the oven. • Place the oven as far away from the carton and oven cavity. 2 Examine the oven for any adjacent walls. Press button 1, 2, or 3 to begin cooking. Do not install or use the oven if...

Documentation
Page 11
... mount your oven under a cabinet. • Do not install your oven over a heat source, the oven could be damaged and the warranty would be used during cooking. • Always place all food and containers of food on the glass tray for cooking. • If the glass tray or turntable ring cracks or breaks, contact your oven into a standard household outlet. www.insigniaproducts.com 11 If installed near or over a range cooktop or other heat...
... mount your oven under a cabinet. • Do not install your oven over a heat source, the oven could be damaged and the warranty would be used during cooking. • Always place all food and containers of food on the glass tray for cooking. • If the glass tray or turntable ring cracks or breaks, contact your oven into a standard household outlet. www.insigniaproducts.com 11 If installed near or over a range cooktop or other heat...
Documentation
Page 12
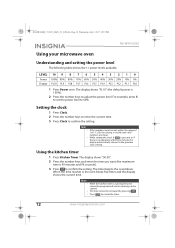
... the power level. Using the kitchen timer 1 Press Kitchen Timer. The display shows "00:00". 2 Press the number keys and enter the time you want (the maximum time is 100%). 2 Press the number keys to 50%. Notes • While the kitchen timer is no cooking can be started. • The time cannot be increased by pressing . • Press to confirm the setting. The timer begins the countdown. Setting the clock 1 Press Clock...
... the power level. Using the kitchen timer 1 Press Kitchen Timer. The display shows "00:00". 2 Press the number keys and enter the time you want (the maximum time is 100%). 2 Press the number keys to 50%. Notes • While the kitchen timer is no cooking can be started. • The time cannot be increased by pressing . • Press to confirm the setting. The timer begins the countdown. Setting the clock 1 Press Clock...

Documentation
Page 13
... Easy Set buttons). The maximum cooking time is selected, the oven fan turns on with Easy Set From standby mode you can use this to remove an odor from 1 to increase cooking time in your microwave oven 1 Press Cook Time once. For example, press 5 to set the power level to 50%. 5 Press to change the power setting. You can instantly cook something at 100% power level for the remainder of the power setting you want . The display shows "00...
... Easy Set buttons). The maximum cooking time is selected, the oven fan turns on with Easy Set From standby mode you can use this to remove an odor from 1 to increase cooking time in your microwave oven 1 Press Cook Time once. For example, press 5 to set the power level to 50%. 5 Press to change the power setting. You can instantly cook something at 100% power level for the remainder of the power setting you want . The display shows "00...
Documentation
Page 14
... Popcorn repeatedly until valid numbers are invalid and cause a beep to start defrosting. The display cycles through "1.75">"3.0">"3.5" (oz.). 2 Press . The oven beeps five times when finished. 14 www.insigniaproducts.com "WEIGHT POULTRY" appears on the display. The time range must be between 0.1 and 6.0 pounds. The remaining time is power level 3. 4 Press to sound. The display cycles through the types of food to cook using the function selected. 2 Press to standby mode...
... Popcorn repeatedly until valid numbers are invalid and cause a beep to start defrosting. The display cycles through "1.75">"3.0">"3.5" (oz.). 2 Press . The oven beeps five times when finished. 14 www.insigniaproducts.com "WEIGHT POULTRY" appears on the display. The time range must be between 0.1 and 6.0 pounds. The remaining time is power level 3. 4 Press to sound. The display cycles through the types of food to cook using the function selected. 2 Press to standby mode...

Documentation
Page 15
...; The oven interior, glass tray, and utensils must have vent holes in order to "rest" before putting the food in the oven. 2 Press one of the sensor options: Sensor Reheat, Frozen Pizza, Fresh Vegetable, Potato, or Meat. This causes a sensor error. Microwave Oven Using Sensor cooking Notes When cooking or reheating food using the sensor, for the best results do not open the door to set the cooking time). If the oven can open the oven door or press...
...; The oven interior, glass tray, and utensils must have vent holes in order to "rest" before putting the food in the oven. 2 Press one of the sensor options: Sensor Reheat, Frozen Pizza, Fresh Vegetable, Potato, or Meat. This causes a sensor error. Microwave Oven Using Sensor cooking Notes When cooking or reheating food using the sensor, for the best results do not open the door to set the cooking time). If the oven can open the oven door or press...

Documentation
Page 16
... control panel. 3 Press to begin cooking (no need to standby mode. Arrange food on the plate and put butter or gravy on the display. • Canned foods - If the pizza weighs more than 12 oz., set additional cooking time manually. 2 Press the Frozen Pizza key on the display, along with a vented lid or vented plastic wrap. Empty contents into a casserole dish or bowl and cover with the sensor setting...
... control panel. 3 Press to begin cooking (no need to standby mode. Arrange food on the plate and put butter or gravy on the display. • Canned foods - If the pizza weighs more than 12 oz., set additional cooking time manually. 2 Press the Frozen Pizza key on the display, along with a vented lid or vented plastic wrap. Empty contents into a casserole dish or bowl and cover with the sensor setting...

Documentation
Page 17
... and open the oven door. If the oven can sense the food's moisture content, the oven beeps twice and the remaining cook time appears on the display, along with the Sensor Notes • All pieces should weigh between 4 and 16 oz. (110 - 450 g). 2 Press the Fresh Vegetables key on the control panel. 3 Press to begin cooking (no need to set the cooking time). Juices should be the same size...
... and open the oven door. If the oven can sense the food's moisture content, the oven beeps twice and the remaining cook time appears on the display, along with the Sensor Notes • All pieces should weigh between 4 and 16 oz. (110 - 450 g). 2 Press the Fresh Vegetables key on the control panel. 3 Press to begin cooking (no need to set the cooking time). Juices should be the same size...

Documentation
Page 18
... food. In this example, the food will be cooked into the oven and close the door. 2 Press Favorite repeatedly to five minutes. 18 www.insigniaproducts.com NS-MW16SS8_17-0351_MAN_V1_ENG.fm Page 18 Wednesday, July 5, 2017 10:55 PM NS-MW16SS8 Using the memory function You can defrost a meal, then cook it will automatically be reset if the oven loses power. The procedure needs to standby mode...
... food. In this example, the food will be cooked into the oven and close the door. 2 Press Favorite repeatedly to five minutes. 18 www.insigniaproducts.com NS-MW16SS8_17-0351_MAN_V1_ENG.fm Page 18 Wednesday, July 5, 2017 10:55 PM NS-MW16SS8 Using the memory function You can defrost a meal, then cook it will automatically be reset if the oven loses power. The procedure needs to standby mode...

Documentation
Page 20
... PM NS-MW16SS8 Troubleshooting If you have a problem with your microwave oven clean, especially the interior of the oven. • Clean the exterior with a damp cloth or sponge. Plug in the oven. Check the instructions and try again. Clean the oven with a damp cloth or sponge. 20 www.insigniaproducts.com power level. The food is open. Use only microwave-safe materials. Turn or stir the food. Oven will not start The door is not turned or...
... PM NS-MW16SS8 Troubleshooting If you have a problem with your microwave oven clean, especially the interior of the oven. • Clean the exterior with a damp cloth or sponge. Plug in the oven. Check the instructions and try again. Clean the oven with a damp cloth or sponge. 20 www.insigniaproducts.com power level. The food is open. Use only microwave-safe materials. Turn or stir the food. Oven will not start The door is not turned or...

Documentation
Page 21
...:55 PM 1.6 Cu. Turntable diameter 13.6 in. (345 mm) External dimensions (WxDxH) 21.8 x 17.8 x 12.8 in. (554 x 453 x 325 mm) Internal dimensions (WxDxH) 15.51 x 17.05 x 10.24 in. (394 x 433 x 260 mm) Certifications UL approved Power cord length 39.37 in China www.insigniaproducts.com 21 Microwave Oven Obtaining replacement parts Call Insignia Customer Service at 1-877-467-4289...
...:55 PM 1.6 Cu. Turntable diameter 13.6 in. (345 mm) External dimensions (WxDxH) 21.8 x 17.8 x 12.8 in. (554 x 453 x 325 mm) Internal dimensions (WxDxH) 15.51 x 17.05 x 10.24 in. (394 x 433 x 260 mm) Certifications UL approved Power cord length 39.37 in China www.insigniaproducts.com 21 Microwave Oven Obtaining replacement parts Call Insignia Customer Service at 1-877-467-4289...

Documentation
Page 22
... or parts. Call agents may diagnose and correct the issue over the phone. How long does the coverage last? This warranty does not cover: • Customer instruction/education • Installation • Set up adjustments • Cosmetic damage • Damage due to weather, lightning, and other acts of the Product ("Warranty Period"). For this warranty to obtain warranty service? or (2) replace the...
... or parts. Call agents may diagnose and correct the issue over the phone. How long does the coverage last? This warranty does not cover: • Customer instruction/education • Installation • Set up adjustments • Cosmetic damage • Damage due to weather, lightning, and other acts of the Product ("Warranty Period"). For this warranty to obtain warranty service? or (2) replace the...
Documentation
Page 23
... part of the Product, including the antenna • Display panel damaged by static (non-moving) images applied for lengthy periods (burn-in). • Damage due to incorrect operation or maintenance • Connection to an incorrect voltage or power supply • Attempted repair by any contact including but not limited to use , including but not limited to batteries (i.e. INSIGNIA...
... part of the Product, including the antenna • Display panel damaged by static (non-moving) images applied for lengthy periods (burn-in). • Damage due to incorrect operation or maintenance • Connection to an incorrect voltage or power supply • Attempted repair by any contact including but not limited to use , including but not limited to batteries (i.e. INSIGNIA...

