User Guide
Page 1
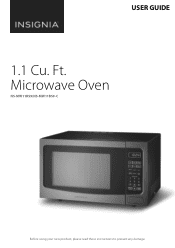
USER GUIDE 1.1 Cu. Ft. Microwave Oven NS-MW11BS9/NS-MW11BS9-C Before using your new product, please read these instructions to prevent any damage.
USER GUIDE 1.1 Cu. Ft. Microwave Oven NS-MW11BS9/NS-MW11BS9-C Before using your new product, please read these instructions to prevent any damage.

User Guide
Page 2
... 6 Microwave oven 6 Control panel ...7 Setting up your microwave oven 8 Installing the turntable 8 Setting the clock and the timer 8 Setting the clock 8 Using the kitchen timer 9 Cooking with your microwave 9 Microwave cooking 9 Cooking quickly 9 Cooking with the auto menu 9 Using a memorized procedure 10 Defrosting in your microwave 10 Changing other microwave settings 10 Using the child lock 10 Muting your microwave 10 Using power saving mode 10 Checking the time or power level 10 Saving a memory procedure 10 Cleaning and maintaining your microwave 11 Cleaning the outside...
... 6 Microwave oven 6 Control panel ...7 Setting up your microwave oven 8 Installing the turntable 8 Setting the clock and the timer 8 Setting the clock 8 Using the kitchen timer 9 Cooking with your microwave 9 Microwave cooking 9 Cooking quickly 9 Cooking with the auto menu 9 Using a memorized procedure 10 Defrosting in your microwave 10 Changing other microwave settings 10 Using the child lock 10 Muting your microwave 10 Using power saving mode 10 Checking the time or power level 10 Saving a memory procedure 10 Cleaning and maintaining your microwave 11 Cleaning the outside...

User Guide
Page 3
.... IMPORTANT SAFETY INSTRUCTIONS When using the appliance. 2 Read and follow the specific "Precautions to avoid possible exposure to facilitate cooking. • Remove wire twist-ties from paper or plastic bags before using electrical appliances basic safety precautions should be kept closed , turn the oven off, and disconnect the power cord, or shut off at the fuse or circuit breaker panel. • Do not use the cavity...
.... IMPORTANT SAFETY INSTRUCTIONS When using the appliance. 2 Read and follow the specific "Precautions to avoid possible exposure to facilitate cooking. • Remove wire twist-ties from paper or plastic bags before using electrical appliances basic safety precautions should be kept closed , turn the oven off, and disconnect the power cord, or shut off at the fuse or circuit breaker panel. • Do not use the cavity...
User Guide
Page 4
... use . 3 If a long cord or extension cord is damaged. Radio interference 1 Operation of the grounding plug can cause serious personal injury or death. Always use " on page 5 as a guide, then test before cooking. Electric Shock Hazard Touching some of the internal components can result in their use of the microwave oven may be reduced or eliminated by providing an escape wire for the electric...
... use . 3 If a long cord or extension cord is damaged. Radio interference 1 Operation of the grounding plug can cause serious personal injury or death. Always use " on page 5 as a guide, then test before cooking. Electric Shock Hazard Touching some of the internal components can result in their use of the microwave oven may be reduced or eliminated by providing an escape wire for the electric...
User Guide
Page 5
... on maximum power for microwave cooking. Plastic foam may break. The bottom of cold water, along with metal handle Metal or metal trimmed utensils Metal twist ties Paper bags Plastic foam Wood REMARKS May cause an electric spark. Most glass jars are not heat resistant and may melt or contaminate the liquid inside gets hot. Paper towels Use to heat food until just...
... on maximum power for microwave cooking. Plastic foam may break. The bottom of cold water, along with metal handle Metal or metal trimmed utensils Metal twist ties Paper bags Plastic foam Wood REMARKS May cause an electric spark. Most glass jars are not heat resistant and may melt or contaminate the liquid inside gets hot. Paper towels Use to heat food until just...
User Guide
Page 6
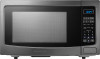
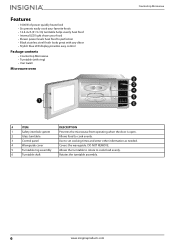
... LED light shows your food • Eleven power levels heat food to perfection • Black stainless steel finish looks great with any décor • Stylish blue LED display provides easy control Package contents • Countertop Microwave • Turntable (with ring) • User Guide Microwave oven Countertop Microwave # ITEM DESCRIPTION 1 Safety interlock system Prevents the microwave from operating when the door is open. 2 Glass turntable Allows food to cook evenly. 3 Control panel Use to cook food evenly. 6 Turntable shaft Rotates the turntable assembly...
... LED light shows your food • Eleven power levels heat food to perfection • Black stainless steel finish looks great with any décor • Stylish blue LED display provides easy control Package contents • Countertop Microwave • Turntable (with ring) • User Guide Microwave oven Countertop Microwave # ITEM DESCRIPTION 1 Safety interlock system Prevents the microwave from operating when the door is open. 2 Glass turntable Allows food to cook evenly. 3 Control panel Use to cook food evenly. 6 Turntable shaft Rotates the turntable assembly...

User Guide
Page 7
... the cooking operation. Press this button, then enter the time you want for 1 to stop the cooking process. See "Setting the clock" on page 10. Press again to enter cook time, defrost time, clock time, and other information. See "Defrosting by time" on page 9. Press repeatedly to begin cooking. Control panel NS-MW11BS9/NS-MW11BS9-C EXPRESS COOK # ITEM 1 Display 2 Time cook 3 Power 4 Auto menu 5 Express cook 6 Number pad 7 Stop/Cancel 8 Defrost 9 Clock 10 Kitchen timer 11 Start/Add 30 seconds 12 Memory DESCRIPTION In standby mode, displays the time.
... the cooking operation. Press this button, then enter the time you want for 1 to stop the cooking process. See "Setting the clock" on page 10. Press again to enter cook time, defrost time, clock time, and other information. See "Defrosting by time" on page 9. Press repeatedly to begin cooking. Control panel NS-MW11BS9/NS-MW11BS9-C EXPRESS COOK # ITEM 1 Display 2 Time cook 3 Power 4 Auto menu 5 Express cook 6 Number pad 7 Stop/Cancel 8 Defrost 9 Clock 10 Kitchen timer 11 Start/Add 30 seconds 12 Memory DESCRIPTION In standby mode, displays the time.
User Guide
Page 8
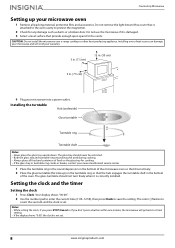
... the glass turntable (flat side up your microwave oven 1 Remove all food and containers of the oven. Do not remove the light brown Mica cover that is attached to the oven cavity to protect the magnetron. 2 Check for the vents: CAUTION: Do not install the microwave over a heat source can damage your microwave and will go back to its last setting. • If the display shows "0:00", the clock is...
... the glass turntable (flat side up your microwave oven 1 Remove all food and containers of the oven. Do not remove the light brown Mica cover that is attached to the oven cavity to protect the magnetron. 2 Check for the vents: CAUTION: Do not install the microwave over a heat source can damage your microwave and will go back to its last setting. • If the display shows "0:00", the clock is...

User Guide
Page 9
... the display. The buzzer sounds once, then heats your potato is assumed to the second stage. NS-MW11BS9/NS-MW11BS9-C Using the kitchen timer 1 Press Kitchen Timer. Note: While the timer is shown on to be 8 oz. (227 g) If your drink. The default power level is 99 minutes and 99 seconds. OR For multi-stage cooking, repeat steps 1-2 to begin heating. Potato 1 Press Potato repeatedly until the number weight...
... the display. The buzzer sounds once, then heats your potato is assumed to the second stage. NS-MW11BS9/NS-MW11BS9-C Using the kitchen timer 1 Press Kitchen Timer. Note: While the timer is shown on to be 8 oz. (227 g) If your drink. The default power level is 99 minutes and 99 seconds. OR For multi-stage cooking, repeat steps 1-2 to begin heating. Potato 1 Press Potato repeatedly until the number weight...
User Guide
Page 10
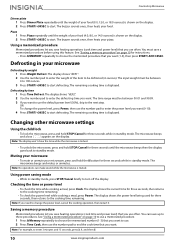
... microwave beeps then the display goes back to standby mode. See "Using a memorized procedure" on the display. 2 Press START/+30SEC to start defrosting. Defrosting in ounces). Changing other microwave settings Using the child lock • To lock the microwave, press and hold the 8 button for instructions. • Press 0/MEMORY repeatedly to choose the memorized procedure that you use often. The input weight must save heating operations (cook time and power level) that you want (1-3), then press START/ ADD 30SEC. Countertop Microwave...
... microwave beeps then the display goes back to standby mode. See "Using a memorized procedure" on the display. 2 Press START/+30SEC to start defrosting. Defrosting in ounces). Changing other microwave settings Using the child lock • To lock the microwave, press and hold the 8 button for instructions. • Press 0/MEMORY repeatedly to choose the memorized procedure that you use often. The input weight must save heating operations (cook time and power level) that you want (1-3), then press START/ ADD 30SEC. Countertop Microwave...
User Guide
Page 11
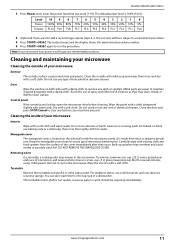
The buzzer beeps and the display shows the memorized procedure number. 6 Press START/+30SEC again to maintain if wiped frequently with a damp cloth. Close the door and press STOP/Cancel to clear any buttons you want (1-10). Built-up immediately. Boil for several whole cloves in the microwave. The turntable motor shaft is precoated steel and plastic. Level 10 9 8 7 6 5 4 3 2 1 0 Power 100% 90% 80% 70...
The buzzer beeps and the display shows the memorized procedure number. 6 Press START/+30SEC again to maintain if wiped frequently with a damp cloth. Close the door and press STOP/Cancel to clear any buttons you want (1-10). Built-up immediately. Boil for several whole cloves in the microwave. The turntable motor shaft is precoated steel and plastic. Level 10 9 8 7 6 5 4 3 2 1 0 Power 100% 90% 80% 70...
User Guide
Page 12
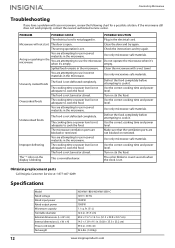
... foods The food is open. The cooking time or power level is not adequate to cook the food. Use the correct cooking time and power level. The ":" colon on the display is blinking This is not turned or stirred. Use the correct cooking time and power level. Specifications Model Rated voltage Rated input power Rated output power Microwave capacity Turntable diameter External dimensions (L × W × H) Internal dimensions (L × W × H) Power cord length Net weight NS-MW11BS9/NS-MW11BS9-C 120 V / 60 Hz 1500 W 1000 W 1.1 cu. Close the door...
... foods The food is open. The cooking time or power level is not adequate to cook the food. Use the correct cooking time and power level. The ":" colon on the display is blinking This is not turned or stirred. Use the correct cooking time and power level. Specifications Model Rated voltage Rated input power Rated output power Microwave capacity Turntable diameter External dimensions (L × W × H) Internal dimensions (L × W × H) Power cord length Net weight NS-MW11BS9/NS-MW11BS9-C 120 V / 60 Hz 1500 W 1000 W 1.1 cu. Close the door...
User Guide
Page 13
... Buy branded retail store or online at www.bestbuy.com or www.bestbuy.ca, and is printed on the web site. Warranty coverage terminates if you sell or otherwise transfer the Product. How to obtain warranty service? This warranty does not cover: • Food loss/spoilage due to failure of refrigerator or freezer • Customer instruction/education • Installation • Set...
... Buy branded retail store or online at www.bestbuy.com or www.bestbuy.ca, and is printed on the web site. Warranty coverage terminates if you sell or otherwise transfer the Product. How to obtain warranty service? This warranty does not cover: • Food loss/spoilage due to failure of refrigerator or freezer • Customer instruction/education • Installation • Set...
User Guide
Page 14
All rights reserved. V3 ENGLISH 19-0612 For product inquiries, please contact us with the information below: 1-877-467-4289 www.insigniaproducts.com INSIGNIA is a trademark of Best Buy and its affiliated companies. Distributed by Best Buy Purchasing, LLC 7601 Penn Ave South, Richfield, MN 55423 U.S.A. ©2019 Best Buy.
All rights reserved. V3 ENGLISH 19-0612 For product inquiries, please contact us with the information below: 1-877-467-4289 www.insigniaproducts.com INSIGNIA is a trademark of Best Buy and its affiliated companies. Distributed by Best Buy Purchasing, LLC 7601 Penn Ave South, Richfield, MN 55423 U.S.A. ©2019 Best Buy.

