
User Guide
Page 2
... power level 12 Setting the clock 12 Using the kitchen timer 12 Cooking in your microwave oven 12 Defrosting in your microwave oven 13 Cooking popcorn 14 Cooking potatoes 14 Cooking frozen vegetables 14 Heating beverages 14 Heating a dinner plate 15 Heating pizza 15 Using the memory function 15 Using multi-stage cooking 16 Using the energy saving mode 16 Checking the time and power level while cooking 16 Using the child-lock 17 Turning off the buzzer 17 Troubleshooting 18 Maintaining your microwave oven 19 Obtaining replacement parts...
... power level 12 Setting the clock 12 Using the kitchen timer 12 Cooking in your microwave oven 12 Defrosting in your microwave oven 13 Cooking popcorn 14 Cooking potatoes 14 Cooking frozen vegetables 14 Heating beverages 14 Heating a dinner plate 15 Heating pizza 15 Using the memory function 15 Using multi-stage cooking 16 Using the energy saving mode 16 Checking the time and power level while cooking 16 Using the child-lock 17 Turning off the buzzer 17 Troubleshooting 18 Maintaining your microwave oven 19 Obtaining replacement parts...

User Guide
Page 3
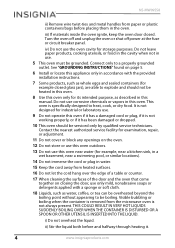
.... 1 Read all instructions before using the oven. 2 Read and follow the specific: "PRECAUTIONS TO AVOID POSSIBLE EXPOSURE TO EXCESSIVE MICROWAVE ENERGY:" found on page 3. 3 As with the door open because this oven with any object between the oven front face and the door or allow soil or cleaner residue to accumulate on sealing surfaces. 3 Do not operate the oven if it is...
.... 1 Read all instructions before using the oven. 2 Read and follow the specific: "PRECAUTIONS TO AVOID POSSIBLE EXPOSURE TO EXCESSIVE MICROWAVE ENERGY:" found on page 3. 3 As with the door open because this oven with any object between the oven front face and the door or allow soil or cleaner residue to accumulate on sealing surfaces. 3 Do not operate the oven if it is...
User Guide
Page 4
... vapors in this oven. 8 Use this manual. See "GROUNDING INSTRUCTIONS" found on closing the door, use . 9 Do not operate this oven. It is not always present. Connect only to heat, cook, or dry food. i) Do not overheat the liquid. Turn the oven off and unplug the oven or shut off power at the fuse or circuit breaker panel. iii) If materials inside the oven ignite, keep the oven door closed glass jars), are...
... vapors in this oven. 8 Use this manual. See "GROUNDING INSTRUCTIONS" found on closing the door, use . 9 Do not operate this oven. It is not always present. Connect only to heat, cook, or dry food. i) Do not overheat the liquid. Turn the oven off and unplug the oven or shut off power at the fuse or circuit breaker panel. iii) If materials inside the oven ignite, keep the oven door closed glass jars), are...

User Guide
Page 5
... power-supply cord is properly grounded. If it is necessary to whether the oven is provided to stand in the microwave oven for the electric current. SAVE THESE INSTRUCTIONS GROUNDING INSTRUCTIONS WARNING Electric Shock Hazard Touching some of California to the state of the internal components can result in their use. • If a long cord set or extension cord is used if care is properly installed and...
... power-supply cord is properly grounded. If it is necessary to whether the oven is provided to stand in the microwave oven for the electric current. SAVE THESE INSTRUCTIONS GROUNDING INSTRUCTIONS WARNING Electric Shock Hazard Touching some of California to the state of the internal components can result in their use. • If a long cord set or extension cord is used if care is properly installed and...
User Guide
Page 6
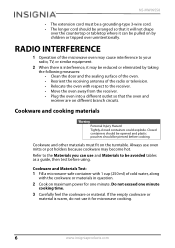
... in question. 2 Cook on different branch circuits. If the empty cookware or material is interference, it for one minute cooking time. 3 Carefully feel the cookware or material. NS-MW09SS8 • The extension cord must fit on the turntable. Closed containers should be opened and plastic pouches should be arranged so that the oven and receiver are on maximum power for microwave cooking. 6 www.insigniaproducts...
... in question. 2 Cook on different branch circuits. If the empty cookware or material is interference, it for one minute cooking time. 3 Carefully feel the cookware or material. NS-MW09SS8 • The extension cord must fit on the turntable. Closed containers should be opened and plastic pouches should be arranged so that the oven and receiver are on maximum power for microwave cooking. 6 www.insigniaproducts...

User Guide
Page 7
... shields the food from oven walls. Incorrect usage may cause the turntable to touch food. Use to cover food during cooking to escape. Do not close to prevent splattering or a wrap for short-term cooking/warming only. Wax paper Use as meat and candy thermometers). Food carton with metal handle May cause arcing. Dinnerware Use microwave-safe only. 0.9 Cu. Some plastic containers soften as a cover to oven walls. Metal...
... shields the food from oven walls. Incorrect usage may cause the turntable to touch food. Use to cover food during cooking to escape. Do not close to prevent splattering or a wrap for short-term cooking/warming only. Wax paper Use as meat and candy thermometers). Food carton with metal handle May cause arcing. Dinnerware Use microwave-safe only. 0.9 Cu. Some plastic containers soften as a cover to oven walls. Metal...
User Guide
Page 8
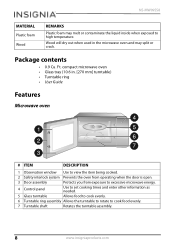
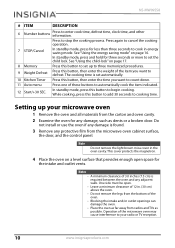
... dry out when used in . [270 mm] turntable) • Turntable ring • User Guide Features Microwave oven # ITEM DESCRIPTION 1 Observation window Use to view the item being cooked. 2 Safety interlock system Prevents the oven from operating when the door is open. 3 Door assembly Protects you from exposure to excessive microwave energy. 4 Control panel Use to set cooking times and enter other information as needed. 5 Glass turntable Allows food to cook evenly. 6 Turntable ring assembly Allows the turntable to rotate to...
... dry out when used in . [270 mm] turntable) • Turntable ring • User Guide Features Microwave oven # ITEM DESCRIPTION 1 Observation window Use to view the item being cooked. 2 Safety interlock system Prevents the oven from operating when the door is open. 3 Door assembly Protects you from exposure to excessive microwave energy. 4 Control panel Use to set cooking times and enter other information as needed. 5 Glass turntable Allows food to cook evenly. 6 Turntable ring assembly Allows the turntable to rotate to...

User Guide
Page 9
Control panel 0.9 Cu. In cooking mode, displays cooking time, weight, and other information. Press to enter the current time. Microwave Oven # ITEM 1 Display 2 Time Defrost 3 Time Cook 4 Power 5 Clock DESCRIPTION In standby mode, displays the time. Press to set the power level of your microwave, then press the number buttons to set the clock, then press the number buttons to set the level you want (0-10). Press this button, then enter the time you want for an item to defrost. Ft. See "Understanding and setting the power level" on page...
Control panel 0.9 Cu. In cooking mode, displays cooking time, weight, and other information. Press to enter the current time. Microwave Oven # ITEM 1 Display 2 Time Defrost 3 Time Cook 4 Power 5 Clock DESCRIPTION In standby mode, displays the time. Press to set the power level of your microwave, then press the number buttons to set the clock, then press the number buttons to set the level you want (0-10). Press this button, then enter the time you want for an item to defrost. Ft. See "Understanding and setting the power level" on page...
User Guide
Page 10
... from the microwave oven cabinet surface, the door, and the control panel. See "Using the energy saving mode" on page 17. 8 Memory 9 Weight Defrost 10 Kitchen Timer Press this button, then enter the time you want to cooking time. Setting up to automatically cook the item indicated. The cooking time is set the child lock. Operation of these buttons to three memorized procedures. Press one of the microwave oven may cause interference to your microwave oven 1 Remove the oven and all...
... from the microwave oven cabinet surface, the door, and the control panel. See "Using the energy saving mode" on page 17. 8 Memory 9 Weight Defrost 10 Kitchen Timer Press this button, then enter the time you want to cooking time. Setting up to automatically cook the item indicated. The cooking time is set the child lock. Operation of these buttons to three memorized procedures. Press one of the microwave oven may cause interference to your microwave oven 1 Remove the oven and all...

User Guide
Page 11
... Do not mount your oven under a cabinet. • Do not install your oven over a heat source, the oven could be damaged and the warranty would be used during cooking. • Always place all food and containers of food on the glass tray for cooking. • If the glass tray or turntable ring cracks or breaks, contact your oven into a standard household outlet. If installed near or over a range cooktop or other heat-producing appliance...
... Do not mount your oven under a cabinet. • Do not install your oven over a heat source, the oven could be damaged and the warranty would be used during cooking. • Always place all food and containers of food on the glass tray for cooking. • If the glass tray or turntable ring cracks or breaks, contact your oven into a standard household outlet. If installed near or over a range cooktop or other heat-producing appliance...

User Guide
Page 12
... 99 minutes and 99 seconds). 3 Press START/+30SEC. to confirm the setting. Note While the kitchen timer is invalid until valid numbers are input. The display shows "PL10" (the default power is 100%). 2 Press the number keys to adjust the power level. Cooking in your microwave oven Understanding and setting the power level The following table shows the 11 power levels available. LEVEL 10 9 8 7 6 5 4 3 2 1 0 Power 100% 90% 80% 70% 60% 50...
... 99 minutes and 99 seconds). 3 Press START/+30SEC. to confirm the setting. Note While the kitchen timer is invalid until valid numbers are input. The display shows "PL10" (the default power is 100%). 2 Press the number keys to adjust the power level. Cooking in your microwave oven Understanding and setting the power level The following table shows the 11 power levels available. LEVEL 10 9 8 7 6 5 4 3 2 1 0 Power 100% 90% 80% 70% 60% 50...

User Guide
Page 13
...." 2 Press the number buttons to change the power setting. 0.9 Cu. Cooking begins immediately. 2 Press START/+30SEC. The maximum cooking time is displayed. Notes • When setting the microwave, if the STOP/CANCEL button is pressed or if there is selected, the oven fan turns on with 0% power. to increase cooking time in the oven. • When setting the microwave, press POWER at 100% power by weight 1 Press Weight Defrost. again to cook the item at 100% power level for three seconds...
...." 2 Press the number buttons to change the power setting. 0.9 Cu. Cooking begins immediately. 2 Press START/+30SEC. The maximum cooking time is displayed. Notes • When setting the microwave, if the STOP/CANCEL button is pressed or if there is selected, the oven fan turns on with 0% power. to increase cooking time in the oven. • When setting the microwave, press POWER at 100% power by weight 1 Press Weight Defrost. again to cook the item at 100% power level for three seconds...
User Guide
Page 14
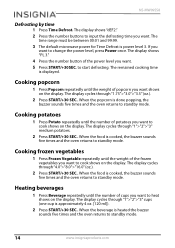
... the food is power level 3. to standby mode. The display cycles through "4.0">"8.0">"16.0" (oz.). 2 Press START/+30 SEC.. The display shows "dEF2." 2 Press the number buttons to change the power level, press Power once. The time range must be between 00:01 and 99:99. 3 The default microwave power for Time Defrost is cooked, the buzzer sounds five times and the oven returns to start defrosting. Cooking potatoes 1 Press Potato repeatedly until the weight of the power level you...
... the food is power level 3. to standby mode. The display cycles through "4.0">"8.0">"16.0" (oz.). 2 Press START/+30 SEC.. The display shows "dEF2." 2 Press the number buttons to change the power level, press Power once. The time range must be between 00:01 and 99:99. 3 The default microwave power for Time Defrost is cooked, the buzzer sounds five times and the oven returns to start defrosting. Cooking potatoes 1 Press Potato repeatedly until the weight of the power level you...
User Guide
Page 15
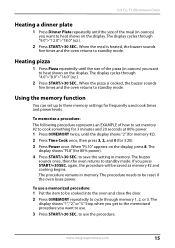
.... The buzzer sounds once, then the oven returns to the memorized procedure you press START/+30SEC. 0.9 Cu. Microwave Oven Heating a dinner plate 1 Press Dinner Plate repeatedly until the display shows "2" (for memory #2). 2 Press Time Cook once, then press 3, 2, and 0 (for 80% power). 4 Press START/+30 SEC. to save the setting in ounces) you want to heat shows on the display, press 8. Stop when you get to standby mode.
.... The buzzer sounds once, then the oven returns to the memorized procedure you press START/+30SEC. 0.9 Cu. Microwave Oven Heating a dinner plate 1 Press Dinner Plate repeatedly until the display shows "2" (for memory #2). 2 Press Time Cook once, then press 3, 2, and 0 (for 80% power). 4 Press START/+30 SEC. to save the setting in ounces) you want to heat shows on the display, press 8. Stop when you get to standby mode.

User Guide
Page 16
... starting the child lock function), then release. Note Auto cooking cannot be cooked into the oven and close the door. 2 Press Time Cook, then press 5, 0, and 0 to set the cooking time to five minutes. 3 Press Power, then press 8 to set the second power level to begin cooking. NS-MW09SS8 Using multi-stage cooking Up to two stages can defrost a meal, then cook it. Checking the time and power level while cooking • To check the time while cooking a meal, press Clock...
... starting the child lock function), then release. Note Auto cooking cannot be cooked into the oven and close the door. 2 Press Time Cook, then press 5, 0, and 0 to set the cooking time to five minutes. 3 Press Power, then press 8 to set the second power level to begin cooking. NS-MW09SS8 Using multi-stage cooking Up to two stages can defrost a meal, then cook it. Checking the time and power level while cooking • To check the time while cooking a meal, press Clock...

User Guide
Page 17
... display shows , indicating that lock is locked, press and hold number 8 on the control panel for three seconds. A long beep sounds and the buzzer is turned off the buzzer 1 In standby mode, press and hold STOP/CANCEL for three seconds. www.insigniaproducts.com 17 Ft. A long beep sounds and the buzzer is active. • To unlock the oven - Press and hold the number 8 button on the control panel...
... display shows , indicating that lock is locked, press and hold number 8 on the control panel for three seconds. A long beep sounds and the buzzer is turned off the buzzer 1 In standby mode, press and hold STOP/CANCEL for three seconds. www.insigniaproducts.com 17 Ft. A long beep sounds and the buzzer is active. • To unlock the oven - Press and hold the number 8 button on the control panel...
User Guide
Page 18
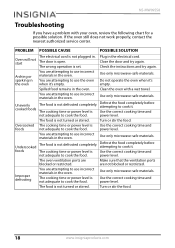
.... Spilled food remains in the electrical cord. Turn or stir the food. Oven will not start The door is not defrosted completely. Unevenly cooked foods The food is not adequate to cook it 's empty. Defrost the food completely before attempting to cook the food. Defrost the food completely before attempting to use incorrect materials in the oven. The cooking time or power level is not defrosted completely. You are blocked or restricted. power level. Use the correct cooking time and power level. NS-MW09SS8 Troubleshooting If...
.... Spilled food remains in the electrical cord. Turn or stir the food. Oven will not start The door is not defrosted completely. Unevenly cooked foods The food is not adequate to cook it 's empty. Defrost the food completely before attempting to cook the food. Defrost the food completely before attempting to use incorrect materials in the oven. The cooking time or power level is not defrosted completely. You are blocked or restricted. power level. Use the correct cooking time and power level. NS-MW09SS8 Troubleshooting If...
User Guide
Page 19
...) Net weight 27.3 lbs. (12.4 kg) Legal notices Copyright INSIGNIA is a trademark of the oven. • Clean the exterior with a damp cloth or sponge. Registered in some countries. All rights reserved. Specifications Model NS-MW09SS8 Rated voltage 120 V~60 Hz Rated input power (microwave) 1350 W Rated output power (microwave) 900 W Oven capacity 0.9 Cu. Microwave Oven Maintaining your microwave oven Keep your microwave oven clean, especially the interior of Best Buy and its...
...) Net weight 27.3 lbs. (12.4 kg) Legal notices Copyright INSIGNIA is a trademark of the oven. • Clean the exterior with a damp cloth or sponge. Registered in some countries. All rights reserved. Specifications Model NS-MW09SS8 Rated voltage 120 V~60 Hz Rated input power (microwave) 1350 W Rated output power (microwave) 900 W Oven capacity 0.9 Cu. Microwave Oven Maintaining your microwave oven Keep your microwave oven clean, especially the interior of Best Buy and its...
User Guide
Page 20
... sole option): (1) repair the Product with new or rebuilt comparable products or parts. This warranty does not cover: • Customer instruction/education • Installation • Set up adjustments • Cosmetic damage • Damage due to weather, lightning, and other than a private home. • Modification of any Best Buy store. NS-MW09SS8 ONE-YEAR LIMITED WARRANTY Definitions: The Distributor* of Insignia branded products...
... sole option): (1) repair the Product with new or rebuilt comparable products or parts. This warranty does not cover: • Customer instruction/education • Installation • Set up adjustments • Cosmetic damage • Damage due to weather, lightning, and other than a private home. • Modification of any Best Buy store. NS-MW09SS8 ONE-YEAR LIMITED WARRANTY Definitions: The Distributor* of Insignia branded products...
User Guide
Page 21
...; Damage due to incorrect operation or maintenance • Connection to an incorrect voltage or power supply • Attempted repair by Insignia to batteries (i.e. AA, AAA, C etc.) • Products where the factory applied serial number has been altered or removed • Loss or Theft of this product or any part of the product • Display panels containing up to three (3) pixel...
...; Damage due to incorrect operation or maintenance • Connection to an incorrect voltage or power supply • Attempted repair by Insignia to batteries (i.e. AA, AAA, C etc.) • Products where the factory applied serial number has been altered or removed • Loss or Theft of this product or any part of the product • Display panels containing up to three (3) pixel...

