
User Guide
Page 2
... microwave 12 Installing the turntable 13 Setting the clock and the timer 14 Setting the clock 14 Using the kitchen timer 14 Cooking with your microwave 14 Microwave cooking 14 Cooking quickly 15 Cooking with the auto menus 15 Using a memorized procedure 16 Defrosting in your microwave 17 Defrosting by time 17 Defrosting by weight 17 Changing other microwave settings 18 Using the child lock 18 Checking the time or power level 18 Cleaning and maintaining your microwave 18 Cleaning the outside of your microwave 18 Cleaning the inside of your microwave 19 Troubleshooting...
... microwave 12 Installing the turntable 13 Setting the clock and the timer 14 Setting the clock 14 Using the kitchen timer 14 Cooking with your microwave 14 Microwave cooking 14 Cooking quickly 15 Cooking with the auto menus 15 Using a memorized procedure 16 Defrosting in your microwave 17 Defrosting by time 17 Defrosting by weight 17 Changing other microwave settings 18 Using the child lock 18 Checking the time or power level 18 Cleaning and maintaining your microwave 18 Cleaning the outside of your microwave 18 Cleaning the inside of your microwave 19 Troubleshooting...

User Guide
Page 3
... be heated in this oven with the door open since open-door operation can result in harmful exposure to defeat or tamper with the provided installation instructions. 5 Do not operate the oven when empty. 6 Some products such as whole eggs and sealed containers -for reliable and trouble-free performance. are able to explode and should not be adjusted or repaired by anyone except qualified service...
... be heated in this oven with the door open since open-door operation can result in harmful exposure to defeat or tamper with the provided installation instructions. 5 Do not operate the oven when empty. 6 Some products such as whole eggs and sealed containers -for reliable and trouble-free performance. are able to explode and should not be adjusted or repaired by anyone except qualified service...

User Guide
Page 4
... is specifically designed to heat, cook, or dry food. Do not leave paper products, cooking utensils or food in the cavity when not in use. 10 Liquids, such as described in this manual. To reduce the risk of table or counter. 16 This appliance should ignite, keep oven door closed, turn oven off, and disconnect the power cord or shut off power at the fuse circuit breaker panel. NS-MW07WH0/NS-MW07BK0 7 Use this...
... is specifically designed to heat, cook, or dry food. Do not leave paper products, cooking utensils or food in the cavity when not in use. 10 Liquids, such as described in this manual. To reduce the risk of table or counter. 16 This appliance should ignite, keep oven door closed, turn oven off, and disconnect the power cord or shut off power at the fuse circuit breaker panel. NS-MW07WH0/NS-MW07BK0 7 Use this...
User Guide
Page 6
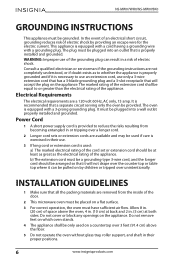
... remove feet on which oven stands. 4 The appliance shall be only used : a) The marked electrical rating of the cord set or extension cord should be arranged so that it will accept the plug on the appliance. Allow 8 in. (20 cm) of space above the floor. 5 Do not operate the oven without glass tray, roller support, and shaft in or tripping over unintentionally. Power Cord 1 A short power...
... remove feet on which oven stands. 4 The appliance shall be only used : a) The marked electrical rating of the cord set or extension cord should be arranged so that it will accept the plug on the appliance. Allow 8 in. (20 cm) of space above the floor. 5 Do not operate the oven without glass tray, roller support, and shaft in or tripping over unintentionally. Power Cord 1 A short power...

User Guide
Page 7
... 8 as indicated on the package. Oven cooking bags Follow the manufacturer's instructions. Make slits to cover food for reheating and absorbing fat. Paper towels Use to let steam escape. Parchment paper Use as the food inside gets hot. If the dish becomes very hot, you can explode. Do not use it in your microwave. Open closed containers can use and Materials to brown the exterior...
... 8 as indicated on the package. Oven cooking bags Follow the manufacturer's instructions. Make slits to cover food for reheating and absorbing fat. Paper towels Use to let steam escape. Parchment paper Use as the food inside gets hot. If the dish becomes very hot, you can explode. Do not use it in your microwave. Open closed containers can use and Materials to brown the exterior...

User Guide
Page 8
... to be used on microwaved food after the food has been removed from microwave energy. Use to cover food during cooking to high temperature. Use a microwave-safe dish instead. Metal shields the food from your microwave. Plastic foam may cause arcing. Use only those labeled "microwave safe" and follow all directions. It can be avoided MATERIAL Aluminum tray Food carton with metal handle Glass jars/bottles Metal or metal trimmed utensils Metal...
... to be used on microwaved food after the food has been removed from microwave energy. Use to cover food during cooking to high temperature. Use a microwave-safe dish instead. Metal shields the food from your microwave. Plastic foam may cause arcing. Use only those labeled "microwave safe" and follow all directions. It can be avoided MATERIAL Aluminum tray Food carton with metal handle Glass jars/bottles Metal or metal trimmed utensils Metal...
User Guide
Page 10
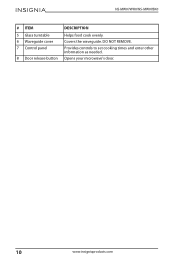
Opens your microwave's door. 10 www.insigniaproducts.com Provides controls to set cooking times and enter other information as needed. NS-MW07WH0/NS-MW07BK0 # ITEM 5 Glass turntable 6 Waveguide cover 7 Control panel 8 Door release button DESCRIPTION Helps food cook evenly. DO NOT REMOVE. Covers the waveguide.
Opens your microwave's door. 10 www.insigniaproducts.com Provides controls to set cooking times and enter other information as needed. NS-MW07WH0/NS-MW07BK0 # ITEM 5 Glass turntable 6 Waveguide cover 7 Control panel 8 Door release button DESCRIPTION Helps food cook evenly. DO NOT REMOVE. Covers the waveguide.

User Guide
Page 11
.... See Defrosting by time on page 17. See Cooking with the auto menus on page 14. 5 Power Press to set the power level of these buttons to set or check the clock. See Setting the clock on page 15. 7 Number pad Press to enter cook time, defrost time, clock time, and other information. 2 Time Defrost Press, then enter the time you want for an item to defrost. Control panel Compact Microwave # ITEM DESCRIPTION 1 Display In standby mode, shows the time.
.... See Defrosting by time on page 17. See Cooking with the auto menus on page 14. 5 Power Press to set the power level of these buttons to set or check the clock. See Setting the clock on page 15. 7 Number pad Press to enter cook time, defrost time, clock time, and other information. 2 Time Defrost Press, then enter the time you want for an item to defrost. Control panel Compact Microwave # ITEM DESCRIPTION 1 Display In standby mode, shows the time.

User Guide
Page 12
... microwave over a range cooktop or other heat-producing appliance. CAUTION: Do not install your microwave into a power outlet. 12 www.insigniaproducts.com Setting up your microwave if it is damaged. 3 Select a level surface that is attached to the interior wall to protect the magnetron. 2 Check for the vents. See Using the kitchen timer on page 14. NS-MW07WH0/NS-MW07BK0 # ITEM 10 Kitchen Timer 11 START +30 Sec. 12 0/Memory DESCRIPTION Press this button...
... microwave over a range cooktop or other heat-producing appliance. CAUTION: Do not install your microwave into a power outlet. 12 www.insigniaproducts.com Setting up your microwave if it is damaged. 3 Select a level surface that is attached to the interior wall to protect the magnetron. 2 Check for the vents. See Using the kitchen timer on page 14. NS-MW07WH0/NS-MW07BK0 # ITEM 10 Kitchen Timer 11 START +30 Sec. 12 0/Memory DESCRIPTION Press this button...

User Guide
Page 13
... food and containers of food on the glass tray for cooking. • If the glass tray or turntable ring cracks or breaks, contact your nearest authorized service center. 1 Place the turntable ring in the round depression in the bottom of your microwave so that it is shipped inside your microwave. www.insigniaproducts.com 13 Compact Microwave Installing the turntable Note: The turntable is correctly installed. Hub (underside) Glass turntable Turntable ring Turntable...
... food and containers of food on the glass tray for cooking. • If the glass tray or turntable ring cracks or breaks, contact your nearest authorized service center. 1 Place the turntable ring in the round depression in the bottom of your microwave so that it is shipped inside your microwave. www.insigniaproducts.com 13 Compact Microwave Installing the turntable Note: The turntable is correctly installed. Hub (underside) Glass turntable Turntable ring Turntable...
User Guide
Page 14
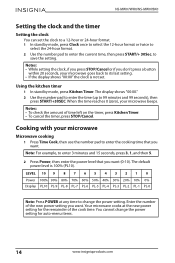
... power setting you want . Your microwave cooks at any time to enter 3 minutes and 15 seconds, press 3, 1, and then 5. 2 Press Power, then enter the power level that you don't press a button within 20 seconds, your microwave beeps. You cannot change the power setting. The display shows "00:00." 2 Use the number pad to enter the time (up to enter the current time, then press START/+ 30Sec. Notes: • While setting the clock...
... power setting you want . Your microwave cooks at any time to enter 3 minutes and 15 seconds, press 3, 1, and then 5. 2 Press Power, then enter the power level that you don't press a button within 20 seconds, your microwave beeps. You cannot change the power setting. The display shows "00:00." 2 Use the number pad to enter the time (up to enter the current time, then press START/+ 30Sec. Notes: • While setting the clock...

User Guide
Page 15
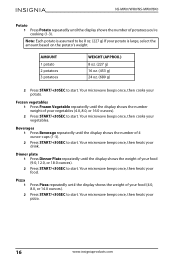
Compact Microwave 3 If you press STOP/Cancel twice, your microwave stops cooking and cancels the cooking program. • When cooking is complete, your microwave beeps five times and enters standby mode. Press START/+30 to resume. • While cooking, if you want to set a second cook setting (multi-stage cooking), repeat steps 1 and 2. Popcorn 1 Press Popcorn repeatedly until the display shows the weight of your popcorn bag (1.75, 3.0, or 3.5 ounces). 2 Press START/+30SEC to 6 minutes...
Compact Microwave 3 If you press STOP/Cancel twice, your microwave stops cooking and cancels the cooking program. • When cooking is complete, your microwave beeps five times and enters standby mode. Press START/+30 to resume. • While cooking, if you want to set a second cook setting (multi-stage cooking), repeat steps 1 and 2. Popcorn 1 Press Popcorn repeatedly until the display shows the weight of your popcorn bag (1.75, 3.0, or 3.5 ounces). 2 Press START/+30SEC to 6 minutes...
User Guide
Page 16
... the potato's weight. AMOUNT 1 potato 2 potatoes 3 potatoes WEIGHT (APPROX.) 8 oz. (227 g) 16 oz. (453 g) 24 oz. (680 g) 2 Press START/+30SEC to be 8 oz. (227 g) If your pizza. 16 www.insigniaproducts.com Note: Each potato is assumed to start . NS-MW07WH0/NS-MW07BK0 Potato 1 Press Potato repeatedly until the display shows the number of your food. Your microwave beeps once, then cooks your potato.
... the potato's weight. AMOUNT 1 potato 2 potatoes 3 potatoes WEIGHT (APPROX.) 8 oz. (227 g) 16 oz. (453 g) 24 oz. (680 g) 2 Press START/+30SEC to be 8 oz. (227 g) If your pizza. 16 www.insigniaproducts.com Note: Each potato is assumed to start . NS-MW07WH0/NS-MW07BK0 Potato 1 Press Potato repeatedly until the display shows the number of your food. Your microwave beeps once, then cooks your potato.

User Guide
Page 17
..., your memorized procedures. Note: If your microwave loses power, it forgets your microwave pauses. 4 Press START/+30SEC to add a second stage, repeat steps 2 and 3. The display shows the remaining defrosting time. Compact Microwave Using a memorized procedure Memorized procedures let you save heating operations (cook time and power level) that you want (1 through 3) that you use your microwave automatically adjusts the time and defrosting power. 1 Press Weight Defrost. Note: For example, to enter...
..., your memorized procedures. Note: If your microwave loses power, it forgets your microwave pauses. 4 Press START/+30SEC to add a second stage, repeat steps 2 and 3. The display shows the remaining defrosting time. Compact Microwave Using a memorized procedure Memorized procedures let you save heating operations (cook time and power level) that you want (1 through 3) that you use your microwave automatically adjusts the time and defrosting power. 1 Press Weight Defrost. Note: For example, to enter...

User Guide
Page 18
... mode. Your microwave cooks at any time to the operating parts inside of your microwave Interior Wipe with a damp cloth. Do not scrub or use any buttons you may stain, streak, or dull the door surface. The display shows the power level being used for time defrost, weight defrost, or auto-menu items. Cleaning and maintaining your microwave Cleaning the outside with a soft cloth and warm water. You cannot change the power setting. Metal parts are easier to the cooking time...
... mode. Your microwave cooks at any time to the operating parts inside of your microwave Interior Wipe with a damp cloth. Do not scrub or use any buttons you may stain, streak, or dull the door surface. The display shows the power level being used for time defrost, weight defrost, or auto-menu items. Cleaning and maintaining your microwave Cleaning the outside with a soft cloth and warm water. You cannot change the power setting. Metal parts are easier to the cooking time...
User Guide
Page 19
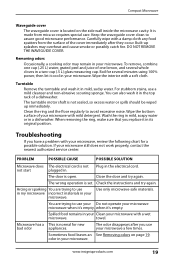
Keep the waveguide cover clean to avoid excessive noise. DO NOT REMOVE THE WAVEGUIDE COVER. Removing odors Occasionally, a cooking odor may overheat and cause smoke or possibly catch fire. If your microwave. The door is not Plug in the electrical cord. Check the instructions and try again. Sometimes food leaves an See Removing odors on the side wall inside the microwave cavity. For stubborn stains, use Use only microwave-safe materials. Clean the...
Keep the waveguide cover clean to avoid excessive noise. DO NOT REMOVE THE WAVEGUIDE COVER. Removing odors Occasionally, a cooking odor may overheat and cause smoke or possibly catch fire. If your microwave. The door is not Plug in the electrical cord. Check the instructions and try again. Sometimes food leaves an See Removing odors on the side wall inside the microwave cavity. For stubborn stains, use Use only microwave-safe materials. Clean the...
User Guide
Page 20
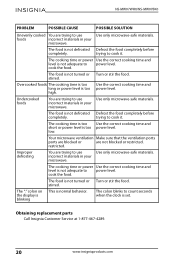
.... Obtaining replacement parts Call Insignia Customer Service at 1-877-467-4289. 20 www.insigniaproducts.com NS-MW07WH0/NS-MW07BK0 PROBLEM POSSIBLE CAUSE POSSIBLE SOLUTION Unevenly cooked You are trying to use Use only microwave-safe materials. Overcooked foods The cooking time is too Use the correct cooking time and long or power level is not turned or Turn or stir the food. Improper defrosting You are trying to cook it . cook the food. trying to use Use only microwave-safe...
.... Obtaining replacement parts Call Insignia Customer Service at 1-877-467-4289. 20 www.insigniaproducts.com NS-MW07WH0/NS-MW07BK0 PROBLEM POSSIBLE CAUSE POSSIBLE SOLUTION Unevenly cooked You are trying to use Use only microwave-safe materials. Overcooked foods The cooking time is too Use the correct cooking time and long or power level is not turned or Turn or stir the food. Improper defrosting You are trying to cook it . cook the food. trying to use Use only microwave-safe...
User Guide
Page 21
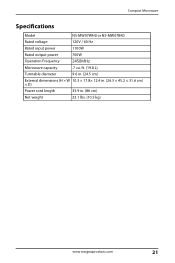
ft. (19.8 L) Turntable diameter 9.6 in. (24.5 cm) External dimensions (H × W 10.3 × 17.8× 12.4 in. (26.3 × 45.2 × 31.6 cm) × D) Power cord length 33.9 in. (86 cm) Net weight 23.1 lbs. (10.5 kg) www.insigniaproducts.com 21 Compact Microwave Specifications Model NS-MW07WH0 or NS-MW07BK0 Rated voltage 120V / 60 Hz Rated input power 1100W Rated output power 700W Operation Frequency 2450MHz Microwave capacity .7 cu.
ft. (19.8 L) Turntable diameter 9.6 in. (24.5 cm) External dimensions (H × W 10.3 × 17.8× 12.4 in. (26.3 × 45.2 × 31.6 cm) × D) Power cord length 33.9 in. (86 cm) Net weight 23.1 lbs. (10.5 kg) www.insigniaproducts.com 21 Compact Microwave Specifications Model NS-MW07WH0 or NS-MW07BK0 Rated voltage 120V / 60 Hz Rated input power 1100W Rated output power 700W Operation Frequency 2450MHz Microwave capacity .7 cu.
User Guide
Page 22
... warranty does not cover: • Food loss/spoilage due to failure of refrigerator or freezer • Customer instruction/education • Installation • Set up adjustments • Cosmetic damage • Damage due to weather, lightning, and other than a private home. 22 www.insigniaproducts.com If service of Products or parts are not returned to you. NS-MW07WH0/NS-MW07BK0 ONE-YEAR LIMITED WARRANTY...
... warranty does not cover: • Food loss/spoilage due to failure of refrigerator or freezer • Customer instruction/education • Installation • Set up adjustments • Cosmetic damage • Damage due to weather, lightning, and other than a private home. 22 www.insigniaproducts.com If service of Products or parts are not returned to you. NS-MW07WH0/NS-MW07BK0 ONE-YEAR LIMITED WARRANTY...
User Guide
Page 23
... in China www.insigniaproducts.com 23 REPAIR REPLACEMENT AS PROVIDED UNDER THIS WARRANTY IS YOUR EXCLUSIVE REMEDY FOR BREACH OF WARRANTY. THIS WARRANTY GIVES YOU SPECIFIC LEGAL RIGHTS, AND YOU MAY ALSO HAVE OTHER RIGHTS, WHICH VARY FROM STATE TO STATE OR PROVINCE TO PROVINCE. Compact Microwave • Modification of any part of Best Buy and its affiliated companies.
... in China www.insigniaproducts.com 23 REPAIR REPLACEMENT AS PROVIDED UNDER THIS WARRANTY IS YOUR EXCLUSIVE REMEDY FOR BREACH OF WARRANTY. THIS WARRANTY GIVES YOU SPECIFIC LEGAL RIGHTS, AND YOU MAY ALSO HAVE OTHER RIGHTS, WHICH VARY FROM STATE TO STATE OR PROVINCE TO PROVINCE. Compact Microwave • Modification of any part of Best Buy and its affiliated companies.

