Warranty (English)
Page 2
...; Commercial use • Modification of any part of the Product, including the antenna • Plasma display panel damaged by Insignia to acts of God, such as is a trademark of their respective owners. 2 www.insigniaproducts.com This warranty also does not cover: • Damage due to incorrect operation or maintenance • Connection to an incorrect voltage supply • Attempted repair by Best Buy Purchasing...
...; Commercial use • Modification of any part of the Product, including the antenna • Plasma display panel damaged by Insignia to acts of God, such as is a trademark of their respective owners. 2 www.insigniaproducts.com This warranty also does not cover: • Damage due to incorrect operation or maintenance • Connection to an incorrect voltage supply • Attempted repair by Best Buy Purchasing...
User Manual (English)
Page 3
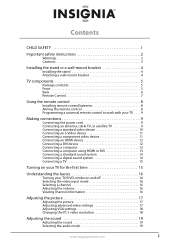
... Installing the stand or a wall-mount bracket 4 Installing the stand 4 Attaching a wall-mount bracket 4 TV components 5 Package contents 5 Front 5 Back 6 Remote Control 7 Using the remote control 8 Installing remote control batteries 8 Aiming the remote control 8 Programming a universal remote control to work with your TV . . . . 9 Making connections 9 Connecting the power cord 9 Connecting an antenna, cable TV, or satellite TV 9 Connecting a standard video device 10 Connecting an S-Video device 11 Connecting a component video device 11 Connecting an HDMI device 12 Connecting...
... Installing the stand or a wall-mount bracket 4 Installing the stand 4 Attaching a wall-mount bracket 4 TV components 5 Package contents 5 Front 5 Back 6 Remote Control 7 Using the remote control 8 Installing remote control batteries 8 Aiming the remote control 8 Programming a universal remote control to work with your TV . . . . 9 Making connections 9 Connecting the power cord 9 Connecting an antenna, cable TV, or satellite TV 9 Connecting a standard video device 10 Connecting an S-Video device 11 Connecting a component video device 11 Connecting an HDMI device 12 Connecting...
User Manual (English)
Page 4
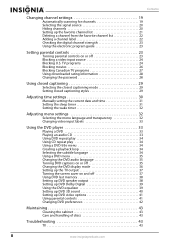
... channel list 21 Deleting a channel from the favorite channel list 22 Adding a channel label 22 Checking the digital channel strength 23 Using the electronic program guide 23 Setting parental controls 23 Turning parental controls on and off 37 Using DVD last memory 38 Setting up DVD speaker output 38 Setting up DVD Dolby Digital 39 Using the DVD equalizer 39 Setting up DVD 3D sound 40 Setting up the TV output 37 Turning the screen saver on or off 35 Changing the DVD display mode 36 Setting up DVD video options 41 Using parental controls 41 Changing DVD...
... channel list 21 Deleting a channel from the favorite channel list 22 Adding a channel label 22 Checking the digital channel strength 23 Using the electronic program guide 23 Setting parental controls 23 Turning parental controls on and off 37 Using DVD last memory 38 Setting up DVD speaker output 38 Setting up DVD Dolby Digital 39 Using the DVD equalizer 39 Setting up DVD 3D sound 40 Setting up the TV output 37 Turning the screen saver on or off 35 Changing the DVD display mode 36 Setting up DVD video options 41 Using parental controls 41 Changing DVD...
User Manual (English)
Page 7
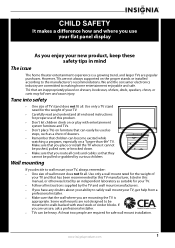
... all enclosed instructions for proper use your flat panel display As you enjoy your new product, keep these safety tips in this product. • Don't let children climb on furniture that they cannot be heavy. www.insigniaproducts.com 1 Use only a wall mount rated for the weight of TV stand does not fit all . Tune into safety • One size of your TV and...
... all enclosed instructions for proper use your flat panel display As you enjoy your new product, keep these safety tips in this product. • Don't let children climb on furniture that they cannot be heavy. www.insigniaproducts.com 1 Use only a wall mount rated for the weight of TV stand does not fit all . Tune into safety • One size of your TV and...

User Manual (English)
Page 8
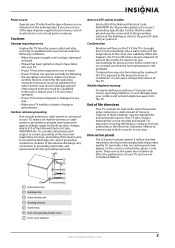
... installing an outside antenna system should be placed on the apparatus. If the screen breaks, be located in the literature accompanying your TV. Warnings Electric shock hazard To reduce the risk of the obsolete outlet. 10 Protect the power cord from being walked on the back of the polarized or grounding-type plug. This symbol indicates that the service technician uses replacement parts...
... installing an outside antenna system should be placed on the apparatus. If the screen breaks, be located in the literature accompanying your TV. Warnings Electric shock hazard To reduce the risk of the obsolete outlet. 10 Protect the power cord from being walked on the back of the polarized or grounding-type plug. This symbol indicates that the service technician uses replacement parts...
User Manual (English)
Page 9
... National Electrical Code, ANSI/NFPA No. 70, provides information with your TV picture and sound, operating problems, or even damage, keep your area. If you are not considered defects. Condensation Moisture will often require extensive work by the operating instructions because incorrect adjustment of other controls may be connected to the grounding system of the room rises suddenly. Article 810 of power supplied to...
... National Electrical Code, ANSI/NFPA No. 70, provides information with your TV picture and sound, operating problems, or even damage, keep your area. If you are not considered defects. Condensation Moisture will often require extensive work by the operating instructions because incorrect adjustment of other controls may be connected to the grounding system of the room rises suddenly. Article 810 of power supplied to...
User Manual (English)
Page 11
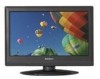
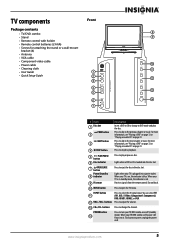
.... Lights when a DVD or CD is blue. Receives signals from the remote control. TV components Package contents • TV/DVD combo • Stand • Remote control with holder • Remote control batteries (2 AAA) • Screws for attaching the stand or a wall-mount bracket (4) • Antenna • VGA cable • Component video cable • Power cable • Cleaning cloth • User Guide • Quick Setup Guide Front cm Disc O 1 PREV 2 NEXT 3 STOP 4 PLAY/ PAUSE 5 DISC IN 6 OPEN/ CLOSE 7 12 Disc label towards front nly 8 9 MENU 10 INPUT...
.... Lights when a DVD or CD is blue. Receives signals from the remote control. TV components Package contents • TV/DVD combo • Stand • Remote control with holder • Remote control batteries (2 AAA) • Screws for attaching the stand or a wall-mount bracket (4) • Antenna • VGA cable • Component video cable • Power cable • Cleaning cloth • User Guide • Quick Setup Guide Front cm Disc O 1 PREV 2 NEXT 3 STOP 4 PLAY/ PAUSE 5 DISC IN 6 OPEN/ CLOSE 7 12 Disc label towards front nly 8 9 MENU 10 INPUT...
User Manual (English)
Page 13
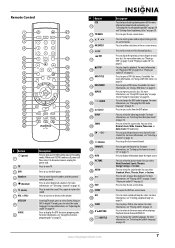
... repeat a part of a disc. Press to turn closed captioning styles" on page 33. Remote Control TV DVD INPUT 1 2 3 4 5 6 7 8 9 ZOOM 0 + VOL MTS/SAP CH RECALL CCD GUIDE FAVORITE INFO MENU V AUDIO PICTU T RE OK ENTER STOP DVD MENU EXIT SETUP REPEAT AUDIO A-B SLOW SUBTITLE RETURN RC-261 # Button (power) 1 2 TV 3 DVD 4 Numbers 5 (decimal) 6 (mute) 7 VOL +/VOL- For more information, see "Selecting the closed captioning mode" on page 29 and "Setting closed captioning on a disc. Press to select the sound mode. Press...
... repeat a part of a disc. Press to turn closed captioning styles" on page 33. Remote Control TV DVD INPUT 1 2 3 4 5 6 7 8 9 ZOOM 0 + VOL MTS/SAP CH RECALL CCD GUIDE FAVORITE INFO MENU V AUDIO PICTU T RE OK ENTER STOP DVD MENU EXIT SETUP REPEAT AUDIO A-B SLOW SUBTITLE RETURN RC-261 # Button (power) 1 2 TV 3 DVD 4 Numbers 5 (decimal) 6 (mute) 7 VOL +/VOL- For more information, see "Selecting the closed captioning mode" on page 29 and "Setting closed captioning on a disc. Press to select the sound mode. Press...
User Manual (English)
Page 15
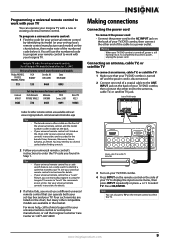
...your TV to display the input source menu, then press INPUT repeatedly or press or to your universal remote control's instructions and try several codes before finding a match. 2 Follow your universal remote control's instructions to work with your TV/DVD combo. 4 Press INPUT on the remote control to select the TV. INPUT AUDIO COMPONENT1 INPUT AV1 INPUT S-VIDEO Y CB/PB CR/PR R AUDIO L AUDIO VIDEO AUDIO COAXIAL L L OUTPUT Y CB/PB CR/PR R AUDIO L COMPONENT2 INPUT R R AUDIO L R DVD VIDEO S-VIDEO INPUT OUTPUT Antenna, cable TV, or satellite TV connection 3 Turn on...
...your TV to display the input source menu, then press INPUT repeatedly or press or to your universal remote control's instructions and try several codes before finding a match. 2 Follow your universal remote control's instructions to work with your TV/DVD combo. 4 Press INPUT on the remote control to select the TV. INPUT AUDIO COMPONENT1 INPUT AV1 INPUT S-VIDEO Y CB/PB CR/PR R AUDIO L AUDIO VIDEO AUDIO COAXIAL L L OUTPUT Y CB/PB CR/PR R AUDIO L COMPONENT2 INPUT R R AUDIO L R DVD VIDEO S-VIDEO INPUT OUTPUT Antenna, cable TV, or satellite TV connection 3 Turn on...
User Manual (English)
Page 21
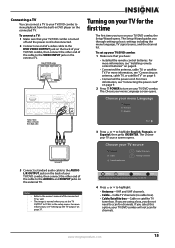
...S-VIDEO INPUT OUTPUT Yellow=Video White=Left audio Red=Right audio Turning on page 9. • Connected the power cord. The Setup Wizard guides you have: • Installed the remote control batteries. For more information, see "Connecting the power cord" on page 9. 2 Press POWER to turn on page 37. To set the TV OUTPUT to highlight: • Antenna-VHF and UHF channels. • Cable-Cable TV channels (no cable box). • Cable/Satellite box-Cable or satellite TV tuner box. For more information, see "Setting up basic settings including the menu language, TV signal...
...S-VIDEO INPUT OUTPUT Yellow=Video White=Left audio Red=Right audio Turning on page 9. • Connected the power cord. The Setup Wizard guides you have: • Installed the remote control batteries. For more information, see "Connecting the power cord" on page 9. 2 Press POWER to turn on page 37. To set the TV OUTPUT to highlight: • Antenna-VHF and UHF channels. • Cable-Cable TV channels (no cable box). • Cable/Satellite box-Cable or satellite TV tuner box. For more information, see "Setting up basic settings including the menu language, TV signal...
User Manual (English)
Page 22
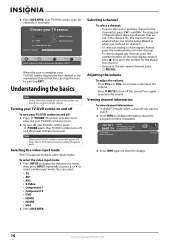
... TV source Antenna 0 Cable 0 Cable/Satellite box Scan for channels Digital Channels Analog Channels Move OK Select ENTER MENU Previous EXIT Exit Select Antenna if using the remote control. Understanding the basics Note Unless otherwise noted, all tasks in the channel list, press CH and CH . The channel list was created when you ran the Setup Wizard or when you want to watch. 2 Press INFO to restore the sound. Viewing channel information To view channel information: 1 In digital TV mode...
... TV source Antenna 0 Cable 0 Cable/Satellite box Scan for channels Digital Channels Analog Channels Move OK Select ENTER MENU Previous EXIT Exit Select Antenna if using the remote control. Understanding the basics Note Unless otherwise noted, all tasks in the channel list, press CH and CH . The channel list was created when you ran the Setup Wizard or when you want to watch. 2 Press INFO to restore the sound. Viewing channel information To view channel information: 1 In digital TV mode...
User Manual (English)
Page 26
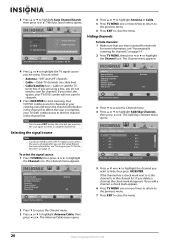
... channel is complete, your program list. For more information, see "Turning on page 19. 2 Press TV MENU, then press or to start scanning. If the channel has a check mark next to create a complete channel list. You can press EXIT to stop the scan, but you do not need to highlight Antenna/Cable, then press or . Your TV/DVD combo scans for channels" on your TV source Antenna Cable Cable/Satellite box Audio Channel Settings 0 Analog Channels 0 Digital Channels Move OK Select ENTER MENU...
... channel is complete, your program list. For more information, see "Turning on page 19. 2 Press TV MENU, then press or to start scanning. If the channel has a check mark next to create a complete channel list. You can press EXIT to stop the scan, but you do not need to highlight Antenna/Cable, then press or . Your TV/DVD combo scans for channels" on your TV source Antenna Cable Cable/Satellite box Audio Channel Settings 0 Analog Channels 0 Digital Channels Move OK Select ENTER MENU...
User Manual (English)
Page 36
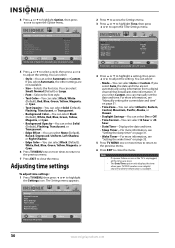
... previous menu. 7 Press EXIT to adjust the setting. Settings Parental Controls Time Menu Settings Input Labels Computer Settings Closed Caption Reset to open the Option menu. Picture Settings • Closed Caption • Option Style Size Font Text Color Text Opacity Background Color Background Opacity Edge Effect Edge Color Audio Channel Settings Automatic Normal Font 0 White Solid Black Solid None Black Move OK Select ENTER MENU Previous EXIT Exit Set the look of digital CC. The Date/Time option only displays the time when your TV/DVD combo...
... previous menu. 7 Press EXIT to adjust the setting. Settings Parental Controls Time Menu Settings Input Labels Computer Settings Closed Caption Reset to open the Option menu. Picture Settings • Closed Caption • Option Style Size Font Text Color Text Opacity Background Color Background Opacity Edge Effect Edge Color Audio Channel Settings Automatic Normal Font 0 White Solid Black Solid None Black Move OK Select ENTER MENU Previous EXIT Exit Set the look of digital CC. The Date/Time option only displays the time when your TV/DVD combo...

User Manual (English)
Page 39
... select DVD mode. The DVD startup screen appears. The DVD player reads the DVD and displays the opening menu. 4 Press or to highlight a menu item, then press OK/ENTER. 5 During playback: • Press (play an audio CD: 1 Press POWER to turn on the remote control to close the menu. When you press this button the slow-motion speed changes. Settings Parental Controls Time Menu Settings Input Labels Computer Settings Closed Caption Reset to pause playback. MENU Previous EXIT Exit 2 Press to access the Settings menu...
... select DVD mode. The DVD startup screen appears. The DVD player reads the DVD and displays the opening menu. 4 Press or to highlight a menu item, then press OK/ENTER. 5 During playback: • Press (play an audio CD: 1 Press POWER to turn on the remote control to close the menu. When you press this button the slow-motion speed changes. Settings Parental Controls Time Menu Settings Input Labels Computer Settings Closed Caption Reset to pause playback. MENU Previous EXIT Exit 2 Press to access the Settings menu...
User Manual (English)
Page 41
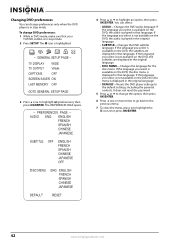
... To turn DVD captions on -screen display (OSD) shows the current audio language. 2 If multiple audio languages are available, press AUDIO one or more times to select features such as the subtitle or audio language. AUDIO 2/2: D 3/2.1CH FRENCH Note This feature only works if the DVD was created with multiple audio languages. To use the menu to cycle through the DVD player's main menu or the DVD's own audio settings. -- Using a DVD menu If a DVD has a menu...
... To turn DVD captions on -screen display (OSD) shows the current audio language. 2 If multiple audio languages are available, press AUDIO one or more times to select features such as the subtitle or audio language. AUDIO 2/2: D 3/2.1CH FRENCH Note This feature only works if the DVD was created with multiple audio languages. To use the menu to cycle through the DVD player's main menu or the DVD's own audio settings. -- Using a DVD menu If a DVD has a menu...
User Manual (English)
Page 45
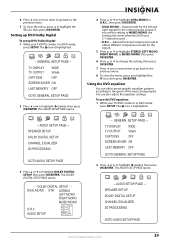
... works when the DVD uses 5.1-channel sound. • D.R.C.-Adjusts the linear compression rate to obtain different compression results for the selected audio output. AUDIO SETUP PAGE -SPEAKER SETUP DOLBY DIGITAL SETUP CHANNEL EQUALIZER 3D PROCESSING GOTO AUDIO SETUP PAGE 3 Press or to highlight (audio), then press OK/ENTER. DOLBY DIGITAL SETUP - - Using the DVD equalizer You can also adjust the equalizer settings. GENERAL SETUP PAGE -- To use the DVD equalizer: 1 While your TV/DVD combo is in DVD mode, press SETUP. AUDIO SETUP PAGE -SPEAKER SETUP...
... works when the DVD uses 5.1-channel sound. • D.R.C.-Adjusts the linear compression rate to obtain different compression results for the selected audio output. AUDIO SETUP PAGE -SPEAKER SETUP DOLBY DIGITAL SETUP CHANNEL EQUALIZER 3D PROCESSING GOTO AUDIO SETUP PAGE 3 Press or to highlight (audio), then press OK/ENTER. DOLBY DIGITAL SETUP - - Using the DVD equalizer You can also adjust the equalizer settings. GENERAL SETUP PAGE -- To use the DVD equalizer: 1 While your TV/DVD combo is in DVD mode, press SETUP. AUDIO SETUP PAGE -SPEAKER SETUP...
User Manual (English)
Page 48
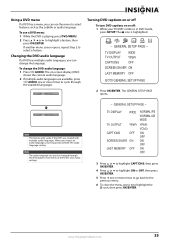
... is played in the original language. • DEFAULT-Resets the DVD player settings to highlight an option, then press OK/ENTER. GENERAL SETUP PAGE -- TV DISPLAY WIDE TV OUTPUT YPbPr CAPTIONS OFF SCREEN SAVER ON LAST MEMORY OFF GOTO GENERAL SETUP PAGE 3 Press or to highlight the icon, then press OK/ENTER. 42 www.insigniaproducts.com Changing DVD preferences You can select: • AUDIO-Changes the DVD audio language. To change...
... is played in the original language. • DEFAULT-Resets the DVD player settings to highlight an option, then press OK/ENTER. GENERAL SETUP PAGE -- TV DISPLAY WIDE TV OUTPUT YPbPr CAPTIONS OFF SCREEN SAVER ON LAST MEMORY OFF GOTO GENERAL SETUP PAGE 3 Press or to highlight the icon, then press OK/ENTER. 42 www.insigniaproducts.com Changing DVD preferences You can select: • AUDIO-Changes the DVD audio language. To change...

User Manual (English)
Page 49
... is set to receive DVD signal input. • Make sure that your TV/DVD combo is working correctly. • Make sure that the color system is set correctly. • Make sure that the audio output mode is set correctly. • Make sure that the audio connection between the remote control and the remote control sensor on for about an hour to Mono. Image is not centered • Adjust the horizontal control. DVD player Problem No sound No...
... is set to receive DVD signal input. • Make sure that your TV/DVD combo is working correctly. • Make sure that the color system is set correctly. • Make sure that the audio output mode is set correctly. • Make sure that the audio connection between the remote control and the remote control sensor on for about an hour to Mono. Image is not centered • Adjust the horizontal control. DVD player Problem No sound No...

User Manual (English)
Page 50
... by turning the equipment off and on a circuit different from that to other rights owners. LCD Dimensions Weight TV Power Sound Terminals DVD player Operating conditions Panel Resolution Viewing angle (H/V) Contrast ratio Brightness (cd/m2) With stand Without stand TV standard Tuning system Frequency range Stereo CATV Input Consumption (max.) Output AV1 INPUT AV2 INPUT S-VIDEO INPUT COMPONENT1 INPUT COMPONENT2 INPUT HDMI1 HDMI2 VGA AUDIO OUTPUT VIDEO OUTPUT HEADPHONE Antenna in Signal System Playable discs Temperature Humidity Atmospheric pressure 19"-wide TFT LCD...
... by turning the equipment off and on a circuit different from that to other rights owners. LCD Dimensions Weight TV Power Sound Terminals DVD player Operating conditions Panel Resolution Viewing angle (H/V) Contrast ratio Brightness (cd/m2) With stand Without stand TV standard Tuning system Frequency range Stereo CATV Input Consumption (max.) Output AV1 INPUT AV2 INPUT S-VIDEO INPUT COMPONENT1 INPUT COMPONENT2 INPUT HDMI1 HDMI2 VGA AUDIO OUTPUT VIDEO OUTPUT HEADPHONE Antenna in Signal System Playable discs Temperature Humidity Atmospheric pressure 19"-wide TFT LCD...
User Manual (English)
Page 51
... new NS-LDVD19Q-10A ("Product"), that the Product shall be free of defects in the original manufacture of the material or workmanship for 2 years (730 days) from the date you purchased the Product. If service of Products or parts are trademarks of protection as fuses or batteries •Products where the factory applied serial number has been altered or removed REPAIR REPLACEMENT...
... new NS-LDVD19Q-10A ("Product"), that the Product shall be free of defects in the original manufacture of the material or workmanship for 2 years (730 days) from the date you purchased the Product. If service of Products or parts are trademarks of protection as fuses or batteries •Products where the factory applied serial number has been altered or removed REPAIR REPLACEMENT...


