
Warranty (English)
Page 1
... to you sell or otherwise transfer the Product. or (2) replace the Product at no charge with a screen 30 inches or larger, call , an Insignia television (size and features to be loaned to you put the Product in -home warranty service for 2 years (730 days) from an authorized dealer... of protection as you purchased it from the date of your TV is determined to the original purchaser of the product in its original packaging or packaging that provides the same amount of Insignia brand products and packaged with new or rebuilt parts; Where is printed on ...
... to you sell or otherwise transfer the Product. or (2) replace the Product at no charge with a screen 30 inches or larger, call , an Insignia television (size and features to be loaned to you put the Product in -home warranty service for 2 years (730 days) from an authorized dealer... of protection as you purchased it from the date of your TV is determined to the original purchaser of the product in its original packaging or packaging that provides the same amount of Insignia brand products and packaged with new or rebuilt parts; Where is printed on ...
User Manual (English)
Page 3
...the remote control 8 Programming a universal remote control to work with your TV . . . . 9 Making connections 9 Connecting the power cord 9 Connecting an antenna, cable TV, or satellite TV 9 Connecting a standard video device 10 Connecting an S-Video device 11 Connecting...TV/DVD combo on and off 16 Selecting the video input mode 16 Selecting a channel 16 Adjusting the volume 16 Viewing channel information 16 Adjusting the picture 17 Adjusting the picture 17 Adjusting advanced video settings 17 Adjusting VGA settings 18 Changing the PC's video resolution 18 Adjusting the sound 19...
...the remote control 8 Programming a universal remote control to work with your TV . . . . 9 Making connections 9 Connecting the power cord 9 Connecting an antenna, cable TV, or satellite TV 9 Connecting a standard video device 10 Connecting an S-Video device 11 Connecting...TV/DVD combo on and off 16 Selecting the video input mode 16 Selecting a channel 16 Adjusting the volume 16 Viewing channel information 16 Adjusting the picture 17 Adjusting the picture 17 Adjusting advanced video settings 17 Adjusting VGA settings 18 Changing the PC's video resolution 18 Adjusting the sound 19...
User Manual (English)
Page 4
... menu 35 Changing the DVD audio language 35 Turning DVD captions on or off 35 Changing the DVD display mode 36 Setting up the TV output 37 Turning the screen saver on and off 37 Using DVD last memory 38 Setting up DVD speaker output 38 Setting up DVD...Setting parental controls 23 Turning parental controls on or off 23 Blocking a video input source 24 Blocking U.S. Contents Changing channel settings 19 Automatically scanning for channels 19 Selecting the signal source 20 Hiding channels 20 Setting up DVD video options 41 Using parental controls 41 Changing DVD preferences 42 ...
... menu 35 Changing the DVD audio language 35 Turning DVD captions on or off 35 Changing the DVD display mode 36 Setting up the TV output 37 Turning the screen saver on and off 37 Using DVD last memory 38 Setting up DVD speaker output 38 Setting up DVD...Setting parental controls 23 Turning parental controls on or off 23 Blocking a video input source 24 Blocking U.S. Contents Changing channel settings 19 Automatically scanning for channels 19 Selecting the signal source 20 Hiding channels 20 Setting up DVD video options 41 Using parental controls 41 Changing DVD preferences 42 ...
User Manual (English)
Page 7
...designed to be mounted to wall mount your ability to making home entertainment enjoyable and safe. Make sure that you place or install the TV where it cannot be pushed, pulled over and cause injury. Wall mounting If you decide to walls backed with entertainment system furniture and...• Make sure that you route all cords and cables so that they cannot be heavy. TVs that are required for the weight of your TV. • Carefully read and understand all . Use only a TV stand rated for safe wall mount installation. We and the consumer electronics industry are committed to safely...
...designed to be mounted to wall mount your ability to making home entertainment enjoyable and safe. Make sure that you place or install the TV where it cannot be pushed, pulled over and cause injury. Wall mounting If you decide to walls backed with entertainment system furniture and...• Make sure that you route all cords and cables so that they cannot be heavy. TVs that are required for the weight of your TV. • Carefully read and understand all . Use only a TV stand rated for safe wall mount installation. We and the consumer electronics industry are committed to safely...

User Manual (English)
Page 8
...shock, do not touch the liquid in correct operating condition. 2 www.insigniaproducts.com Refer servicing to rain or moisture. Handling the LCD panel • Your TV's screen is used, use caution when moving the S3125A cart/apparatus combination to excessive heat such as the original part. Also, if...back of your safety. Power lines An outside antenna system, extreme care should not be careful of broken glass. • If the LCD panel is in the panel. When installing an outside antenna system should be fatal. This helps prevent property damage and personal injury from ...
...shock, do not touch the liquid in correct operating condition. 2 www.insigniaproducts.com Refer servicing to rain or moisture. Handling the LCD panel • Your TV's screen is used, use caution when moving the S3125A cart/apparatus combination to excessive heat such as the original part. Also, if...back of your safety. Power lines An outside antenna system, extreme care should not be careful of broken glass. • If the LCD panel is in the panel. When installing an outside antenna system should be fatal. This helps prevent property damage and personal injury from ...
User Manual (English)
Page 9
...servicing to your home, consult an electrician or your local power company. Cautions Damage requiring service Unplug this happens, the TV's performance may be recycled and reused. Condensation Moisture will often require extensive work by the operating instructions because incorrect adjustment ....com 3 If you are not considered defects. Non-active pixels The LCD panel contains almost 3 million thin film transistors, which provide exceptionally sharp video quality. Power source Operate your TV only from the type of power source indicated on the screen as practical...
...servicing to your home, consult an electrician or your local power company. Cautions Damage requiring service Unplug this happens, the TV's performance may be recycled and reused. Condensation Moisture will often require extensive work by the operating instructions because incorrect adjustment ....com 3 If you are not considered defects. Non-active pixels The LCD panel contains almost 3 million thin film transistors, which provide exceptionally sharp video quality. Power source Operate your TV only from the type of power source indicated on the screen as practical...
User Manual (English)
Page 10
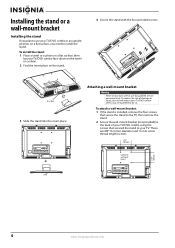
...the insert place. To install the stand: 1 Place a towel or cushion on a flat surface, then lay your TV/DVD combo face-down on the towel or cushion. 2 Find the insert place on a flat surface, you need ...to the back of damage or injury, do so. These are qualified to do not wall-mount your TV/DVD combo unless you are M4*16 (4 mm diameter and 16 mm screw thread length) screws. 3.937" (100... mm) Location for use your TV/DVD combo in an upright position on the stand. 4 Secure the stand with the four provided screws. ...
...the insert place. To install the stand: 1 Place a towel or cushion on a flat surface, then lay your TV/DVD combo face-down on the towel or cushion. 2 Find the insert place on a flat surface, you need ...to the back of damage or injury, do so. These are qualified to do not wall-mount your TV/DVD combo unless you are M4*16 (4 mm diameter and 16 mm screw thread length) screws. 3.937" (100... mm) Location for use your TV/DVD combo in an upright position on the stand. 4 Secure the stand with the four provided screws. ...
User Manual (English)
Page 11
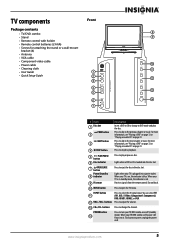
.... Press to stop disc playback. 5 PLAY/PAUSE button 6 Disc indicator Press to the previous chapter or track. POWER button 14 Press to turn your TV is on page 33. For more information, see "Playing a DVD" on page 33 or "Playing an audio CD" on or off , power still... the disc slot. buttons Press to change to DVD mode and play or pause a disc. You can select TV, AV1, AV2, S-Video, Component1, Component2, DVD, HDMI1, HDMI2, or VGA. TV components Package contents • TV/DVD combo • Stand • Remote control with holder • Remote control batteries (2 AAA) •...
.... Press to stop disc playback. 5 PLAY/PAUSE button 6 Disc indicator Press to the previous chapter or track. POWER button 14 Press to turn your TV is on page 33. For more information, see "Playing a DVD" on page 33 or "Playing an audio CD" on or off , power still... the disc slot. buttons Press to change to DVD mode and play or pause a disc. You can select TV, AV1, AV2, S-Video, Component1, Component2, DVD, HDMI1, HDMI2, or VGA. TV components Package contents • TV/DVD combo • Stand • Remote control with holder • Remote control batteries (2 AAA) •...

User Manual (English)
Page 12
... an S-Video device" on page 10. ANT. For more information, see "Connecting a standard video device" on page 11. When your TV/DVD combo through the external device. Connect a component video device to these jacks. Connect a standard AV device to these jacks. Back 1...For more information, see "Connecting a computer" on page 15. Connect the power cord to this jack. For more information, see "Connecting a TV" on page 13. 6 www.insigniaproducts.com Connect a computer's video to this jack. For more information, see "Connecting a component video device...
... an S-Video device" on page 10. ANT. For more information, see "Connecting a standard video device" on page 11. When your TV/DVD combo through the external device. Connect a component video device to these jacks. Connect a standard AV device to these jacks. Back 1...For more information, see "Connecting a computer" on page 15. Connect the power cord to this jack. For more information, see "Connecting a TV" on page 13. 6 www.insigniaproducts.com Connect a computer's video to this jack. For more information, see "Connecting a component video device...
User Manual (English)
Page 13
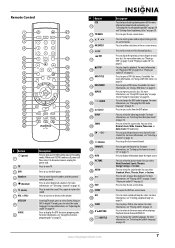
.... For more information, see "Using the electronic program guide" on page 23. # Button CCD 10 11 TV MENU 12 13 OK/ENTER 14 / / 15 STOP 16 DVD/TITLE 17 18 DVD/MENU REPEAT 19 AUDIO 20 21 (eject) INPUT 22 ZOOM 23 CH /CH 24 25 RECALL FAVORITE 26 27 INFO..." on -screen menus. Press to turn closed captioning styles" on page 16. MTS/SAP 8 GUIDE 9 Description Press to open the on -screen menu. Remote Control TV DVD INPUT 1 2 3 4 5 6 7 8 9 ZOOM 0 + VOL MTS/SAP CH RECALL CCD GUIDE FAVORITE INFO MENU V AUDIO PICTU T RE OK ENTER STOP DVD MENU EXIT SETUP ...
.... For more information, see "Using the electronic program guide" on page 23. # Button CCD 10 11 TV MENU 12 13 OK/ENTER 14 / / 15 STOP 16 DVD/TITLE 17 18 DVD/MENU REPEAT 19 AUDIO 20 21 (eject) INPUT 22 ZOOM 23 CH /CH 24 25 RECALL FAVORITE 26 27 INFO..." on -screen menus. Press to turn closed captioning styles" on page 16. MTS/SAP 8 GUIDE 9 Description Press to open the on -screen menu. Remote Control TV DVD INPUT 1 2 3 4 5 6 7 8 9 ZOOM 0 + VOL MTS/SAP CH RECALL CCD GUIDE FAVORITE INFO MENU V AUDIO PICTU T RE OK ENTER STOP DVD MENU EXIT SETUP ...
User Manual (English)
Page 14
... a cloth. Remove batteries when the charge is not going to be used for an extended period of time, remove the batteries. 30° 30° TV DVD INPUT 1 2 3 4 5 6 7 8 9 ZOOM 0 + VOL MTS/SAP CH RECALL CCD GUIDE FAVORITE DISPLAY V MENU AUDIO PICTU T RE OK ENTER STOP DVD ... rash. Do not place the remote control in the battery compartment. 3 Replace the cover. symbols on the remote sensor. If chemicals touch your TV/DVD combo. 2 Insert two AAA batteries into the battery compartment. Do not mix old and new batteries. Do not place objects, such as ...
... a cloth. Remove batteries when the charge is not going to be used for an extended period of time, remove the batteries. 30° 30° TV DVD INPUT 1 2 3 4 5 6 7 8 9 ZOOM 0 + VOL MTS/SAP CH RECALL CCD GUIDE FAVORITE DISPLAY V MENU AUDIO PICTU T RE OK ENTER STOP DVD ... rash. Do not place the remote control in the battery compartment. 3 Replace the cover. symbols on the remote sensor. If chemicals touch your TV/DVD combo. 2 Insert two AAA batteries into the battery compartment. Do not mix old and new batteries. Do not place objects, such as ...
User Manual (English)
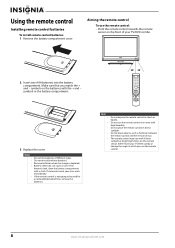
Page 15
...universal remote control: 1 Find the code for your universal remote control or set-top box manufacturer, or call the Insignia Customer Care Center at 1-877-467-4289. Insignia TV codes for universal remote controls (for all else fails, you can manually program it . To completely disconnect power, ... feature, you must use the numbered code to program your remote control to work with your TV You can operate your TV. Back of your TV/DVD combo, then connect the other end of your Insignia TV. Tips • If your universal remote control has a code search feature, run a code...
...universal remote control: 1 Find the code for your universal remote control or set-top box manufacturer, or call the Insignia Customer Care Center at 1-877-467-4289. Insignia TV codes for universal remote controls (for all else fails, you can manually program it . To completely disconnect power, ... feature, you must use the numbered code to program your remote control to work with your TV You can operate your TV. Back of your TV/DVD combo, then connect the other end of your Insignia TV. Tips • If your universal remote control has a code search feature, run a code...

User Manual (English)
Page 16
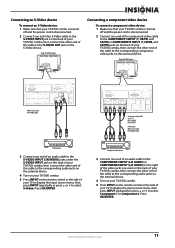
... INPUT L R R AUDIO L R DVD VIDEO SR-VIDEO INPUT OUTPUT White=Left audio Red=Right audio Yellow=Video Standard video device 3 Turn on your TV/DVD combo. 4 Press INPUT on the external device. INPUT AUDIO COMPONENT1 INPUT AV1 INPUT S-VIDEO Y CB/PB CR/PR R AUDIO L AUDIO VIDEO AUDIO...OUTPUT Y CB/PB CR/PR R AUDIO L COMPONENT2 INPUT R R AUDIO L R DVD VIDEO S-VIDEO INPUT OUTPUT HDMI1 INPUT VGA INPUT ANT. Back of TV/DVD combo ~ 120V 60Hz AC INPUT HDMI1 INPUT VGA INPUT ANT. INPUT AUDIO COMPONENT1 INPUT AV1 INPUT S-VIDEO Y CB/PB CR/PR R AUDIO L ...
... INPUT L R R AUDIO L R DVD VIDEO SR-VIDEO INPUT OUTPUT White=Left audio Red=Right audio Yellow=Video Standard video device 3 Turn on your TV/DVD combo. 4 Press INPUT on the external device. INPUT AUDIO COMPONENT1 INPUT AV1 INPUT S-VIDEO Y CB/PB CR/PR R AUDIO L AUDIO VIDEO AUDIO...OUTPUT Y CB/PB CR/PR R AUDIO L COMPONENT2 INPUT R R AUDIO L R DVD VIDEO S-VIDEO INPUT OUTPUT HDMI1 INPUT VGA INPUT ANT. Back of TV/DVD combo ~ 120V 60Hz AC INPUT HDMI1 INPUT VGA INPUT ANT. INPUT AUDIO COMPONENT1 INPUT AV1 INPUT S-VIDEO Y CB/PB CR/PR R AUDIO L ...
User Manual (English)
Page 17
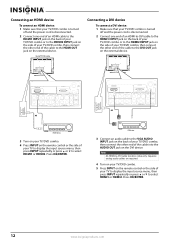
...AUDIO L COMPONENT2 INPUT R R AUDIO L R DVD VIDEO S-VIDEO INPUT OUTPUT Connecting a component video device To connect a component video device: 1 Make sure that your TV/DVD combo is turned off and the power cord is disconnected. 2 Connect one end of an S-Video cable to the S-VIDEO INPUT jack on the... the corresponding component video jacks on the external device. Connecting an S-Video device To connect an S-Video device: 1 Make sure that your TV/DVD combo is turned off and the power cord is disconnected. 2 Connect one end of the component video cable to the COMPONENT1 INPUT (Y,...
...AUDIO L COMPONENT2 INPUT R R AUDIO L R DVD VIDEO S-VIDEO INPUT OUTPUT Connecting a component video device To connect a component video device: 1 Make sure that your TV/DVD combo is turned off and the power cord is disconnected. 2 Connect one end of an S-Video cable to the S-VIDEO INPUT jack on the... the corresponding component video jacks on the external device. Connecting an S-Video device To connect an S-Video device: 1 Make sure that your TV/DVD combo is turned off and the power cord is disconnected. 2 Connect one end of the component video cable to the COMPONENT1 INPUT (Y,...
User Manual (English)
Page 18
... or press or to select HDMI1 or HDMI2. Press OK/ENTER. Note An HDMI-to the VGA AUDIO INPUT jack on the back of your TV/DVD combo, then connect the other end of the cable into the AUDIO OUT jack on the DVI device. Separate analog audio cables are required.... DVI device 3 Connect an audio cable to -DVI cable transfers video only. Connecting an HDMI device To connect an HDMI device: 1 Make sure that your TV/DVD combo is turned off and the power cord is disconnected. 2 Connect one end of an HDMI cable to the HDMI1 INPUT jack on the...
... or press or to select HDMI1 or HDMI2. Press OK/ENTER. Note An HDMI-to the VGA AUDIO INPUT jack on the back of your TV/DVD combo, then connect the other end of the cable into the AUDIO OUT jack on the DVI device. Separate analog audio cables are required.... DVI device 3 Connect an audio cable to -DVI cable transfers video only. Connecting an HDMI device To connect an HDMI device: 1 Make sure that your TV/DVD combo is turned off and the power cord is disconnected. 2 Connect one end of an HDMI cable to the HDMI1 INPUT jack on the...
User Manual (English)
Page 19
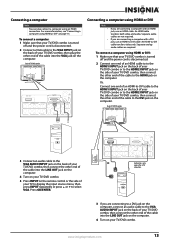
... a computer Note You can also connect a computer using HDMI or DVI: 1 Make sure that your TV/DVD combo is turned off and the power cord is disconnected. 2 Connect one end of an HDMI-to...HDMI2 INPUT VGA AUDIO INPUT jack on the back of the cable into the VGA jack on your TV/DVD combo, then connect the other end of the cable into the LINE OUT jack on the computer.... 4 Turn on the computer. Press OK/ENTER. Back of TV/DVD combo ~ 120V 60Hz AC INPUT HDMI1 INPUT VGA INPUT ANT. For more information, see "Connecting a computer ...
... a computer Note You can also connect a computer using HDMI or DVI: 1 Make sure that your TV/DVD combo is turned off and the power cord is disconnected. 2 Connect one end of an HDMI-to...HDMI2 INPUT VGA AUDIO INPUT jack on the back of the cable into the VGA jack on your TV/DVD combo, then connect the other end of the cable into the LINE OUT jack on the computer.... 4 Turn on the computer. Press OK/ENTER. Back of TV/DVD combo ~ 120V 60Hz AC INPUT HDMI1 INPUT VGA INPUT ANT. For more information, see "Connecting a computer ...

User Manual (English)
Page 20
...audio Red=Right audio HDMI1 INPUT VGA INPUT ANT. Press OK/ENTER. Connecting a standard sound system To connect a standard sound system: 1 Make sure that your TV/DVD combo is turned off and the power cord is disconnected. 2 Connect one end of a coaxial cable to the COAXIAL OUTPUT jack on the back...combo is turned off and the power cord is disconnected. 2 Connect a standard audio cable to the AUDIO L/R OUTPUT jacks on the back of your TV to display the input source menu, then press INPUT repeatedly or press or to select HDMI1 or HDMI2. INPUT AUDIO COMPONENT1 INPUT AV1 INPUT S-VIDEO Y...
...audio Red=Right audio HDMI1 INPUT VGA INPUT ANT. Press OK/ENTER. Connecting a standard sound system To connect a standard sound system: 1 Make sure that your TV/DVD combo is turned off and the power cord is disconnected. 2 Connect one end of a coaxial cable to the COAXIAL OUTPUT jack on the back...combo is turned off and the power cord is disconnected. 2 Connect a standard audio cable to the AUDIO L/R OUTPUT jacks on the back of your TV to display the input source menu, then press INPUT repeatedly or press or to select HDMI1 or HDMI2. INPUT AUDIO COMPONENT1 INPUT AV1 INPUT S-VIDEO Y...
User Manual (English)
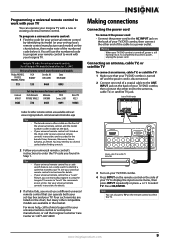
Page 21
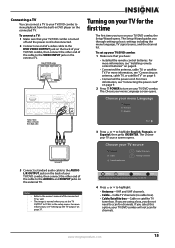
...an antenna for channels. For more information, see "Connecting the power cord" on page 9. 2 Press POWER to turn on the external TV. The Setup Wizard guides you do not need to scan for the first time The first time you have: • Installed the remote ...control batteries. For more information, see "Connecting an antenna, cable TV, or satellite TV" on your TV/DVD combo. Choose your TV source Antenna Cable Cable/Satellite box 0 Digital Channels 0 Analog Channels 3 Connect a standard audio cable to the AUDIO L/R ...
...an antenna for channels. For more information, see "Connecting the power cord" on page 9. 2 Press POWER to turn on the external TV. The Setup Wizard guides you do not need to scan for the first time The first time you have: • Installed the remote ...control batteries. For more information, see "Connecting an antenna, cable TV, or satellite TV" on your TV/DVD combo. Choose your TV source Antenna Cable Cable/Satellite box 0 Digital Channels 0 Analog Channels 3 Connect a standard audio cable to the AUDIO L/R ...
User Manual (English)
Page 22
...select a channel: • To go to display information about the program content, if available. Viewing channel information To view channel information: 1 In digital TV mode, select a channel you scanned for channels. • To select an analog or main digital channel, press the number buttons for the channel. &#...number for the digital sub-channel. • To tune to close the display. 16 www.insigniaproducts.com 5 Press OK/ENTER. Choose your TV/DVD combo displays the first channel in the channel list, press CH and CH . Pressing one of these buttons skips any channels that are...
...select a channel: • To go to display information about the program content, if available. Viewing channel information To view channel information: 1 In digital TV mode, select a channel you scanned for channels. • To select an analog or main digital channel, press the number buttons for the channel. &#...number for the digital sub-channel. • To tune to close the display. 16 www.insigniaproducts.com 5 Press OK/ENTER. Choose your TV/DVD combo displays the first channel in the channel list, press CH and CH . Pressing one of these buttons skips any channels that are...

User Manual (English)
Page 23
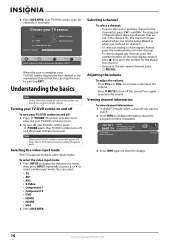
... more times to return to the previous menu. 5 Press EXIT to close the menu. Adjusting the picture Adjusting the picture To adjust the picture: 1 Press TV MENU, then press or to adjust the setting. If a another menu opens, press , , , or to adjust the setting or open a setting menu.... In VGA mode, you can select On or Off. TV mode Picture Picture Mode Brightness Contrast Color Tint Sharpness Advanced Video Picture Audio Channel Settings Vivid 50 70 65 50 55 Move OK Select ENTER...
... more times to return to the previous menu. 5 Press EXIT to close the menu. Adjusting the picture Adjusting the picture To adjust the picture: 1 Press TV MENU, then press or to adjust the setting. If a another menu opens, press , , , or to adjust the setting or open a setting menu.... In VGA mode, you can select On or Off. TV mode Picture Picture Mode Brightness Contrast Color Tint Sharpness Advanced Video Picture Audio Channel Settings Vivid 50 70 65 50 55 Move OK Select ENTER...


