Firmware Installation Guide (English)
Page 1
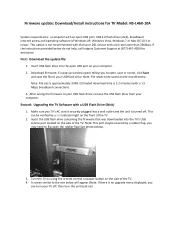
.... 2. This can turn the unit back on the root directory. you to the one below do not help, call Insignia Customer Support at (877) 467‐4289 for TV Model: NS‐L46X‐10A System requirements: a computer with a bit rate lower than 256kbps. A screen similar to open USB port, USB 2.0 flash ...maybe covered by a red indicator light on the side of Windows XP, Windows Vista, Windows 7 or Mac OS 10.3 or newer. Turn the TV on using the remote control or power button on the front of the TV. This option is 1‐2 minutes (with a USB Flash Drive (Stick) 1. remove ...
.... 2. This can turn the unit back on the root directory. you to the one below do not help, call Insignia Customer Support at (877) 467‐4289 for TV Model: NS‐L46X‐10A System requirements: a computer with a bit rate lower than 256kbps. A screen similar to open USB port, USB 2.0 flash ...maybe covered by a red indicator light on the side of Windows XP, Windows Vista, Windows 7 or Mac OS 10.3 or newer. Turn the TV on using the remote control or power button on the front of the TV. This option is 1‐2 minutes (with a USB Flash Drive (Stick) 1. remove ...

Firmware Installation Guide (English)
Page 2
Once the update has completed, a screen similar to the one (1) minute. 6. this update takes approximately one shown below will appear: 7. Remove the USB flash drive (stick) from the TV. 8. The software update will then begin Note: DO NOT TURN THE POWER OFF OR UNPLUG DURING THE UPDATE Note: During the software update, a progress bar will then restart. 5. Press the Enter/OK key on the remote. Using your remote control arrow keys, make sure the "Yes" button is highlighted and press enter/OK on the remote control, TV will appear displaying the progress of the update;
Once the update has completed, a screen similar to the one (1) minute. 6. this update takes approximately one shown below will appear: 7. Remove the USB flash drive (stick) from the TV. 8. The software update will then begin Note: DO NOT TURN THE POWER OFF OR UNPLUG DURING THE UPDATE Note: During the software update, a progress bar will then restart. 5. Press the Enter/OK key on the remote. Using your remote control arrow keys, make sure the "Yes" button is highlighted and press enter/OK on the remote control, TV will appear displaying the progress of the update;
Firmware Installation Guide (English)
Page 3
...TV is powered up . 9. Note: You will need to reprogram your computer prior to using your favorite channels and any custom settings that you erase/delete the update file from the USB flash drive using the USB flash drive again. April 2010 Note: If you may have set up the process... is recommended that you experience any issues while performing this upgrade, call Insignia Customer Support at (877) 467‐4289 for assistance. ...
...TV is powered up . 9. Note: You will need to reprogram your computer prior to using your favorite channels and any custom settings that you erase/delete the update file from the USB flash drive using the USB flash drive again. April 2010 Note: If you may have set up the process... is recommended that you experience any issues while performing this upgrade, call Insignia Customer Support at (877) 467‐4289 for assistance. ...
Warranty (English)
Page 2
...BREACH OF ANY EXPRESS OR IMPLIED WARRANTY ON THIS PRODUCT, INCLUDING, BUT NOT LIMITED TO, LOST DATA, LOSS OF USE OF YOUR PRODUCT, LOST BUSINESS OR LOST PROFITS. INSIGNIA is or with all faults • Consumables, such as lightning strikes • Accident • Misuse •... Abuse • Negligence • Commercial use • Modification of any part of their respective owners. 2 www.insigniaproducts.com This ...
...BREACH OF ANY EXPRESS OR IMPLIED WARRANTY ON THIS PRODUCT, INCLUDING, BUT NOT LIMITED TO, LOST DATA, LOSS OF USE OF YOUR PRODUCT, LOST BUSINESS OR LOST PROFITS. INSIGNIA is or with all faults • Consumables, such as lightning strikes • Accident • Misuse •... Abuse • Negligence • Commercial use • Modification of any part of their respective owners. 2 www.insigniaproducts.com This ...
User Manual (English)
Page 3
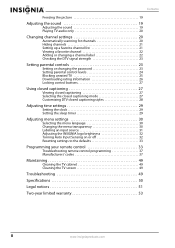
... safety instructions 2 Warnings 2 Cautions 3 Introduction 4 Installing a wall-mount bracket 4 TV components 5 Accessories 5 Cleaning cloth 5 Front 5 Back 5 Side 6 Remote control 6 Using the remote control 7 Installing the remote control batteries 7 Aiming the remote control 8 Using the remote control holder 8 Programming a universal remote control to work with your TV . . . . 8 Making connections 9 Connecting the power 9 Connecting...
... safety instructions 2 Warnings 2 Cautions 3 Introduction 4 Installing a wall-mount bracket 4 TV components 5 Accessories 5 Cleaning cloth 5 Front 5 Back 5 Side 6 Remote control 6 Using the remote control 7 Installing the remote control batteries 7 Aiming the remote control 8 Using the remote control holder 8 Programming a universal remote control to work with your TV . . . . 8 Making connections 9 Connecting the power 9 Connecting...
User Manual (English)
Page 4
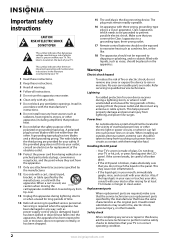
...or changing the password 23 Setting parental control levels 24 Blocking unrated TV 25 Downloading rating information 26 Locking control buttons 27 Using closed captioning 27 Viewing closed captioning 27 Selecting the closed captioning mode 27 Customizing DTV closed captioning styles 28 Adjusting time ...29 Adjusting menu settings 30 Selecting the menu language 30 Changing the menu transparency 30 Labeling an input source 31 Adjusting the INSIGNIA logo brightness 32 Turning Auto Input Sensing on or off 32 Resetting settings to the defaults 33 Programming your remote control 33...
...or changing the password 23 Setting parental control levels 24 Blocking unrated TV 25 Downloading rating information 26 Locking control buttons 27 Using closed captioning 27 Viewing closed captioning 27 Selecting the closed captioning mode 27 Customizing DTV closed captioning styles 28 Adjusting time ...29 Adjusting menu settings 30 Selecting the menu language 30 Changing the menu transparency 30 Labeling an input source 31 Adjusting the INSIGNIA logo brightness 32 Turning Auto Input Sensing on or off 32 Resetting settings to the defaults 33 Programming your remote control 33...

User Manual (English)
Page 5
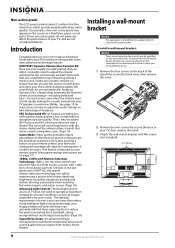
.... Make sure that you place or install the TV where it cannot be heavy. Wall mounting If you decide to the manufacturer's recommendations. Use only a wall mount rated for the weight of your TV and that has been recommended by this TV manufacturer, listed in mind The issue...; Don't place TVs on furniture that can easily be pulled or grabbed by curious children. f CHILD SAFETY It makes a difference how and where you use of this manual, or otherwise listed by an independent laboratory as a chest of drawers. • Remember that children can become excited while watching a program...
.... Make sure that you place or install the TV where it cannot be heavy. Wall mounting If you decide to the manufacturer's recommendations. Use only a wall mount rated for the weight of your TV and that has been recommended by this TV manufacturer, listed in mind The issue...; Don't place TVs on furniture that can easily be pulled or grabbed by curious children. f CHILD SAFETY It makes a difference how and where you use of this manual, or otherwise listed by an independent laboratory as a chest of drawers. • Remember that children can become excited while watching a program...
User Manual (English)
Page 6
...block any service or repair to this device, ask the service technician to perform routine safety checks to determine that your TV is used, use this apparatus during lightning storms or when unused for replacement of the obsolete outlet. 10 Protect the power cord from the apparatus. 11 Only...to rain or moisture, does not operate normally, or has been dropped. 15 The wall plug is broken, make sure that the service technician uses replacement parts specified by the manufacturer, or sold with your outlet, consult an electrician for long periods of time. 14 Refer all instructions. ...
...block any service or repair to this device, ask the service technician to perform routine safety checks to determine that your TV is used, use this apparatus during lightning storms or when unused for replacement of the obsolete outlet. 10 Protect the power cord from the apparatus. 11 Only...to rain or moisture, does not operate normally, or has been dropped. 15 The wall plug is broken, make sure that the service technician uses replacement parts specified by the manufacturer, or sold with your outlet, consult an electrician for long periods of time. 14 Refer all instructions. ...
User Manual (English)
Page 8
..., and reduced motion blurring, particularly when watching fast-motion sports and action scenes. (Page 18) Advanced Light Control: The backlight used in the operating instructions unless you are qualified to operate at maximum wattage for all images projected onto your LCD TV does not ... lines of hazards, do not perform any servicing other than others. To reduce the risk of resolution (up from your Insignia Advanced Series television can automatically find these opportunities to your remote control. More game settings instructions are for all room conditions, nor for...
..., and reduced motion blurring, particularly when watching fast-motion sports and action scenes. (Page 18) Advanced Light Control: The backlight used in the operating instructions unless you are qualified to operate at maximum wattage for all images projected onto your LCD TV does not ... lines of hazards, do not perform any servicing other than others. To reduce the risk of resolution (up from your Insignia Advanced Series television can automatically find these opportunities to your remote control. More game settings instructions are for all room conditions, nor for...
User Manual (English)
Page 9
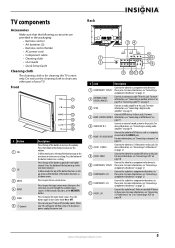
..." on page 9. 3 SPDIF Connect an audio amplifier to this button again to these jacks. Connect the audio for cleaning the TV screen only. Do not use the cleaning cloth to clean any other part of the button to go to this jack. Front 1 2 3 4 GAME 5 6 # Button 1 VOL 2 CH 3 MENU 4 INPUT 5 GAME 6 (power...
..." on page 9. 3 SPDIF Connect an audio amplifier to this button again to these jacks. Connect the audio for cleaning the TV screen only. Do not use the cleaning cloth to clean any other part of the button to go to this jack. Front 1 2 3 4 GAME 5 6 # Button 1 VOL 2 CH 3 MENU 4 INPUT 5 GAME 6 (power...
User Manual (English)
Page 11
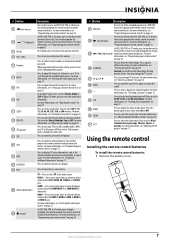
.... HDMI-Press one or more information, see "Adjusting the sound" on page 33. For more times to select the device connected to control connected devices. Using the remote control Installing the remote control batteries To install the remote control batteries: 1 Remove the battery cover. You need to program the remote control...
.... HDMI-Press one or more information, see "Adjusting the sound" on page 33. For more times to select the device connected to control connected devices. Using the remote control Installing the remote control batteries To install the remote control batteries: 1 Remove the battery cover. You need to program the remote control...
User Manual (English)
Page 12
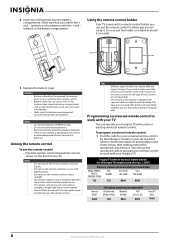
... screws for your universal remote control by identifying its model (or your TV. Using the remote control holder Your TV comes with a remote control holder you want to work with all Insignia TVs manufactured after Jan. 1, 2007) Universal remote control manufacturers and models Philips PHDVD5... the batteries leak, clean the battery compartment with the + and - 2 Insert two AA batteries into the battery compartment. Either move your Insignia TV with separate adhesive tape for an extended period of wall. (Screws are disposed of wall. Make sure that batteries are not provided.) ...
... screws for your universal remote control by identifying its model (or your TV. Using the remote control holder Your TV comes with a remote control holder you want to work with all Insignia TVs manufactured after Jan. 1, 2007) Universal remote control manufacturers and models Philips PHDVD5... the batteries leak, clean the battery compartment with the + and - 2 Insert two AA batteries into the battery compartment. Either move your Insignia TV with separate adhesive tape for an extended period of wall. (Screws are disposed of wall. Make sure that batteries are not provided.) ...
User Manual (English)
Page 13
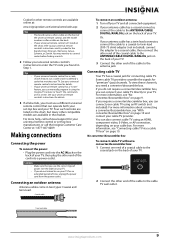
... TV. If you require a converter/descrambler box, you can manually program it using the Insignia TV remote to "teach" the commands one end of a coaxial cable to ...the coaxial jack on the back of your TV, then plug the other end of the cord into the AC IN jack on the back of your TV. 2 Connect the other end of the cable to use...you do not intend to the cable TV wall outlet. For more help, call the Insignia Customer Care Center at : www.insigniaproducts.com/universalcontrolcodes.aspx Tips • The brand name...
... TV. If you require a converter/descrambler box, you can manually program it using the Insignia TV remote to "teach" the commands one end of a coaxial cable to ...the coaxial jack on the back of your TV, then plug the other end of the cord into the AC IN jack on the back of your TV. 2 Connect the other end of the cable to use...you do not intend to the cable TV wall outlet. For more help, call the Insignia Customer Care Center at : www.insigniaproducts.com/universalcontrolcodes.aspx Tips • The brand name...
User Manual (English)
Page 14
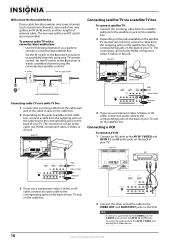
... position to the AV IN 1 VIDEO jack, unplug the S-Video device. 10 www.insigniaproducts.com To assign the audio jacks to watch scrambled channels using your TV. The connection can be to the corresponding jacks on the back of your TV remote control. Back of antenna cable. Back of TV...of the cable to the HDMI, component video, S-Video, or AV jack. Back of TV Satellite receiver HDMI Video or S-Video Component 3 If you use a component video, S-Video, or AV cable, connect an audio cable to the corresponding jacks on the back of your cable box descrambles only some ...
... position to the AV IN 1 VIDEO jack, unplug the S-Video device. 10 www.insigniaproducts.com To assign the audio jacks to watch scrambled channels using your TV. The connection can be to the corresponding jacks on the back of your TV remote control. Back of antenna cable. Back of TV...of the cable to the HDMI, component video, S-Video, or AV jack. Back of TV Satellite receiver HDMI Video or S-Video Component 3 If you use a component video, S-Video, or AV cable, connect an audio cable to the corresponding jacks on the back of your cable box descrambles only some ...
User Manual (English)
Page 15
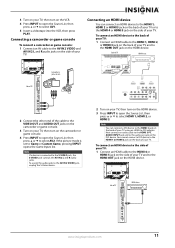
... a camcorder or game console: 1 Connect an AV cable to the AV IN 2 VIDEO and AV IN 2 L and R audio jacks on the side of your TV using an HDMI-to-DVI adapter. To connect an HDMI device to the back of your TV: 1 Connect an HDMI cable to the HDMI 1, HDMI 2, or...
... a camcorder or game console: 1 Connect an AV cable to the AV IN 2 VIDEO and AV IN 2 L and R audio jacks on the side of your TV using an HDMI-to-DVI adapter. To connect an HDMI device to the back of your TV: 1 Connect an HDMI cable to the HDMI 1, HDMI 2, or...
User Manual (English)
Page 18
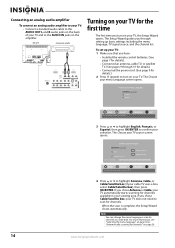
... English, Français, or Español, then press OK/ENTER to highlight Antenna, Cable, or Cable/Satellite box (if your cable TV uses a box, select Cable/Satellite box), then press OK/ENTER. If you chose Cable/Satellite box, your selection. If you chose Antenna or Cable, ...of your TV source Antenna Cable Cable/Satellite box 0 Analog Channels 0 Digital Channels Scan for channels MOVE OK ENTER SELECT MENU PREVIOUS Select Antenna If using an antenna for details.) 2 Press (power) to the AUDIO IN jacks on page 20. 14 www.insigniaproducts.com Choose your TV and to ...
... English, Français, or Español, then press OK/ENTER to highlight Antenna, Cable, or Cable/Satellite box (if your cable TV uses a box, select Cable/Satellite box), then press OK/ENTER. If you chose Cable/Satellite box, your selection. If you chose Antenna or Cable, ...of your TV source Antenna Cable Cable/Satellite box 0 Analog Channels 0 Digital Channels Scan for channels MOVE OK ENTER SELECT MENU PREVIOUS Select Antenna If using an antenna for details.) 2 Press (power) to the AUDIO IN jacks on page 20. 14 www.insigniaproducts.com Choose your TV and to ...
User Manual (English)
Page 19
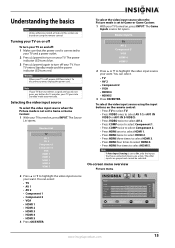
... input source when the Picture mode is not set to select AV 1(for 15 minutes, your want . To select the video input source using the input buttons on using the remote control. The Game Inputs source list opens. The power indicator LED turns blue. 3 Press (power) again to affect picture quality MENU...
... input source when the Picture mode is not set to select AV 1(for 15 minutes, your want . To select the video input source using the input buttons on using the remote control. The Game Inputs source list opens. The power indicator LED turns blue. 3 Press (power) again to affect picture quality MENU...
User Manual (English)
Page 21
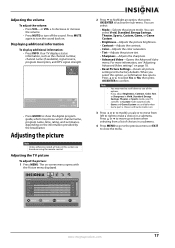
... to move from a list of choices in Vivid, Standard, Energy Savings, Theater, or Sports mode, your TV switches to see "Adjusting Advanced Video settings" on using the remote control. Adjusting the TV picture To adjust the picture: 1 Press MENU. www.insigniaproducts.com 17 Your TV displays status information, such as the...
... to move from a list of choices in Vivid, Standard, Energy Savings, Theater, or Sports mode, your TV switches to see "Adjusting Advanced Video settings" on using the remote control. Adjusting the TV picture To adjust the picture: 1 Press MENU. www.insigniaproducts.com 17 Your TV displays status information, such as the...
User Manual (English)
Page 22
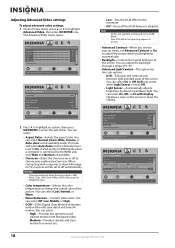
... Auto. You can select: • High-Provides the smoothest and clearest motion from film based video. • Medium-Provides smooth and clear motion for normal use. • Low-Sets the DCM effect to the minimum. • Off-Turns off automatically. Picture Advanced Video Color Temperature Noise Reduction DCM Advanced Contrast Backlight...
... Auto. You can select: • High-Provides the smoothest and clearest motion from film based video. • Medium-Provides smooth and clear motion for normal use. • Low-Sets the DCM effect to the minimum. • Off-Turns off automatically. Picture Advanced Video Color Temperature Noise Reduction DCM Advanced Contrast Backlight...
User Manual (English)
Page 23
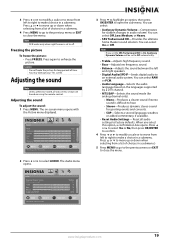
..., weather, or added commentary, if available. • Reset Audio Settings- You can select On or Off. Note If you select this section are based on using the remote control. Freezing the picture To freeze the picture: • Press FREEZE. Press again to an external audio system. Note DCR works only when...
..., weather, or added commentary, if available. • Reset Audio Settings- You can select On or Off. Note If you select this section are based on using the remote control. Freezing the picture To freeze the picture: • Press FREEZE. Press again to an external audio system. Note DCR works only when...

