
Firmware Installation Guide (English)
Page 1
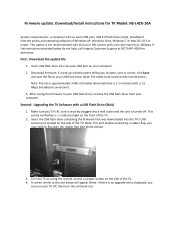
...covered by a red indicator light on your TV off . you to the one below do not help, call Insignia Customer Support at (877) 467‐4289 for TV Model: NS‐L42X‐10A System requirements: a computer with an open USB port on the front of the TV. 4. if a pop&#...flash drive containing the firmware that was downloaded into a wall outlet and the unit is turned off , then turn your computer. 2. Download firmware; A screen similar to open the rubber flap (See photo below). 3. If the instructions provided below will appear (Note: if there is not recommended with a ...
...covered by a red indicator light on your TV off . you to the one below do not help, call Insignia Customer Support at (877) 467‐4289 for TV Model: NS‐L42X‐10A System requirements: a computer with an open USB port on the front of the TV. 4. if a pop&#...flash drive containing the firmware that was downloaded into a wall outlet and the unit is turned off , then turn your computer. 2. Download firmware; A screen similar to open the rubber flap (See photo below). 3. If the instructions provided below will appear (Note: if there is not recommended with a ...
Firmware Installation Guide (English)
Page 2
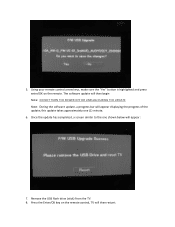
Press the Enter/OK key on the remote. The software update will then begin Note: DO NOT TURN THE POWER OFF OR UNPLUG DURING THE UPDATE Note: During the software update, a progress bar will appear: 7. Once the update has completed, a screen similar to the one (1) minute. 6. this update takes approximately one shown below will appear displaying the progress of the update; Remove the USB flash drive (stick) from the TV. 8. Using your remote control arrow keys, make sure the "Yes" button is highlighted and press enter/OK on the remote control, TV will then restart. 5.
Press the Enter/OK key on the remote. The software update will then begin Note: DO NOT TURN THE POWER OFF OR UNPLUG DURING THE UPDATE Note: During the software update, a progress bar will appear: 7. Once the update has completed, a screen similar to the one (1) minute. 6. this update takes approximately one shown below will appear displaying the progress of the update; Remove the USB flash drive (stick) from the TV. 8. Using your remote control arrow keys, make sure the "Yes" button is highlighted and press enter/OK on the remote control, TV will then restart. 5.

Warranty (English)
Page 1
...as the original packaging. www.insigniaproducts.com 1 The Warranty Period lasts for a television with a screen 30 inches or larger, call , an Insignia television (size and features to be determined by Insignia) will be defective by this warranty that requires service, terms of this warranty apply. Make .... How to obtain warranty service? This Product must pay all labor and parts charges. What does this warranty become the property of Insignia and are required after the Warranty Period expires, you must be free of defects in -home warranty service for 2 years (730 ...
...as the original packaging. www.insigniaproducts.com 1 The Warranty Period lasts for a television with a screen 30 inches or larger, call , an Insignia television (size and features to be determined by Insignia) will be defective by this warranty that requires service, terms of this warranty apply. Make .... How to obtain warranty service? This Product must pay all labor and parts charges. What does this warranty become the property of Insignia and are required after the Warranty Period expires, you must be free of defects in -home warranty service for 2 years (730 ...
User Manual (English)
Page 3
... your TV for the first time 14 Understanding the basics 15 Turning your TV on or off 15 Selecting the video input source 15 On-screen menu overview 15 Navigating the menus 16 Selecting a channel 16 Adjusting the volume 17 Displaying additional information 17 Adjusting the picture 17 Adjusting the TV...
... your TV for the first time 14 Understanding the basics 15 Turning your TV on or off 15 Selecting the video input source 15 On-screen menu overview 15 Navigating the menus 16 Selecting a channel 16 Adjusting the volume 17 Displaying additional information 17 Adjusting the picture 17 Adjusting the TV...
User Manual (English)
Page 4
...sleep timer 29 Adjusting menu settings 30 Selecting the menu language 30 Changing the menu transparency 30 Labeling an input source 31 Adjusting the INSIGNIA logo brightness 32 Turning Auto Input Sensing on or off 32 Resetting settings to the defaults 33 Programming your remote control 33 Troubleshooting ...remote control programming 37 Manufacturers' codes 37 Maintaining 49 Cleaning the TV cabinet 49 Cleaning the TV screen 49 Troubleshooting 49 Specifications 50 Legal notices 51 Two-year limited warranty 53 ii www.insigniaproducts.com
...sleep timer 29 Adjusting menu settings 30 Selecting the menu language 30 Changing the menu transparency 30 Labeling an input source 31 Adjusting the INSIGNIA logo brightness 32 Turning Auto Input Sensing on or off 32 Resetting settings to the defaults 33 Programming your remote control 33 Troubleshooting ...remote control programming 37 Manufacturers' codes 37 Maintaining 49 Cleaning the TV cabinet 49 Cleaning the TV screen 49 Troubleshooting 49 Specifications 50 Legal notices 51 Two-year limited warranty 53 ii www.insigniaproducts.com
User Manual (English)
Page 6
... device, ask the service technician to perform routine safety checks to qualified service personnel. Handling the LCD panel • Your TV's screen is a Class I apparatus which needs to be fatal. Replacement parts When replacement parts are provided for long periods of time, unplug...important operating and maintenance instructions in your eyes or touches your skin, consult with them might be grounded to qualified service technicians. If the screen breaks, be taken to rain or moisture. Also, if the liquid gets in the literature accompanying your TV. 1 Read these instructions....
... device, ask the service technician to perform routine safety checks to qualified service personnel. Handling the LCD panel • Your TV's screen is a Class I apparatus which needs to be fatal. Replacement parts When replacement parts are provided for long periods of time, unplug...important operating and maintenance instructions in your eyes or touches your skin, consult with them might be grounded to qualified service technicians. If the screen breaks, be taken to rain or moisture. Also, if the liquid gets in the literature accompanying your TV. 1 Read these instructions....
User Manual (English)
Page 8
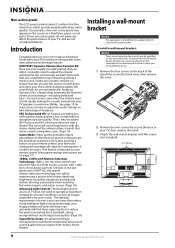
...servicing other than others. To install a wall-mount bracket: Warning These servicing instructions are on the screen as exceptional picture quality. SRS TruSurround HD: At Insignia, providing you will automatically adjust for all images projected onto your TV, then remove the stand. 3...Page 18) Advanced Light Control: The backlight used in the last generation of Audyssey. Using intelligent light sensing technology, your Insignia Advanced Series television can automatically find these opportunities to be experiencing a picture with superior audio quality is a feature that you are...
...servicing other than others. To install a wall-mount bracket: Warning These servicing instructions are on the screen as exceptional picture quality. SRS TruSurround HD: At Insignia, providing you will automatically adjust for all images projected onto your TV, then remove the stand. 3...Page 18) Advanced Light Control: The backlight used in the last generation of Audyssey. Using intelligent light sensing technology, your Insignia Advanced Series television can automatically find these opportunities to be experiencing a picture with superior audio quality is a feature that you are...
User Manual (English)
Page 9
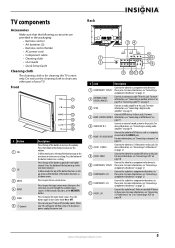
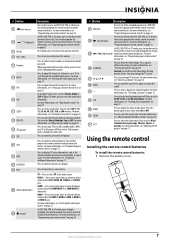
... antenna or cable TV to these jacks. For more information, see "Connecting a computer" on page 12. 10 COMPONENT 2 L/R Connect the audio for cleaning the TV screen only. For more information, see "Connecting a VCR" on page 10. Front 1 2 3 4 GAME 5 6 # Button 1 VOL 2 CH 3 MENU 4 INPUT 5 ...DVI device, such as the OK/ENTER button. For more 4 HDMI 1/HDMI 2/HDMI 3 information, see "Connecting a component video device" on -screen menu. Press to open the input source menu, then press the arrow keys to this jack. Press to increase a setting. For more information, see...
... antenna or cable TV to these jacks. For more information, see "Connecting a computer" on page 12. 10 COMPONENT 2 L/R Connect the audio for cleaning the TV screen only. For more information, see "Connecting a VCR" on page 10. Front 1 2 3 4 GAME 5 6 # Button 1 VOL 2 CH 3 MENU 4 INPUT 5 ...DVI device, such as the OK/ENTER button. For more 4 HDMI 1/HDMI 2/HDMI 3 information, see "Connecting a component video device" on -screen menu. Press to open the input source menu, then press the arrow keys to this jack. Press to increase a setting. For more information, see...
User Manual (English)
Page 10
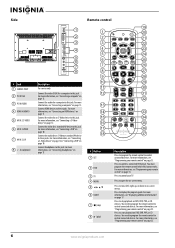
... AV IN 2 S-VIDEO 6 AV IN 2 VIDEO 7 AV IN 2 L/R 8 (headphone) 1 2 3 4 5 6 7 8 Description For service only. Press to move left, right, up, or down in on -screen menu. Press to control connected devices. You need to program the remote control to control connected devices. For more information, see "Programming your TV. Press... HDMI 25 7 26 8 27 9 28 10 29 11 30 12 31 32 13 14 33 15 34 16 GAME 35 DYN VOL 17 36 18 NS-RC02U-10A 37 # Button 1 SET 2 DVD 3 TV 4 MENU 5 6 GUIDE 7 (stop playback on DVD, DVR, PVR, or CD devices. Connect the audio ...
... AV IN 2 S-VIDEO 6 AV IN 2 VIDEO 7 AV IN 2 L/R 8 (headphone) 1 2 3 4 5 6 7 8 Description For service only. Press to move left, right, up, or down in on -screen menu. Press to control connected devices. You need to program the remote control to control connected devices. For more information, see "Programming your TV. Press... HDMI 25 7 26 8 27 9 28 10 29 11 30 12 31 32 13 14 33 15 34 16 GAME 35 DYN VOL 17 36 18 NS-RC02U-10A 37 # Button 1 SET 2 DVD 3 TV 4 MENU 5 6 GUIDE 7 (stop playback on DVD, DVR, PVR, or CD devices. Connect the audio ...
User Manual (English)
Page 11
... captioning" on page 33. Caution: Do not freeze the video image for Audyssey Dynamic Volume. For more information, see "Adjusting the sound" on -screen menu. Press again to confirm selections or changes. For more information, see "Programming your TV is off . For more information, see "Selecting a ..."Selecting the video input source" on page 33. You need to program the remote control to control connected devices. You may damage the TV screen. 31 CH /CH Press to begin recording. You can select Heavy, Medium, Low, or Off. You need to program the remote control...
... captioning" on page 33. Caution: Do not freeze the video image for Audyssey Dynamic Volume. For more information, see "Adjusting the sound" on -screen menu. Press again to confirm selections or changes. For more information, see "Programming your TV is off . For more information, see "Selecting a ..."Selecting the video input source" on page 33. You need to program the remote control to control connected devices. You may damage the TV screen. 31 CH /CH Press to begin recording. You can select Heavy, Medium, Low, or Off. You need to program the remote control...
User Manual (English)
Page 18
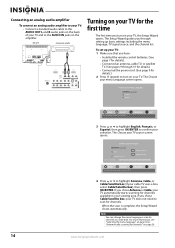
...PREVIOUS EXIT EXIT 3 Press or to highlight English, Français, or Español, then press OK/ENTER to confirm your menu Language screen opens. When the scan is complete, the Setup Wizard closes automatically. The Choose your TV does not need to scan for channels. If you ...chose Cable/Satellite box, your TV source screen opens. If you turn on your TV. For more information, see "Selecting the menu language" on page 30 or "Automatically scanning for channels available...
...PREVIOUS EXIT EXIT 3 Press or to highlight English, Français, or Español, then press OK/ENTER to confirm your menu Language screen opens. When the scan is complete, the Setup Wizard closes automatically. The Choose your TV does not need to scan for channels. If you ...chose Cable/Satellite box, your TV source screen opens. If you turn on your TV. For more information, see "Selecting the menu language" on page 30 or "Automatically scanning for channels available...
User Manual (English)
Page 19
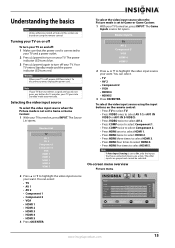
... inputs are based on , press INPUT. Understanding the basics Note Unless otherwise noted, all tasks in this section are grayed and cannot be selected. On-screen menu overview Picture menu Picture Mode Brightness Contrast Color Tint Sharpness PICTURE AUDIO CHANNELS SETTINGS Vivid 42 45 54 0 +5 MOVE OK ENTER SELECT Adjust settings...
... inputs are based on , press INPUT. Understanding the basics Note Unless otherwise noted, all tasks in this section are grayed and cannot be selected. On-screen menu overview Picture menu Picture Mode Brightness Contrast Color Tint Sharpness PICTURE AUDIO CHANNELS SETTINGS Vivid 42 45 54 0 +5 MOVE OK ENTER SELECT Adjust settings...
User Manual (English)
Page 20
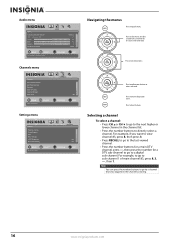
... a DTV sub-channel to go to directly select a channel. Press to select menus, to adjust selected items, or to the previous screen. Press to return to move the on-screen cursor left or right. For example, to go to the next higher or lower channel in the channel list. • Press the...
... a DTV sub-channel to go to directly select a channel. Press to select menus, to adjust selected items, or to the previous screen. Press to return to move the on-screen cursor left or right. For example, to go to the next higher or lower channel in the channel list. • Press the...
User Manual (English)
Page 21
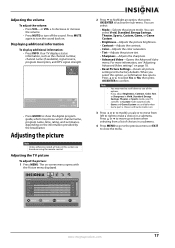
..." on the information provided by the broadcaster. The on using the remote control. Press MUTE again to confirm. Game and Game Custom are based on -screen menu opens with the Picture menu displayed. Adjusting the volume To adjust the volume: • Press VOL - Displaying additional information To display additional information: •...
..." on the information provided by the broadcaster. The on using the remote control. Press MUTE again to confirm. Game and Game Custom are based on -screen menu opens with the Picture menu displayed. Adjusting the volume To adjust the volume: • Press VOL - Displaying additional information To display additional information: •...
User Manual (English)
Page 22
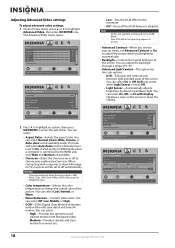
... Auto Zoom on TV, overscan will be set to adjust the picture detail and brightness automatically. • Backlight-Controls the overall brilliance of the screen. You can select Off, Low, Middle, or High. • DCM-DCM (Digital Clear Motion) eliminates motion blur with computer to choose your...SETTINGS On Cool Off Off On With Display 21 MOVE OK ENTER SELECT MENU PREVIOUS Enhance contrast ratio between light and dark areas of the screen. You can select: • High-Provides the smoothest and clearest motion from film based video. • Medium-Provides smooth and clear ...
... Auto Zoom on TV, overscan will be set to adjust the picture detail and brightness automatically. • Backlight-Controls the overall brilliance of the screen. You can select Off, Low, Middle, or High. • DCM-DCM (Digital Clear Motion) eliminates motion blur with computer to choose your...SETTINGS On Cool Off Off On With Display 21 MOVE OK ENTER SELECT MENU PREVIOUS Enhance contrast ratio between light and dark areas of the screen. You can select: • High-Provides the smoothest and clearest motion from film based video. • Medium-Provides smooth and clear ...
User Manual (English)
Page 23
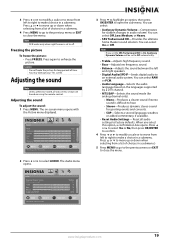
... from a list of choices in a submenu.) 5 Press MENU to go to the previous menu or EXIT to close the menu. You may damage your TV's screen. When you set the SRS TruSurround HD to On, Audyssey Dynamic Volume will be set to off. Note If you select this section are based... on -screen menu opens with the Picture menu displayed. Press or to move from a list of time. Freezing the picture To freeze the picture: • Press FREEZE...
... from a list of choices in a submenu.) 5 Press MENU to go to the previous menu or EXIT to close the menu. You may damage your TV's screen. When you set the SRS TruSurround HD to On, Audyssey Dynamic Volume will be set to off. Note If you select this section are based... on -screen menu opens with the Picture menu displayed. Press or to move from a list of time. Freezing the picture To freeze the picture: • Press FREEZE...
User Manual (English)
Page 24
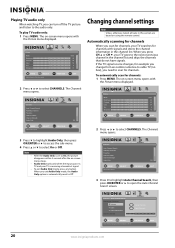
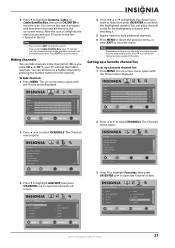
... SELECT Adjust channel options MENU PREVIOUS EXIT EXIT Changing channel settings Note Unless otherwise noted, all tasks in this section are based on -screen menu closes. • Audio Only works only when the input source is automatically reset to On, the picture disappears within 5 seconds ...scan for channels MOVE OK ENTER SELECT MENU PREVIOUS Select Antenna if using the remote control. The on -screen menu opens with the Picture menu displayed. The on -screen menu opens with signals and stores the channel information in the channel list. Playing TV audio only When watching...
... SELECT Adjust channel options MENU PREVIOUS EXIT EXIT Changing channel settings Note Unless otherwise noted, all tasks in this section are based on -screen menu closes. • Audio Only works only when the input source is automatically reset to On, the picture disappears within 5 seconds ...scan for channels MOVE OK ENTER SELECT MENU PREVIOUS Select Antenna if using the remote control. The on -screen menu opens with the Picture menu displayed. The on -screen menu opens with signals and stores the channel information in the channel list. Playing TV audio only When watching...
User Manual (English)
Page 25
...channels are found in your TV will skip the hidden channels. The Channels menu opens. 2 Press or to stop the search. Note Depending on -screen menu opens with the Picture menu displayed. Channels Add/Skip Channel PICTURE AUDIO CHANNELS SETTINGS Ch 5-0 Ch 9-1 WWOR DT Ch 10-0 Ch 60-2 ...complete, the menu closes and your TV will not scan for the channel. Press EXIT to the first channel in the channel list. The on -screen menu. Setting up a favorite channel list To set up a favorite channel list: 1 Press MENU. Picture Mode Brightness Contrast Color Tint Sharpness PICTURE ...
...channels are found in your TV will skip the hidden channels. The Channels menu opens. 2 Press or to stop the search. Note Depending on -screen menu opens with the Picture menu displayed. Channels Add/Skip Channel PICTURE AUDIO CHANNELS SETTINGS Ch 5-0 Ch 9-1 WWOR DT Ch 10-0 Ch 60-2 ...complete, the menu closes and your TV will not scan for the channel. Press EXIT to the first channel in the channel list. The on -screen menu. Setting up a favorite channel list To set up a favorite channel list: 1 Press MENU. Picture Mode Brightness Contrast Color Tint Sharpness PICTURE ...
User Manual (English)
Page 26
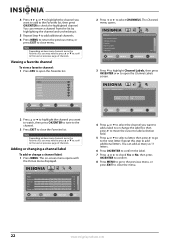
... OK ENTER SELECT Adjust channel options MENU PREVIOUS EXIT EXIT 3 Press to highlight Channel Labels, then press OK/ENTER or to open the Channel Labels screen. Viewing a favorite channel To view a favorite channel: 1 Press FAV to open the Favorites list. Adding or changing a channel label To add or change the label... on how many as many channels are in the Favorites list, you may need to press or to scroll to close menu. Note Depending on -screen menu opens with the Picture menu displayed.
... OK ENTER SELECT Adjust channel options MENU PREVIOUS EXIT EXIT 3 Press to highlight Channel Labels, then press OK/ENTER or to open the Channel Labels screen. Viewing a favorite channel To view a favorite channel: 1 Press FAV to open the Favorites list. Adding or changing a channel label To add or change the label... on how many as many channels are in the Favorites list, you may need to press or to scroll to close menu. Note Depending on -screen menu opens with the Picture menu displayed.

User Manual (English)
Page 27
...parental controls Note Unless otherwise noted, all tasks in this section are tuned to a DTV channel, you should set controls for both ratings. The on -screen menu opens with the Picture menu displayed. To set up a password: 1 Press MENU. Channel Strength CH 7-3 Now 0% 0 MOVE OK ENTER SELECT Display ...signal strength of programs your children can press INFO to see the DTV signal strength. 2 Press or to close the menu. The on -screen menu opens with the Picture menu displayed. Setting or changing the password Your TV has a V-chip that lets you need to select CHANNELS. ...
...parental controls Note Unless otherwise noted, all tasks in this section are tuned to a DTV channel, you should set controls for both ratings. The on -screen menu opens with the Picture menu displayed. To set up a password: 1 Press MENU. Channel Strength CH 7-3 Now 0% 0 MOVE OK ENTER SELECT Display ...signal strength of programs your children can press INFO to see the DTV signal strength. 2 Press or to close the menu. The on -screen menu opens with the Picture menu displayed. Setting or changing the password Your TV has a V-chip that lets you need to select CHANNELS. ...


