
Firmware Installation Guide (English)
Page 1
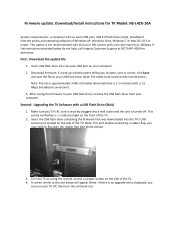
... to open, save or cancel, click Save and save the file to the one below do not help, call Insignia Customer Support at (877) 467‐4289 for TV Model: NS‐L42X‐10A System requirements: a computer with an open the rubber flap (See photo below). 3. This can turn the unit back... on your computer. Note: This port maybe covered by a rubber flap, you can be saved on the front of Windows XP, Windows Vista, Windows 7 or Mac OS 10.3 or...
... to open, save or cancel, click Save and save the file to the one below do not help, call Insignia Customer Support at (877) 467‐4289 for TV Model: NS‐L42X‐10A System requirements: a computer with an open the rubber flap (See photo below). 3. This can turn the unit back... on your computer. Note: This port maybe covered by a rubber flap, you can be saved on the front of Windows XP, Windows Vista, Windows 7 or Mac OS 10.3 or...
User Manual (English)
Page 3
... to work with your TV . . . . 8 Making connections 9 Connecting the power 9 Connecting an outdoor antenna 9 Connecting cable TV 9 Connecting satellite TV via a satellite TV box 10 Connecting a VCR 10 Connecting a camcorder or game console 11 Connecting an HDMI device 11 Connecting a component video device 12 Connecting a S-Video device 12 Connecting a computer 13 Connecting...
... to work with your TV . . . . 8 Making connections 9 Connecting the power 9 Connecting an outdoor antenna 9 Connecting cable TV 9 Connecting satellite TV via a satellite TV box 10 Connecting a VCR 10 Connecting a camcorder or game console 11 Connecting an HDMI device 11 Connecting a component video device 12 Connecting a S-Video device 12 Connecting a computer 13 Connecting...
User Manual (English)
Page 6
... fire or electric shock, do not touch the liquid in your device receiver during lightning storms or when unused for replacement of the obsolete outlet. 10 Protect the power cord from the apparatus. 11 Only use attachments/accessories specified by the manufacturer. 12 Use only with a cart, stand, tripod, bracket, or...
... fire or electric shock, do not touch the liquid in your device receiver during lightning storms or when unused for replacement of the obsolete outlet. 10 Protect the power cord from the apparatus. 11 Only use attachments/accessories specified by the manufacturer. 12 Use only with a cart, stand, tripod, bracket, or...
User Manual (English)
Page 9
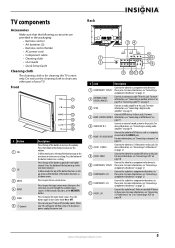
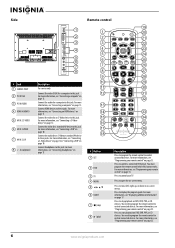
...device to these jacks. For more information, see "Connecting a S-Video device" on page 14. For more information, see "Connecting a component video device" on page 10. Front 1 2 3 4 GAME 5 6 # Button 1 VOL 2 CH 3 MENU 4 INPUT 5 GAME 6 (power) Description Press the top of the ...• User Guide • Quick Setup Guide Cleaning cloth The cleaning cloth is off (standby mode). Back 34 5 1 6 2 7 8 9 10 11 12 # Jack Description Connect the video for cleaning the TV screen only. For more information, see "Connecting an outdoor antenna" on page 9 or ...
...device to these jacks. For more information, see "Connecting a S-Video device" on page 14. For more information, see "Connecting a component video device" on page 10. Front 1 2 3 4 GAME 5 6 # Button 1 VOL 2 CH 3 MENU 4 INPUT 5 GAME 6 (power) Description Press the top of the ...• User Guide • Quick Setup Guide Cleaning cloth The cleaning cloth is off (standby mode). Back 34 5 1 6 2 7 8 9 10 11 12 # Jack Description Connect the video for cleaning the TV screen only. For more information, see "Connecting an outdoor antenna" on page 9 or ...
User Manual (English)
Page 10
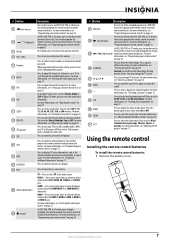
... more information, see "Connecting a computer" on page 17. For more information, see "Connecting a S-Video device" on page 12 or "Connecting a VCR" on page 10. Connect headphones to control a connected DVD player. Press to this jack. You must program the remote control before this jack. You need to program the... 19 1 20 2 21 3 22 4 23 5 24 6 TV VIDEO COMP HDMI 25 7 26 8 27 9 28 10 29 11 30 12 31 32 13 14 33 15 34 16 GAME 35 DYN VOL 17 36 18 NS-RC02U-10A 37 # Button 1 SET 2 DVD 3 TV 4 MENU 5 6 GUIDE 7 (stop playback on DVD, DVR, PVR, ...
... more information, see "Connecting a computer" on page 17. For more information, see "Connecting a S-Video device" on page 12 or "Connecting a VCR" on page 10. Connect headphones to control a connected DVD player. Press to this jack. You must program the remote control before this jack. You need to program the... 19 1 20 2 21 3 22 4 23 5 24 6 TV VIDEO COMP HDMI 25 7 26 8 27 9 28 10 29 11 30 12 31 32 13 14 33 15 34 16 GAME 35 DYN VOL 17 36 18 NS-RC02U-10A 37 # Button 1 SET 2 DVD 3 TV 4 MENU 5 6 GUIDE 7 (stop playback on DVD, DVR, PVR, ...
User Manual (English)
Page 11
# Button 9 (fast reverse) 10 / (skip back) 11 RECALL 12 VOL+/VOL- 13 Numbers 14 INPUT 15 FAV 16 SAP 17 SLEEP 18 DYN VOL 19 (power) 20 STB 21 ... CD devices. For more information, see "Programming your remote control" on page 19. You can select Heavy, Medium, Low, or Off. You can select Off, 5, 10, 15, 30, 60, 90, 120, 180, or 240 minutes. Press to turn Game mode On or Off. 36 ZOOM Press to list all the recorded...
# Button 9 (fast reverse) 10 / (skip back) 11 RECALL 12 VOL+/VOL- 13 Numbers 14 INPUT 15 FAV 16 SAP 17 SLEEP 18 DYN VOL 19 (power) 20 STB 21 ... CD devices. For more information, see "Programming your remote control" on page 19. You can select Heavy, Medium, Low, or Off. You can select Off, 5, 10, 15, 30, 60, 90, 120, 180, or 240 minutes. Press to turn Game mode On or Off. 36 ZOOM Press to list all the recorded...
User Manual (English)
Page 13
...cable TV provider. To view these channels, you need to the antenna jack. For more information, see "No converter/descrambler box" on page 10. For more information about connecting a converter/descrambler box, see "With converter/descrambler box" on the chart, but many other compatible models are ...TV. If you must use the correct type of time, unplug the power cord from the power outlet. For more help, call the Insignia Customer Care Center at : www.insigniaproducts.com/universalcontrolcodes.aspx Tips • The brand name is often visible on the front of the universal...
...cable TV provider. To view these channels, you need to the antenna jack. For more information, see "No converter/descrambler box" on page 10. For more information about connecting a converter/descrambler box, see "With converter/descrambler box" on the chart, but many other compatible models are ...TV. If you must use the correct type of time, unplug the power cord from the power outlet. For more help, call the Insignia Customer Care Center at : www.insigniaproducts.com/universalcontrolcodes.aspx Tips • The brand name is often visible on the front of the universal...
User Manual (English)
Page 14
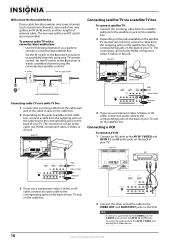
... on the back of your TV. Set the RF switch to the A position to tune to the AV IN 1 VIDEO jack, unplug the S-Video device. 10 www.insigniaproducts.com Back of TV VCR HDMI Video or S-Video Component 3 If you need a two-way splitter, an RF (A/B) switch, and four lengths of...
... on the back of your TV. Set the RF switch to the A position to tune to the AV IN 1 VIDEO jack, unplug the S-Video device. 10 www.insigniaproducts.com Back of TV VCR HDMI Video or S-Video Component 3 If you need a two-way splitter, an RF (A/B) switch, and four lengths of...
User Manual (English)
Page 18
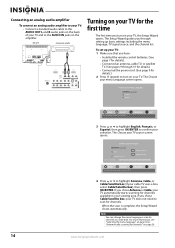
... that you have: • Installed the remote control batteries. (See page 7 for details). • Connected an antenna, cable TV, or satellite TV. (See pages 9 through 10 for details.) • Connected the power cord. (See page 9 for details.) 2 Press (power) to turn on your TV, the Setup Wizard opens. If you chose...
... that you have: • Installed the remote control batteries. (See page 7 for details). • Connected an antenna, cable TV, or satellite TV. (See pages 9 through 10 for details.) • Connected the power cord. (See page 9 for details.) 2 Press (power) to turn on your TV, the Setup Wizard opens. If you chose...
User Manual (English)
Page 25
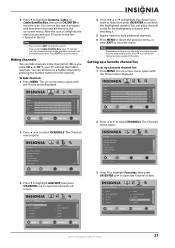
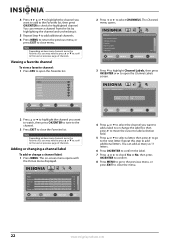
... to the first channel in the channel list. The Channels menu opens. Channels Add/Skip Channel PICTURE AUDIO CHANNELS SETTINGS Ch 5-0 Ch 9-1 WWOR DT Ch 10-0 Ch 60-2 Ch 60-4 Ch 9-0 Ch 9-2 WNYW DT Ch 60-1 Ch 60-3 Ch 60-7 MOVE OK ENTER SELECT MENU PREVIOUS Manually add and skip channels..., or press EXIT to start the scan. If you press CH or CH , your program list EXIT EXIT Channels Favorites Ch 5-0 Ch 9-1 WWOR DT Ch 10-0 Ch 60-2 Ch 60-4 PICTURE AUDIO CHANNELS SETTINGS Ch 9-0 Ch 9-2 WNYW DT Ch 60-1 Ch 60-3 Ch 60-7 MOVE OK ENTER SELECT Add channels to...
... to the first channel in the channel list. The Channels menu opens. Channels Add/Skip Channel PICTURE AUDIO CHANNELS SETTINGS Ch 5-0 Ch 9-1 WWOR DT Ch 10-0 Ch 60-2 Ch 60-4 Ch 9-0 Ch 9-2 WNYW DT Ch 60-1 Ch 60-3 Ch 60-7 MOVE OK ENTER SELECT MENU PREVIOUS Manually add and skip channels..., or press EXIT to start the scan. If you press CH or CH , your program list EXIT EXIT Channels Favorites Ch 5-0 Ch 9-1 WWOR DT Ch 10-0 Ch 60-2 Ch 60-4 PICTURE AUDIO CHANNELS SETTINGS Ch 9-0 Ch 9-2 WNYW DT Ch 60-1 Ch 60-3 Ch 60-7 MOVE OK ENTER SELECT Add channels to...
User Manual (English)
Page 26
Favorites Ch 5-0 Ch 10-0 Ch 60-3 Ch 60-8 Ch 60-11 Ch 60-12 MOVE OK ENTER SELECT Add channels to create a favorites list MENU PREVIOUS EXIT EXIT 2 Press ...
Favorites Ch 5-0 Ch 10-0 Ch 60-3 Ch 60-8 Ch 60-11 Ch 60-12 MOVE OK ENTER SELECT Add channels to create a favorites list MENU PREVIOUS EXIT EXIT 2 Press ...
User Manual (English)
Page 34
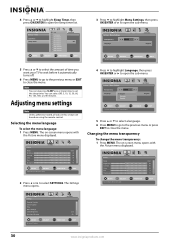
... ENTER SELECT Adjust settings to affect picture quality MENU PREVIOUS EXIT EXIT 2 Press or to set the sleep timer. Note You can select Off, 5, 10, 15, 30, 60, 90, 120, 180, or 240 minutes. Selecting the menu language To select the menu language: 1 Press MENU. The ...Changing the menu transparency To change the menu transparency: 1 Press MENU. Settings Time Date/Time Sleep Timer PICTUREOff AUDIO CHANNELS SETTINGS 5 minutes 10 minutes 15 minutes 30 minutes Off 60 minutes 90 minutes 120 minutes 180 minutes 240 minutes MOVE OK ENTER SELECT MENU PREVIOUS EXIT EXIT Settings...
... ENTER SELECT Adjust settings to affect picture quality MENU PREVIOUS EXIT EXIT 2 Press or to set the sleep timer. Note You can select Off, 5, 10, 15, 30, 60, 90, 120, 180, or 240 minutes. Selecting the menu language To select the menu language: 1 Press MENU. The ...Changing the menu transparency To change the menu transparency: 1 Press MENU. Settings Time Date/Time Sleep Timer PICTUREOff AUDIO CHANNELS SETTINGS 5 minutes 10 minutes 15 minutes 30 minutes Off 60 minutes 90 minutes 120 minutes 180 minutes 240 minutes MOVE OK ENTER SELECT MENU PREVIOUS EXIT EXIT Settings...
User Manual (English)
Page 38
... above . To find out which code is ready to the key (see "Troubleshooting remote control programming" on . 2 Press and hold SET until the Insignia's LED blinks twice. Also, locate the key (on the remote you want , press and hold SET until the LED blinks twice, then release. ...displays one long blink, a learning error has occurred. The feedback LED stays lit for the device you select. Note If more than 10 seconds pass between key presses, the remote exits programming. In either your batteries are not learnable, including multi-frequency types, some considerations to...
... above . To find out which code is ready to the key (see "Troubleshooting remote control programming" on . 2 Press and hold SET until the Insignia's LED blinks twice. Also, locate the key (on the remote you want , press and hold SET until the LED blinks twice, then release. ...displays one long blink, a learning error has occurred. The feedback LED stays lit for the device you select. Note If more than 10 seconds pass between key presses, the remote exits programming. In either your batteries are not learnable, including multi-frequency types, some considerations to...
User Manual (English)
Page 39
... mode LED blinks twice. 3 Press CH once. Note Do not use for example, TV). 4 The LED blinks twice. Changing volume lock The Insignia universal remote control comes preset to move additional keys. To lock volume control to another mode (such as a source or destination key. Deleting all ... batteries are 1 through one mode (such as source mode) to one device's volume controls volume in a specific mode Note If more than 10 seconds pass between key presses, the remote exits programming. To unlock a single device's volume control: 1 Press the desired device mode key (...
... mode LED blinks twice. 3 Press CH once. Note Do not use for example, TV). 4 The LED blinks twice. Changing volume lock The Insignia universal remote control comes preset to move additional keys. To lock volume control to another mode (such as a source or destination key. Deleting all ... batteries are 1 through one mode (such as source mode) to one device's volume controls volume in a specific mode Note If more than 10 seconds pass between key presses, the remote exits programming. To unlock a single device's volume control: 1 Press the desired device mode key (...


