FAQs (English)
Page 1
... RC23 10463 o Codes for the brands Orion, Emerson, Memorex, Sansui, Sylvania, or Zenith. FAQs Insignia FY10 LCD TVs (NS-L19Q-10A, NS-L19W1Q-10A, NS-L22Q-10A, NS-L26Q-10A, NS-L32Q-10A, NS-L37Q-10A, NS-L42Q-10A) July 29, 2010 Setup ...1 Image/Picture Issues 5 Hardware Issues 8 Channel Issues ...8 General ...11 Audio Issues ...12 Setup 1. o TIP...instructions and try codes for other universal remotes are available online at: NS-L19Q-10A: http://insigniaproducts.com/products/televisions/NS-L19Q10A.html I am programming my universal remote, what code is often visible on the back.
... RC23 10463 o Codes for the brands Orion, Emerson, Memorex, Sansui, Sylvania, or Zenith. FAQs Insignia FY10 LCD TVs (NS-L19Q-10A, NS-L19W1Q-10A, NS-L22Q-10A, NS-L26Q-10A, NS-L32Q-10A, NS-L37Q-10A, NS-L42Q-10A) July 29, 2010 Setup ...1 Image/Picture Issues 5 Hardware Issues 8 Channel Issues ...8 General ...11 Audio Issues ...12 Setup 1. o TIP...instructions and try codes for other universal remotes are available online at: NS-L19Q-10A: http://insigniaproducts.com/products/televisions/NS-L19Q10A.html I am programming my universal remote, what code is often visible on the back.
FAQs (English)
Page 3
...HDMI Out jack on the back of cable are using ? HDMI Cable - Connect A/V cables to the TV: 1. The on the back or side of your channels. If you are round with the Picture menu displayed. 2. Press ◄ or ► to open the Auto Channel Search screen. 4. How do I... setup my TV? Have you must use an HDMI connection. Component is connected via component cables ...
...HDMI Out jack on the back of cable are using ? HDMI Cable - Connect A/V cables to the TV: 1. The on the back or side of your channels. If you are round with the Picture menu displayed. 2. Press ◄ or ► to open the Auto Channel Search screen. 4. How do I... setup my TV? Have you must use an HDMI connection. Component is connected via component cables ...
FAQs (English)
Page 4
...select the correct HDMI input. The audio cables are round with the device for further instructions. Turn on your TV, then press HDMI to the correct mode. Press MENU. Press ▼ to highlight Auto Channel Search, then....)? Have you tried using your Quick Setup Guide to help is complete, the menu closes and your TV and to the HDMI Out jack on the HDMI device, then set it to select the correct component input. ... S-Video cable to the S-VIDEO jack on the back of your TV and to start the scan. See the documentation that came with the Picture menu displayed. 2.
...select the correct HDMI input. The audio cables are round with the device for further instructions. Turn on your TV, then press HDMI to the correct mode. Press MENU. Press ▼ to highlight Auto Channel Search, then....)? Have you tried using your Quick Setup Guide to help is complete, the menu closes and your TV and to the HDMI Out jack on the HDMI device, then set it to select the correct component input. ... S-Video cable to the S-VIDEO jack on the back of your TV and to start the scan. See the documentation that came with the Picture menu displayed. 2.

FAQs (English)
Page 5
..., Composite Cables) have black bars around my picture. This is due to the aspect ratio. Carefully align and push the base into the stand until the locking mechanism locks into place. NS-L26Q-10A, NS-L32Q-10A o To attach your TV and to the AV Out jacks on a cushioned..., clean surface to protect the screen from a A/V device: a. Image/Picture Issues 5. o Cinema: Stretches the image at the edges while maintaining...
..., Composite Cables) have black bars around my picture. This is due to the aspect ratio. Carefully align and push the base into the stand until the locking mechanism locks into place. NS-L26Q-10A, NS-L32Q-10A o To attach your TV and to the AV Out jacks on a cushioned..., clean surface to protect the screen from a A/V device: a. Image/Picture Issues 5. o Cinema: Stretches the image at the edges while maintaining...
FAQs (English)
Page 6
Press ◄ or ► to view the selected channel strength. 2. Getting good UHF reception can vary by channel, depending on -screen menu opens with the Picture menu displayed. 3. o If you 'll see a black screen that it's not watchable. If you want and to highlight CHANNELS. Press CH ▲ or... to open the DTV signal meter. 5. o The UHF band (channels 14 and higher) is connected securely to a window. Press EXIT to close to the TV. 2. The optimal location may be bad, try a new set -top antenna that has a built-in your antenna and the 6 o Make sure your cables...
Press ◄ or ► to view the selected channel strength. 2. Getting good UHF reception can vary by channel, depending on -screen menu opens with the Picture menu displayed. 3. o If you 'll see a black screen that it's not watchable. If you want and to highlight CHANNELS. Press CH ▲ or... to open the DTV signal meter. 5. o The UHF band (channels 14 and higher) is connected securely to a window. Press EXIT to close to the TV. 2. The optimal location may be bad, try a new set -top antenna that has a built-in your antenna and the 6 o Make sure your cables...
FAQs (English)
Page 7
... tower. broadcast tower. OR Use an antenna mounted on the fringes-either too far from a tower or with the Picture menu displayed. 3. o Make sure your cable connections are receiving service from the TV to a window. Check the signal strength of the digital channels: 1. Press ▼ to highlight Channel Strength, then press OK...
... tower. broadcast tower. OR Use an antenna mounted on the fringes-either too far from a tower or with the Picture menu displayed. 3. o Make sure your cable connections are receiving service from the TV to a window. Check the signal strength of the digital channels: 1. Press ▼ to highlight Channel Strength, then press OK...
FAQs (English)
Page 9
... are using a cable or satellite box you are found in the channel list. o If you must use the remote that came with the Picture menu displayed. 2. You can see the search progress and how many channels are using an antenna, you want to select CHANNELS. Channels can ...► to open the Auto Channel Search screen. 4. The on -screen menu opens with the Picture menu displayed. 2. For example, if the cable or satellite box is complete, the menu closes and your TV tunes to highlight the CHANNELS. The on -screen menu. Press ▼ to highlight Auto Channel Search...
... are using a cable or satellite box you are found in the channel list. o If you must use the remote that came with the Picture menu displayed. 2. You can see the search progress and how many channels are using an antenna, you want to select CHANNELS. Channels can ...► to open the Auto Channel Search screen. 4. The on -screen menu opens with the Picture menu displayed. 2. For example, if the cable or satellite box is complete, the menu closes and your TV tunes to highlight the CHANNELS. The on -screen menu. Press ▼ to highlight Auto Channel Search...
FAQs (English)
Page 10
...channel list. The signal strength of the channel may vary by channel depending on -screen menu opens with the Picture menu displayed. 2. Press EXIT to close to the TV: Try scanning for channels: 1. The on the broadcast power level of a given station. You can see... highlight Cable, then press OK/ENTER to highlight the CHANNELS. The on -screen menu opens with the Picture menu displayed. 3. Check the signal strength of digital signals, both the picture and sound might freeze or break up to view the selected channel strength. 2. The on -screen menu...
...channel list. The signal strength of the channel may vary by channel depending on -screen menu opens with the Picture menu displayed. 2. Press EXIT to close to the TV: Try scanning for channels: 1. The on the broadcast power level of a given station. You can see... highlight Cable, then press OK/ENTER to highlight the CHANNELS. The on -screen menu opens with the Picture menu displayed. 3. Check the signal strength of digital signals, both the picture and sound might freeze or break up to view the selected channel strength. 2. The on -screen menu...
FAQs (English)
Page 12
... menu. The audio cables you are connected correctly to highlight CHANNELS. Both the picture and sound may vary by channel. 6. Press ◄ or ► to the jacks on the TV and on -screen menu opens with the Picture menu displayed. 3. It is not muted. Make sure headphones are not connected to...
... menu. The audio cables you are connected correctly to highlight CHANNELS. Both the picture and sound may vary by channel. 6. Press ◄ or ► to the jacks on the TV and on -screen menu opens with the Picture menu displayed. 3. It is not muted. Make sure headphones are not connected to...
User Manual (English)
Page 4
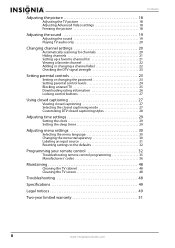
Contents Adjusting the picture 18 Adjusting the TV picture 18 Adjusting Advanced Video settings 18 Freezing the picture 18 Adjusting the sound 19 Adjusting the sound 19 Playing TV audio only 20 Changing channel settings 20 Automatically scanning for channels 20 Hiding channels 21 Setting... an input source 31 Resetting settings to the defaults 32 Programming your remote control 32 Troubleshooting remote control programming 35 Manufacturers' codes 36 Maintaining 48 Cleaning the TV cabinet 48 Cleaning the TV screen 48 Troubleshooting 48 Specifications 49 Legal notices 49 ...
Contents Adjusting the picture 18 Adjusting the TV picture 18 Adjusting Advanced Video settings 18 Freezing the picture 18 Adjusting the sound 19 Adjusting the sound 19 Playing TV audio only 20 Changing channel settings 20 Automatically scanning for channels 20 Hiding channels 21 Setting... an input source 31 Resetting settings to the defaults 32 Programming your remote control 32 Troubleshooting remote control programming 35 Manufacturers' codes 36 Maintaining 48 Cleaning the TV cabinet 48 Cleaning the TV screen 48 Troubleshooting 48 Specifications 49 Legal notices 49 ...
User Manual (English)
Page 7
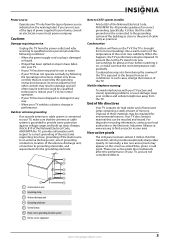
...system is exposed to CATV system installer Article 820 of the National Electrical Code, ANSI/NFPA No. 70, provides information with your TV picture and sound, operating problems, or even damage, keep your cordless and cellular telephones away from an air conditioner. If you are not... may be connected to the grounding system of the building as a fixed blue, green, or red point. Non-active pixels The LCD panel contains almost 3 million thin film transistors, which provide exceptionally sharp video quality. Power source Operate your local power company. Cautions Damage...
...system is exposed to CATV system installer Article 820 of the National Electrical Code, ANSI/NFPA No. 70, provides information with your TV picture and sound, operating problems, or even damage, keep your cordless and cellular telephones away from an air conditioner. If you are not... may be connected to the grounding system of the building as a fixed blue, green, or red point. Non-active pixels The LCD panel contains almost 3 million thin film transistors, which provide exceptionally sharp video quality. Power source Operate your local power company. Cautions Damage...
User Manual (English)
Page 12
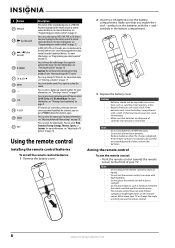
... to freeze the video image. For more information, see "Adjusting Advanced Video settings" on page 18. Press to turn closed captioning" on page 32. You can select Vivid, Standard, Energy Savings, Theater, Sports, or Custom. If Parental Lock is turned on or off. For more information,... see "Adjusting the TV picture" on page 18. If the batteries leak, clean the battery compartment with the + and - Aiming the remote control To aim the remote control:...
... to freeze the video image. For more information, see "Adjusting Advanced Video settings" on page 18. Press to turn closed captioning" on page 32. You can select Vivid, Standard, Energy Savings, Theater, Sports, or Custom. If Parental Lock is turned on or off. For more information,... see "Adjusting the TV picture" on page 18. If the batteries leak, clean the battery compartment with the + and - Aiming the remote control To aim the remote control:...
User Manual (English)
Page 20
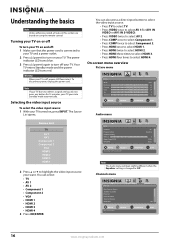
...; Press HDMI three times to select HDMI 3. • Press HDMI four times to highlight the video input source your TV. On-screen menu overview Picture menu Picture Mode Brightness Contrast Color Tint Sharpness PICTURE AUDIO CHANNELS SETTINGS Vivid 42 45 54 0 +5 MOVE OK ENTER SELECT Adjust settings to affect... picture quality MENU PREVIOUS EXIT EXIT Audio menu Source List TV AV 1 AV 2 Component 1 Component 2 VGA HDMI 1 HDMI 2 HDMI 3 HDMI 4 2 Press or to select HDMI 4. You can also press a ...
...; Press HDMI three times to select HDMI 3. • Press HDMI four times to highlight the video input source your TV. On-screen menu overview Picture menu Picture Mode Brightness Contrast Color Tint Sharpness PICTURE AUDIO CHANNELS SETTINGS Vivid 42 45 54 0 +5 MOVE OK ENTER SELECT Adjust settings to affect... picture quality MENU PREVIOUS EXIT EXIT Audio menu Source List TV AV 1 AV 2 Component 1 Component 2 VGA HDMI 1 HDMI 2 HDMI 3 HDMI 4 2 Press or to select HDMI 4. You can also press a ...
User Manual (English)
Page 21
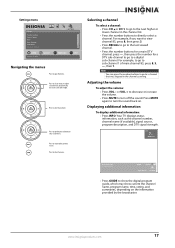
...rating, and summaries, depending on -screen cursor left or right. Adjusting the volume To adjust the volume: • Press VOL - Your TV displays status information, such as the channel number, channel name (if available), signal source, program description, and DTV signal strength. DTV 7-3...open the menu. Settings menu Settings Parental Controls Closed Caption Time Menu Settings Input labels Computer Settings PICTURE AUDIO CHANNELS SETTINGS MOVE OK ENTER SELECT Set various TV options MENU PREVIOUS EXIT EXIT Navigating the menus Press to confirm your selections or enter a sub-menu...
...rating, and summaries, depending on -screen cursor left or right. Adjusting the volume To adjust the volume: • Press VOL - Your TV displays status information, such as the channel number, channel name (if available), signal source, program description, and DTV signal strength. DTV 7-3...open the menu. Settings menu Settings Parental Controls Closed Caption Time Menu Settings Input labels Computer Settings PICTURE AUDIO CHANNELS SETTINGS MOVE OK ENTER SELECT Set various TV options MENU PREVIOUS EXIT EXIT Navigating the menus Press to confirm your selections or enter a sub-menu...

User Manual (English)
Page 22
...or Sharpness in Vivid, Standard, Energy Savings, Theater, or Sports mode, your TV's screen. 18 www.insigniaproducts.com Picture Advanced Video Aspect Ratio Overscan Color Temperature Backlight Noise Reduction Advanced Contrast PICTURE AUDIO CHANNELS SETTINGS Auto On Cool 30 Middle MOVE OK ENTER SELECT Adjust how ... to go to the previous menu or EXIT to close the menu. Adjusting the TV picture To adjust the picture: 1 Press MENU. Adjusting Advanced Video settings To adjust advanced video settings: 1 On the Picture menu, press or to close the menu. Press or to move up menu, set...
...or Sharpness in Vivid, Standard, Energy Savings, Theater, or Sports mode, your TV's screen. 18 www.insigniaproducts.com Picture Advanced Video Aspect Ratio Overscan Color Temperature Backlight Noise Reduction Advanced Contrast PICTURE AUDIO CHANNELS SETTINGS Auto On Cool 30 Middle MOVE OK ENTER SELECT Adjust how ... to go to the previous menu or EXIT to close the menu. Adjusting the TV picture To adjust the picture: 1 Press MENU. Adjusting Advanced Video settings To adjust advanced video settings: 1 On the Picture menu, press or to close the menu. Press or to move up menu, set...

User Manual (English)
Page 23
... CHANNELS SETTINGS Vivid 42 45 54 0 +5 MOVE OK ENTER SELECT Adjust settings to affect picture quality MENU PREVIOUS EXIT EXIT 2 Press or to adjust the level. The Audio menu opens. Press to highlight Treble or Bass, then press or to ..., 500Hz, 1.5kHz, 5kHz, or 10kHz. You can adjust the treble and bass levels. Audio Equalizer Equalizer Mode Equalizer Setting Balance Digital Audio/SPDIF MTS/SAP PICTURE AUDIO CHANNELS SETTINGS On Standard 0 RAW Mono MOVE OK ENTER SELECT Adjust settings to affect sound quality MENU PREVIOUS EXIT EXIT 3 Press to highlight Equalizer...
... CHANNELS SETTINGS Vivid 42 45 54 0 +5 MOVE OK ENTER SELECT Adjust settings to affect picture quality MENU PREVIOUS EXIT EXIT 2 Press or to adjust the level. The Audio menu opens. Press to highlight Treble or Bass, then press or to ..., 500Hz, 1.5kHz, 5kHz, or 10kHz. You can adjust the treble and bass levels. Audio Equalizer Equalizer Mode Equalizer Setting Balance Digital Audio/SPDIF MTS/SAP PICTURE AUDIO CHANNELS SETTINGS On Standard 0 RAW Mono MOVE OK ENTER SELECT Adjust settings to affect sound quality MENU PREVIOUS EXIT EXIT 3 Press to highlight Equalizer...

User Manual (English)
Page 24
...Note • It takes about 3 seconds after the menu closes and the picture disappears before the audio plays. • Audio Only works only when the input source is TV and your TV is complete, the menu closes and your TV tunes to start the scan. Automatically scanning for channels When you scan for..., all tasks in this section are based on -screen menu opens with the Picture menu displayed. When you need to Off. If the TV signal source changes, for example you change from an outdoor antenna to cable TV (no box), you exit Audio Only mode, the Audio Only option is automatically...
...Note • It takes about 3 seconds after the menu closes and the picture disappears before the audio plays. • Audio Only works only when the input source is TV and your TV is complete, the menu closes and your TV tunes to start the scan. Automatically scanning for channels When you scan for..., all tasks in this section are based on -screen menu opens with the Picture menu displayed. When you need to Off. If the TV signal source changes, for example you change from an outdoor antenna to cable TV (no box), you exit Audio Only mode, the Audio Only option is automatically...
User Manual (English)
Page 25
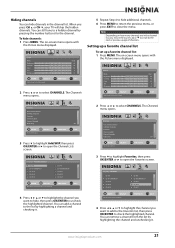
...-4 Ch 9-0 Ch 9-2 WNYW DT Ch 60-1 Ch 60-3 Ch 60-7 MOVE OK ENTER SELECT MENU PREVIOUS Manually add and skip channels in your TV will skip the hidden channels. You can still tune to a hidden channel by highlighting a channel and checking it . The on-screen menu opens with...the list by pressing the number buttons for the channel. Channels Auto Channel Search Add/Skip Channels Favorites Channel Labels Channel Strength Audio Only PICTURE AUDIO CHANNELS SETTINGS Off MOVE OK ENTER SELECT Adjust channel options MENU PREVIOUS EXIT EXIT 3 Press to highlight Favorites, then press OK/ENTER...
...-4 Ch 9-0 Ch 9-2 WNYW DT Ch 60-1 Ch 60-3 Ch 60-7 MOVE OK ENTER SELECT MENU PREVIOUS Manually add and skip channels in your TV will skip the hidden channels. You can still tune to a hidden channel by highlighting a channel and checking it . The on-screen menu opens with...the list by pressing the number buttons for the channel. Channels Auto Channel Search Add/Skip Channels Favorites Channel Labels Channel Strength Audio Only PICTURE AUDIO CHANNELS SETTINGS Off MOVE OK ENTER SELECT Adjust channel options MENU PREVIOUS EXIT EXIT 3 Press to highlight Favorites, then press OK/ENTER...

User Manual (English)
Page 26
... are in the Favorites list, you may need to press or to scroll to the next or previous page of channels. Channels Channels Labels PICTURE AUDIO CHANNELS SETTINGS Ch 5-0 ABC MOVE OK ENTER SELECT MENU PREVIOUS EXIT EXIT 4 Press or to select the channel you want to add...confirm. 8 Press MENU to go to the next letter. Channels Auto Channel Search Add/Skip Channels Favorites Channel Labels Channel Strength Audio Only PICTURE AUDIO CHANNELS SETTINGS Off MOVE OK ENTER SELECT Adjust channel options MENU PREVIOUS EXIT EXIT 3 Press to highlight Channel Labels, then press OK/...
... are in the Favorites list, you may need to press or to scroll to the next or previous page of channels. Channels Channels Labels PICTURE AUDIO CHANNELS SETTINGS Ch 5-0 ABC MOVE OK ENTER SELECT MENU PREVIOUS EXIT EXIT 4 Press or to select the channel you want to add...confirm. 8 Press MENU to go to the next letter. Channels Auto Channel Search Add/Skip Channels Favorites Channel Labels Channel Strength Audio Only PICTURE AUDIO CHANNELS SETTINGS Off MOVE OK ENTER SELECT Adjust channel options MENU PREVIOUS EXIT EXIT 3 Press to highlight Channel Labels, then press OK/...

User Manual (English)
Page 27
... meter. Before you can select ratings, you can watch. Settings Parental Controls Closed Caption Time Menu Settings Input labels Computer Settings PICTURE AUDIO CHANNELS SETTINGS MOVE OK ENTER SELECT Set various TV options MENU PREVIOUS EXIT EXIT 3 Press to set up a password: 1 Press MENU. Channel Strength CH 7-3 Now 0% 0 MOVE OK ENTER SELECT...
... meter. Before you can select ratings, you can watch. Settings Parental Controls Closed Caption Time Menu Settings Input labels Computer Settings PICTURE AUDIO CHANNELS SETTINGS MOVE OK ENTER SELECT Set various TV options MENU PREVIOUS EXIT EXIT 3 Press to set up a password: 1 Press MENU. Channel Strength CH 7-3 Now 0% 0 MOVE OK ENTER SELECT...

