FAQs (English)
Page 1
... of the universal remote control, and the model number is often visible on the back. FAQs Insignia FY10 LCD TVs (NS-L19Q-10A, NS-L19W1Q-10A, NS-L22Q-10A, NS-L26Q-10A, NS-L32Q-10A, NS-L37Q-10A, NS-L42Q-10A) July 29, 2010 Setup ...1 Image/Picture Issues 5 Hardware Issues 8 Channel Issues ...8 General ...11 Audio Issues ...12 Setup 1. I am programming my universal remote, what code is needed? Use the following table to your universal remote control's instructions and try codes for other universal remotes are available online at: NS-L19Q-10A: http://insigniaproducts...
... of the universal remote control, and the model number is often visible on the back. FAQs Insignia FY10 LCD TVs (NS-L19Q-10A, NS-L19W1Q-10A, NS-L22Q-10A, NS-L26Q-10A, NS-L32Q-10A, NS-L37Q-10A, NS-L42Q-10A) July 29, 2010 Setup ...1 Image/Picture Issues 5 Hardware Issues 8 Channel Issues ...8 General ...11 Audio Issues ...12 Setup 1. I am programming my universal remote, what code is needed? Use the following table to your universal remote control's instructions and try codes for other universal remotes are available online at: NS-L19Q-10A: http://insigniaproducts...
FAQs (English)
Page 2
... have the NS-L32Q-10A, NS-L37Q-10A, or NS-L42Q-10A, your brand until the red LED blinks twice, then release. 5. NOTE: If the LED does not blink twice, repeat steps 3 to program (TV, DVD, STB, or AUX.) 4. Write down the code(s) you want to control. 2 Press and hold the SET button on the Insignia Universal Remote for the device that works. o To program your remote control." 7. The device codes can be using. 2. The LED blinks once as a DVD. 3. For...
... have the NS-L32Q-10A, NS-L37Q-10A, or NS-L42Q-10A, your brand until the red LED blinks twice, then release. 5. NOTE: If the LED does not blink twice, repeat steps 3 to program (TV, DVD, STB, or AUX.) 4. Write down the code(s) you want to control. 2 Press and hold the SET button on the Insignia Universal Remote for the device that works. o To program your remote control." 7. The device codes can be using. 2. The LED blinks once as a DVD. 3. For...
FAQs (English)
Page 4
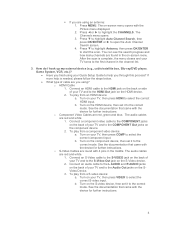
... the component device. 2. Connect a component video cable to the COMPONENT jacks on the S-Video device. 2. To play from an HDMI device: a. The Channels menu opens. 3. Press ▼ to highlight Antenna, then press OK/ENTER to help is complete, the menu closes and your TV, then press VIDEO to select the correct S-video input. How do I hook up my external device (e.g., cable/satellite box, Blu-ray/DVD player, Game System, VCR, etc.)? Have you tried using ? The audio cables...
... the component device. 2. Connect a component video cable to the COMPONENT jacks on the S-Video device. 2. To play from an HDMI device: a. The Channels menu opens. 3. Press ▼ to highlight Antenna, then press OK/ENTER to help is complete, the menu closes and your TV, then press VIDEO to select the correct S-video input. How do I hook up my external device (e.g., cable/satellite box, Blu-ray/DVD player, Game System, VCR, etc.)? Have you tried using ? The audio cables...

FAQs (English)
Page 5
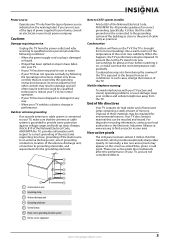
... signal strength of digital TV and movies is due to a different source or TV station. To change the appearance of the screen. 6. b. Both the picture and sound may broadcast different aspect ratios. Carefully align and push the base into the stand until the locking mechanism locks into place. NS-L26Q-10A, NS-L32Q-10A o To attach your stand: 1. It is not filling the screen. Image/Picture Issues 5. o Wide: Displays a full-screen image. Turn...
... signal strength of digital TV and movies is due to a different source or TV station. To change the appearance of the screen. 6. b. Both the picture and sound may broadcast different aspect ratios. Carefully align and push the base into the stand until the locking mechanism locks into place. NS-L26Q-10A, NS-L32Q-10A o To attach your stand: 1. It is not filling the screen. Image/Picture Issues 5. o Wide: Displays a full-screen image. Turn...
FAQs (English)
Page 8
... happens when I am receiving the error message "No Signal". Press INPUT and make sure have selected the correct input for the device or service you have the correct input selected to view channels via component cables press the COMP button on your remote to select Component to view your 8 Make sure that box to change channels. Make sure you using a cable/satellite box, cable connected directly to the TV. symbols in the...
... happens when I am receiving the error message "No Signal". Press INPUT and make sure have selected the correct input for the device or service you have the correct input selected to view channels via component cables press the COMP button on your remote to select Component to view your 8 Make sure that box to change channels. Make sure you using a cable/satellite box, cable connected directly to the TV. symbols in the...
User Manual (English)
Page 3
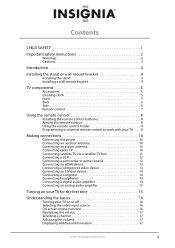
...4 Installing the stand 4 Installing a wall-mount bracket 4 TV components 5 Accessories 5 Cleaning cloth 5 Front 5 Back 6 Side 6 Remote control 7 Using the remote control 8 Installing the remote control batteries 8 Aiming the remote control 8 Using the remote control holder 9 Programming a universal remote control to work with your TV . . . . 9 Making connections 10 Connecting the power 10 Connecting an outdoor antenna 10 Connecting an indoor antenna 10 Connecting cable TV 10 Connecting satellite TV via a satellite TV box 11 Connecting a VCR 12 Connecting a camcorder or game...
...4 Installing the stand 4 Installing a wall-mount bracket 4 TV components 5 Accessories 5 Cleaning cloth 5 Front 5 Back 6 Side 6 Remote control 7 Using the remote control 8 Installing the remote control batteries 8 Aiming the remote control 8 Using the remote control holder 9 Programming a universal remote control to work with your TV . . . . 9 Making connections 10 Connecting the power 10 Connecting an outdoor antenna 10 Connecting an indoor antenna 10 Connecting cable TV 10 Connecting satellite TV via a satellite TV box 11 Connecting a VCR 12 Connecting a camcorder or game...
User Manual (English)
Page 4
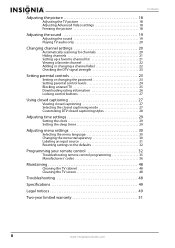
... Video settings 18 Freezing the picture 18 Adjusting the sound 19 Adjusting the sound 19 Playing TV audio only 20 Changing channel settings 20 Automatically scanning for channels 20 Hiding channels 21 Setting up a favorite channel list 21 Viewing a favorite channel 22 Adding or changing a channel label 22 Checking the DTV signal strength 23 Setting parental controls 23 Setting or changing the password 23 Setting parental control levels 24 Blocking unrated TV 25 Downloading rating information 26 Locking control buttons 27 Using closed captioning 27 Viewing closed captioning...
... Video settings 18 Freezing the picture 18 Adjusting the sound 19 Adjusting the sound 19 Playing TV audio only 20 Changing channel settings 20 Automatically scanning for channels 20 Hiding channels 21 Setting up a favorite channel list 21 Viewing a favorite channel 22 Adding or changing a channel label 22 Checking the DTV signal strength 23 Setting parental controls 23 Setting or changing the password 23 Setting parental control levels 24 Blocking unrated TV 25 Downloading rating information 26 Locking control buttons 27 Using closed captioning 27 Viewing closed captioning...
User Manual (English)
Page 6
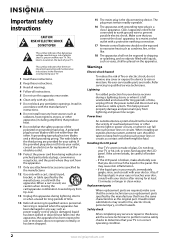
... in the panel. Important safety instructions CAUTION RISK OF ELECTRIC SHOCK DO NOT OPEN This symbol indicates that your TV is in correct operating condition. 2 www.insigniaproducts.com Warnings Electric shock hazard To reduce the risk of overhead power lines or other apparatus (including amplifiers) that you do not remove any heat sources such as power-supply cord or plug is...
... in the panel. Important safety instructions CAUTION RISK OF ELECTRIC SHOCK DO NOT OPEN This symbol indicates that your TV is in correct operating condition. 2 www.insigniaproducts.com Warnings Electric shock hazard To reduce the risk of overhead power lines or other apparatus (including amplifiers) that you do not remove any heat sources such as power-supply cord or plug is...
User Manual (English)
Page 7
... conductors, location of cable entry as a fixed blue, green, or red point. Mobile telephone warning To avoid interference with respect to correct grounding of the mast and supporting structure, grounding of the lead-in wire to qualified service personnel under the following the operating instructions. Condensation Moisture will often require extensive work by following conditions: • When the power supply cord or plug is...
... conductors, location of cable entry as a fixed blue, green, or red point. Mobile telephone warning To avoid interference with respect to correct grounding of the mast and supporting structure, grounding of the lead-in wire to qualified service personnel under the following the operating instructions. Condensation Moisture will often require extensive work by following conditions: • When the power supply cord or plug is...

User Manual (English)
Page 8
To reduce the risk of a high-quality Insignia product. Your NS-L32Q-10A represents the state of the art in the operating instructions unless you are for reliable and trouble-free performance. Installing the stand or wall-mount bracket Installing the stand To install the stand: 1 Carefully place your TV screen face-down on your TV. 2 Secure the base to the stand with the four included screws. 2 Remove the stand. 4 www.insigniaproducts.com Introduction Congratulations on...
To reduce the risk of a high-quality Insignia product. Your NS-L32Q-10A represents the state of the art in the operating instructions unless you are for reliable and trouble-free performance. Installing the stand or wall-mount bracket Installing the stand To install the stand: 1 Carefully place your TV screen face-down on your TV. 2 Secure the base to the stand with the four included screws. 2 Remove the stand. 4 www.insigniaproducts.com Introduction Congratulations on...
User Manual (English)
Page 11
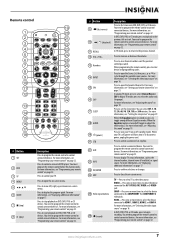
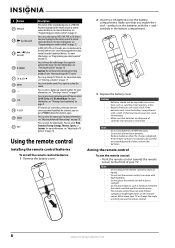
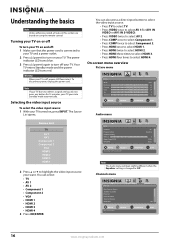
... the video input source" on -screen menu. You need to program the remote control to turn your remote control" on page 29. For more information, see "Programming your remote control" on page 32. Press to control a connected set the sleep timer. Press to increase or decrease the volume. Press to open the Source List, then press or to select TV as the channel number, channel name (if available), or signal source. For more information, see "Programming your remote control" on page 32. Press to display TV...
... the video input source" on -screen menu. You need to program the remote control to turn your remote control" on page 29. For more information, see "Programming your remote control" on page 32. Press to control a connected set the sleep timer. Press to increase or decrease the volume. Press to open the Source List, then press or to select TV as the channel number, channel name (if available), or signal source. For more information, see "Programming your remote control" on page 32. Press to display TV...
User Manual (English)
Page 12
... a channel" on the remote sensor. Notes Do not expose the remote control to the next title or track. You may not work if direct sunlight or bright light shines on page 17. For more information, see "Adjusting Advanced Video settings" on page 18. You need to program the remote control to control connected devices. You need to program the remote control to control connected devices. For more information, see "Freezing the picture" on...
... a channel" on the remote sensor. Notes Do not expose the remote control to the next title or track. You may not work if direct sunlight or bright light shines on page 17. For more information, see "Adjusting Advanced Video settings" on page 18. You need to program the remote control to control connected devices. You need to program the remote control to control connected devices. For more information, see "Freezing the picture" on...
User Manual (English)
Page 15
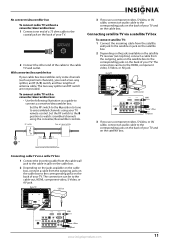
... box. Connecting satellite TV via a cable TV box 1 Connect the incoming cable from the cable wall jack to the cable-in jack on the satellite box. 2 Depending on the jacks available on the satellite TV receiver (set signal splitter B Out In TV Cable converter/descrambler box 3 If you use a component video, S-Video, or AV cable, connect an audio cable to the corresponding jacks on the back of your cable box descrambles only some channels (such as a guide to watch scrambled channels using your TV. Connecting cable TV...
... box. Connecting satellite TV via a cable TV box 1 Connect the incoming cable from the cable wall jack to the cable-in jack on the satellite box. 2 Depending on the jacks available on the satellite TV receiver (set signal splitter B Out In TV Cable converter/descrambler box 3 If you use a component video, S-Video, or AV cable, connect an audio cable to the corresponding jacks on the back of your cable box descrambles only some channels (such as a guide to watch scrambled channels using your TV. Connecting cable TV...

User Manual (English)
Page 19
... to turn on the amplifier. Choose your TV. Note You can change the menu language or scan for details.) 2 Press (power) to confirm your TV automatically starts scanning for channels. To set up basic settings including the menu language, TV signal source, and the channel list. If you have: • Installed the remote control batteries. (See page 8 for details). • Connected an antenna, cable TV, or satellite TV. (See pages 10, through setting up your TV: 1 Make...
... to turn on the amplifier. Choose your TV. Note You can change the menu language or scan for details.) 2 Press (power) to confirm your TV automatically starts scanning for channels. To set up basic settings including the menu language, TV signal source, and the channel list. If you have: • Installed the remote control batteries. (See page 8 for details). • Connected an antenna, cable TV, or satellite TV. (See pages 10, through setting up your TV: 1 Make...
User Manual (English)
Page 20
... the power cord is connected to your TV and a power outlet. 2 Press (power) to turn off your TV is changed to highlight the video input source your TV on or off , power still flows into Standby mode automatically. On-screen menu overview Picture menu Picture Mode Brightness Contrast Color Tint Sharpness PICTURE AUDIO CHANNELS SETTINGS Vivid 42 45 54 0 +5 MOVE OK ENTER SELECT Adjust settings to affect picture quality MENU PREVIOUS EXIT EXIT Audio menu Source List TV AV 1 AV 2 Component 1 Component 2 VGA HDMI 1 HDMI 2 HDMI 3 HDMI 4 2 Press or to Off . The Source List...
... the power cord is connected to your TV and a power outlet. 2 Press (power) to turn off your TV is changed to highlight the video input source your TV on or off , power still flows into Standby mode automatically. On-screen menu overview Picture menu Picture Mode Brightness Contrast Color Tint Sharpness PICTURE AUDIO CHANNELS SETTINGS Vivid 42 45 54 0 +5 MOVE OK ENTER SELECT Adjust settings to affect picture quality MENU PREVIOUS EXIT EXIT Audio menu Source List TV AV 1 AV 2 Component 1 Component 2 VGA HDMI 1 HDMI 2 HDMI 3 HDMI 4 2 Press or to Off . The Source List...

User Manual (English)
Page 22
... based on the Channels menu is connected to the HDMI jack, only Wide and Normal are available. • Color temperature-Selects the color temperature to change the overall color of choices in a submenu. 4 Press MENU to go to the previous menu or EXIT to see "Adjusting Advanced Video settings" on -screen menu opens with the Picture menu displayed. Adjusting Advanced Video settings To adjust advanced video settings: 1 On the Picture menu, press or to unfreeze the picture. Picture Advanced Video...
... based on the Channels menu is connected to the HDMI jack, only Wide and Normal are available. • Color temperature-Selects the color temperature to change the overall color of choices in a submenu. 4 Press MENU to go to the previous menu or EXIT to see "Adjusting Advanced Video settings" on -screen menu opens with the Picture menu displayed. Adjusting Advanced Video settings To adjust advanced video settings: 1 On the Picture menu, press or to unfreeze the picture. Picture Advanced Video...

User Manual (English)
Page 27
...Parental Guidelines (based on using the remote control. The on -screen menu opens with the Picture menu displayed. Channel Strength CH 7-3 Now 0% 0 MOVE OK ENTER SELECT Display signal strength of programs your children can watch. Picture Mode Brightness Contrast Color Tint Sharpness PICTURE AUDIO CHANNELS SETTINGS Vivid 42 45 54 0 +5 MOVE OK ENTER SELECT Adjust settings to affect picture quality MENU PREVIOUS EXIT EXIT 2 Press or to close the menu. Channels Auto Channel Search Add/Skip Channels Favorites Channel Labels Channel Strength Audio Only PICTURE AUDIO CHANNELS...
...Parental Guidelines (based on using the remote control. The on -screen menu opens with the Picture menu displayed. Channel Strength CH 7-3 Now 0% 0 MOVE OK ENTER SELECT Display signal strength of programs your children can watch. Picture Mode Brightness Contrast Color Tint Sharpness PICTURE AUDIO CHANNELS SETTINGS Vivid 42 45 54 0 +5 MOVE OK ENTER SELECT Adjust settings to affect picture quality MENU PREVIOUS EXIT EXIT 2 Press or to close the menu. Channels Auto Channel Search Add/Skip Channels Favorites Channel Labels Channel Strength Audio Only PICTURE AUDIO CHANNELS...
User Manual (English)
Page 36
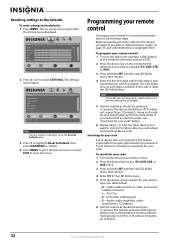
... hold SET until the red LED blinks twice, then release. 4 Enter the first five-digit code for the device and brand that you want to the remote control after trying all codes listed for your brand, or if your code" below ). • 0-Cable (cable converters, video accessories, satellite receivers) • 1-TV (TVs) • 2-VCR (VCRs, DVD players) • 3-Audio (audio amplifiers, audio amps/tuners, CD players) 6 Aim the remote at the device and press (power). For...
... hold SET until the red LED blinks twice, then release. 4 Enter the first five-digit code for the device and brand that you want to the remote control after trying all codes listed for your brand, or if your code" below ). • 0-Cable (cable converters, video accessories, satellite receivers) • 1-TV (TVs) • 2-VCR (VCRs, DVD players) • 3-Audio (audio amplifiers, audio amps/tuners, CD players) 6 Aim the remote at the device and press (power). For...
User Manual (English)
Page 52
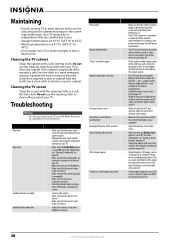
.... Make sure that the power cord is correctly connected to repair your TV to the antenna, such as a logo, game, or computer image, for an extended period of the speakers Control buttons do not work Snowy picture or noise VGA picture is not stable or synchronized No output from the cloth, then wipe the screen or cabinet with the remote control signal. Turn off one of time. This can make...
.... Make sure that the power cord is correctly connected to repair your TV to the antenna, such as a logo, game, or computer image, for an extended period of the speakers Control buttons do not work Snowy picture or noise VGA picture is not stable or synchronized No output from the cloth, then wipe the screen or cabinet with the remote control signal. Turn off one of time. This can make...
User Manual (English)
Page 55
... NS-L32Q-10A ("Product"), that the Product shall be free of defects in the original manufacture of the material or workmanship for a period of two (2) years from the date of your home. This Product must pay all faults • Consumables, such as fuses or batteries • Products where the factory applied serial number has been altered or removed REPAIR REPLACEMENT...
... NS-L32Q-10A ("Product"), that the Product shall be free of defects in the original manufacture of the material or workmanship for a period of two (2) years from the date of your home. This Product must pay all faults • Consumables, such as fuses or batteries • Products where the factory applied serial number has been altered or removed REPAIR REPLACEMENT...


