
User Guide
Page 1
Ice Maker NS-IMK20WH7 USER GUIDE Before using your new product, please read these instructions to prevent any damage.
Ice Maker NS-IMK20WH7 USER GUIDE Before using your new product, please read these instructions to prevent any damage.
User Guide
Page 2
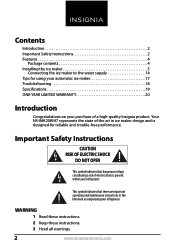
...electric shock is designed for using your automatic ice maker 17 Troubleshooting 18 Specifications 19 ONE-YEAR LIMITED WARRANTY 20 Introduction Congratulations on your refrigerator. Your NS-IMK20WH7 represents the state of a high-quality Insignia product. Important Safety Instructions CAUTION RISK OF ELECTRIC... your refrigerator. WARNING 1 Read these instructions. 2 Keep these instructions. 3 Heed all warnings. 2 www.insigniaproducts.com Contents Introduction 2 Important Safety Instructions 2 Features 4 Package contents 4 Installing the ice maker 5 Connecting the ice...
...electric shock is designed for using your automatic ice maker 17 Troubleshooting 18 Specifications 19 ONE-YEAR LIMITED WARRANTY 20 Introduction Congratulations on your refrigerator. Your NS-IMK20WH7 represents the state of a high-quality Insignia product. Important Safety Instructions CAUTION RISK OF ELECTRIC... your refrigerator. WARNING 1 Read these instructions. 2 Keep these instructions. 3 Heed all warnings. 2 www.insigniaproducts.com Contents Introduction 2 Important Safety Instructions 2 Features 4 Package contents 4 Installing the ice maker 5 Connecting the ice...

User Guide
Page 3
... be used by the manufacturer, its service agent, or similar qualified persons in order to avoid a hazard. Children should not be performed by children without supervision. 5 If a component part is damaged, liquid has been spilled or objects have fallen into the appliance, the appliance has been exposed to follow these instructions can be replaced by...
... be used by the manufacturer, its service agent, or similar qualified persons in order to avoid a hazard. Children should not be performed by children without supervision. 5 If a component part is damaged, liquid has been spilled or objects have fallen into the appliance, the appliance has been exposed to follow these instructions can be replaced by...

User Guide
Page 4
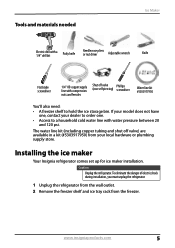
... read these instructions to six pounds of ice • Prevents overflow by automatically detecting when storage bin is full • Works with these Insignia refrigerators: NS-RTM18WH7, NS-RTM18SS7, and NS-RTM21SS7 Package contents Ice maker unit Water valve Ice storage bin Plastic water supply tubing Ice Maker NS-IMK20WH7 USER GUIDE Water inlet tube (2) Tube clamp Before using your...
... read these instructions to six pounds of ice • Prevents overflow by automatically detecting when storage bin is full • Works with these Insignia refrigerators: NS-RTM18WH7, NS-RTM18SS7, and NS-RTM21SS7 Package contents Ice maker unit Water valve Ice storage bin Plastic water supply tubing Ice Maker NS-IMK20WH7 USER GUIDE Water inlet tube (2) Tube clamp Before using your...
User Guide
Page 5
... Your Insignia refrigerator comes set up for ice maker installation. To eliminate the danger of electric shock during installation, you must unplug the refrigerator. 1 Unplug the refrigerator from the wall outlet. 2 Remove the freezer shelf and ice tray rack from your dealer to order one , contact your local hardware or plumbing supply store. If your model...
... Your Insignia refrigerator comes set up for ice maker installation. To eliminate the danger of electric shock during installation, you must unplug the refrigerator. 1 Unplug the refrigerator from the wall outlet. 2 Remove the freezer shelf and ice tray rack from your dealer to order one , contact your local hardware or plumbing supply store. If your model...
User Guide
Page 6
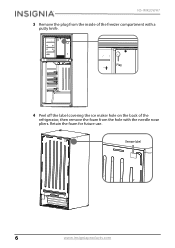
Plug 4 Peel off the label covering the ice maker hole on the back of the freezer compartment with the needle nose pliers. NS-IMK20WH7 3 Remove the plug from the inside of the refrigerator, then remove the foam from the hole with a putty knife. Retain the foam for future use. Remove label 6 www.insigniaproducts.com
Plug 4 Peel off the label covering the ice maker hole on the back of the freezer compartment with the needle nose pliers. NS-IMK20WH7 3 Remove the plug from the inside of the refrigerator, then remove the foam from the hole with a putty knife. Retain the foam for future use. Remove label 6 www.insigniaproducts.com
User Guide
Page 8
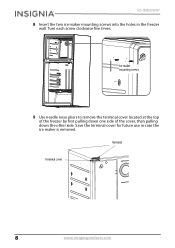
Ice maker mounting screws 9 Use needle nose pliers to remove the terminal cover located at the top of the freezer by first pulling down one side of the cover, then pulling down the other side. NS-IMK20WH7 8 Insert the two ice maker mounting screws into the holes in case the ice maker is removed. Turn each screw clockwise five times. Terminal Terminal cover 8 www.insigniaproducts.com Save the terminal cover for future use in the freezer wall.
Ice maker mounting screws 9 Use needle nose pliers to remove the terminal cover located at the top of the freezer by first pulling down one side of the cover, then pulling down the other side. NS-IMK20WH7 8 Insert the two ice maker mounting screws into the holes in case the ice maker is removed. Turn each screw clockwise five times. Terminal Terminal cover 8 www.insigniaproducts.com Save the terminal cover for future use in the freezer wall.
User Guide
Page 10
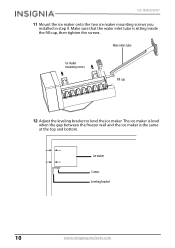
NS-IMK20WH7 11 Mount the ice maker onto the two ice maker mounting screws you installed in step 9. Ice maker Screws Leveling bracket 10 www.insigniaproducts.com Water inlet tube Ice maker mounting screws Fill cup 12 Adjust the leveling bracket to level the ice maker. Make sure that the water inlet tube is the same at the top and bottom. The ice maker is level when the gap between the freezer wall and the ice maker is sitting inside the fill cup, then tighten the screws.
NS-IMK20WH7 11 Mount the ice maker onto the two ice maker mounting screws you installed in step 9. Ice maker Screws Leveling bracket 10 www.insigniaproducts.com Water inlet tube Ice maker mounting screws Fill cup 12 Adjust the leveling bracket to level the ice maker. Make sure that the water inlet tube is the same at the top and bottom. The ice maker is level when the gap between the freezer wall and the ice maker is sitting inside the fill cup, then tighten the screws.

User Guide
Page 11
Align the bracket of the refrigerator. Ice storage bin 14 Locate the pre-punched holes at the bottom right corner of the back panel of the water valve with the factory drilled holes, then use a Phillips head screwdriver to drive the two self-drilling screws through the bracket and into the cabinet. Self-drilling screws Factory pre-punched holes Water valve www.insigniaproducts.com 11 Ice Maker 13 Reinstall the freezer shelf and set the ice storage bin on the shelf.
Align the bracket of the refrigerator. Ice storage bin 14 Locate the pre-punched holes at the bottom right corner of the back panel of the water valve with the factory drilled holes, then use a Phillips head screwdriver to drive the two self-drilling screws through the bracket and into the cabinet. Self-drilling screws Factory pre-punched holes Water valve www.insigniaproducts.com 11 Ice Maker 13 Reinstall the freezer shelf and set the ice storage bin on the shelf.
User Guide
Page 12
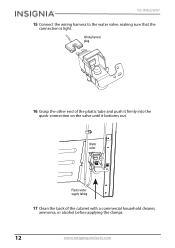
Water valve Plastic water supply tubing 17 Clean the back of the plastic tube and push it firmly into the quick-connection on the valve until it bottoms out. Wiring harness plug 16 Grasp the other end of the cabinet with a commercial household cleaner, ammonia, or alcohol before applying the clamps. 12 www.insigniaproducts.com NS-IMK20WH7 15 Connect the wiring harness to the water valve, making sure that the connection is tight.
Water valve Plastic water supply tubing 17 Clean the back of the plastic tube and push it firmly into the quick-connection on the valve until it bottoms out. Wiring harness plug 16 Grasp the other end of the cabinet with a commercial household cleaner, ammonia, or alcohol before applying the clamps. 12 www.insigniaproducts.com NS-IMK20WH7 15 Connect the wiring harness to the water valve, making sure that the connection is tight.
User Guide
Page 14
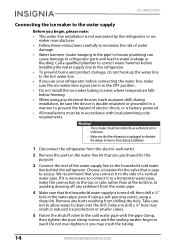
...falls below freezing. • When using any electrical devices (such as power drill) during installation. 1 Disconnect the refrigerator from the electric wall outlet. 2 Remove the parts in the water pipe (even if using a self-piercing valve), using a sharp bit. NS-IMK20WH7 Connecting the ice maker to the water.... • Follow these instructions carefully to minimize the risk of electric shock during installation, be sure the device is double insulated or grounded in a manner to prevent the hazard of electric shock, or is not warranted by an authorized service technician. • Make...
...falls below freezing. • When using any electrical devices (such as power drill) during installation. 1 Disconnect the refrigerator from the electric wall outlet. 2 Remove the parts in the water pipe (even if using a self-piercing valve), using a sharp bit. NS-IMK20WH7 Connecting the ice maker to the water.... • Follow these instructions carefully to minimize the risk of electric shock during installation, be sure the device is double insulated or grounded in a manner to prevent the hazard of electric shock, or is not warranted by an authorized service technician. • Make...

User Guide
Page 15
...inlet valve and discard it is not plugged into the wall outlet. • If your refrigerator does not have a water filter, we recommend installing one additional turn with water until it . For plastic tubing, insert the molded end of the refrigerator's water valve. 10 Unscrew the plastic ...cap from the wall after installation. 7 Connect the tubing to the valve by placing the compression nut and ferrules (sleeves) for copper tubing onto to the shutoff valve. Make...
...inlet valve and discard it is not plugged into the wall outlet. • If your refrigerator does not have a water filter, we recommend installing one additional turn with water until it . For plastic tubing, insert the molded end of the refrigerator's water valve. 10 Unscrew the plastic ...cap from the wall after installation. 7 Connect the tubing to the valve by placing the compression nut and ferrules (sleeves) for copper tubing onto to the shutoff valve. Make...
User Guide
Page 16
... plumbing may cause the ice maker to be discolored or have poor flavor. Important It takes approximately 24 hours for the ice maker to the electric wall outlet. 17 To turn with a steel clamp and screw at the location shown on the illustration. 14 Coil the excess water supply line (... arrange the coils so they do not vibrate or wear against any other surface. 15 Turn on the ice maker, lower the wire signal arm. NS-IMK20WH7 11 Slide a brass compression nut, then a ferrule (sleeve), onto the water supply line. 1/4" tubing 1/4" compression nut Water inlet valve 12 Push the end of your...
... plumbing may cause the ice maker to be discolored or have poor flavor. Important It takes approximately 24 hours for the ice maker to the electric wall outlet. 17 To turn with a steel clamp and screw at the location shown on the illustration. 14 Coil the excess water supply line (... arrange the coils so they do not vibrate or wear against any other surface. 15 Turn on the ice maker, lower the wire signal arm. NS-IMK20WH7 11 Slide a brass compression nut, then a ferrule (sleeve), onto the water supply line. 1/4" tubing 1/4" compression nut Water inlet valve 12 Push the end of your...
User Guide
Page 17
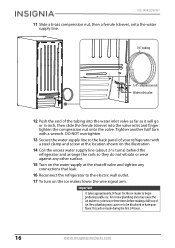
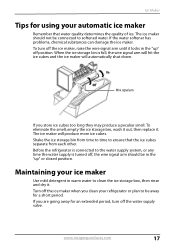
... is turned off position. Shake the ice storage bin from each other. To eliminate the smell, empty the ice storage bin, wash it out, then replace it . The ice maker should be in the "up " off , the wire signal arm should not be away for a short period. Turn off the ...cubes and the ice maker will produce more ice cubes. www.insigniaproducts.com 17 If the water softener has problems, chemical substances can damage the ice maker. Ice Maker Tips for using your automatic ice maker Remember that the ice cubes separate from time to time to ensure that water quality ...
... is turned off position. Shake the ice storage bin from each other. To eliminate the smell, empty the ice storage bin, wash it out, then replace it . The ice maker should be in the "up " off , the wire signal arm should not be away for a short period. Turn off the ...cubes and the ice maker will produce more ice cubes. www.insigniaproducts.com 17 If the water softener has problems, chemical substances can damage the ice maker. Ice Maker Tips for using your automatic ice maker Remember that the ice cubes separate from time to time to ensure that water quality ...
User Guide
Page 18
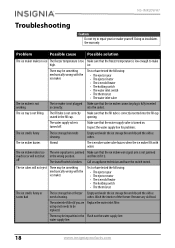
... be something mechanically wrong with water. Problem Possible cause Possible solution The ice maker makes no ice The freezer temperature is too Make sure that the ice maker connector plug is low enough to repair your ice maker yourself. There may be replaced. The ice cubes will not shut... and free it if it is broken. NS-IMK20WH7 Troubleshooting Caution Do not try to make high. Inspect the water supply line for problems. The ice smells funny The ice storage bin needs cleaning. The water inlet filter (if you are Replace the water inlet filter. The ice maker ...
... be something mechanically wrong with water. Problem Possible cause Possible solution The ice maker makes no ice The freezer temperature is too Make sure that the ice maker connector plug is low enough to repair your ice maker yourself. There may be replaced. The ice cubes will not shut... and free it if it is broken. NS-IMK20WH7 Troubleshooting Caution Do not try to make high. Inspect the water supply line for problems. The ice smells funny The ice storage bin needs cleaning. The water inlet filter (if you are Replace the water inlet filter. The ice maker ...
User Guide
Page 19
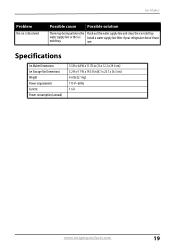
water supply line or the ice Install a water supply line filter if your refrigerator doesn't have mold tray. one. Specifications Ice Maker Dimensions Ice Storage Bin Dimensions Weight Power requirements Current Power consumption (annual) 5.5 H x 4.8 W x 11.7D in (14 x 12.2 x 29.6 cm) 3.2 H x 9.1 W x 14.3 D in the Flush out the water supply line and clean the ice mold tray. Ice Maker Problem The ice is discolored Possible cause Possible solution There may be impurities in (8.1 x 23.1 x 36.3 cm) 4.6 lbs (2.1 kg) 115 V~60 Hz 1.6 A www.insigniaproducts.com 19
water supply line or the ice Install a water supply line filter if your refrigerator doesn't have mold tray. one. Specifications Ice Maker Dimensions Ice Storage Bin Dimensions Weight Power requirements Current Power consumption (annual) 5.5 H x 4.8 W x 11.7D in (14 x 12.2 x 29.6 cm) 3.2 H x 9.1 W x 14.3 D in the Flush out the water supply line and clean the ice mold tray. Ice Maker Problem The ice is discolored Possible cause Possible solution There may be impurities in (8.1 x 23.1 x 36.3 cm) 4.6 lbs (2.1 kg) 115 V~60 Hz 1.6 A www.insigniaproducts.com 19
User Guide
Page 20
...service? Make sure that provides the same amount of the Product ("Warranty Period"). If you received with new or rebuilt parts; This warranty does not cover: • Food loss/spoilage due to failure of refrigerator or freezer • Customer instruction/education • Installation • Set...does this warranty statement. Products and parts replaced under this warranty to you must be defective by an authorized Insignia repair center or store personnel, Insignia will (at no charge with this warranty cover? or (2) replace the Product at its original packaging...
...service? Make sure that provides the same amount of the Product ("Warranty Period"). If you received with new or rebuilt parts; This warranty does not cover: • Food loss/spoilage due to failure of refrigerator or freezer • Customer instruction/education • Installation • Set...does this warranty statement. Products and parts replaced under this warranty to you must be defective by an authorized Insignia repair center or store personnel, Insignia will (at no charge with this warranty cover? or (2) replace the Product at its original packaging...

User Guide
Page 21
...SET FORTH ABOVE AND NO WARRANTIES, WHETHER EXPRESS OR IMPLIED, WILL APPLY AFTER THE WARRANTY PERIOD. Contact Insignia: For customer service please call 1-877-467-4289 www.insigniaproducts.com INSIGNIA...INSIGNIA SHALL NOT BE LIABLE FOR ANY INCIDENTAL OR CONSEQUENTIAL DAMAGES FOR THE BREACH OF ANY EXPRESS OR IMPLIED WARRANTY ON THIS PRODUCT, INCLUDING, BUT NOT LIMITED TO, LOST DATA, LOSS OF USE OF YOUR PRODUCT, LOST BUSINESS OR LOST PROFITS. Made in China www.insigniaproducts.com 21 THIS WARRANTY GIVES YOU SPECIFIC...by Insignia to service the ...8226; Attempted repair by any part of the ...
...SET FORTH ABOVE AND NO WARRANTIES, WHETHER EXPRESS OR IMPLIED, WILL APPLY AFTER THE WARRANTY PERIOD. Contact Insignia: For customer service please call 1-877-467-4289 www.insigniaproducts.com INSIGNIA...INSIGNIA SHALL NOT BE LIABLE FOR ANY INCIDENTAL OR CONSEQUENTIAL DAMAGES FOR THE BREACH OF ANY EXPRESS OR IMPLIED WARRANTY ON THIS PRODUCT, INCLUDING, BUT NOT LIMITED TO, LOST DATA, LOSS OF USE OF YOUR PRODUCT, LOST BUSINESS OR LOST PROFITS. Made in China www.insigniaproducts.com 21 THIS WARRANTY GIVES YOU SPECIFIC...by Insignia to service the ...8226; Attempted repair by any part of the ...

User Guide
Page 22
www.insigniaproducts.com 1-877-467-4289 (U.S. All rights reserved. Distributed by Best Buy Purchasing, LLC ©2016 Best Buy. Made in China. V1 ENGLISH 16-0335 and Canada) or 01-800-926-3000 (Mexico) INSIGNIA is a trademark of Best Buy and its affiliated companies.
www.insigniaproducts.com 1-877-467-4289 (U.S. All rights reserved. Distributed by Best Buy Purchasing, LLC ©2016 Best Buy. Made in China. V1 ENGLISH 16-0335 and Canada) or 01-800-926-3000 (Mexico) INSIGNIA is a trademark of Best Buy and its affiliated companies.
