User Guide
Page 1
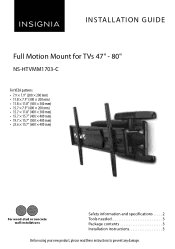
INSTALLATION GUIDE Full Motion Mount for TVs 47" - 80" NS-HTVMM1703-C For VESA patterns: • 7.9 × 7.9" (200 × 200 mm) • 11.8 × 7.9" (300 × 200 mm) • 11.8 × 11.8" (300 × 300 mm) • ...
INSTALLATION GUIDE Full Motion Mount for TVs 47" - 80" NS-HTVMM1703-C For VESA patterns: • 7.9 × 7.9" (200 × 200 mm) • 11.8 × 7.9" (300 × 200 mm) • 11.8 × 11.8" (300 × 300 mm) • ...
User Guide
Page 2
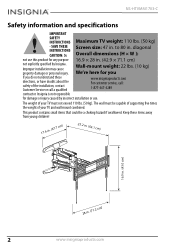
...47 in . This product contains small items that could be capable of supporting five times the weight of your TV and wall mount combined. Improper installation may cause property damage or personal injury. 16.9 × 28 in. (42.9 × 71.1 cm) Wall... use. diagonal INSTRUCTIONS CAUTION: Do Overall dimensions (H × W ): not use this product for damage or injury caused by Insignia. NS-HTVMM1703-C Safety information and specifications IMPORTANT SAFETY INSTRUCTIONS Maximum TV weight: 110 lbs. (50 kg) - The wall must be a choking hazard if swallowed. The weight of your...
...47 in . This product contains small items that could be capable of supporting five times the weight of your TV and wall mount combined. Improper installation may cause property damage or personal injury. 16.9 × 28 in. (42.9 × 71.1 cm) Wall... use. diagonal INSTRUCTIONS CAUTION: Do Overall dimensions (H × W ): not use this product for damage or injury caused by Insignia. NS-HTVMM1703-C Safety information and specifications IMPORTANT SAFETY INSTRUCTIONS Maximum TV weight: 110 lbs. (50 kg) - The wall must be a choking hazard if swallowed. The weight of your...

User Guide
Page 3
Full Motion Mount for TVs 47" - 80" Tools needed You will need the following tools to assemble your new TV wall mount: ardware Edge-to-edge Pencil stud finder Measuring tape Drill Tape Phillips screwdriver Hammer 3/16 in. (5 mm) wood drill bit (for wood stud wall) OR 3/8 in. (10 mm) masonry drill bit (for concrete wall) Package contents Make sure that you have all the hardware necessary to assemble your new TV wall mount: Wall Mount (1) TV Brackets (2) Wall Plate Template (1) www.insigniaproducts.com 3
Full Motion Mount for TVs 47" - 80" Tools needed You will need the following tools to assemble your new TV wall mount: ardware Edge-to-edge Pencil stud finder Measuring tape Drill Tape Phillips screwdriver Hammer 3/16 in. (5 mm) wood drill bit (for wood stud wall) OR 3/8 in. (10 mm) masonry drill bit (for concrete wall) Package contents Make sure that you have all the hardware necessary to assemble your new TV wall mount: Wall Mount (1) TV Brackets (2) Wall Plate Template (1) www.insigniaproducts.com 3
User Guide
Page 5
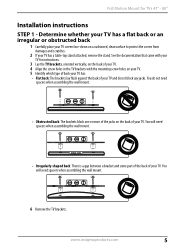
... or an irregular or obstructed back 1 Carefully place your TV screen face-down on the back of your TV. www.insigniaproducts.com 5 See the documentation that came with your TV for TVs 47" - 80" Installation instructions STEP 1 - You will need spacers when assembling the wall mount. • Irregularly-shaped back: There is a gap between a bracket...
... or an irregular or obstructed back 1 Carefully place your TV screen face-down on the back of your TV. www.insigniaproducts.com 5 See the documentation that came with your TV for TVs 47" - 80" Installation instructions STEP 1 - You will need spacers when assembling the wall mount. • Irregularly-shaped back: There is a gap between a bracket...
User Guide
Page 6
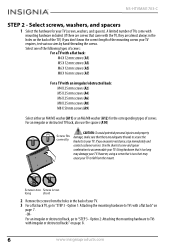
Select screws, washers, and spacers 1 Select the hardware for the corresponding types of the mounting screws your TV. 3 For a flat back TV, go to "STEP 3 - Select one of the following types of screws: For a TV with a flat back: M4 X 12 mm screws (A1) M5 X 12 mm screws (...mounting hardware included. (If there are almost always in the back of the TV.) If you encounter resistance, stop immediately and contact customer service. For an irregular or obstructed back, go to TVs with irregular or obstructed backs" on page 7. -OR- If you don't know the correct length of screws. NS-HTVMM1703...
Select screws, washers, and spacers 1 Select the hardware for the corresponding types of the mounting screws your TV. 3 For a flat back TV, go to "STEP 3 - Select one of the following types of screws: For a TV with a flat back: M4 X 12 mm screws (A1) M5 X 12 mm screws (...mounting hardware included. (If there are almost always in the back of the TV.) If you encounter resistance, stop immediately and contact customer service. For an irregular or obstructed back, go to TVs with irregular or obstructed backs" on page 7. -OR- If you don't know the correct length of screws. NS-HTVMM1703...

User Guide
Page 7
Do not over tighten. Option 1: Attaching the mounting hardware to TVs with a flat back 1 Align the left and right TV brackets with the screw holes on the back of the TV. 3 Tighten the screws until they are snug against the TV brackets. A11 or A12 A1/A3 or A5/A7 Wall brackets ...You'll need Screws or or or A1 (4) A3 (4) A5 (4) Washers or A11 (4) A12 (4) A7 (4) Magnetic removable bubble level Phillips screwdriver TV brackets (2) www.insigniaproducts.com 7 Make sure that the brackets are level. 2 Install washers (A11 or A12), and screws (A1, A3, A5, or A7)...
Do not over tighten. Option 1: Attaching the mounting hardware to TVs with a flat back 1 Align the left and right TV brackets with the screw holes on the back of the TV. 3 Tighten the screws until they are snug against the TV brackets. A11 or A12 A1/A3 or A5/A7 Wall brackets ...You'll need Screws or or or A1 (4) A3 (4) A5 (4) Washers or A11 (4) A12 (4) A7 (4) Magnetic removable bubble level Phillips screwdriver TV brackets (2) www.insigniaproducts.com 7 Make sure that the brackets are level. 2 Install washers (A11 or A12), and screws (A1, A3, A5, or A7)...
User Guide
Page 8
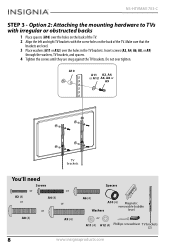
... the holes on the back of the TV. 2 Align the left and right TV brackets with the screw holes on the back of the TV. Make sure that the brackets are snug against the TV brackets. NS-HTVMM1703-C STEP 3 - Option 2: Attaching the mounting hardware to TVs with irregular or obstructed backs 1 Place ...spacers (A10) over the holes in the TV brackets. A10 A11 A2, A4, or A12 A6, A8 or A9 TV brackets You'll need Screws or A2...
... the holes on the back of the TV. 2 Align the left and right TV brackets with the screw holes on the back of the TV. Make sure that the brackets are snug against the TV brackets. NS-HTVMM1703-C STEP 3 - Option 2: Attaching the mounting hardware to TVs with irregular or obstructed backs 1 Place ...spacers (A10) over the holes in the TV brackets. A10 A11 A2, A4, or A12 A6, A8 or A9 TV brackets You'll need Screws or A2...

User Guide
Page 9
... your eyes are level with the middle of the screen. The total measurement is normally 40 to where you want the center of your TV. Determine wall-mount location Note: • For more detailed information on determining where to drill your holes, visit our online height-finder at: http://mf1.bestbuy....com 9 This is the height where you drill holes in the wall: 1 Measure the distance from the bottom of your TV to the center point halfway between the top and bottom mounting holes on the back of the wall plate to be offset .8 in. Before you want the bottom of the furniture...
... your eyes are level with the middle of the screen. The total measurement is normally 40 to where you want the center of your TV. Determine wall-mount location Note: • For more detailed information on determining where to drill your holes, visit our online height-finder at: http://mf1.bestbuy....com 9 This is the height where you drill holes in the wall: 1 Measure the distance from the bottom of your TV to the center point halfway between the top and bottom mounting holes on the back of the wall plate to be offset .8 in. Before you want the bottom of the furniture...

User Guide
Page 11
... anchors are firm against the wall plate. B2 B3 B1 Box Magnetic wrench removable bubble level You'll need B1 (6) B2 (6) Box wrench B3 (6) Wall mount Magnetic removable bubble level Wall plate template 3/8 in the wall plate. Align the center of 2.28 in. (58 mm) using a 3/8 in. (10 ...Drill drill bit Hammer www.insigniaproducts.com 11 CAUTION: DO NOT over-tighten the lag bolts (B3). . Full Motion Mount for TVs 47" - 80" STEP 5 - Option 2: Installing on the wall-mount is level, then tape it to the wall plate, align the wall plate with the height mark (a+b) you made in...
... anchors are firm against the wall plate. B2 B3 B1 Box Magnetic wrench removable bubble level You'll need B1 (6) B2 (6) Box wrench B3 (6) Wall mount Magnetic removable bubble level Wall plate template 3/8 in the wall plate. Align the center of 2.28 in. (58 mm) using a 3/8 in. (10 ...Drill drill bit Hammer www.insigniaproducts.com 11 CAUTION: DO NOT over-tighten the lag bolts (B3). . Full Motion Mount for TVs 47" - 80" STEP 5 - Option 2: Installing on the wall-mount is level, then tape it to the wall plate, align the wall plate with the height mark (a+b) you made in...
User Guide
Page 13
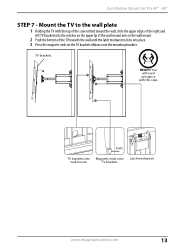
... the wall until the latch mechanism clicks into Magnetic ends onto Latch mechanism wall-mount TV brackets www.insigniaproducts.com 13 TV brackets HEAVY! Mount the TV to the wall plate 1 Holding the TV with this step. You will need assistance with the top of the screen tilted toward the wall, slide the upper edges of...
... the wall until the latch mechanism clicks into Magnetic ends onto Latch mechanism wall-mount TV brackets www.insigniaproducts.com 13 TV brackets HEAVY! Mount the TV to the wall plate 1 Holding the TV with this step. You will need assistance with the top of the screen tilted toward the wall, slide the upper edges of...
User Guide
Page 15
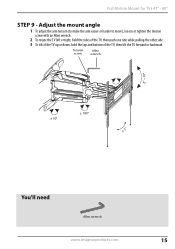
Full Motion Mount for TVs 47" - 80" STEP 9 - Tension screw Allen wrench -2° ~ 10° ± 90° ± 180° ± 3° You'll need Allen wrench www.insigniaproducts.com 15 Adjust the mount angle 1 To adjust the arm tension (to make the arm easier or harder to move), loosen or tighten the tension screw with an Allen wrench. 2 To rotate the TV left or right, hold the sides of the TV, then push one side while pulling the other side. 3 To tilt of the TV up or down, hold the top and bottom of the TV, then tilt the TV forward or backward.
Full Motion Mount for TVs 47" - 80" STEP 9 - Tension screw Allen wrench -2° ~ 10° ± 90° ± 180° ± 3° You'll need Allen wrench www.insigniaproducts.com 15 Adjust the mount angle 1 To adjust the arm tension (to make the arm easier or harder to move), loosen or tighten the tension screw with an Allen wrench. 2 To rotate the TV left or right, hold the sides of the TV, then push one side while pulling the other side. 3 To tilt of the TV up or down, hold the top and bottom of the TV, then tilt the TV forward or backward.
User Guide
Page 16
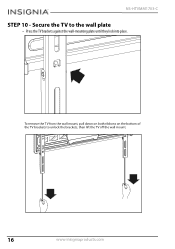
To remove the TV from the wall mount, pull down on both ribbons on the bottom of the TV brackets to the wall plate • Press the TV brackets against the wall-mounting plate until they lock into place. Secure the TV to unlock the brackets, then lift the TV off the wall mount. 16 www.insigniaproducts.com NS-HTVMM1703-C STEP 10 -
To remove the TV from the wall mount, pull down on both ribbons on the bottom of the TV brackets to the wall plate • Press the TV brackets against the wall-mounting plate until they lock into place. Secure the TV to unlock the brackets, then lift the TV off the wall mount. 16 www.insigniaproducts.com NS-HTVMM1703-C STEP 10 -
User Guide
Page 17
... Product at a Best Buy retail store location, please take your Insignia Product during the Warranty Period. Full Motion Mount for TVs 47" - 80" ONE-YEAR LIMITED WARRANTY Definitions: The Distributor* of Insignia branded products warrants to you, the original purchaser of this new Insignia-branded product ("Product"), that the Product shall be defective by an...
... Product at a Best Buy retail store location, please take your Insignia Product during the Warranty Period. Full Motion Mount for TVs 47" - 80" ONE-YEAR LIMITED WARRANTY Definitions: The Distributor* of Insignia branded products warrants to you, the original purchaser of this new Insignia-branded product ("Product"), that the Product shall be defective by an...
