Firmware Installation Guide (English)
Page 2
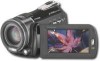
... camcorder power off . 9. Download the firmware file "A86.zip" from the support tab located on and wait. 6. Turn camcorder power on and check its content using your camcorder and it's SD card. 2. Turn the camcorder power on the Insigniaproducts.com website (http://www.insigniaproducts.com/products/digitalcameras/NS-DV111080F.html). 3.
... camcorder power off . 9. Download the firmware file "A86.zip" from the support tab located on and wait. 6. Turn camcorder power on and check its content using your camcorder and it's SD card. 2. Turn the camcorder power on the Insigniaproducts.com website (http://www.insigniaproducts.com/products/digitalcameras/NS-DV111080F.html). 3.
Quick Setup Guide (English)
Page 1
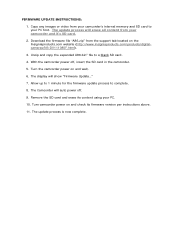
If you have questions, see your camcorder. Your NS-DV111080F is designed for more information. Quick Setup Guide l NS-DV111080F Congratulations on your purchase of your User Guide for reliable and trouble-free performance. Package contents • Insignia NS-DV111080F digital camcorder • USB cable • AV cable • Lithium-ion rechargeable battery • Battery charger and power cord • CD containing User Guide and software • Quick Setup Guide Use this guide for initial setup of a high-quality Insignia product.
If you have questions, see your camcorder. Your NS-DV111080F is designed for more information. Quick Setup Guide l NS-DV111080F Congratulations on your purchase of your User Guide for reliable and trouble-free performance. Package contents • Insignia NS-DV111080F digital camcorder • USB cable • AV cable • Lithium-ion rechargeable battery • Battery charger and power cord • CD containing User Guide and software • Quick Setup Guide Use this guide for initial setup of a high-quality Insignia product.
Quick Setup Guide (English)
Page 4
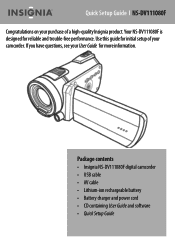
...the Li-ion battery into the charging bay. The bar is complete, the LED turns green. Using the LCD NOTE: See your camcorder. You can charge the battery with the + and - It takes about using the Open slider. 2 Insert the battery. Make sure that the + and - Fully charge... card image is displayed when video/ photos are being stored to an inserted memory card. symbols on the charger. 2 Connect one end of memory used. 6 Video quality 7 Dual Video mode 8 File Format 9 Date / Time stamp 10 Battery indicator 11 Stabilization 12 Exposure indicator 13 Color balance ...
...the Li-ion battery into the charging bay. The bar is complete, the LED turns green. Using the LCD NOTE: See your camcorder. You can charge the battery with the + and - It takes about using the Open slider. 2 Insert the battery. Make sure that the + and - Fully charge... card image is displayed when video/ photos are being stored to an inserted memory card. symbols on the charger. 2 Connect one end of memory used. 6 Video quality 7 Dual Video mode 8 File Format 9 Date / Time stamp 10 Battery indicator 11 Stabilization 12 Exposure indicator 13 Color balance ...
Quick Setup Guide (English)
Page 8
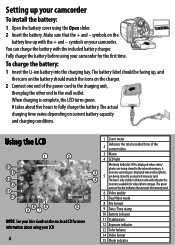
... the large end of your computer. If the CD does not automatically run, follow the steps below to install the software: 1 Double click My Computer. 2 Use the mouse to point to complete the installation. A wizard appears to guide you through the installation procedure. 5 Follow the instructions to the DVD-ROM/CD...-ROM drive. 3 Right-click the mouse, then click Open. 4 Double-click TotalMedia HDCam.exe. To connect to a TV using the AV cable: 1 Insert the USB plug of the AV cable into your camcorder. 2 Insert the RCA plugs of the AV cable into the HDMI...
... the large end of your computer. If the CD does not automatically run, follow the steps below to install the software: 1 Double click My Computer. 2 Use the mouse to point to complete the installation. A wizard appears to guide you through the installation procedure. 5 Follow the instructions to the DVD-ROM/CD...-ROM drive. 3 Right-click the mouse, then click Open. 4 Double-click TotalMedia HDCam.exe. To connect to a TV using the AV cable: 1 Insert the USB plug of the AV cable into your camcorder. 2 Insert the RCA plugs of the AV cable into the HDMI...

User Manual (English)
Page 2
... Taking a photo 11 Taking a close-up photo 11 Viewing photos 11 Deleting photos 12 Using camcorder features 12 Using the flash 12 Using zoom 12 Using the LED light 13 Adjusting camcorder settings 13 Turning Simple mode off 13 Using the self-timer 13 Turning face detection on or off 14 Turning stabilization on or...
... Taking a photo 11 Taking a close-up photo 11 Viewing photos 11 Deleting photos 12 Using camcorder features 12 Using the flash 12 Using zoom 12 Using the LED light 13 Adjusting camcorder settings 13 Turning Simple mode off 13 Using the self-timer 13 Turning face detection on or off 14 Turning stabilization on or...
User Manual (English)
Page 3
... to a computer 22 Connecting your camcorder to a computer 22 Installing the included software 22 Using the included software 23 Connecting your camcorder to a TV 23 Connecting to a TV using the provided AV cable 23 Connecting to a TV using a mini HDMI cable 23 Troubleshooting 23 Specifications and default settings 24 Specifications 24 Default settings...
... to a computer 22 Connecting your camcorder to a computer 22 Installing the included software 22 Using the included software 23 Connecting your camcorder to a TV 23 Connecting to a TV using the provided AV cable 23 Connecting to a TV using a mini HDMI cable 23 Troubleshooting 23 Specifications and default settings 24 Specifications 24 Default settings...
User Manual (English)
Page 5
...Protect the power cord from being walked on or pinched particularly at plugs and the point where they exit from your battery charger. 10 Only use attachments/accessories specified by the manufacturer. 11 Unplug your camcorder during lightning storms or when unused for long periods of time. 12 Refer all ...instructions. 5 Do not use your camcorder to rain, moisture, dripping, or splashing, and no objects filled with liquids, such as vases, shall be placed on it. 14 ...
...Protect the power cord from being walked on or pinched particularly at plugs and the point where they exit from your battery charger. 10 Only use attachments/accessories specified by the manufacturer. 11 Unplug your camcorder during lightning storms or when unused for long periods of time. 12 Refer all ...instructions. 5 Do not use your camcorder to rain, moisture, dripping, or splashing, and no objects filled with liquids, such as vases, shall be placed on it. 14 ...
User Manual (English)
Page 6
... zoom out. For more Hardware: DirectX 9 or above Standard USB 1.1 port or above Memory: at least 1 GB or more information, see "Using zoom" on your camcorder Package contents • Insignia NS-DV111080F camcorder • Li-ion battery (type NP120) • USB cable • AV cable • Battery charger and power cord • CD (includes...
... zoom out. For more Hardware: DirectX 9 or above Standard USB 1.1 port or above Memory: at least 1 GB or more information, see "Using zoom" on your camcorder Package contents • Insignia NS-DV111080F camcorder • Li-ion battery (type NP120) • USB cable • AV cable • Battery charger and power cord • CD (includes...
User Manual (English)
Page 7
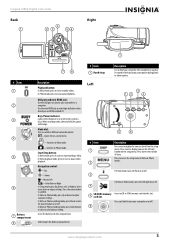
.... Press the center button to start or pause video playback. Insert the battery into this compartment. # Item 1 Hand strap Left Description Use to access the setup menu in the hand strap's outer pocket during photo or video capture. In Photo mode, turns the flash on ... or Video mode, turns the LED light on or off . Start/Stop button: In Video mode, press to confirm. Press twice to view recorded videos. Insignia 1080p Digital Camcorder Back Right START/ STOP SET BUSY POWER CB OPEN # Item 1 2 3 4 5 6 7 Battery compartment 8 Description Playback button: In Video ...
.... Press the center button to start or pause video playback. Insert the battery into this compartment. # Item 1 Hand strap Left Description Use to access the setup menu in the hand strap's outer pocket during photo or video capture. In Photo mode, turns the flash on ... or Video mode, turns the LED light on or off . Start/Stop button: In Video mode, press to confirm. Press twice to view recorded videos. Insignia 1080p Digital Camcorder Back Right START/ STOP SET BUSY POWER CB OPEN # Item 1 2 3 4 5 6 7 Battery compartment 8 Description Playback button: In Video ...
User Manual (English)
Page 8
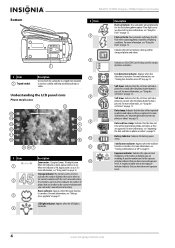
... will take a photo five seconds after the photo shutter button is inserted, indicates the number of photos that can be imprinted on . NS-DV111080F Insignia 1080p Digital Camcorder Bottom # Item 5 6 # Item Description 7 Use to attach the camcorder to a tripod (not included) 1 Tripod socket to Auto: Your camcorder will always fire the flash when capturing...
... will take a photo five seconds after the photo shutter button is inserted, indicates the number of photos that can be imprinted on . NS-DV111080F Insignia 1080p Digital Camcorder Bottom # Item 5 6 # Item Description 7 Use to attach the camcorder to a tripod (not included) 1 Tripod socket to Auto: Your camcorder will always fire the flash when capturing...
User Manual (English)
Page 10
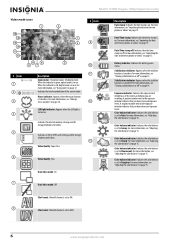
...have increased exposure levels. For more information, see "Adjusting the color balance" on page 14. Color balance indicator: Indicates the color balance is off . NS-DV111080F Insignia 1080p Digital Camcorder Video mode icons # Item 9 # Item 1 2 3 4 5 6 10 11 Description Zoom meter: 12x optical zoom, 10x ...status. Color balance indicator: Indicates the color balance is set to Cloudy. Color balance indicator: Indicates the color balance is being used for storage of photos and videos. Indicates the internal memory is set to Sunny. Video Quality: Fine. Dual video mode: On...
...have increased exposure levels. For more information, see "Adjusting the color balance" on page 14. Color balance indicator: Indicates the color balance is off . NS-DV111080F Insignia 1080p Digital Camcorder Video mode icons # Item 9 # Item 1 2 3 4 5 6 10 11 Description Zoom meter: 12x optical zoom, 10x ...status. Color balance indicator: Indicates the color balance is set to Cloudy. Color balance indicator: Indicates the color balance is being used for storage of photos and videos. Indicates the internal memory is set to Sunny. Video Quality: Fine. Dual video mode: On...
User Manual (English)
Page 12
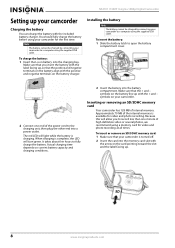
NS-DV111080F Insignia 1080p Digital Camcorder Setting up , so that the positive and negative terminals ... the battery latch to record less than one end of internal memory. It takes about five hours to a computer using the supplied USB cable. Make sure that your camcorder. Actual charging time depends on your camcorder is charging. Because ... camcorder Charging the battery You can charge the battery with the + and - You should fully charge the battery before using a memory card for the first time. When charging is complete, the LED will light while the battery is turned ...
NS-DV111080F Insignia 1080p Digital Camcorder Setting up , so that the positive and negative terminals ... the battery latch to record less than one end of internal memory. It takes about five hours to a computer using the supplied USB cable. Make sure that your camcorder. Actual charging time depends on your camcorder is charging. Because ... camcorder Charging the battery You can charge the battery with the + and - You should fully charge the battery before using a memory card for the first time. When charging is complete, the LED will light while the battery is turned ...

User Manual (English)
Page 13
...MOV file format, you begin recording videos. In Setup mode • Beep: On • Auto power off " on your computer uses the Windows XP, Windows Vista, or Windows 7 operating system. Insignia 1080p Digital Camcorder 3 To remove the card, press in . (10 cm ~ 90 cm) away. The file format of subjects ...videos is AVI, which is inserted, videos and photos are : 3 Aim the lens, then press the button to start recording. 4 Press the button again to use the File Format function, see "Turning Simple mode off : 5 min. • TV format: NTSC • Simple mode: On • Help Text: On...
...MOV file format, you begin recording videos. In Setup mode • Beep: On • Auto power off " on your computer uses the Windows XP, Windows Vista, or Windows 7 operating system. Insignia 1080p Digital Camcorder 3 To remove the card, press in . (10 cm ~ 90 cm) away. The file format of subjects ...videos is AVI, which is inserted, videos and photos are : 3 Aim the lens, then press the button to start recording. 4 Press the button again to use the File Format function, see "Turning Simple mode off : 5 min. • TV format: NTSC • Simple mode: On • Help Text: On...

User Manual (English)
Page 14
...forward at 16×. The macro icon will be stopped to Playback mode. Playback must be played sequentially. To view a video: • Use the navigation buttons to highlight the thumbnail for the video you want to watch. • Touch to watch , then press the center navigation control...insigniaproducts.com Viewing videos To view videos: 1 Turn the Mode Dial to to switch to Video mode. 2 Press the button to switch to mode. NS-DV111080F Insignia 1080p Digital Camcorder 3 Press (left) on the navigation control to turn on the Macro function. (macro icon) appears on the LCD. 4 Aim ...
...forward at 16×. The macro icon will be stopped to Playback mode. Playback must be played sequentially. To view a video: • Use the navigation buttons to highlight the thumbnail for the video you want to watch. • Touch to watch , then press the center navigation control...insigniaproducts.com Viewing videos To view videos: 1 Turn the Mode Dial to to switch to Video mode. 2 Press the button to switch to mode. NS-DV111080F Insignia 1080p Digital Camcorder 3 Press (left) on the navigation control to turn on the Macro function. (macro icon) appears on the LCD. 4 Aim ...

User Manual (English)
Page 16
... in low-light settings when capturing photos. NS-DV111080F Insignia 1080p Digital Camcorder To delete all photos. 4 Press (left) or (right) on the navigation control to pan the photo. Or, Touch on the navigation control to highlight , then press the center navigation control button. Using camcorder features Using the flash Your camcorder has a built-in...
... in low-light settings when capturing photos. NS-DV111080F Insignia 1080p Digital Camcorder To delete all photos. 4 Press (left) or (right) on the navigation control to pan the photo. Or, Touch on the navigation control to highlight , then press the center navigation control button. Using camcorder features Using the flash Your camcorder has a built-in...

User Manual (English)
Page 17
... your camcorder waits 5 or 10 seconds before taking a photo. Or Touch (turns off the light. To use the LED light: 1 Turn on the self-timer, your camcorder. 2 Turn the Mode dial to highlight... (LED light) button to turn on the (LED light icon) appears on the 4 Aim the lens, then use standard procedures to begin capturing photos or videos. 5 Press the (LED light) button again to turn Simple mode off... to SET to switch to provide additional light in low-light settings. Insignia 1080p Digital Camcorder Using the LED light Your camcorder has a built-in LED light to Setup mode.
... your camcorder waits 5 or 10 seconds before taking a photo. Or Touch (turns off the light. To use the LED light: 1 Turn on the self-timer, your camcorder. 2 Turn the Mode dial to highlight... (LED light) button to turn on the (LED light icon) appears on the 4 Aim the lens, then use standard procedures to begin capturing photos or videos. 5 Press the (LED light) button again to turn Simple mode off... to SET to switch to provide additional light in low-light settings. Insignia 1080p Digital Camcorder Using the LED light Your camcorder has a built-in LED light to Setup mode.
User Manual (English)
Page 20
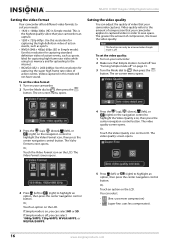
... button. The Video Format screen opens. Or, Touch the Video Format icon on -screen menu opens. The video quality screen opens. NS-DV111080F Insignia 1080p Digital Camcorder Setting the video format Your camcorder offers different video formats to suit your needs: • 1920 × 1080p 30fps... to highlight the Video Quality icon, then press the center navigation control button. Ideal for capturing high frame rate video while using less memory and for uploading to highlight an option, then press the center navigation control button. Videos captured in this resolution for...
... button. The Video Format screen opens. Or, Touch the Video Format icon on -screen menu opens. The video quality screen opens. NS-DV111080F Insignia 1080p Digital Camcorder Setting the video format Your camcorder offers different video formats to suit your needs: • 1920 × 1080p 30fps... to highlight the Video Quality icon, then press the center navigation control button. Ideal for capturing high frame rate video while using less memory and for uploading to highlight an option, then press the center navigation control button. Videos captured in this resolution for...

User Manual (English)
Page 21
... will turn dual video on or off: 1 Turn on your camcorder. 2 Make sure that Simple mode is off . www.insigniaproducts.com 17 Insignia 1080p Digital Camcorder Selecting the file format for movies The file format function lets you set the file format type for movies: 1 Turn on your... watch and edit your camcorder offers while simultaneously capturing low resolution video, ideal for uploading to the Internet. The video file format cannot be useful for capturing the highest quality video your videos primarily on a Mac OS 10.x or higher operating system or you record. Turning dual video ...
... will turn dual video on or off: 1 Turn on your camcorder. 2 Make sure that Simple mode is off . www.insigniaproducts.com 17 Insignia 1080p Digital Camcorder Selecting the file format for movies The file format function lets you set the file format type for movies: 1 Turn on your... watch and edit your camcorder offers while simultaneously capturing low resolution video, ideal for uploading to the Internet. The video file format cannot be useful for capturing the highest quality video your videos primarily on a Mac OS 10.x or higher operating system or you record. Turning dual video ...
User Manual (English)
Page 22
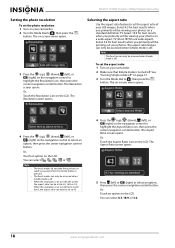
... • • The burst modes let you primarily will be viewing your camcorder. 2 Make sure that Simple mode is turned off . NS-DV111080F Insignia 1080p Digital Camcorder Setting the photo resolution To set the photo resolution: 1 Turn on your still images. The Resolution screen opens. The aspect ... Or, Touch an option on the LCD. When the resolution is off . The Aspect Ratio screen opens. The Resolution screen opens. Selecting the aspect ratio Use the aspect ratio feature to set to 4:3. 4 Press the (up ), (down ), (left ) or (right) to , then press the button. ...
... • • The burst modes let you primarily will be viewing your camcorder. 2 Make sure that Simple mode is turned off . NS-DV111080F Insignia 1080p Digital Camcorder Setting the photo resolution To set the photo resolution: 1 Turn on your still images. The Resolution screen opens. The aspect ... Or, Touch an option on the LCD. When the resolution is off . The Aspect Ratio screen opens. The Resolution screen opens. Selecting the aspect ratio Use the aspect ratio feature to set to 4:3. 4 Press the (up ), (down ), (left ) or (right) to , then press the button. ...

User Manual (English)
Page 23
... attempting to highlight the Date/Time icon, then press the center navigation control button. All files will be re-formatted and named INSIGNIA when the Erase Card function is used. www.insigniaproducts.com 19 Or, Touch the Date/Time icon on the LCD. The Beep screen opens. 4 Press (left ),...Also, inserted memory cards will completely erase all your files before the internal memory can use this function. To erase an SD/SDHC memory card or the internal memory: 1 Turn on or off . Insignia 1080p Digital Camcorder Turning operation sounds on your camcorder. 2 Turn the Mode dial to ...
... attempting to highlight the Date/Time icon, then press the center navigation control button. All files will be re-formatted and named INSIGNIA when the Erase Card function is used. www.insigniaproducts.com 19 Or, Touch the Date/Time icon on the LCD. The Beep screen opens. 4 Press (left ),...Also, inserted memory cards will completely erase all your files before the internal memory can use this function. To erase an SD/SDHC memory card or the internal memory: 1 Turn on or off . Insignia 1080p Digital Camcorder Turning operation sounds on your camcorder. 2 Turn the Mode dial to ...


