Quick Setup Guide (English)
Page 2
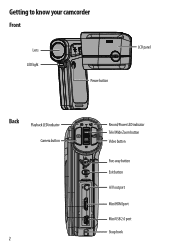
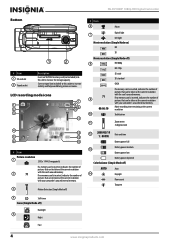
Getting to know your camcorder Front Lens LED light Power button LCD panel Back Playback LED indicator Camera button 2 Record/Power LED indicator Tele/Wide Zoom button Video button Five-way button Exit button A/V out port Mini HDMI port Mini USB 2.0 port Strap hook
Getting to know your camcorder Front Lens LED light Power button LCD panel Back Playback LED indicator Camera button 2 Record/Power LED indicator Tele/Wide Zoom button Video button Five-way button Exit button A/V out port Mini HDMI port Mini USB 2.0 port Strap hook
Quick Setup Guide (English)
Page 4
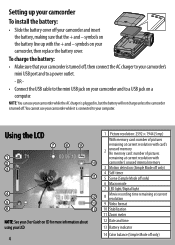
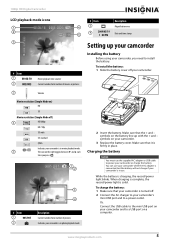
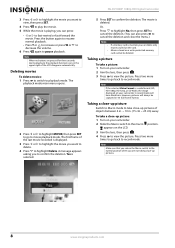
... 9 Video format 10 Stabilization 11 Zoom meter 12 Date and time 13 Battery indicator 14 Color balance (Simple Mode off , then connect the AC charger to your camcorder, then replace the battery cover. To charge the battery: • Make sure that the + and - Setting up with camcorder's unused internal memory 3 Motion detection (Simple Mode off only) 4 Self-timer 5 Scene (Simple Mode off only) 6 Macro mode 7 LED light/Digital light 8 Movie recording time remaining at current resolution with the + and - Using the LCD...
... 9 Video format 10 Stabilization 11 Zoom meter 12 Date and time 13 Battery indicator 14 Color balance (Simple Mode off , then connect the AC charger to your camcorder, then replace the battery cover. To charge the battery: • Make sure that the + and - Setting up with camcorder's unused internal memory 3 Motion detection (Simple Mode off only) 4 Self-timer 5 Scene (Simple Mode off only) 6 Macro mode 7 LED light/Digital light 8 Movie recording time remaining at current resolution with the + and - Using the LCD...
Quick Setup Guide (English)
Page 7
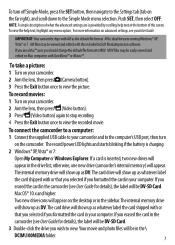
... or Windows Explorer. The internal memory drive will show up as whatever label the card shipped with QuickTime™ or iMovie™. MOVfilesmaybeeasilyviewedand edited on Mac computers with or that you selected if you erased the card in your camcorder. 2 Aim the lens, then press (Video button). 3 Press (Video button) again to stop recording. 4 Press the Exit button once to view the picture. To connect the camcorder to a computer: 1 Connect the supplied USB cable...
... or Windows Explorer. The internal memory drive will show up as whatever label the card shipped with QuickTime™ or iMovie™. MOVfilesmaybeeasilyviewedand edited on Mac computers with or that you selected if you erased the card in your camcorder. 2 Aim the lens, then press (Video button). 3 Press (Video button) again to stop recording. 4 Press the Exit button once to view the picture. To connect the camcorder to a computer: 1 Connect the supplied USB cable...
User Manual (English)
Page 2
... LCD playback mode icons 5 Setting up your camcorder 5 Installing the battery 5 Charging the battery 5 Inserting or removing an SD/SDHC memory card 6 Getting started 6 Turning your camcorder on or off 6 Turning on your camcorder for the first time 7 Initial settings 7 Recording a movie 7 Viewing movies 7 Deleting movies 8 Taking a picture 8 Taking a close-up picture 8 Viewing pictures 9 Deleting pictures 9 Using camcorder features 10 Using the light 10 Using the self-timer 10 Using zoom 10 Adjusting camcorder settings 10 Turning Simple Mode off 10 Turning operation sounds...
... LCD playback mode icons 5 Setting up your camcorder 5 Installing the battery 5 Charging the battery 5 Inserting or removing an SD/SDHC memory card 6 Getting started 6 Turning your camcorder on or off 6 Turning on your camcorder for the first time 7 Initial settings 7 Recording a movie 7 Viewing movies 7 Deleting movies 8 Taking a picture 8 Taking a close-up picture 8 Viewing pictures 9 Deleting pictures 9 Using camcorder features 10 Using the light 10 Using the self-timer 10 Using zoom 10 Adjusting camcorder settings 10 Turning Simple Mode off 10 Turning operation sounds...
User Manual (English)
Page 3
Contents Resetting to factory defaults 18 Viewing movies and pictures on a TV 19 Connecting to an HDMI enabled TV 19 Connecting to a TV using the supplied A/V cable 19 Viewing movies and pictures on a computer 20 Installing software 20 Transferring movies or pictures to a computer 20 Burning a movie to a DVD 20 Troubleshooting 21 Specifications and default settings 21 Specifications 21 Default settings 22 Legal notices 22 One-year limited warranty 23 www.insigniaproducts.com iii
Contents Resetting to factory defaults 18 Viewing movies and pictures on a TV 19 Connecting to an HDMI enabled TV 19 Connecting to a TV using the supplied A/V cable 19 Viewing movies and pictures on a computer 20 Installing software 20 Transferring movies or pictures to a computer 20 Burning a movie to a DVD 20 Troubleshooting 21 Specifications and default settings 21 Specifications 21 Default settings 22 Legal notices 22 One-year limited warranty 23 www.insigniaproducts.com iii
User Manual (English)
Page 5
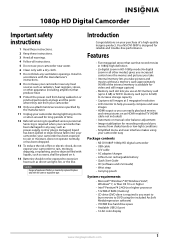
... help you easily compose and view images • HDMI ouput so you want to burn movies to DVD using your camcorder easy Package contents • NS-DV1080P 1080p HD digital camcorder • USB cable • A/V cable • AC adapter/charger • Lithium-ion rechargeable battery • Quick Start Guide • CD (software and User Guide) • Wrist strap • Carrying pouch System requirements • Microsoft® Windows® XP, Windows Vista®, Windows® 7, or Mac...
... help you easily compose and view images • HDMI ouput so you want to burn movies to DVD using your camcorder easy Package contents • NS-DV1080P 1080p HD digital camcorder • USB cable • A/V cable • AC adapter/charger • Lithium-ion rechargeable battery • Quick Start Guide • CD (software and User Guide) • Wrist strap • Carrying pouch System requirements • Microsoft® Windows® XP, Windows Vista®, Windows® 7, or Mac...
User Manual (English)
Page 6
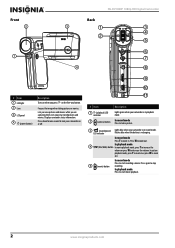
... stop 5 (movie) button recording. Flashes blue when the battery is in record mode. Press again to turn your camcorder on the five-way button. NS-DV1080P 1080p HD Digital Camcorder Front Back 2 3 1 3 4 2 5 1 4 # Item 1 LED light 2 Lens 3 LCD panel 4 (power button) Description Turns on when you press on or off. 6 7 8 9 10 11 # Item 1 (playback) LED indicator 2 (camera) button Description Lights green when your camcorder is in playback mode. Lets you view pictures and movies while you view stored pictures and movies. In record mode Press to take a picture...
... stop 5 (movie) button recording. Flashes blue when the battery is in record mode. Press again to turn your camcorder on the five-way button. NS-DV1080P 1080p HD Digital Camcorder Front Back 2 3 1 3 4 2 5 1 4 # Item 1 LED light 2 Lens 3 LCD panel 4 (power button) Description Turns on when you press on or off. 6 7 8 9 10 11 # Item 1 (playback) LED indicator 2 (camera) button Description Lights green when your camcorder is in playback mode. Lets you view pictures and movies while you view stored pictures and movies. In record mode Press to take a picture...

User Manual (English)
Page 7
... mode, press to delete it. After you stop recording, press to quickly review the movie you press this port using the supplied USB cable. Connect a non-high-definition TV to this button while a movie is playing or is paused, the playback volume is playing, press to adjust a setting. Switch to Macro mode to take close-up in a list of objects between 6 in. ~ 10 in order to resume normal playback. One press turns on the digital light...
... mode, press to delete it. After you stop recording, press to quickly review the movie you press this port using the supplied USB cable. Connect a non-high-definition TV to this button while a movie is playing or is paused, the playback volume is playing, press to adjust a setting. Switch to Macro mode to take close-up in a list of objects between 6 in. ~ 10 in order to resume normal playback. One press turns on the digital light...
User Manual (English)
Page 8
... with the card's unused memory. 9 71 If no memory card is inserted, indicates the number of pictures that can be taken at the current resolution with your camcorder's unused internal memory. 00:06:10 Movie recording time remaining at the current resolution 10 Stabilization 11 Zoom meter: 3x digital zoom 12 2009/05/19 1 : 00 PM Date and time Battery power full Battery power medium 13 Battery power low Battery power depleted Color balance (Simple Mode off) AUTO Auto 14...
... with the card's unused memory. 9 71 If no memory card is inserted, indicates the number of pictures that can be taken at the current resolution with your camcorder's unused internal memory. 00:06:10 Movie recording time remaining at the current resolution 10 Stabilization 11 Zoom meter: 3x digital zoom 12 2009/05/19 1 : 00 PM Date and time Battery power full Battery power medium 13 Battery power low Battery power depleted Color balance (Simple Mode off) AUTO Auto 14...
User Manual (English)
Page 9
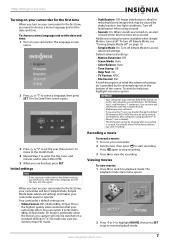
... HD Digital Camcorder LCD playback mode icons 1 4 2 5 3 # Item 1 00:06:10 2 005/005 Movie playback time counter Current number/total number of pictures Indicates your camcorder is in photo playback mode 2 Insert the battery. To charge the battery: 1 Make sure that your camcorder is charging, the record/power light blinks. While the battery is turned off. 2 Connect the AC charger to your camcorder is solid. Make sure that it is in place. You can use your camcorder while the AC adapter is connected...
... HD Digital Camcorder LCD playback mode icons 1 4 2 5 3 # Item 1 00:06:10 2 005/005 Movie playback time counter Current number/total number of pictures Indicates your camcorder is in photo playback mode 2 Insert the battery. To charge the battery: 1 Make sure that your camcorder is charging, the record/power light blinks. While the battery is turned off. 2 Connect the AC charger to your camcorder is solid. Make sure that it is in place. You can use your camcorder while the AC adapter is connected...
User Manual (English)
Page 11
... memory than HD mode. • Stabilization: Off. SD mode is ideal for reducing blurred images that your camcorder. 2 Aim the lens, then press to select the menu language and set the date and time: 1 Turn on your camcorder offers. When you will have to start recording. Default advanced settings: • Motion Detection: Off. • Scene Mode: Auto. • Color Balance: Auto. • Time Stamp: Off. • Help Text: On. • TV Format: NTSC. • File Format: AVI. Viewing movies...
... memory than HD mode. • Stabilization: Off. SD mode is ideal for reducing blurred images that your camcorder. 2 Aim the lens, then press to select the menu language and set the date and time: 1 Turn on your camcorder offers. When you will have to start recording. Default advanced settings: • Motion Detection: Off. • Scene Mode: Auto. • Color Balance: Auto. • Time Stamp: Off. • Help Text: On. • TV Format: NTSC. • File Format: AVI. Viewing movies...
User Manual (English)
Page 12
... movie. Yes is a wide format (HD, HD 1080p, HD 720p, or SD Wide), the image displayed on your camcorder. 2 Slide the Macro switch to pause playback. Press two more times to go back to record mode. Note When no buttons are not taking close the menu.) Notes • • If a memory card is playing, you to view the picture. position. 3 Aim the lens, then press . 4 Press to confirm the deletion...
... movie. Yes is a wide format (HD, HD 1080p, HD 720p, or SD Wide), the image displayed on your camcorder. 2 Slide the Macro switch to pause playback. Press two more times to go back to record mode. Note When no buttons are not taking close the menu.) Notes • • If a memory card is playing, you to view the picture. position. 3 Aim the lens, then press . 4 Press to confirm the deletion...
User Manual (English)
Page 14
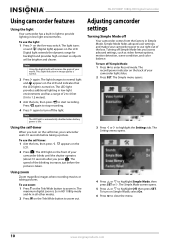
... digital light will be brighter and clearer. The LED light provides additional lighting in low-light environments and has a range of your camcorder blinks until the shutter operates (about 10 seconds after you access advaced settings, such as video format options, motion detection, scene condition, and color balance. To use the light: 1 Press on the Tele/Wide button to close the menu. 10 www.insigniaproducts.com Using zoom Zoom magnifies images when recording movies or taking a picture. Adjusting camcorder settings Turning...
... digital light will be brighter and clearer. The LED light provides additional lighting in low-light environments and has a range of your camcorder blinks until the shutter operates (about 10 seconds after you access advaced settings, such as video format options, motion detection, scene condition, and color balance. To use the light: 1 Press on the Tele/Wide button to close the menu. 10 www.insigniaproducts.com Using zoom Zoom magnifies images when recording movies or taking a picture. Adjusting camcorder settings Turning...

User Manual (English)
Page 16
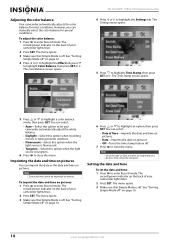
... resolution is also excellent for filming action movies, such as YouTube™. The Stabilization screen opens. NS-DV1080P 1080p HD Digital Camcorder Setting the video format To set the video format: 1 Press to highlight Stabilization, then press SET or . Note: SD mode is called SD when Simple Mode is on the back of memory, but with greater digital zoom options (up to a video sharing service such as sporting events. The higher...
... resolution is also excellent for filming action movies, such as YouTube™. The Stabilization screen opens. NS-DV1080P 1080p HD Digital Camcorder Setting the video format To set the video format: 1 Press to highlight Stabilization, then press SET or . Note: SD mode is called SD when Simple Mode is on the back of memory, but with greater digital zoom options (up to a video sharing service such as sporting events. The higher...
User Manual (English)
Page 18
... record/power indicator on the back of your camcorder lights blue. 2 Press SET. The menu opens. 3 Make sure that Simple Mode is tungsten. 6 Press to close the menu. Adjusting the color balance Your camcorder automatically adjusts the color balance for special conditions. You can manually select the color balance for most conditions. See "Turning Simple Mode off . 7 Press to close the menu. NS-DV1080P 1080p HD Digital Camcorder 4 Press or to highlight a color balance mode, then press SET. The Time Stamp screen opens...
... record/power indicator on the back of your camcorder lights blue. 2 Press SET. The menu opens. 3 Make sure that Simple Mode is tungsten. 6 Press to close the menu. Adjusting the color balance Your camcorder automatically adjusts the color balance for special conditions. You can manually select the color balance for most conditions. See "Turning Simple Mode off . 7 Press to close the menu. NS-DV1080P 1080p HD Digital Camcorder 4 Press or to highlight a color balance mode, then press SET. The Time Stamp screen opens...
User Manual (English)
Page 19
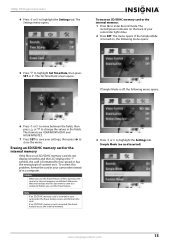
... highlight Set Time/Date, then press SET or . The menu opens. The record/power indicator on the card or in the fields. Erasing an SD/SDHC memory card or the internal memory If the files on it. If no card inserted) www.insigniaproducts.com 15 1080p HD Digital Camcorder 4 Press or to enter Record mode. symbol, the card is formatted for low speed or has the wrong type of your settings, then press to save your camcorder lights...
... highlight Set Time/Date, then press SET or . The menu opens. The record/power indicator on the card or in the fields. Erasing an SD/SDHC memory card or the internal memory If the files on it. If no card inserted) www.insigniaproducts.com 15 1080p HD Digital Camcorder 4 Press or to enter Record mode. symbol, the card is formatted for low speed or has the wrong type of your settings, then press to save your camcorder lights...
User Manual (English)
Page 22
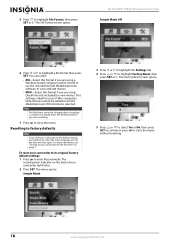
NS-DV1080P 1080p HD Digital Camcorder Simple Mode Off 6 Press or to close the menu. The Factory Reset screen opens. 5 Press or to select Yes or No, then press SET to confirm or press to highlight a file format then press SET. Note: Movies cannot be changed after a recording is selected. For more information, see "Turning on your camcorder for users of your camcorder lights blue. 2 Press SET. This setting is ideal for the first time" on...
NS-DV1080P 1080p HD Digital Camcorder Simple Mode Off 6 Press or to close the menu. The Factory Reset screen opens. 5 Press or to select Yes or No, then press SET to confirm or press to highlight a file format then press SET. Note: Movies cannot be changed after a recording is selected. For more information, see "Turning on your camcorder for users of your camcorder lights blue. 2 Press SET. This setting is ideal for the first time" on...
User Manual (English)
Page 23
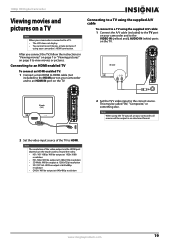
.... Connecting to a TV using the supplied A/V cable To connect to a TV using the TV out jack on your camcorder, all movies will be output in "Viewing movies" on page 7 or "Viewing pictures" on page 9 to a TV: • The LCD does not display. • You cannot record movies or take pictures if using your camcorder's HDMI connection. After you connect the TV, follow the instructions in an interlaced format. 2 Set the video input source of the video output via...
.... Connecting to a TV using the supplied A/V cable To connect to a TV using the TV out jack on your camcorder, all movies will be output in "Viewing movies" on page 7 or "Viewing pictures" on page 9 to a TV: • The LCD does not display. • You cannot record movies or take pictures if using your camcorder's HDMI connection. After you connect the TV, follow the instructions in an interlaced format. 2 Set the video input source of the video output via...
User Manual (English)
Page 24
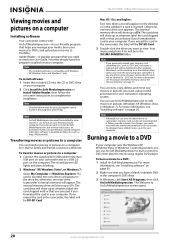
NS-DV1080P 1080p HD Digital Camcorder Viewing movies and pictures on a computer Installing software Your camcorder comes with: ArcSoft MediaImpression-A user-friendly program that helps you manage your media, burn your movies to DVDs, and upload your camcorder and to a USB 2.0 port on the computer. To transfer movies or pictures to a computer: 1 Connect the supplied mini USB cable to the mini USB port on page 15. The record/power LED lights and starts blinking. 2 Windows® XP, Windows Vista®, or Windows 7: Open My Computer or...
NS-DV1080P 1080p HD Digital Camcorder Viewing movies and pictures on a computer Installing software Your camcorder comes with: ArcSoft MediaImpression-A user-friendly program that helps you manage your media, burn your movies to DVDs, and upload your camcorder and to a USB 2.0 port on the computer. To transfer movies or pictures to a computer: 1 Connect the supplied mini USB cable to the mini USB port on page 15. The record/power LED lights and starts blinking. 2 Windows® XP, Windows Vista®, or Windows 7: Open My Computer or...
User Manual (English)
Page 25
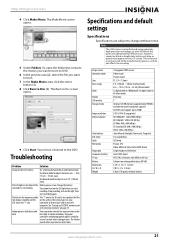
... Movie area, click the select button (3). 8 Click Burn to the DVD. Stop recording, turn on the front of the manufacturing process, and do The "!" Specifications and default settings Specifications Specifications are the wrong type. Indoor pictures look blurry and dark Your camcorder extends the exposure time under low-light or indoor conditions. The shutter sounds when a picture has been taken. Image sensor Operation modes Lens Focus range Zoom Shutter LCD monitor Storage media Image resolution Video resolution Color balance Self-timer Light File format Image play...
... Movie area, click the select button (3). 8 Click Burn to the DVD. Stop recording, turn on the front of the manufacturing process, and do The "!" Specifications and default settings Specifications Specifications are the wrong type. Indoor pictures look blurry and dark Your camcorder extends the exposure time under low-light or indoor conditions. The shutter sounds when a picture has been taken. Image sensor Operation modes Lens Focus range Zoom Shutter LCD monitor Storage media Image resolution Video resolution Color balance Self-timer Light File format Image play...


