Quick Setup Guide (English)
Page 1
Your Insignia digital camera is designed for more information. Use this guide for initial setup of your purchase of a high-quality Insignia product. Quick Setup Guide NS-DSC1112SL / DSC1112SL-CN Congratulations on your camera. Package contents Digital camera Wrist strap USB cable Li-ion battery (NP45) Battery Charger Quick Setup Guide CD with User Guide 1 If you have questions, see your User Guide for reliable and troublefree performance.
Your Insignia digital camera is designed for more information. Use this guide for initial setup of your purchase of a high-quality Insignia product. Quick Setup Guide NS-DSC1112SL / DSC1112SL-CN Congratulations on your camera. Package contents Digital camera Wrist strap USB cable Li-ion battery (NP45) Battery Charger Quick Setup Guide CD with User Guide 1 If you have questions, see your User Guide for reliable and troublefree performance.
Quick Setup Guide (English)
Page 3
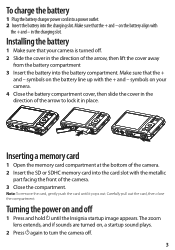
...camera. 2 Insert the SD or SDHC memory card into the charging slot. To charge the battery 1 Plug the battery charger power cord into a power outlet. 2 Insert the battery into the card slot with the metallic part facing the front of the camera. 3 Close ...the compartment. Installing the battery 1 Make sure that the + and - symbols on the battery line up with the + and - Note: To remove the card, gently push the card until the Insignia...
...camera. 2 Insert the SD or SDHC memory card into the charging slot. To charge the battery 1 Plug the battery charger power cord into a power outlet. 2 Insert the battery into the card slot with the metallic part facing the front of the camera. 3 Close ...the compartment. Installing the battery 1 Make sure that the + and - symbols on the battery line up with the + and - Note: To remove the card, gently push the card until the Insignia...
User Manual (English)
Page 6
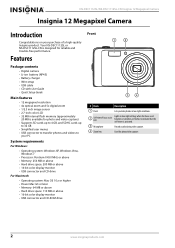
NS-DSC1112SL/NS-DSC1112SL-CN Insignia 12 Megapixel Camera Insignia 12 Megapixel Camera Introduction Congratulations on , or flashes to your PC System requirements For Windows: • Operating system: Windows XP, Windows Vista...turned on your purchase of a high-quality Insignia product. Your NS-DSC1112SL or NS-DSC1112SL-CN is activated. 3 Microphone Records audio during video capture. 4 Zoom lens Used for reliable and trouble-free performance. Features Package contents • Digital camera • Li-ion battery (NP45) • Battery charger • Wrist strap • USB cable...
NS-DSC1112SL/NS-DSC1112SL-CN Insignia 12 Megapixel Camera Insignia 12 Megapixel Camera Introduction Congratulations on , or flashes to your PC System requirements For Windows: • Operating system: Windows XP, Windows Vista...turned on your purchase of a high-quality Insignia product. Your NS-DSC1112SL or NS-DSC1112SL-CN is activated. 3 Microphone Records audio during video capture. 4 Zoom lens Used for reliable and trouble-free performance. Features Package contents • Digital camera • Li-ion battery (NP45) • Battery charger • Wrist strap • USB cable...
User Manual (English)
Page 8
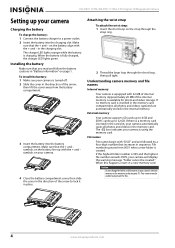
...is equipped with the + and - When the battery is charging. When this happens, insert in the internal memory. The charger LED lights orange while the battery is fully charged, the charger LED lights green. Attaching the wrist strap To ...NS-DSC1112SL/NS-DSC1112SL-CN Insignia 12 Megapixel Camera Setting up your camera Charging the battery To charge the battery: 1 Connect the battery charger to a power outlet. 2 Insert the battery into the battery compartment. Installing the battery Make sure that the + and - File numbering starts from the battery compartment. 3 Insert the battery...
...is equipped with the + and - When the battery is charging. When this happens, insert in the internal memory. The charger LED lights orange while the battery is fully charged, the charger LED lights green. Attaching the wrist strap To ...NS-DSC1112SL/NS-DSC1112SL-CN Insignia 12 Megapixel Camera Setting up your camera Charging the battery To charge the battery: 1 Connect the battery charger to a power outlet. 2 Insert the battery into the battery compartment. Installing the battery Make sure that the + and - File numbering starts from the battery compartment. 3 Insert the battery...


