User Manual (English)
Page 2
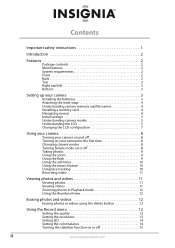
...the first time 8 Changing camera modes 8 Turning Simple mode on or off 8 Taking photos 9 Using the zoom 9 Using the flash 9 Using the self-timer 10 Using the macro feature 10 Using face tracking 10 Recording video 11 Viewing photos and videos 11 Viewing photos 11 Viewing videos 11 Zooming photos in Playback mode 12 Using the thumbnail view 12 Erasing photos and videos 12 Erasing photos or videos using the delete button 12 Using the Record menu 12 Setting the quality 12 Setting the resolution 13 Setting ISO 14 Setting the color balance 14 Turning the stabilizer function on...
...the first time 8 Changing camera modes 8 Turning Simple mode on or off 8 Taking photos 9 Using the zoom 9 Using the flash 9 Using the self-timer 10 Using the macro feature 10 Using face tracking 10 Recording video 11 Viewing photos and videos 11 Viewing photos 11 Viewing videos 11 Zooming photos in Playback mode 12 Using the thumbnail view 12 Erasing photos and videos 12 Erasing photos or videos using the delete button 12 Using the Record menu 12 Setting the quality 12 Setting the resolution 13 Setting ISO 14 Setting the color balance 14 Turning the stabilizer function on...

User Manual (English)
Page 3
... Erasing photos and videos 17 Copying photos and videos to a memory card 17 Viewing a slideshow of photos 18 Using the Setup menu 19 Turning alert sounds on or off 19 Turning Quick View on or off 19 Imprinting the date and time on photos 19 Setting the date and time 20 Turning Power Save on or off 20 Using the Tools menu 21 Setting the menu language 21 Setting the battery type 21 Turning help text on or off 22 Resetting settings to the factory defaults 22 Transferring files to a computer 23 Troubleshooting...
... Erasing photos and videos 17 Copying photos and videos to a memory card 17 Viewing a slideshow of photos 18 Using the Setup menu 19 Turning alert sounds on or off 19 Turning Quick View on or off 19 Imprinting the date and time on photos 19 Setting the date and time 20 Turning Power Save on or off 20 Using the Tools menu 21 Setting the menu language 21 Setting the battery type 21 Turning help text on or off 22 Resetting settings to the factory defaults 22 Transferring files to a computer 23 Troubleshooting...
User Manual (English)
Page 6
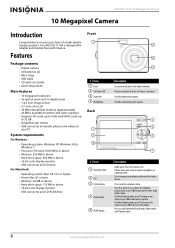
...-bit color display monitor • USB connector and CD-ROM drive Front # Item 1 Flash 2 Self-timer LED 3 Zoom lens 4 Microphone Back # Item 1 Operation lamp 2 LCD 3 Delete button 4 Zoom button 5 MODE button Description Lets you take photos in low-light conditions. In Photo Playback mode, press T to zoom in on . Records audio during video capture. NS-DSC1110A 10 Megapixel Camera 10 Megapixel Camera Introduction Congratulations on a photo. Description Lights green when the camera is on a subject for wide-angle photos/video. Press to decrease the volume. Press T to indicate that...
...-bit color display monitor • USB connector and CD-ROM drive Front # Item 1 Flash 2 Self-timer LED 3 Zoom lens 4 Microphone Back # Item 1 Operation lamp 2 LCD 3 Delete button 4 Zoom button 5 MODE button Description Lets you take photos in low-light conditions. In Photo Playback mode, press T to zoom in on . Records audio during video capture. NS-DSC1110A 10 Megapixel Camera 10 Megapixel Camera Introduction Congratulations on a photo. Description Lights green when the camera is on a subject for wide-angle photos/video. Press to decrease the volume. Press T to indicate that...

User Manual (English)
Page 7
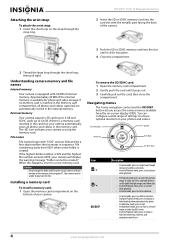
... navigation button 7 MENU button Description The Macro, Face Tracking, Self-Timer, and Flash buttons are also used to navigate through the on -screen menu. Press to take a photo or to increase the LCD brightness for 10 seconds. For more information, see "Installing the batteries" on page 4. For more information, see "Installing a memory card" on page 3. symbols in the battery compartment. 4 Close the battery compartment cover, then slide the cover in the direction...
... navigation button 7 MENU button Description The Macro, Face Tracking, Self-Timer, and Flash buttons are also used to navigate through the on -screen menu. Press to take a photo or to increase the LCD brightness for 10 seconds. For more information, see "Installing the batteries" on page 4. For more information, see "Installing a memory card" on page 3. symbols in the battery compartment. 4 Close the battery compartment cover, then slide the cover in the direction...
User Manual (English)
Page 8
... image or video clip. File names File names begin with 32 MB of settings to ensure optimal results from your camera will display the warning message "Folder cannot be unable to show or hide the volume bar, time bar, and navigation control icon. 4 www.insigniaproducts.com If the highest folder number is inserted in the memory card compartment, all photos and videos in the memory card. To remove the SD/SDHC card: 1 Open the memory card...
... image or video clip. File names File names begin with 32 MB of settings to ensure optimal results from your camera will display the warning message "Folder cannot be unable to show or hide the volume bar, time bar, and navigation control icon. 4 www.insigniaproducts.com If the highest folder number is inserted in the memory card compartment, all photos and videos in the memory card. To remove the SD/SDHC card: 1 Open the memory card...
User Manual (English)
Page 9
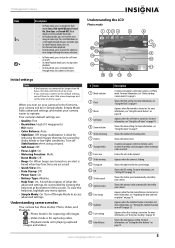
...; Date Stamp: Off. • Power Save: On. • Battery Type: Alkaline. • Help Text: On. A brief description of remaining shots. For more information, see "Understanding camera modes" on . Appears when the camera is turned on page 14. For more information, see "Setting ISO" on . Your camera's default settings are only available for playing captured images and videos. # Item 1 Mode indicator 2 Flash 3 Macro 4 Self-timer 5 Zoom indicator 6 Shots remaining 7 Battery 8 Storage media 9 Focus area 10 Shake warning 11 Histogram 12 ISO 13 Shutter speed...
...; Date Stamp: Off. • Power Save: On. • Battery Type: Alkaline. • Help Text: On. A brief description of remaining shots. For more information, see "Understanding camera modes" on . Appears when the camera is turned on page 14. For more information, see "Setting ISO" on . Your camera's default settings are only available for playing captured images and videos. # Item 1 Mode indicator 2 Flash 3 Macro 4 Self-timer 5 Zoom indicator 6 Shots remaining 7 Battery 8 Storage media 9 Focus area 10 Shake warning 11 Histogram 12 ISO 13 Shutter speed...
User Manual (English)
Page 10
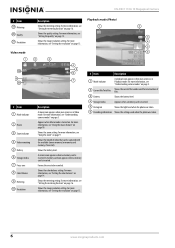
... memory (or memory card memory, if inserted). Shows the quality setting. Playback mode (Photo) # Item 1 Mode indicator 2 Macro 3 Zoom indicator 4 Video remaining 5 Battery 6 Storage media 7 Focus area 8 Color Balance 9 Metering 10 Resolution Description A movie icon appears when your camera is in Playback mode. A memory card icon appears when a memory card is inserted. 5 Histogram Shows the light level when the photo was taken. 6 Recording information Shows the settings used when the photo was taken. 6 www.insigniaproducts.com Shows the metering setting. Shows the image...
... memory (or memory card memory, if inserted). Shows the quality setting. Playback mode (Photo) # Item 1 Mode indicator 2 Macro 3 Zoom indicator 4 Video remaining 5 Battery 6 Storage media 7 Focus area 8 Color Balance 9 Metering 10 Resolution Description A movie icon appears when your camera is in Playback mode. A memory card icon appears when a memory card is inserted. 5 Histogram Shows the light level when the photo was taken. 6 Recording information Shows the settings used when the photo was taken. 6 www.insigniaproducts.com Shows the metering setting. Shows the image...
User Manual (English)
Page 11
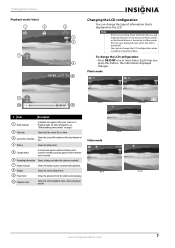
..., Flash, Self-timer, Macro, and Stabilizer features are turned on full OSD off 3 Current file/ Total files Shows the current file number and the total number of time the video has been playing. 10 Playback status Shows the current playback status, such as playing or paused. Video mode 5 Storage media A camera icon appears when no memory card is inserted. 6 Recording information Shows settings used when the video was recorded. 7 Button indicator Shows the buttons to press to control video playback. 8 Volume Shows the current volume...
..., Flash, Self-timer, Macro, and Stabilizer features are turned on full OSD off 3 Current file/ Total files Shows the current file number and the total number of time the video has been playing. 10 Playback status Shows the current playback status, such as playing or paused. Video mode 5 Storage media A camera icon appears when no memory card is inserted. 6 Recording information Shows settings used when the video was recorded. 7 Button indicator Shows the buttons to press to control video playback. 8 Volume Shows the current volume...

User Manual (English)
Page 12
... change camera modes: • Press MODE repeatedly to select a mode. To turn Simple mode on or off your camera. 2 Press MODE repeatedly to select a language, then press OK/DISP. The mode icon appears on , a startup sound plays. The on your camera: • Press POWER. Note If the batteries are turned on the upper-left of the LCD. 3 Press MENU. Playback mode NS-DSC1110A 10 Megapixel Camera 2 Press / or / to select Photo mode or Video mode. The Select Time and Date screen opens. To turn off : 1 Turn...
... change camera modes: • Press MODE repeatedly to select a mode. To turn Simple mode on or off your camera. 2 Press MODE repeatedly to select a language, then press OK/DISP. The mode icon appears on , a startup sound plays. The on your camera: • Press POWER. Note If the batteries are turned on the upper-left of the LCD. 3 Press MENU. Playback mode NS-DSC1110A 10 Megapixel Camera 2 Press / or / to select Photo mode or Video mode. The Select Time and Date screen opens. To turn off : 1 Turn...
User Manual (English)
Page 13
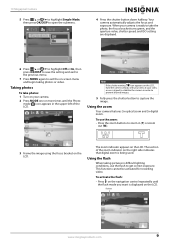
When your camera is being used. This function cannot be activated for recording video. To activate the flash: • Press on the navigation control repeatedly until the Photo mode icon appears in (T) or zoom out (W). 3 Frame the image using the focus bracket on the right side indicates that digital zoom is ready to exit the on the LCD. Taking photos To take the photo, the focus bracket turns green, and the aperture value, shutter speed, and ISO setting are displayed. 6 Press / or...
When your camera is being used. This function cannot be activated for recording video. To activate the flash: • Press on the navigation control repeatedly until the Photo mode icon appears in (T) or zoom out (W). 3 Frame the image using the focus bracket on the right side indicates that digital zoom is ready to exit the on the LCD. Taking photos To take the photo, the focus bracket turns green, and the aperture value, shutter speed, and ISO setting are displayed. 6 Press / or...
User Manual (English)
Page 14
... speed. Macro icon Notes • • Flash charging time may take the photo. Your camera will take the actual image. Force on-Flash fires every time you take photos after a 10-second delay. Flash off . The self-timer setting is automatically set to Off when you turn on the LCD. Using face tracking The face tracking mode detects faces and sets the camera to focus on or off -The flash never fires, regardless of the screen turns green. 4 Fully press the shutter button...
... speed. Macro icon Notes • • Flash charging time may take the photo. Your camera will take the actual image. Force on-Flash fires every time you take photos after a 10-second delay. Flash off . The self-timer setting is automatically set to Off when you turn on the LCD. Using face tracking The face tracking mode detects faces and sets the camera to focus on or off -The flash never fires, regardless of the screen turns green. 4 Fully press the shutter button...
User Manual (English)
Page 16
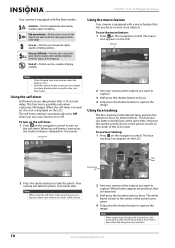
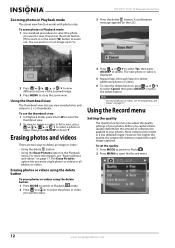
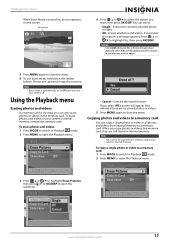
... image up to 5×. Erasing photos or videos using the delete button To erase photos or videos using the delete button: 1 Press MODE to switch to Playback mode. 2 Press / or / to select the photo or video you capture them. Using the Record menu Setting the quality The Quality function lets you adjust the quality settings of compression applied to your photos before you want to view, then press the zoom button (T) to zoom in Playback mode The zoom view function works with photos only. To use the thumbnail view: 1 In Playback mode...
... image up to 5×. Erasing photos or videos using the delete button To erase photos or videos using the delete button: 1 Press MODE to switch to Playback mode. 2 Press / or / to select the photo or video you capture them. Using the Record menu Setting the quality The Quality function lets you adjust the quality settings of compression applied to your photos before you want to view, then press the zoom button (T) to zoom in Playback mode The zoom view function works with photos only. To use the thumbnail view: 1 In Playback mode...
User Manual (English)
Page 18
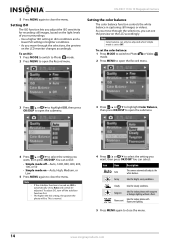
... Fluorescent Ideal for recording still images, based on the light levels of your surroundings. • Use a higher ISO setting in dim conditions and a lower ISO setting in capturing still images or videos. NS-DSC1110A 10 Megapixel Camera 5 Press MENU again to close the menu. Note Color balance can select: Icon Item Auto Auto Description The camera automatically adjusts the white balance. To adjust ISO, turn off -Auto, 1600, 800, 400, 200, 100, or 50 • Simple mode on the LCD accordingly.
... Fluorescent Ideal for recording still images, based on the light levels of your surroundings. • Use a higher ISO setting in dim conditions and a lower ISO setting in capturing still images or videos. NS-DSC1110A 10 Megapixel Camera 5 Press MENU again to close the menu. Note Color balance can select: Icon Item Auto Auto Description The camera automatically adjusts the white balance. To adjust ISO, turn off -Auto, 1600, 800, 400, 200, 100, or 50 • Simple mode on the LCD accordingly.
User Manual (English)
Page 20
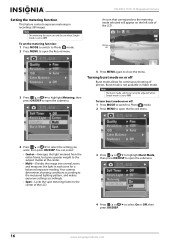
.... Your camera determines shooting conditions according to the measured lighting pattern, and makes exposure settings accordingly. • Spot-Locks the spot metering frame to open the Record menu. NS-DSC1110A 10 Megapixel Camera An icon that corresponds to the metering mode selected will appear on or off : 1 Press MODE to switch to Photo mode. 2 Press MENU to the center of the LCD. Note The burst mode setting can only be set when Simple mode is set to...
.... Your camera determines shooting conditions according to the measured lighting pattern, and makes exposure settings accordingly. • Spot-Locks the spot metering frame to open the Record menu. NS-DSC1110A 10 Megapixel Camera An icon that corresponds to the metering mode selected will appear on or off : 1 Press MODE to switch to Photo mode. 2 Press MENU to the center of the LCD. Note The burst mode setting can only be set when Simple mode is set to...
User Manual (English)
Page 21
... the erase function If you select this option, a message appears. Burst mode icon 4 Press / or / to open the submenu. Caution Selecting All will appear that you back up any files you want , then press OK/DISP. To copy a single photo or video to a memory card: 1 Press MODE to switch to Playback mode. 2 Press MENU to open the Playback menu. 3 Press / or / to highlight Erase Pictures, then press / or OK/DISP to save before...
... the erase function If you select this option, a message appears. Burst mode icon 4 Press / or / to open the submenu. Caution Selecting All will appear that you back up any files you want , then press OK/DISP. To copy a single photo or video to a memory card: 1 Press MODE to switch to Playback mode. 2 Press MENU to open the Playback menu. 3 Press / or / to highlight Erase Pictures, then press / or OK/DISP to save before...
User Manual (English)
Page 23
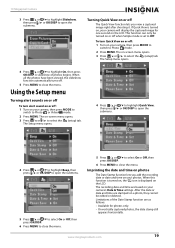
Using the Setup menu Turning alert sounds on or off To turn Quick View on your camera's Date & Time settings. The recording date and time are based on a photo, they cannot be turned on or off when Simple mode is displayed on or off . 5 Press MENU to close the menu. This function can only be edited or deleted. The Setup menu opens. 4 Press / or / to highlight On, then press OK/DISP. A slideshow of the Date Stamp function are stamped on your...
Using the Setup menu Turning alert sounds on or off To turn Quick View on your camera's Date & Time settings. The recording date and time are based on a photo, they cannot be turned on or off when Simple mode is displayed on or off . 5 Press MENU to close the menu. This function can only be edited or deleted. The Setup menu opens. 4 Press / or / to highlight On, then press OK/DISP. A slideshow of the Date Stamp function are stamped on your...
User Manual (English)
Page 24
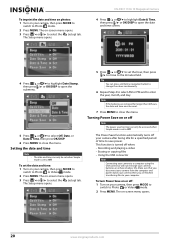
.... NS-DSC1110A 10 Megapixel Camera 4 Press / or / to highlight Date & Time, then press / or OK/DISP to open the date and time screen. 4 Press / or / to highlight Date Stamp, then press / or OK/DISP to open the submenu. 5 Press / or / to select Off, Date, or Date & Time, then press OK/DISP. 6 Press MENU to Off. Turning Power Save on or off when: • Recording and playing a video • Erasing or copying files • Using the USB connector Note Connecting...
.... NS-DSC1110A 10 Megapixel Camera 4 Press / or / to highlight Date & Time, then press / or OK/DISP to open the date and time screen. 4 Press / or / to highlight Date Stamp, then press / or OK/DISP to open the submenu. 5 Press / or / to select Off, Date, or Date & Time, then press OK/DISP. 6 Press MENU to Off. Turning Power Save on or off when: • Recording and playing a video • Erasing or copying files • Using the USB connector Note Connecting...
User Manual (English)
Page 27
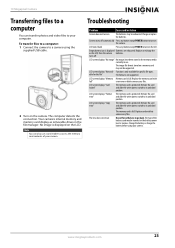
...photos and video files to its unlocked position. LCD screen displays "No image" No images have been stored in the memory media currently in the file manager. Remove the card and slide the write-protect switch to go back. Change the battery or charge the battery before using the supplied USB cable. 2 Turn on a memory card may not be supported. LCD turns blank Press any button except POWER button to its unlocked position. LCD screen displays "Not avail- LCD screen displays "Copy error" The memory card is protected. Your camera's internal memory and memory card display...
...photos and video files to its unlocked position. LCD screen displays "No image" No images have been stored in the memory media currently in the file manager. Remove the card and slide the write-protect switch to go back. Change the battery or charge the battery before using the supplied USB cable. 2 Turn on a memory card may not be supported. LCD turns blank Press any button except POWER button to its unlocked position. LCD screen displays "Not avail- LCD screen displays "Copy error" The memory card is protected. Your camera's internal memory and memory card display...
User Manual (English)
Page 28
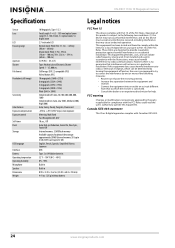
... FCC Part 15 This device complies with the instructions, may cause undesired operation. NS-DSC1110A 10 Megapixel Camera Specifications Sensor Lens LCD Focusing range Aperture Shutter File format Resolution (still image) Sensitivity Color balance Exposure compensation Exposure control Self-timer Flash Storage OSD language Interface Battery Operating temperature Operating humidity Microphone Speaker Dimensions Weight 10 Megapixels, Type: 1/2.3 Focal Length: F = 6.3 - 18.9 mm (optical zoom range 35.5 - 106.5 mm), 3× optical zoom, 5× digital zoom 2.7-inch color LCD Normal mode...
... FCC Part 15 This device complies with the instructions, may cause undesired operation. NS-DSC1110A 10 Megapixel Camera Specifications Sensor Lens LCD Focusing range Aperture Shutter File format Resolution (still image) Sensitivity Color balance Exposure compensation Exposure control Self-timer Flash Storage OSD language Interface Battery Operating temperature Operating humidity Microphone Speaker Dimensions Weight 10 Megapixels, Type: 1/2.3 Focal Length: F = 6.3 - 18.9 mm (optical zoom range 35.5 - 106.5 mm), 3× optical zoom, 5× digital zoom 2.7-inch color LCD Normal mode...
User Manual (English)
Page 29
... the date of your home. How to obtain warranty service? This warranty also does not cover: • Damage due to incorrect operation or maintenance • Connection to an incorrect voltage supply • Attempted repair by Insignia to service the Product • Products sold as fuses or batteries • Products where the factory applied serial number has been altered or removed REPAIR REPLACEMENT AS...
... the date of your home. How to obtain warranty service? This warranty also does not cover: • Damage due to incorrect operation or maintenance • Connection to an incorrect voltage supply • Attempted repair by Insignia to service the Product • Products sold as fuses or batteries • Products where the factory applied serial number has been altered or removed REPAIR REPLACEMENT AS...


