Quick Setup Guide (English)
Page 1
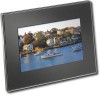
... or screen Back 4 Extend the stand from the memory card or USB device automatically starts to your purchase of a highquality Insignia product. Slide the power switch to fit correctly. The frame turns on and automatically starts playing a slideshow of the pictures ...NS-DPF7G/NS-DPF9G 7"/9" Digital Picture Frame Congratulations on your computer • Multi-image mode displays multiple pictures at the front of the frame and press ENTER. Package contents • Digital picture frame • AC power adapter • Memory Stick Duo Pro adapter • USB cable • Remote control...
... or screen Back 4 Extend the stand from the memory card or USB device automatically starts to your purchase of a highquality Insignia product. Slide the power switch to fit correctly. The frame turns on and automatically starts playing a slideshow of the pictures ...NS-DPF7G/NS-DPF9G 7"/9" Digital Picture Frame Congratulations on your computer • Multi-image mode displays multiple pictures at the front of the frame and press ENTER. Package contents • Digital picture frame • AC power adapter • Memory Stick Duo Pro adapter • USB cable • Remote control...
User Manual (English)
Page 4
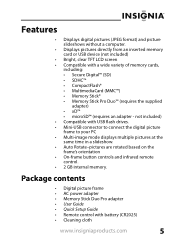
... displays multiple pictures at the same time in a slideshow. • Auto Rotate-pictures are rotated based on the frame's orientation • On-frame button controls and infrared remote control. • 2 GB internal memory. not included) • Compatible with a wide variety of memory cards, including: • Secure Digital™ (SD) • ... • Digital picture frame • AC power adapter • Memory Stick Duo Pro adapter • User Guide • Quick Setup Guide • Remote control with battery (CR2025) • Cleaning cloth www.insigniaproducts.com 5
... displays multiple pictures at the same time in a slideshow. • Auto Rotate-pictures are rotated based on the frame's orientation • On-frame button controls and infrared remote control. • 2 GB internal memory. not included) • Compatible with a wide variety of memory cards, including: • Secure Digital™ (SD) • ... • Digital picture frame • AC power adapter • Memory Stick Duo Pro adapter • User Guide • Quick Setup Guide • Remote control with battery (CR2025) • Cleaning cloth www.insigniaproducts.com 5
User Manual (English)
Page 6
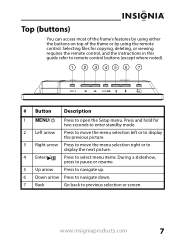
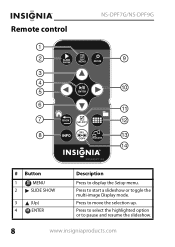
.... 7 Back Go back to open the Setup menu. www.insigniaproducts.com 7 Press and hold for copying, deleting, or viewing requires the remote control, and the instructions in this guide refer to remote control buttons (except where noted). / # Button Description 1 MENU/ Press to previous selection or screen. Top (buttons) You can access most of the...
.... 7 Back Go back to open the Setup menu. www.insigniaproducts.com 7 Press and hold for copying, deleting, or viewing requires the remote control, and the instructions in this guide refer to remote control buttons (except where noted). / # Button Description 1 MENU/ Press to previous selection or screen. Top (buttons) You can access most of the...
User Manual (English)
Page 7
Press to pause and resume the slideshow. 8 www.insigniaproducts.com Press to select the highlighted option or to move the selection up. Press to display the Setup menu. Remote control NS-DPF7G/NS-DPF9G # Button 1 7 MENU 2 SLIDE SHOW 3 (Up) 4 ENTER Description Press to start a slideshow or toggle the multi-image Display mode.
Press to pause and resume the slideshow. 8 www.insigniaproducts.com Press to select the highlighted option or to move the selection up. Press to display the Setup menu. Remote control NS-DPF7G/NS-DPF9G # Button 1 7 MENU 2 SLIDE SHOW 3 (Up) 4 ENTER Description Press to start a slideshow or toggle the multi-image Display mode.
User Manual (English)
Page 9
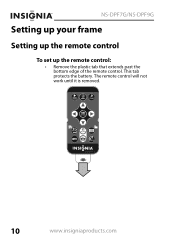
NS-DPF7G/NS-DPF9G Setting up your frame Setting up the remote control To set up the remote control: • Remove the plastic tab that extends past the bottom edge of the remote control. The remote control will not work until it is removed. 10 www.insigniaproducts.com This tab protects the battery.
NS-DPF7G/NS-DPF9G Setting up your frame Setting up the remote control To set up the remote control: • Remove the plastic tab that extends past the bottom edge of the remote control. The remote control will not work until it is removed. 10 www.insigniaproducts.com This tab protects the battery.
User Manual (English)
Page 11
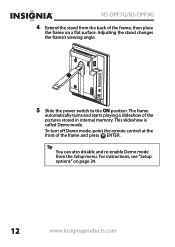
To turn off Demo mode, point the remote control at the front of the frame, then place the frame on page 24. 12 www.insigniaproducts.com Tip You can also disable and re-enable ... mode. For instructions, see "Setup options" on a flat surface. Adjusting the stand changes the frame's viewing angle. 5 Slide the power switch to the ON position. NS-DPF7G/NS-DPF9G 4 Extend the stand from the Setup menu. The frame automatically turns and starts playing a slideshow of the pictures stored in internal memory.
To turn off Demo mode, point the remote control at the front of the frame, then place the frame on page 24. 12 www.insigniaproducts.com Tip You can also disable and re-enable ... mode. For instructions, see "Setup options" on a flat surface. Adjusting the stand changes the frame's viewing angle. 5 Slide the power switch to the ON position. NS-DPF7G/NS-DPF9G 4 Extend the stand from the Setup menu. The frame automatically turns and starts playing a slideshow of the pictures stored in internal memory.
User Manual (English)
Page 19
NS-DPF7G/NS-DPF9G To delete pictures with your PC: 1 Make sure that your computer is in progress, press (BACK) to access the thumbnail screen. The Thumbnails screen ...'s internal memory or an inserted memory card. To set up a slideshow of selected pictures: Tip A slideshow of selected pictures can set up a slideshow using the remote control. 1 Press (thumbnails). - Each memory area will appear as "removable disks." Customizing slideshows You can only be set up by using either all of the supplied...
NS-DPF7G/NS-DPF9G To delete pictures with your PC: 1 Make sure that your computer is in progress, press (BACK) to access the thumbnail screen. The Thumbnails screen ...'s internal memory or an inserted memory card. To set up a slideshow of selected pictures: Tip A slideshow of selected pictures can set up a slideshow using the remote control. 1 Press (thumbnails). - Each memory area will appear as "removable disks." Customizing slideshows You can only be set up by using either all of the supplied...

User Manual (English)
Page 22
... opens. 3 Press or to highlight a display option, then press ENTER to the previous screen. A square icon ( ) to the right of the frame or on the remote control. To set viewing options: 1 Press (BACK) repeatedly until the Home screen opens. 2 Press the arrow buttons to highlight the SETUP icon, then press ENTER. A second...
... opens. 3 Press or to highlight a display option, then press ENTER to the previous screen. A square icon ( ) to the right of the frame or on the remote control. To set viewing options: 1 Press (BACK) repeatedly until the Home screen opens. 2 Press the arrow buttons to highlight the SETUP icon, then press ENTER. A second...
User Manual (English)
Page 25
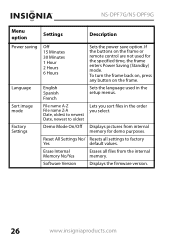
... Sets the language used for demo purposes. Erase Internal Memory No/Yes Erases all settings to oldest Lets you sort files in the setup menus. NS-DPF7G/NS-DPF9G Menu option Settings Description Power saving Language Sort image mode Factory Settings Off 15 Minutes 30 Minutes 1 Hour 2 Hours 6 Hours Sets the power save... (Standby) mode. Software Version Displays the firmware version. 26 www.insigniaproducts.com To turn the frame back on, press any button on the frame or remote control are not used in the order you select.
... Sets the language used for demo purposes. Erase Internal Memory No/Yes Erases all settings to oldest Lets you sort files in the setup menus. NS-DPF7G/NS-DPF9G Menu option Settings Description Power saving Language Sort image mode Factory Settings Off 15 Minutes 30 Minutes 1 Hour 2 Hours 6 Hours Sets the power save... (Standby) mode. Software Version Displays the firmware version. 26 www.insigniaproducts.com To turn the frame back on, press any button on the frame or remote control are not used in the order you select.
User Manual (English)
Page 26
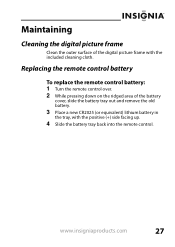
www.insigniaproducts.com 27 Maintaining Cleaning the digital picture frame Clean the outer surface of the battery cover, slide the battery tray out and remove the old battery. 3 Place a new CR2025 (or equivalent) lithium battery in the tray, with the included cleaning cloth. Replacing the remote control battery To replace the remote control battery: 1 Turn the remote control over. 2 While pressing down on the ridged area of the digital picture frame with the positive (+) side facing up. 4 Slide the battery tray back into the remote control.
www.insigniaproducts.com 27 Maintaining Cleaning the digital picture frame Clean the outer surface of the battery cover, slide the battery tray out and remove the old battery. 3 Place a new CR2025 (or equivalent) lithium battery in the tray, with the included cleaning cloth. Replacing the remote control battery To replace the remote control battery: 1 Turn the remote control over. 2 While pressing down on the ridged area of the digital picture frame with the positive (+) side facing up. 4 Slide the battery tray back into the remote control.


