Quick Setup Guide
Page 1
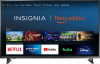
... or the HDMI 1 (ARC) jack. You must secure a wall-mount bracket to the Home menu, select Settings, then select Display & Sounds. Do not plug your power cord in until all four holes. Note: If you need to change the setting to access live over-the-air TV. QUICK SETUP GUIDE 43"/50"/55"/58" 60 Hz LED TV 4K ULTRA HD NS-43DF710NA19 / NS-50DF710NA19 / NS-55DF710NA19 / NS-58DF620NA20 / NS-50DF711SE21...
... or the HDMI 1 (ARC) jack. You must secure a wall-mount bracket to the Home menu, select Settings, then select Display & Sounds. Do not plug your power cord in until all four holes. Note: If you need to change the setting to access live over-the-air TV. QUICK SETUP GUIDE 43"/50"/55"/58" 60 Hz LED TV 4K ULTRA HD NS-43DF710NA19 / NS-50DF710NA19 / NS-55DF710NA19 / NS-58DF620NA20 / NS-50DF711SE21...
Quick Setup Guide
Page 2
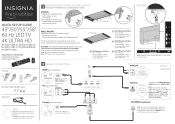
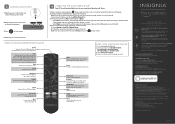
.... 3 TURNING ON YOUR TV 1 Plug the power cord into the back of your TV and a power outlet. 2 Remove the remote control cover and install the batteries. + + AAA AAA 3 Press on your remote. 4 Follow the on the remote, and initiates voice input. Select Confirms selection or action. Guide Brings up , down the Voice Button activates the Alexa-enabled microphone on -screen instructions. App 1 Launches App 1 from the displayed network...
.... 3 TURNING ON YOUR TV 1 Plug the power cord into the back of your TV and a power outlet. 2 Remove the remote control cover and install the batteries. + + AAA AAA 3 Press on your remote. 4 Follow the on the remote, and initiates voice input. Select Confirms selection or action. Guide Brings up , down the Voice Button activates the Alexa-enabled microphone on -screen instructions. App 1 Launches App 1 from the displayed network...
Marketing Sheet
Page 2
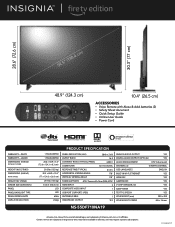
... HDMI INPUT 3 COMPOSITE VIDEO INPUT 1 USB PORT (SUPPORTS JPEG) 1 ANTENNA/CABLE 1 HEADPHONE OUTPUT YES ANALOG AUDIO OUTPUT YES DIGITAL AUDIO OUTPUT (OPTICAL) YES AUDIO ENHANCEMENT DTS TruSurround SPEAKERS (2) 10 WATTS/CHANNEL OSD LANGUAGES ENGLISH BUILT-IN WI-FI, ETHERNET YES HDMI CEC YES GAME MODE YES V-CHIP (VERSION 2.0) YES SLEEP TIMER YES TEXT TO SPEECH YES VESA MOUNT (mm) 200 × 200 VESA MOUNT SCREWS M6 × 16 mm NS-55DF710NA19...
... HDMI INPUT 3 COMPOSITE VIDEO INPUT 1 USB PORT (SUPPORTS JPEG) 1 ANTENNA/CABLE 1 HEADPHONE OUTPUT YES ANALOG AUDIO OUTPUT YES DIGITAL AUDIO OUTPUT (OPTICAL) YES AUDIO ENHANCEMENT DTS TruSurround SPEAKERS (2) 10 WATTS/CHANNEL OSD LANGUAGES ENGLISH BUILT-IN WI-FI, ETHERNET YES HDMI CEC YES GAME MODE YES V-CHIP (VERSION 2.0) YES SLEEP TIMER YES TEXT TO SPEECH YES VESA MOUNT (mm) 200 × 200 VESA MOUNT SCREWS M6 × 16 mm NS-55DF710NA19...
User Guide
Page 5
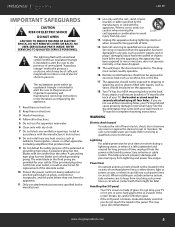
... is used, use all servicing to keep from tip-over. 13 Unplug this apparatus near any antenna or cable system. This may fall into such power lines or circuits. Handling the LCD panel • Your TV's screen is made of broken glass. • If the LCD panel is the disconnecting device. If the screen breaks, be located in the panel. No user-serviceable parts are provided for replacement...
... is used, use all servicing to keep from tip-over. 13 Unplug this apparatus near any antenna or cable system. This may fall into such power lines or circuits. Handling the LCD panel • Your TV's screen is made of broken glass. • If the LCD panel is the disconnecting device. If the screen breaks, be located in the panel. No user-serviceable parts are provided for replacement...
User Guide
Page 6
... picture and sound, operating problems, or even damage, keep your TV to the point of power source indicated on , or make sure that the service technician uses replacement parts specified by following conditions: • When the power supply cord or plug is brought from an air conditioner. If you are for use by a qualified technician to restore your cordless and cellular telephones away from the type of cable...
... picture and sound, operating problems, or even damage, keep your TV to the point of power source indicated on , or make sure that the service technician uses replacement parts specified by following conditions: • When the power supply cord or plug is brought from an air conditioner. If you are for use by a qualified technician to restore your cordless and cellular telephones away from the type of cable...
User Guide
Page 9
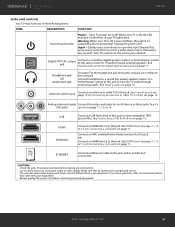
... Power/Input button FUNCTION Power-Turns TV power on page 16. See AV (AV) jacks (good) on page 15. USB HDMI HDMI/ARC Connect a USB flash drive to this jack to these jacks. See HDMI (best) on page 11, 13, or 14, or Connecting a computer on page 11, 13, or 14. Connect an ARC-enabled home theater receiver to select a video input source, then wait a few seconds. CAUTIONS: • Check...
... Power/Input button FUNCTION Power-Turns TV power on page 16. See AV (AV) jacks (good) on page 15. USB HDMI HDMI/ARC Connect a USB flash drive to this jack to these jacks. See HDMI (best) on page 11, 13, or 14, or Connecting a computer on page 11, 13, or 14. Connect an ARC-enabled home theater receiver to select a video input source, then wait a few seconds. CAUTIONS: • Check...
User Guide
Page 11
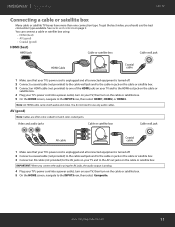
... box. 4 Plug your TV's power cord into a power outlet, turn on your TV, then turn on your TV and to the INPUTS row, then select HDMI1, HDMI2, or HDMI3. See Jacks and controls on the cable or satellite box. AV (good) Note: Cables are often color-coded to match color-coded jacks. To get the best video, you connect the audio using : • HDMI (best) • AV (good...
... box. 4 Plug your TV's power cord into a power outlet, turn on your TV, then turn on your TV and to the INPUTS row, then select HDMI1, HDMI2, or HDMI3. See Jacks and controls on the cable or satellite box. AV (good) Note: Cables are often color-coded to match color-coded jacks. To get the best video, you connect the audio using : • HDMI (best) • AV (good...

User Guide
Page 12
...'s power cord into a power outlet, then turn on the cable or satellite box. 5 On the HOME screen, navigate to the INPUTS row, then select Antenna. 6 If you cannot tune to channels you may be caused by a poor or weak signal from radio waves. • If the antenna is not installed correctly, contact qualified service personnel to correct the problem. • If the signal...
...'s power cord into a power outlet, then turn on the cable or satellite box. 5 On the HOME screen, navigate to the INPUTS row, then select Antenna. 6 If you cannot tune to channels you may be caused by a poor or weak signal from radio waves. • If the antenna is not installed correctly, contact qualified service personnel to correct the problem. • If the signal...
User Guide
Page 13
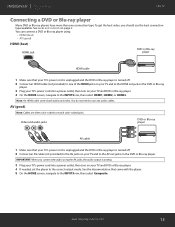
.... 3 Plug your TV's power cord into a power outlet, then turn on the DVD or Blu-ray player. www.insigniaproducts.com 13 AV (good) Note: Cables are often color-coded to the INPUTS row, then select Composite. To get the best video, you connect the audio using : • HDMI (best) • AV (good) HDMI (best) HDMI jack DVD or Blu-ray player HDMI cable 1 Make sure that came...
.... 3 Plug your TV's power cord into a power outlet, then turn on the DVD or Blu-ray player. www.insigniaproducts.com 13 AV (good) Note: Cables are often color-coded to the INPUTS row, then select Composite. To get the best video, you connect the audio using : • HDMI (best) • AV (good) HDMI (best) HDMI jack DVD or Blu-ray player HDMI cable 1 Make sure that came...
User Guide
Page 14
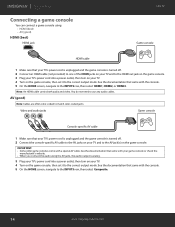
... you connect the audio using : • HDMI (best) • AV (good) HDMI (best) HDMI jack LED TV Game console HDMI cable 1 Make sure that came with the console. 5 On the HOME screen, navigate to the INPUTS row, then select Composite. 14 www.insigniaproducts.com See the documentation that your TV's power cord is unplugged and the game console is turned off . 2 Connect the console-specific AV cable to...
... you connect the audio using : • HDMI (best) • AV (good) HDMI (best) HDMI jack LED TV Game console HDMI cable 1 Make sure that came with the console. 5 On the HOME screen, navigate to the INPUTS row, then select Composite. 14 www.insigniaproducts.com See the documentation that your TV's power cord is unplugged and the game console is turned off . 2 Connect the console-specific AV cable to...

User Guide
Page 16
... using the USB flash drive. LED TV Connecting a USB flash drive USB port USB flash drive 1 Plug a USB flash drive into the USB port on your hearing. Note: The Photos viewer only supports JPEG format images (with your TV. You may lose data or damage the USB flash drive. 2 When the "View Pictures" message appears, press MENU. Notes: • If you connect headphones when your TV is turned off the TV while using headphones, use the lowest volume setting...
... using the USB flash drive. LED TV Connecting a USB flash drive USB port USB flash drive 1 Plug a USB flash drive into the USB port on your hearing. Note: The Photos viewer only supports JPEG format images (with your TV. You may lose data or damage the USB flash drive. 2 When the "View Pictures" message appears, press MENU. Notes: • If you connect headphones when your TV is turned off the TV while using headphones, use the lowest volume setting...
User Guide
Page 17
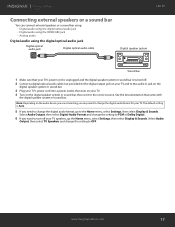
... default setting is turned off your TV speakers, go to the Home menu, select Settings, then select Display & Sounds. Select Audio Output, then select Digital Audio Format and change the setting to OFF. Note: Depending on the digital speaker system or sound bar, then set it to the correct source. LED TV Connecting external speakers or a sound bar You can connect external speakers or a sound bar using: • Digital audio using the digital optical audio jack • Digital audio using the HDMI...
... default setting is turned off your TV speakers, go to the Home menu, select Settings, then select Display & Sounds. Select Audio Output, then select Digital Audio Format and change the setting to OFF. Note: Depending on the digital speaker system or sound bar, then set it to the correct source. LED TV Connecting external speakers or a sound bar You can connect external speakers or a sound bar using: • Digital audio using the digital optical audio jack • Digital audio using the HDMI...

User Guide
Page 18
... the Home menu, select Settings, then select Display & Sounds. Select Audio Output, then select Digital Audio Format and change the setting to PCM or Dolby Digital. 6 If you may need to change the setting to the correct source. See the documentation that your TV's power cord is unplugged and the digital speaker system or sound bar is Auto. 5 If you connect external speakers or a soundbar, sound plays through your TV. 4 Turn on...
... the Home menu, select Settings, then select Display & Sounds. Select Audio Output, then select Digital Audio Format and change the setting to PCM or Dolby Digital. 6 If you may need to change the setting to the correct source. See the documentation that your TV's power cord is unplugged and the digital speaker system or sound bar is Auto. 5 If you connect external speakers or a soundbar, sound plays through your TV. 4 Turn on...
User Guide
Page 19
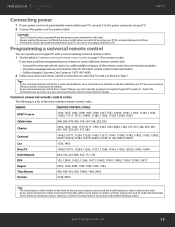
... a time. CAUTION: • Your TV should only be operated from the power source indicated on the label. • Always unplug the power cord from the power outlet when you will not be using the Insignia TV remote to try several codes before finding a match. Programming a universal remote control You can manually program it using your TV for an extended period of the universal remote control, and the model number is...
... a time. CAUTION: • Your TV should only be operated from the power source indicated on the label. • Always unplug the power cord from the power outlet when you will not be using the Insignia TV remote to try several codes before finding a match. Programming a universal remote control You can manually program it using your TV for an extended period of the universal remote control, and the model number is...
User Guide
Page 20
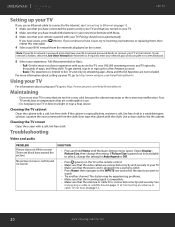
... audio PROBLEM Picture does not fill the screen. SOLUTION • Press and hold Home until the Quick Settings menu opens. If Picture Size is grayed out (not available to select), change the setting. Note: If your remote is especially dirty, moisten a soft, lint-free cloth in a weak detergent solution, squeeze the excess moisture from the list. Cleaning the TV screen Clean the screen with a soft, lint-free cloth. Select Display Picture Size...
... audio PROBLEM Picture does not fill the screen. SOLUTION • Press and hold Home until the Quick Settings menu opens. If Picture Size is grayed out (not available to select), change the setting. Note: If your remote is especially dirty, moisten a soft, lint-free cloth in a weak detergent solution, squeeze the excess moisture from the list. Cleaning the TV screen Clean the screen with a soft, lint-free cloth. Select Display Picture Size...
User Guide
Page 21
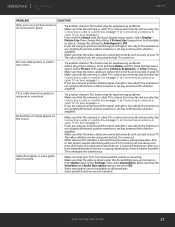
... interference. Select Display Picture Size, then change the setting for example, a surround sound receiver, external speakers, fans, or hair dryers) may be bad. Try a new set -top antenna with your TV. • The video cable(s) you are using an antenna and the signal strength is low, adjust the antenna or use a highly directional outdoor antenna or set . No color, dark picture, or color is connected correctly and securely. See Connecting a cable or satellite...
... interference. Select Display Picture Size, then change the setting for example, a surround sound receiver, external speakers, fans, or hair dryers) may be bad. Try a new set -top antenna with your TV. • The video cable(s) you are using an antenna and the signal strength is low, adjust the antenna or use a highly directional outdoor antenna or set . No color, dark picture, or color is connected correctly and securely. See Connecting a cable or satellite...
User Guide
Page 22
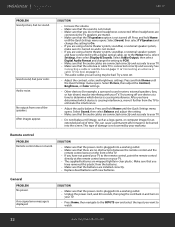
... Quick Settings menu opens. Select Sound, then select Balance and adjust the setting. • Make sure that the power cord is turned on page 12. • The audio cables you have headphones connected. This can cause a permanent after-image to the Home menu, select Settings, then select Display & Sounds. SOLUTION • Make sure that the audio cables are connected correctly and securely to your TV. • The supplied batteries are no sound. A no signal error message...
... Quick Settings menu opens. Select Sound, then select Balance and adjust the setting. • Make sure that the power cord is turned on page 12. • The audio cables you have headphones connected. This can cause a permanent after-image to the Home menu, select Settings, then select Display & Sounds. SOLUTION • Make sure that the audio cables are connected correctly and securely to your TV. • The supplied batteries are no sound. A no signal error message...
User Guide
Page 23
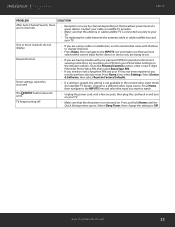
... and hold Home until the Quick Settings menu opens. www.insigniaproducts.com 23 Go to the Parental Controls section, enter a new 5-digit PIN under Prime Video PIN, then select Reset Your PIN. • If you need to perform a factory reset. Change to Factory Defaults. One or more channels do not display. • If you are using a cable or satellite box, use . The /INPUT button does not work. • Unplug the power cord, wait...
... and hold Home until the Quick Settings menu opens. www.insigniaproducts.com 23 Go to the Parental Controls section, enter a new 5-digit PIN under Prime Video PIN, then select Reset Your PIN. • If you need to perform a factory reset. Change to Factory Defaults. One or more channels do not display. • If you are using a cable or satellite box, use . The /INPUT button does not work. • Unplug the power cord, wait...
User Guide
Page 25
... the Home menu, select Settings, then select Display & Sounds. On the Home menu, select Settings, then select Display & Sounds. See the documentation that came with the device for more information. Note: If the problem is not solved by using these troubleshooting instructions, turn off my TV. • Make sure that the CEC control feature is turned on again. LED TV PROBLEM SOLUTION My connected CEC device does not turn off when I turn...
... the Home menu, select Settings, then select Display & Sounds. On the Home menu, select Settings, then select Display & Sounds. See the documentation that came with the device for more information. Note: If the problem is not solved by using these troubleshooting instructions, turn off my TV. • Make sure that the CEC control feature is turned on again. LED TV PROBLEM SOLUTION My connected CEC device does not turn off when I turn...

User Guide
Page 27
... failures (dots that are dark or incorrectly illuminated) grouped in an area smaller than a private home. • Modification of any part of the Product, including the antenna • Display panel damaged by static (non-moving) images applied for lengthy periods (burn-in). • Damage due to incorrect operation or maintenance • Connection to an incorrect voltage or power supply • Attempted repair...
... failures (dots that are dark or incorrectly illuminated) grouped in an area smaller than a private home. • Modification of any part of the Product, including the antenna • Display panel damaged by static (non-moving) images applied for lengthy periods (burn-in). • Damage due to incorrect operation or maintenance • Connection to an incorrect voltage or power supply • Attempted repair...


