

Warranty (English)
Page 1
... Period lasts for a television with new or rebuilt comparable products or parts. This warranty lasts as long as the original packaging. INSIGNIA PRODUCTS MAKES NO OTHER EXPRESS WARRANTIES WITH RESPECT TO THE PRODUCT, ALL EXPRESS AND IMPLIED WARRANTIES FOR THE PRODUCT, INCLUDING, BUT NOT...new or rebuilt parts; Registered in some countries. This warranty does not cover: • Customer instruction/education • Installation • Set up adjustments • Cosmetic damage • Damage due to acts of God, such as the original packaging. If you purchased the Product...
... Period lasts for a television with new or rebuilt comparable products or parts. This warranty lasts as long as the original packaging. INSIGNIA PRODUCTS MAKES NO OTHER EXPRESS WARRANTIES WITH RESPECT TO THE PRODUCT, ALL EXPRESS AND IMPLIED WARRANTIES FOR THE PRODUCT, INCLUDING, BUT NOT...new or rebuilt parts; Registered in some countries. This warranty does not cover: • Customer instruction/education • Installation • Set up adjustments • Cosmetic damage • Damage due to acts of God, such as the original packaging. If you purchased the Product...
Quick Setup Guide (English)
Page 1
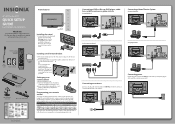
... the battery cover. 2 Insert two AAA batteries into a power outlet. Use 2 or more people to the screen. non-Insignia wall mount Setting up your universal Insignia remote control to work with other end of the cord into the battery compartment. If you enjoy the quality and reliability of ...existing universal remote control to work with your TV using the two screws provided. Front features 42"/50" Plasma HDTV QUICK SETUP GUIDE NS-42P650A11/NS-50P650A11 Thank You for purchasing this product for years to come. symbols in the home, see the table below for common codes....
... the battery cover. 2 Insert two AAA batteries into a power outlet. Use 2 or more people to the screen. non-Insignia wall mount Setting up your universal Insignia remote control to work with other end of the cord into the battery compartment. If you enjoy the quality and reliability of ...existing universal remote control to work with your TV using the two screws provided. Front features 42"/50" Plasma HDTV QUICK SETUP GUIDE NS-42P650A11/NS-50P650A11 Thank You for purchasing this product for years to come. symbols in the home, see the table below for common codes....
Quick Setup Guide (English)
Page 2
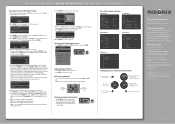
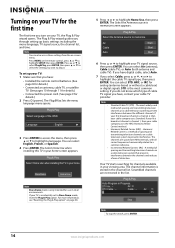
...Delegación Cuajimalpa, Distrito Federal, México 05349 RFC#BBI0802114Q2 © 2010 BBY Solutions, Inc. INSIGNIA is ready to use. You can select Air (antenna), Cable (cable TV), or Auto both antenna... area and stores them in your cable TV provider. Component1 ---- HDMI1 ---- Registered in most common setting. If you do not know which type of the OSD screen opens. Press ▲ or ▼...an information banner. 42"/50" PLASMA HDTV I QUICK SETUP GUIDE I NS-42P650A11/NS-50P650A11 Turning on your TV for the rst time 1 Connect the power cord, then press (power) to...
...Delegación Cuajimalpa, Distrito Federal, México 05349 RFC#BBI0802114Q2 © 2010 BBY Solutions, Inc. INSIGNIA is ready to use. You can select Air (antenna), Cable (cable TV), or Auto both antenna... area and stores them in your cable TV provider. Component1 ---- HDMI1 ---- Registered in most common setting. If you do not know which type of the OSD screen opens. Press ▲ or ▼...an information banner. 42"/50" PLASMA HDTV I QUICK SETUP GUIDE I NS-42P650A11/NS-50P650A11 Turning on your TV for the rst time 1 Connect the power cord, then press (power) to...
User Manual (English)
Page 2
... menus 17 Selecting a channel 18 Adjusting the volume 18 Displaying additional information 18 Adjusting the picture 18 Adjusting the TV picture 18 Adjusting advanced picture settings 19 i www.insigniaproducts.com
... menus 17 Selecting a channel 18 Adjusting the volume 18 Displaying additional information 18 Adjusting the picture 18 Adjusting the TV picture 18 Adjusting advanced picture settings 19 i www.insigniaproducts.com
User Manual (English)
Page 3
... console 20 Adjusting the computer image 21 Using Energy Saving mode 21 Adjusting the sound 22 Adjusting the sound 22 Changing channel settings 23 Automatically searching for channels 23 Removing scrambled channels from the channel list 23 Opening the channel list 24 Fine-tuning an ... display modes 42 Legal notices 44 Two-year limited warranty 45 www.insigniaproducts.com ii TV parental control levels 29 Setting movie levels 30 Setting Canadian TV rating levels 31 Downloading rating information 31 Using closed captioning 33 Viewing closed captioning 33 Selecting the closed ...
... console 20 Adjusting the computer image 21 Using Energy Saving mode 21 Adjusting the sound 22 Adjusting the sound 22 Changing channel settings 23 Automatically searching for channels 23 Removing scrambled channels from the channel list 23 Opening the channel list 24 Fine-tuning an ... display modes 42 Legal notices 44 Two-year limited warranty 45 www.insigniaproducts.com ii TV parental control levels 29 Setting movie levels 30 Setting Canadian TV rating levels 31 Downloading rating information 31 Using closed captioning 33 Viewing closed captioning 33 Selecting the closed ...
User Manual (English)
Page 7
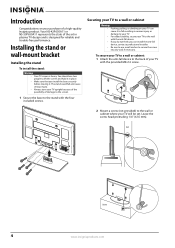
... on your TV can install the anti-fall and cause serious injury. • Always store your TV will be set. You should use a wall anchor to secure the screw into dry wall, if necessary. Leave the screw head ..., contact a professional installer. • Be sure to use two people to the stand with the four included screws. Your NS-42P650A11 or NS-50P650A11 represents the state of your TV to a wall or cabinet: 1 Attach the anti-fall resulting in serious injury or ...wall or cabinet where your TV upright because of the possibility of a high-quality Insignia product.
... on your TV can install the anti-fall and cause serious injury. • Always store your TV will be set. You should use a wall anchor to secure the screw into dry wall, if necessary. Leave the screw head ..., contact a professional installer. • Be sure to use two people to the stand with the four included screws. Your NS-42P650A11 or NS-50P650A11 represents the state of your TV to a wall or cabinet: 1 Attach the anti-fall resulting in serious injury or ...wall or cabinet where your TV upright because of the possibility of a high-quality Insignia product.
User Manual (English)
Page 10
... video device to turn the sound back on page 12. 6 HDMI IN 1 (DVI)/ HDMI IN 2 Connect an HDMI device to select menu items or adjust settings. In the on page 11. 9 COMPONENT IN 2 PR, PB, Y and AUDIO L/R Connect a component video device to confirm selections or changes. For more information, see "Selecting...
... video device to turn the sound back on page 12. 6 HDMI IN 1 (DVI)/ HDMI IN 2 Connect an HDMI device to select menu items or adjust settings. In the on page 11. 9 COMPONENT IN 2 PR, PB, Y and AUDIO L/R Connect a component video device to confirm selections or changes. For more information, see "Selecting...
User Manual (English)
Page 11
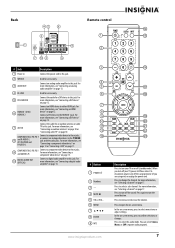
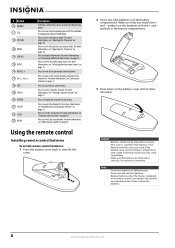
...19 FAV.CH 20 OPTION 21 CH.LIST 22 SLEEP 23 AUDIO Description In the on-screen menu, press to return to be exposed to set the sleep timer. For more information, see "Adjusting the TV picture" on page 18. For more information, see "Adjusting the TV picture"... on page 22. Press to display information. For more information, see "Displaying additional information" on page 17. For more information, see "Setting a wake-up timer" on -screen menu. For more information, see "Adjusting the sound" on page 18. Using the remote control Installing remote control batteries...
...19 FAV.CH 20 OPTION 21 CH.LIST 22 SLEEP 23 AUDIO Description In the on-screen menu, press to return to be exposed to set the sleep timer. For more information, see "Adjusting the TV picture" on page 18. For more information, see "Adjusting the TV picture"... on page 22. Press to display information. For more information, see "Displaying additional information" on page 17. For more information, see "Setting a wake-up timer" on -screen menu. For more information, see "Adjusting the sound" on page 18. Using the remote control Installing remote control batteries...

User Manual (English)
Page 12
...to shock or liquids. See the label on the front of your TV. See your universal remote control's instructions for details. 3 If all Insignia TVs manufactured after Jan. 1, 2007) Universal remote control manufacturers and models Philips PHDVD5, PH5DSS, PMDVR8, PDVR8 RCA RCU807 One for All URC-... between the remote control and the remote sensor. For more help, call technical support for your universal remote control or set-top box manufacturer, or call the Insignia Customer Care Center at a time. Aiming the remote control To aim the remote control: • Point the remote ...
...to shock or liquids. See the label on the front of your TV. See your universal remote control's instructions for details. 3 If all Insignia TVs manufactured after Jan. 1, 2007) Universal remote control manufacturers and models Philips PHDVD5, PH5DSS, PMDVR8, PDVR8 RCA RCU807 One for All URC-... between the remote control and the remote sensor. For more help, call technical support for your universal remote control or set-top box manufacturer, or call the Insignia Customer Care Center at a time. Aiming the remote control To aim the remote control: • Point the remote ...
User Manual (English)
Page 14
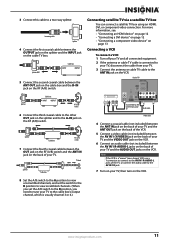
.... 3 Connect the antenna or cable TV cable to the ANT IN jack on the VCR. 8 Set the A/B switch to the A position to view unscrambled channels, and set the switch to the B position to view scrambled channels. (When you set the A/B switch to the B position, you need to tune your TV to the cable...
.... 3 Connect the antenna or cable TV cable to the ANT IN jack on the VCR. 8 Set the A/B switch to the A position to view unscrambled channels, and set the switch to the B position to view scrambled channels. (When you set the A/B switch to the B position, you need to tune your TV to the cable...
User Manual (English)
Page 17
...the remote control batteries. (See page 8 for details.) • Connected an antenna, cable TV, or satellite TV. (See pages 10 through setting up your home screen appears. If you do not know which type of cable TV signal you have, contact your cable company uses Standard. If... OSD. Press MENU on a cable television system that you have digital cable, select Auto. 7 If you want to memorize. The most common setting. Scrambled channels are spaced at 6-MHz intervals, with all carrier frequencies harmonically related to highlight the cable TV signal type, then press ENTER. DTV...
...the remote control batteries. (See page 8 for details.) • Connected an antenna, cable TV, or satellite TV. (See pages 10 through setting up your home screen appears. If you do not know which type of cable TV signal you have, contact your cable company uses Standard. If... OSD. Press MENU on a cable television system that you have digital cable, select Auto. 7 If you want to memorize. The most common setting. Scrambled channels are spaced at 6-MHz intervals, with all carrier frequencies harmonically related to highlight the cable TV signal type, then press ENTER. DTV...
User Manual (English)
Page 18
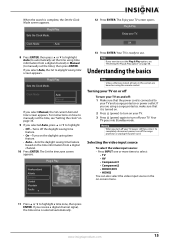
... 3 Press (power) again to turn off the daylight saving time feature. • On-Turns on the daylight saving time feature. • Auto-Sets the daylight saving time feature based on the time information from a digital channel) or Manual (to use. If you receive a digital channel signal, ...Standby mode. Turning your TV on . 2 Press (power) to daylight saving time screen appears. www.insigniaproducts.com 15 Plug & Play Sets the Clock Mode. The Set the time zone screen appears. Warning When you want to highlight a time zone, then press ENTER. When the search is complete, the...
... 3 Press (power) again to turn off the daylight saving time feature. • On-Turns on the daylight saving time feature. • Auto-Sets the daylight saving time feature based on the time information from a digital channel) or Manual (to use. If you receive a digital channel signal, ...Standby mode. Turning your TV on . 2 Press (power) to daylight saving time screen appears. www.insigniaproducts.com 15 Plug & Play Sets the Clock Mode. The Set the time zone screen appears. Warning When you want to highlight a time zone, then press ENTER. When the search is complete, the...
User Manual (English)
Page 20
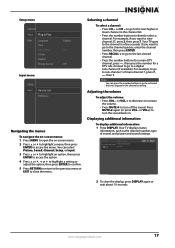
... select Picture, Sound, Channel, Setup, or Input. 3 Press or to highlight an option, then press ENTER to access the option. 4 Press or , or to highlight a setting or adjust the option, then press ENTER to confirm. 5 Press RETURN to return to the previous menu or EXIT to close the display, press DISPLAY... a menu, then press ENTER to access the menu. You can press the number buttons to go to sub-channel 1 of sound, and picture and sound settings. For example, to go to a channel that was skipped in a few seconds. Setup menu Channel Setup Plug & Play Input Language Time Game Mode V-Chip ...
... select Picture, Sound, Channel, Setup, or Input. 3 Press or to highlight an option, then press ENTER to access the option. 4 Press or , or to highlight a setting or adjust the option, then press ENTER to confirm. 5 Press RETURN to return to the previous menu or EXIT to close the display, press DISPLAY... a menu, then press ENTER to access the menu. You can press the number buttons to go to sub-channel 1 of sound, and picture and sound settings. For example, to go to a channel that was skipped in a few seconds. Setup menu Channel Setup Plug & Play Input Language Time Game Mode V-Chip ...
User Manual (English)
Page 21
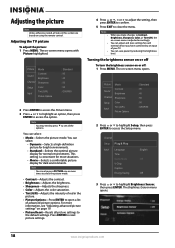
... saturation. • Tint (G/R)-Adjusts the intensity of red in this section are based on page 19. • Picture Reset-Resets all picture settings to close the menu. Notes • • • When you have connected to access the option. The Brightness Sensor menu opens....: 95 : 45 : 50 : 50 : G50/R50 2 Press or to highlight Setup, then press ENTER to highlight Brightness Sensor, then press ENTER. This setting is adjusted accordingly. Channel Setup Plug & Play Input Language Time Game Mode V-Chip Caption Energy Saving : English : Off : Off 3 Press or to access the...
... saturation. • Tint (G/R)-Adjusts the intensity of red in this section are based on page 19. • Picture Reset-Resets all picture settings to close the menu. Notes • • • When you have connected to access the option. The Brightness Sensor menu opens....: 95 : 45 : 50 : 50 : G50/R50 2 Press or to highlight Setup, then press ENTER to highlight Brightness Sensor, then press ENTER. This setting is adjusted accordingly. Channel Setup Plug & Play Input Language Time Game Mode V-Chip Caption Energy Saving : English : Off : Off 3 Press or to access the...
User Manual (English)
Page 22
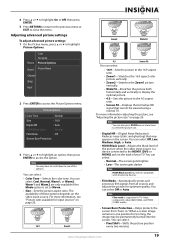
...; Zoom2-Stretches the Zoom1 picture vertically. • Wide Fit-Stretches the picture both horizontally and vertically to display the optimal picture. • 4:3-Sets the picture to the 4:3 aspect ratio. • Screen Fit-Displays the full native HD signal that may have to scroll down to Movie.... select: • Pixel Shift-Shifts the picture position every two minutes. When a screen image remains in ." Adjusting advanced picture settings To adjust advanced picture settings: 1 On the Picture menu, press or to access the option. Warm1 and Warm2 are only available if the Mode option is...
...; Zoom2-Stretches the Zoom1 picture vertically. • Wide Fit-Stretches the picture both horizontally and vertically to display the optimal picture. • 4:3-Sets the picture to the 4:3 aspect ratio. • Screen Fit-Displays the full native HD signal that may have to scroll down to Movie.... select: • Pixel Shift-Shifts the picture position every two minutes. When a screen image remains in ." Adjusting advanced picture settings To adjust advanced picture settings: 1 On the Picture menu, press or to access the option. Warm1 and Warm2 are only available if the Mode option is...

User Manual (English)
Page 23
... Wide Fit, Screen Fit Notes You can select Dark (darkens the sides) or Light (brightens the sides). • Picture Reset-Resets the advanced picture settings to center the picture. Channel Setup Plug & Play Input Language Time Game Mode V-Chip Caption Energy Saving : English : Off : Off 3 Press or ...to highlight Game Mode, then press ENTER. 4 Press or to the default settings. The Equalizer settings are reset to highlight Off or On, then press ENTER. Press or , or to your TV. Note The Game Mode feature is only...
... Wide Fit, Screen Fit Notes You can select Dark (darkens the sides) or Light (brightens the sides). • Picture Reset-Resets the advanced picture settings to center the picture. Channel Setup Plug & Play Input Language Time Game Mode V-Chip Caption Energy Saving : English : Off : Off 3 Press or ...to highlight Game Mode, then press ENTER. 4 Press or to the default settings. The Equalizer settings are reset to highlight Off or On, then press ENTER. Press or , or to your TV. Note The Game Mode feature is only...
User Manual (English)
Page 24
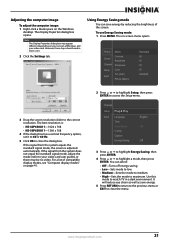
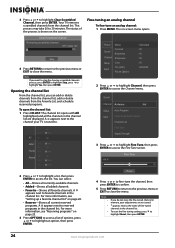
Using Energy Saving mode You can select: • Off-Turns off energy saving. • Low-Sets mode to low. • Medium-Sets the mode to medium. • High-Sets the mode to close the menu. Use this mode to access the Setup menu. www.insigniaproducts.com 21 If the ...desktop. If the signal from the system equals the standard signal mode, the screen is : • NS-42P650A11-1024 x 768 • NS-50P650A11-1360 x 768 4 If the dialog box has a vertical frequency option, set it to 60 or 60 Hz. 5 Click OK to maximum. The best resolution is adjusted automatically. ...
Using Energy Saving mode You can select: • Off-Turns off energy saving. • Low-Sets mode to low. • Medium-Sets the mode to medium. • High-Sets the mode to close the menu. Use this mode to access the Setup menu. www.insigniaproducts.com 21 If the ...desktop. If the signal from the system equals the standard signal mode, the screen is : • NS-42P650A11-1024 x 768 • NS-50P650A11-1360 x 768 4 If the dialog box has a vertical frequency option, set it to 60 or 60 Hz. 5 Click OK to maximum. The best resolution is adjusted automatically. ...
User Manual (English)
Page 25
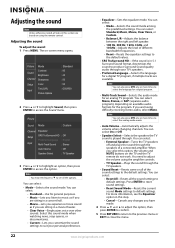
... to suit your TV's speakers. • Preferred Language-Selects the language for an analog TV program. When you customize the sound settings to produce Surround Sound quality audio through the TV speakers. • Sound Reset-Resets some or all of a connected amplifier. You... mode for a digital TV program, if multiple tracks are available. You can select: • Mode-Selects the sound mode among the predefined settings. Picture Sound Mode : Custom Channel Setup Input Equalizer SRS TruSurround HD Preferred Language Multi-Track Sound : Off : English : Stereo Auto Volume ...
... to suit your TV's speakers. • Preferred Language-Selects the language for an analog TV program. When you customize the sound settings to produce Surround Sound quality audio through the TV speakers. • Sound Reset-Resets some or all of a connected amplifier. You... mode for a digital TV program, if multiple tracks are available. You can select: • Mode-Selects the sound mode among the predefined settings. Picture Sound Mode : Custom Channel Setup Input Equalizer SRS TruSurround HD Preferred Language Multi-Track Sound : Off : English : Stereo Auto Volume ...
User Manual (English)
Page 26
... search. For more information, see "Resetting the Plug & Play option" on using the remote control. The on -screen menu opens. Antenna is highlighted. Changing channel settings Note Unless otherwise noted, all tasks in cable mode. The on -screen menu opens. 2 Press or to highlight Channel, then press ENTER to access the...
... search. For more information, see "Resetting the Plug & Play option" on using the remote control. The on -screen menu opens. Antenna is highlighted. Changing channel settings Note Unless otherwise noted, all tasks in cable mode. The on -screen menu opens. 2 Press or to highlight Channel, then press ENTER to access the...
User Manual (English)
Page 27
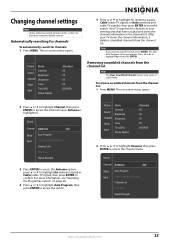
...in the channel list are not saved. * appears next to the name of options, press or to access the list. For more information, see "Setting up a favorite channel list" on the screen. Picture Mode Sound Channel Contrast Brightness Sharpness Setup Input Color Tint (G/R) Picture Options : Standard : 95... Press or to highlight Channel, then press ENTER to highlight Reset, then press ENTER. 24 www.insigniaproducts.com To reset the fine tuning setting, press to access the Channel menu. This process may take 20 to highlight Clear Scrambled Channel, then press ENTER. The on page 25...
...in the channel list are not saved. * appears next to the name of options, press or to access the list. For more information, see "Setting up a favorite channel list" on the screen. Picture Mode Sound Channel Contrast Brightness Sharpness Setup Input Color Tint (G/R) Picture Options : Standard : 95... Press or to highlight Channel, then press ENTER to highlight Reset, then press ENTER. 24 www.insigniaproducts.com To reset the fine tuning setting, press to access the Channel menu. This process may take 20 to highlight Clear Scrambled Channel, then press ENTER. The on page 25...


