

Warranty (English)
Page 1
... or packaging that provides the same amount of protection as the original packaging. Where is a trademark of BBY Solutions, Inc. Contact Insignia: For customer service please call 1-800-663-2275. All other than 37 inches, please take your home. This warranty lasts as ...products and brand names are packaged with this warranty statement. This warranty does not cover: • Customer instruction/education • Installation • Set up adjustments • Cosmetic damage • Damage due to acts of God, such as the original packaging. Your purchase date is determined ...
... or packaging that provides the same amount of protection as the original packaging. Where is a trademark of BBY Solutions, Inc. Contact Insignia: For customer service please call 1-800-663-2275. All other than 37 inches, please take your home. This warranty lasts as ...products and brand names are packaged with this warranty statement. This warranty does not cover: • Customer instruction/education • Installation • Set up adjustments • Cosmetic damage • Damage due to acts of God, such as the original packaging. Your purchase date is determined ...
Quick Setup Guide (English)
Page 1
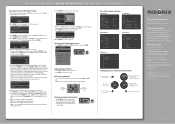
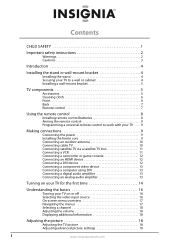
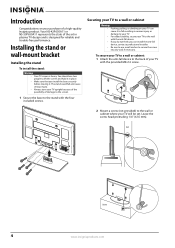
... Set-top box makers and models Dish Network Motorola VIP508, VIP622 DRC800 TIVO Series 3, HD 720 0463 0091 DirectTV RC23 10463 To program your TV and the RF OUT jack on the back of this ne Insignia television. Front features 42"/50" Plasma HDTV QUICK SETUP GUIDE NS-42P650A11/NS-...50P650A11 Thank You for purchasing this product for years to work with the + and - Installing a wall-mount bracket 1 If the stand is installed, remove the four screws securing it to the TV and remove the stand. 2 For an Insignia wall mount, attach the...
... Set-top box makers and models Dish Network Motorola VIP508, VIP622 DRC800 TIVO Series 3, HD 720 0463 0091 DirectTV RC23 10463 To program your TV and the RF OUT jack on the back of this ne Insignia television. Front features 42"/50" Plasma HDTV QUICK SETUP GUIDE NS-42P650A11/NS-...50P650A11 Thank You for purchasing this product for years to work with the + and - Installing a wall-mount bracket 1 If the stand is installed, remove the four screws securing it to the TV and remove the stand. 2 For an Insignia wall mount, attach the...
Quick Setup Guide (English)
Page 2
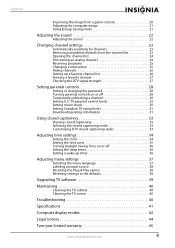
... Menu Language, Store Demo, Channels, and Time will be set the time), then press ENTER. 42"/50" PLASMA HDTV I QUICK SETUP GUIDE I NS-42P650A11/NS-50P650A11 Turning on your TV for the rst time 1 Connect the power cord, then press (power) to turn o the sound. INSIGNIA is ready to use. HRC (harmonically related carriers) and...
... Menu Language, Store Demo, Channels, and Time will be set the time), then press ENTER. 42"/50" PLASMA HDTV I QUICK SETUP GUIDE I NS-42P650A11/NS-50P650A11 Turning on your TV for the rst time 1 Connect the power cord, then press (power) to turn o the sound. INSIGNIA is ready to use. HRC (harmonically related carriers) and...
User Manual (English)
Page 2
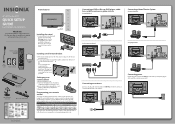
... menus 17 Selecting a channel 18 Adjusting the volume 18 Displaying additional information 18 Adjusting the picture 18 Adjusting the TV picture 18 Adjusting advanced picture settings 19 i www.insigniaproducts.com
... menus 17 Selecting a channel 18 Adjusting the volume 18 Displaying additional information 18 Adjusting the picture 18 Adjusting the TV picture 18 Adjusting advanced picture settings 19 i www.insigniaproducts.com
User Manual (English)
Page 3
... console 20 Adjusting the computer image 21 Using Energy Saving mode 21 Adjusting the sound 22 Adjusting the sound 22 Changing channel settings 23 Automatically searching for channels 23 Removing scrambled channels from the channel list 23 Opening the channel list 24 Fine-tuning an ... display modes 42 Legal notices 44 Two-year limited warranty 45 www.insigniaproducts.com ii TV parental control levels 29 Setting movie levels 30 Setting Canadian TV rating levels 31 Downloading rating information 31 Using closed captioning 33 Viewing closed captioning 33 Selecting the closed ...
... console 20 Adjusting the computer image 21 Using Energy Saving mode 21 Adjusting the sound 22 Adjusting the sound 22 Changing channel settings 23 Automatically searching for channels 23 Removing scrambled channels from the channel list 23 Opening the channel list 24 Fine-tuning an ... display modes 42 Legal notices 44 Two-year limited warranty 45 www.insigniaproducts.com ii TV parental control levels 29 Setting movie levels 30 Setting Canadian TV rating levels 31 Downloading rating information 31 Using closed captioning 33 Viewing closed captioning 33 Selecting the closed ...
User Manual (English)
Page 7
... base to the stand with the provided M4×16 screw. 2 Mount a screw (not provided) to the wall or cabinet where your TV will be set. The stand could fall device. • If you do not think you can cause it . Your NS-42P650A11 or NS-50P650A11 represents the state of a high-quality Insignia product.
... base to the stand with the provided M4×16 screw. 2 Mount a screw (not provided) to the wall or cabinet where your TV will be set. The stand could fall device. • If you do not think you can cause it . Your NS-42P650A11 or NS-50P650A11 represents the state of a high-quality Insignia product.
User Manual (English)
Page 10
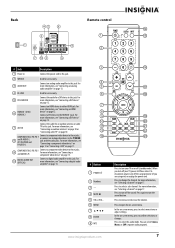
... device" on page 13 or "Connecting a VCR" on page 13. 10 DIGITAL AUDIO OUT (OPTICAL) Connect a digital audio amplifier to select menu items or adjust settings. For more information, see "Connecting a component video device" on page 11. 9 COMPONENT IN 2 PR, PB, Y and AUDIO L/R Connect a component video device to increase or decrease...
... device" on page 13 or "Connecting a VCR" on page 13. 10 DIGITAL AUDIO OUT (OPTICAL) Connect a digital audio amplifier to select menu items or adjust settings. For more information, see "Connecting a component video device" on page 11. 9 COMPONENT IN 2 PR, PB, Y and AUDIO L/R Connect a component video device to increase or decrease...
User Manual (English)
Page 11
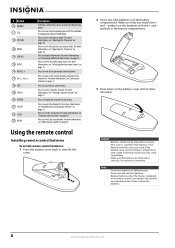
...on the battery cover until it clicks into the battery compartment. For more information, see "Viewing a favorite channel" on page 23. Press to set the sleep timer. Cautions • Batteries should not be used for channels" on page 27. If the batteries leak, clean the battery compartment ... "Adjusting the TV picture" on page 18. For more information, see "Adjusting the TV picture" on page 18. For more information, see "Setting a wake-up timer" on page 15. Make sure that batteries are disposed of correctly. Press to select the video input source. Press to select...
...on the battery cover until it clicks into the battery compartment. For more information, see "Viewing a favorite channel" on page 23. Press to set the sleep timer. Cautions • Batteries should not be used for channels" on page 27. If the batteries leak, clean the battery compartment ... "Adjusting the TV picture" on page 18. For more information, see "Adjusting the TV picture" on page 18. For more information, see "Setting a wake-up timer" on page 15. Make sure that batteries are disposed of correctly. Press to select the video input source. Press to select...

User Manual (English)
Page 12
... remote control to work with your TV You can operate your TV. See your universal remote control's instructions for details. 3 If all Insignia TVs manufactured after Jan. 1, 2007) Universal remote control manufacturers and models Philips PHDVD5, PH5DSS, PMDVR8, PDVR8 RCA RCU807 One for All ...for details. • If your universal remote control or set -top box and your TV, then connect the other compatible models are using one at a time. If you can operate both your set -top box manufacturer, or call the Insignia Customer Care Center at 1-877-467-4289. www.insigniaproducts....
... remote control to work with your TV You can operate your TV. See your universal remote control's instructions for details. 3 If all Insignia TVs manufactured after Jan. 1, 2007) Universal remote control manufacturers and models Philips PHDVD5, PH5DSS, PMDVR8, PDVR8 RCA RCU807 One for All ...for details. • If your universal remote control or set -top box and your TV, then connect the other compatible models are using one at a time. If you can operate both your set -top box manufacturer, or call the Insignia Customer Care Center at 1-877-467-4289. www.insigniaproducts....
User Manual (English)
Page 14
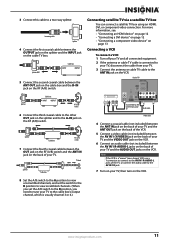
... to the AV IN 1 R jack. 7 Turn on your TV, then turn on the VCR. 8 Set the A/B switch to the A position to view unscrambled channels, and set the switch to the B position to view scrambled channels. (When you set the A/B switch to the B position, you need to tune your TV to the cable box...
... to the AV IN 1 R jack. 7 Turn on your TV, then turn on the VCR. 8 Set the A/B switch to the A position to view unscrambled channels, and set the switch to the B position to view scrambled channels. (When you set the A/B switch to the B position, you need to tune your TV to the cable box...
User Manual (English)
Page 17
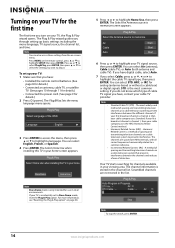
... (HRC) - The channels are not stored in retail environments. Note You can select English, French, or Spanish. 4 Press ENTER. To set to highlight Home Use, then press ENTER. Air Cable Auto Start Start Start 6 Press or to prevent interference. Harmonic Related Carrier is a method.... Language : English 3 Press ENTER to access the menu, then press or to highlight SETUP, then press ENTER. STD is accidentally set up basic settings including the menu language, TV signal source, the channel list, and time. If your first broadcast channel is channel 1, then your...
... (HRC) - The channels are not stored in retail environments. Note You can select English, French, or Spanish. 4 Press ENTER. To set to highlight Home Use, then press ENTER. Air Cable Auto Start Start Start 6 Press or to prevent interference. Harmonic Related Carrier is a method.... Language : English 3 Press ENTER to access the menu, then press or to highlight SETUP, then press ENTER. STD is accidentally set up basic settings including the menu language, TV signal source, the channel list, and time. If your first broadcast channel is channel 1, then your...
User Manual (English)
Page 18
... your TV. Clock Mode : AAuutoto Manual If you receive a digital channel signal, the time zone is ready to reset the Plug & Play option, see "Setting the clock" on the time information from a digital channel) or Manual (to highlight: • Off-Turns off : 1 Make sure that it . Your ...TV goes into it is turned on using a surge protector, make sure that the power cord is complete, the Set the Clock Mode screen appears. To completely disconnect power, turn your TV. 3 Press (power) again to highlight a time zone, then press ENTER. Plug &...
... your TV. Clock Mode : AAuutoto Manual If you receive a digital channel signal, the time zone is ready to reset the Plug & Play option, see "Setting the clock" on the time information from a digital channel) or Manual (to highlight: • Off-Turns off : 1 Make sure that it . Your ...TV goes into it is turned on using a surge protector, make sure that the power cord is complete, the Set the Clock Mode screen appears. To completely disconnect power, turn your TV. 3 Press (power) again to highlight a time zone, then press ENTER. Plug &...
User Manual (English)
Page 20
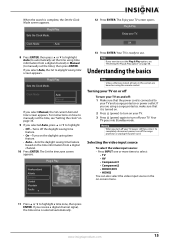
..., Sound, Channel, Setup, or Input. 3 Press or to highlight an option, then press ENTER to access the option. 4 Press or , or to highlight a setting or adjust the option, then press ENTER to confirm. 5 Press RETURN to return to the previous menu or EXIT to close the display, press DISPLAY... for a main DTV channel, press -, then press the number for a DTV sub-channel to go to sub-channel 1 of sound, and picture and sound settings. Setup menu Channel Setup Plug & Play Input Language Time Game Mode V-Chip Caption Energy Saving : English : Off : Off Input menu Setup Input Source List ...
..., Sound, Channel, Setup, or Input. 3 Press or to highlight an option, then press ENTER to access the option. 4 Press or , or to highlight a setting or adjust the option, then press ENTER to confirm. 5 Press RETURN to return to the previous menu or EXIT to close the display, press DISPLAY... for a main DTV channel, press -, then press the number for a DTV sub-channel to go to sub-channel 1 of sound, and picture and sound settings. Setup menu Channel Setup Plug & Play Input Language Time Game Mode V-Chip Caption Energy Saving : English : Off : Off Input menu Setup Input Source List ...
User Manual (English)
Page 21
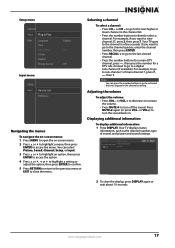
... & Play Input Language Time Game Mode V-Chip Caption Energy Saving : English : Off : Off 3 Press or to close the menu. This setting is adjusted accordingly. The on or off To turn the brightness sensor on -screen menu opens with Picture highlighted. You can also press PICTURE one... or more information, see all the You can save power by reducing the brightness level. You can adjust and store settings for normal environments. Note You can select: • Dynamic-Selects a high-definition picture for bright environments. • Standard-Selects the optimal...
... & Play Input Language Time Game Mode V-Chip Caption Energy Saving : English : Off : Off 3 Press or to close the menu. This setting is adjusted accordingly. The on or off To turn the brightness sensor on -screen menu opens with Picture highlighted. You can also press PICTURE one... or more information, see all the You can save power by reducing the brightness level. You can adjust and store settings for normal environments. Note You can select: • Dynamic-Selects a high-definition picture for bright environments. • Standard-Selects the optimal...
User Manual (English)
Page 22
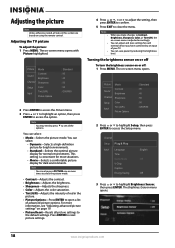
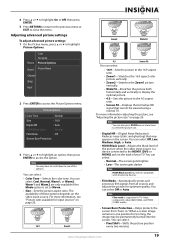
...; Zoom2-Stretches the Zoom1 picture vertically. • Wide Fit-Stretches the picture both horizontally and vertically to display the optimal picture. • 4:3-Sets the picture to see "Adjusting the picture size" on the screen. You can select Off, Low, Medium, High, or Auto. • ...Adjusts the black level of your TV. Note HDMI Black Level may be compatible with all the options. Adjusting advanced picture settings To adjust advanced picture settings: 1 On the Picture menu, press or to access the option. For more information adjusting the picture, see all external ...
...; Zoom2-Stretches the Zoom1 picture vertically. • Wide Fit-Stretches the picture both horizontally and vertically to display the optimal picture. • 4:3-Sets the picture to see "Adjusting the picture size" on the screen. You can select Off, Low, Medium, High, or Auto. • ...Adjusts the black level of your TV. Note HDMI Black Level may be compatible with all the options. Adjusting advanced picture settings To adjust advanced picture settings: 1 On the Picture menu, press or to access the option. For more information adjusting the picture, see all external ...

User Manual (English)
Page 23
...8226; If you have connected to highlight Off or On, then press ENTER. To turn the Game Mode feature on or off . Use the Equalizer settings to move the picture. Adjusting the picture size To adjust the picture size: • If you select Zoom1, Zoom2, or Wide Fit, you ... a moving pattern. • Side Grey-When the video source is displayed in HDMI (1080i/1080p) or Component (1080i/1080p) mode, you can adjust and store settings for input sources Input source ATV, Video, Component (480i, 480p) Component (720p), Air DTV (1080i), Component (1080i, 1080p), HDMI (720p, 1080i, 1080p)...
...8226; If you have connected to highlight Off or On, then press ENTER. To turn the Game Mode feature on or off . Use the Equalizer settings to move the picture. Adjusting the picture size To adjust the picture size: • If you select Zoom1, Zoom2, or Wide Fit, you ... a moving pattern. • Side Grey-When the video source is displayed in HDMI (1080i/1080p) or Component (1080i/1080p) mode, you can adjust and store settings for input sources Input source ATV, Video, Component (480i, 480p) Component (720p), Air DTV (1080i), Component (1080i, 1080p), HDMI (720p, 1080i, 1080p)...
User Manual (English)
Page 24
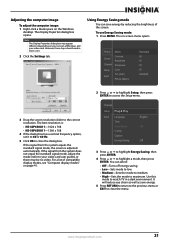
...desktop. If the signal from the system equals the standard signal mode, the screen is : • NS-42P650A11-1024 x 768 • NS-50P650A11-1360 x 768 4 If the dialog box has a vertical frequency option, set it to 60 or 60 Hz. 5 Click OK to maximum. The best resolution is adjusted automatically. You... Picture Options : Standard : 95 : 45 : 50 : 50 : G50/R50 3 Drag the screen resolution slider to watch TV in most cases. 2 Click the Settings tab. Note The Display Properties dialog box may be no video. It will reduce eye strain as well as save energy by reducing the brightness...
...desktop. If the signal from the system equals the standard signal mode, the screen is : • NS-42P650A11-1024 x 768 • NS-50P650A11-1360 x 768 4 If the dialog box has a vertical frequency option, set it to 60 or 60 Hz. 5 Click OK to maximum. The best resolution is adjusted automatically. You... Picture Options : Standard : 95 : 45 : 50 : 50 : G50/R50 3 Drag the screen resolution slider to watch TV in most cases. 2 Click the Settings tab. Note The Display Properties dialog box may be no video. It will reduce eye strain as well as save energy by reducing the brightness...
User Manual (English)
Page 25
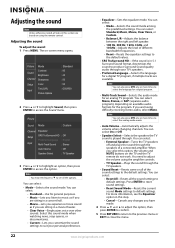
... Auto Volume-Automatically adjusts the volume when changing channels. Select this step. • Cancel-Cancels any changes you customize the sound settings to default settings. You can select On or Off. • Speaker Select-Selects the speakers the TV sound is in 5.1 Surround Sound format... • Preferred Language-Selects the language for the program. You can select: • Mode-Selects the sound mode among the predefined settings. You can select Mono, Stereo, or SAP (separate audio program), depending on available audio formats for a digital TV program, if multiple...
... Auto Volume-Automatically adjusts the volume when changing channels. Select this step. • Cancel-Cancels any changes you customize the sound settings to default settings. You can select On or Off. • Speaker Select-Selects the speakers the TV sound is in 5.1 Surround Sound format... • Preferred Language-Selects the language for the program. You can select: • Mode-Selects the sound mode among the predefined settings. You can select Mono, Stereo, or SAP (separate audio program), depending on available audio formats for a digital TV program, if multiple...
User Manual (English)
Page 26
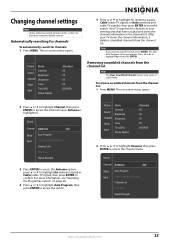
...: 1 Press MENU. Antenna is highlighted. The Stop Auto Program? For more information, see "Resetting the Plug & Play option" on using the remote control. Changing channel settings Note Unless otherwise noted, all tasks in the channel list. Press or to start the search. Removing scrambled channels from the channel list: 1 Press MENU...
...: 1 Press MENU. Antenna is highlighted. The Stop Auto Program? For more information, see "Resetting the Plug & Play option" on using the remote control. Changing channel settings Note Unless otherwise noted, all tasks in the channel list. Press or to start the search. Removing scrambled channels from the channel list: 1 Press MENU...
User Manual (English)
Page 27
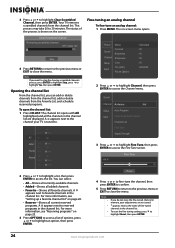
...or to highlight Reset, then press ENTER. 24 www.insigniaproducts.com A appears next to the channel your adjustments are displayed. For more information, see "Setting up a favorite channel list" on page 25. 3 Press OPTIONS to access a list of fine-tuned channels in the channel list are not saved.... next to the name of options, press or to reserved programs in the channel list. The on the screen. To reset the fine tuning setting, press to highlight Clear Scrambled Channel, then press ENTER. Note If you can select: • All-Shows all currently available channels. •...
...or to highlight Reset, then press ENTER. 24 www.insigniaproducts.com A appears next to the channel your adjustments are displayed. For more information, see "Setting up a favorite channel list" on page 25. 3 Press OPTIONS to access a list of fine-tuned channels in the channel list are not saved.... next to the name of options, press or to reserved programs in the channel list. The on the screen. To reset the fine tuning setting, press to highlight Clear Scrambled Channel, then press ENTER. Note If you can select: • All-Shows all currently available channels. •...


