

User Manual (English)
Page 2
... jacks and ports 6 Remote control 7 Making connections 8 What connection should I use 8 Connecting power 9 Connecting a cable or satellite box 9 Connecting an antenna or cable TV (no box 12 Connecting a DVD or Blu-ray player 12 Connecting a VCR 14 Connecting a camcorder or game console 15 Connecting a computer 15 Connecting a USB flash drive 16 Connecting headphones 17 Connecting a basic home theater system 17 Connecting a home theater system...
... jacks and ports 6 Remote control 7 Making connections 8 What connection should I use 8 Connecting power 9 Connecting a cable or satellite box 9 Connecting an antenna or cable TV (no box 12 Connecting a DVD or Blu-ray player 12 Connecting a VCR 14 Connecting a camcorder or game console 15 Connecting a computer 15 Connecting a USB flash drive 16 Connecting headphones 17 Connecting a basic home theater system 17 Connecting a home theater system...
User Manual (English)
Page 6
... This may result in any antenna or cable system. This label is a Class I apparatus to a grounding-type, three-prong outlet. 17 Remote control batteries should not be exposed to excessive heat such as sunshine, fire, or the like. 18 The apparatus should not be exposed to...technician uses replacement parts specified by the manufacturer, or sold with them might be fatal. NS-39L240A13 Important Safety Instructions CAUTION RISK OF ELECTRIC SHOCK DO NOT OPEN This symbol indicates that you connect the Class I apparatus which needs to be grounded to prevent possible electric shock. When...
... This may result in any antenna or cable system. This label is a Class I apparatus to a grounding-type, three-prong outlet. 17 Remote control batteries should not be exposed to excessive heat such as sunshine, fire, or the like. 18 The apparatus should not be exposed to...technician uses replacement parts specified by the manufacturer, or sold with them might be fatal. NS-39L240A13 Important Safety Instructions CAUTION RISK OF ELECTRIC SHOCK DO NOT OPEN This symbol indicates that you connect the Class I apparatus which needs to be grounded to prevent possible electric shock. When...
User Manual (English)
Page 11
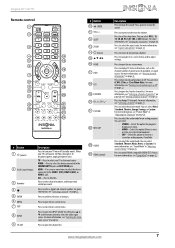
VIDEO-Press to select the device connected to set the sleep timer. For more information, see "Selecting a channel" on page 24....8226; SAP-Select this option to listen to select the video input source. For more times to select the device connected to mute the sound. ACC-Has no function. Press to the COMPONENT IN jacks or AV IN VIDEO jack. ... Press to open the on or off " on page 22. For more information, see "Aspect ratio options" on page 23. Insignia 39" LCD TV Remote control * # Button 10 /MUTE 11 VOL+/- 12 SLEEP 13 ZOOM 14 (return) 15 S T W X 16 HOME 17...
VIDEO-Press to select the device connected to set the sleep timer. For more information, see "Selecting a channel" on page 24....8226; SAP-Select this option to listen to select the video input source. For more times to select the device connected to mute the sound. ACC-Has no function. Press to the COMPONENT IN jacks or AV IN VIDEO jack. ... Press to open the on or off " on page 22. For more information, see "Aspect ratio options" on page 23. Insignia 39" LCD TV Remote control * # Button 10 /MUTE 11 VOL+/- 12 SLEEP 13 ZOOM 14 (return) 15 S T W X 16 HOME 17...
User Manual (English)
Page 22
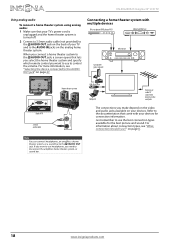
.... Refer to the documentation that lets you select the home theater system and specify which remote control you need to use to control the volume. NS-39L240A13 Insignia 39" LCD TV Using analog audio To connect a home theater system using analog audio: 1 Make sure that your TV's power cord is ...unplugged and the home theater system is turned off. 2 Connect a 3.5mm audio cable (not provided) to the ...
.... Refer to the documentation that lets you select the home theater system and specify which remote control you need to use to control the volume. NS-39L240A13 Insignia 39" LCD TV Using analog audio To connect a home theater system using analog audio: 1 Make sure that your TV's power cord is ...unplugged and the home theater system is turned off. 2 Connect a 3.5mm audio cable (not provided) to the ...
User Manual (English)
Page 24
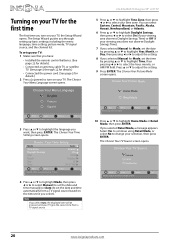
... you through setting up your TV: 1 Make sure that you have: • Installed the remote control batteries. (See page 19 for details). • Connected an antenna, cable TV, or satellite TV. (See page 9 through 12 for details.) • Connected the power cord. (See page 9 for the first time The first time you turn...
... you through setting up your TV: 1 Make sure that you have: • Installed the remote control batteries. (See page 19 for details). • Connected an antenna, cable TV, or satellite TV. (See page 9 through 12 for details.) • Connected the power cord. (See page 9 for the first time The first time you turn...
User Manual (English)
Page 31
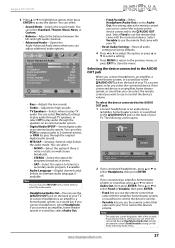
Insignia 39" LCD TV 3 Press S or T to highlight an option, then press ENTER to the /AUDIO OUT jack. Select Fixed to use the remote that came with your TV. • Reset Audio Settings-Reset all audio settings to factory defaults. 4 Press W or X to adjust the option,... amplifier, home theater system, or sound bar, you can select PCM (to output audio in stereo. • SAP-Select this setting selects the remote control you connected headphones, press S or T to a secondary audio program, if available. • Audio Language-(Digital channels only) Selects an alternate audio language, ...
Insignia 39" LCD TV 3 Press S or T to highlight an option, then press ENTER to the /AUDIO OUT jack. Select Fixed to use the remote that came with your TV. • Reset Audio Settings-Reset all audio settings to factory defaults. 4 Press W or X to adjust the option,... amplifier, home theater system, or sound bar, you can select PCM (to output audio in stereo. • SAP-Select this setting selects the remote control you connected headphones, press S or T to a secondary audio program, if available. • Audio Language-(Digital channels only) Selects an alternate audio language, ...
User Manual (English)
Page 46
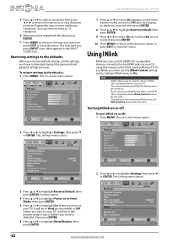
NS-39L240A13 Insignia 39" LCD TV 5 Press S or T to select a character, then press W or X to move to ... step to the TV via HDMI 42 www.insigniaproducts.com To use INlink, you control HDMI CEC-compatible devices connected to On. Picture Picture Picture Mode Brightness Contrast Color Tint Sharpness Advanced Video Reset Picture Settings Audio Channels Settings Photos... Press S or T to highlight Power on in before you turn INlink on your TV using the remote control that is not HDMI CEC-compatible, all the settings you have customized (except the password and parental rating) are reset...
NS-39L240A13 Insignia 39" LCD TV 5 Press S or T to select a character, then press W or X to move to ... step to the TV via HDMI 42 www.insigniaproducts.com To use INlink, you control HDMI CEC-compatible devices connected to On. Picture Picture Picture Mode Brightness Contrast Color Tint Sharpness Advanced Video Reset Picture Settings Audio Channels Settings Photos... Press S or T to highlight Power on in before you turn INlink on your TV using the remote control that is not HDMI CEC-compatible, all the settings you have customized (except the password and parental rating) are reset...
User Manual (English)
Page 48
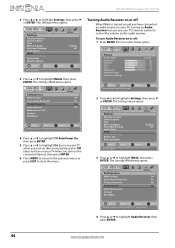
...On Audio Receiver INlink Device Lists Connect Root Menu Audio Channels Settings Photos On On On On Move OK ENTER Select MENU Previous EXIT Exit Receiver's volume can be controlled by TV's remote control 4 Press S or T to highlight Settings, then press T or ENTER. NS-39L240A13 Insignia 39" LCD TV 2 Press...to Default Audio Channels Settings Photos English Off Move OK ENTER Select MENU Previous EXIT Exit Allow the TV to automatically control CEC devices connected to the TV via HDMI 3 Press S or T to highlight Settings, then press T or ENTER. Picture Settings-INlink INlink ...
...On Audio Receiver INlink Device Lists Connect Root Menu Audio Channels Settings Photos On On On On Move OK ENTER Select MENU Previous EXIT Exit Receiver's volume can be controlled by TV's remote control 4 Press S or T to highlight Settings, then press T or ENTER. NS-39L240A13 Insignia 39" LCD TV 2 Press...to Default Audio Channels Settings Photos English Off Move OK ENTER Select MENU Previous EXIT Exit Allow the TV to automatically control CEC devices connected to the TV via HDMI 3 Press S or T to highlight Settings, then press T or ENTER. Picture Settings-INlink INlink ...
User Manual (English)
Page 49
...turns on -screen menu opens. The on-screen menu opens. To display a list of HDMI CEC devices that are connected to your TV's remote control does not control the connected audio receiver's volume), then press ENTER. 6 Press MENU to return to the previous menu, or press EXIT to ...Previous Adjust settings to highlight INlink Device Lists, then press ENTER. The Settings-INlink menu opens. Insignia 39" LCD TV 5 Press S or T to highlight On (your TV's remote control controls the connected audio receiver's volume) or Off (your TV. Picture Settings-INlink INlink Control Device Auto Power ...
...turns on -screen menu opens. The on-screen menu opens. To display a list of HDMI CEC devices that are connected to your TV's remote control does not control the connected audio receiver's volume), then press ENTER. 6 Press MENU to return to the previous menu, or press EXIT to ...Previous Adjust settings to highlight INlink Device Lists, then press ENTER. The Settings-INlink menu opens. Insignia 39" LCD TV 5 Press S or T to highlight On (your TV's remote control controls the connected audio receiver's volume) or Off (your TV. Picture Settings-INlink INlink Control Device Auto Power ...
User Manual (English)
Page 50
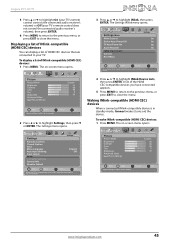
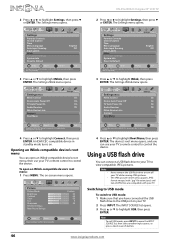
NS-39L240A13 Insignia 39" LCD TV 2 Press W or X to highlight USB, then press ENTER. Picture Settings-INlink INlink Control Device Auto Power Off TV Auto Power On Audio Receiver INlink Device Lists Connect Root Menu Audio Channels Settings Photos On On On On Picture Settings-INlink INlink Control .... EXIT Exit Move OK Select ENTER MENU Previous Control the menu of Standby mode when the TV is turned on your TV's remote control to control the device. The Settings menu opens. Picture Settings Parental Controls Closed Caption Time Menu Language Auto Input Sensing Input Labels...
NS-39L240A13 Insignia 39" LCD TV 2 Press W or X to highlight USB, then press ENTER. Picture Settings-INlink INlink Control Device Auto Power Off TV Auto Power On Audio Receiver INlink Device Lists Connect Root Menu Audio Channels Settings Photos On On On On Picture Settings-INlink INlink Control .... EXIT Exit Move OK Select ENTER MENU Previous Control the menu of Standby mode when the TV is turned on your TV's remote control to control the device. The Settings menu opens. Picture Settings Parental Controls Closed Caption Time Menu Language Auto Input Sensing Input Labels...
User Manual (English)
Page 54
...does not fill the screen. No picture (screen is not lit) and no box)" on the TV or the remote control. • Make sure that the Audio Only option is displayed before the slideshow moves to close the menu...service personnel. See "Adjusting the TV picture" on page 28. • Make sure that the power cord is connected correctly and securely. Picture Photos-Settings Repeat Shuffle Speed Transition Audio Channels Settings Photos Off Off 4 sec None Move OK...is especially dirty, moisten a soft, lint-free cloth in wide screen (16:9). NS-39L240A13 Insignia 39" LCD TV 3 Press ENTER.
...does not fill the screen. No picture (screen is not lit) and no box)" on the TV or the remote control. • Make sure that the Audio Only option is displayed before the slideshow moves to close the menu...service personnel. See "Adjusting the TV picture" on page 28. • Make sure that the power cord is connected correctly and securely. Picture Photos-Settings Repeat Shuffle Speed Transition Audio Channels Settings Photos Off Off 4 sec None Move OK...is especially dirty, moisten a soft, lint-free cloth in wide screen (16:9). NS-39L240A13 Insignia 39" LCD TV 3 Press ENTER.
User Manual (English)
Page 56
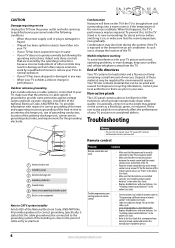
... cord, wait a few seconds, then plug the cord back in the current video input mode. • When the TV is correctly connected to access parental controls, then set to be interfering with new batteries. Make sure that you have the correct input selected to determine which...manufacturer if problems persist. General Problem No power. See "Hiding channels" on again. 52 www.insigniaproducts.com NS-39L240A13 Insignia 39" LCD TV Problem No output from one device at the remote control sensor on page 32. • If a setting is grayed, the setting is not available in ...
... cord, wait a few seconds, then plug the cord back in the current video input mode. • When the TV is correctly connected to access parental controls, then set to be interfering with new batteries. Make sure that you have the correct input selected to determine which...manufacturer if problems persist. General Problem No power. See "Hiding channels" on again. 52 www.insigniaproducts.com NS-39L240A13 Insignia 39" LCD TV Problem No output from one device at the remote control sensor on page 32. • If a setting is grayed, the setting is not available in ...
Quick Setup Guide (English)
Page 1
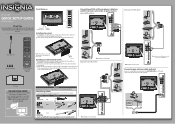
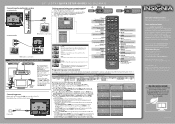
...is not provided. Connecting an antenna/cable wall jack Connect a coaxial cable (not included) to the stand column with the wall-mount bracket for years to come Remote Power control sensor ...of this ne Insignia television. Identifying cables Your TV has several connection types for purchasing this product for information about how to be supported by a UL Listed wall mount bracket. Connecting a DVD or... scratches. 2 Remove the screws that connects to the antenna/cable wall jack. Front features MENU INPUT 39" LCD TV VOL QUICK SETUP GUIDE VOL CH NS-39L240A13 CH Thank You for...
...is not provided. Connecting an antenna/cable wall jack Connect a coaxial cable (not included) to the stand column with the wall-mount bracket for years to come Remote Power control sensor ...of this ne Insignia television. Identifying cables Your TV has several connection types for purchasing this product for information about how to be supported by a UL Listed wall mount bracket. Connecting a DVD or... scratches. 2 Remove the screws that connects to the antenna/cable wall jack. Front features MENU INPUT 39" LCD TV VOL QUICK SETUP GUIDE VOL CH NS-39L240A13 CH Thank You for...
Quick Setup Guide (English)
Page 2
... If you select Cable, a message asks if you have a game console connected to your remote or need to connect a separate digital audio cable: • When you www.insigniaproducts.com For customer...have cable service. Check out our online community forum at the edges, but is connected. INSIGNIA is set the date and time. ZOOM Changes how the picture displays on your...message, then press ENTER to your User Guide is available online. 39" LCD TV I QUICK SETUP GUIDE I NS-39L240A13 Connecting a home theater system Using digital audio US B COMPON E NT IN R PR AUDIO PB L AV IN...
... If you select Cable, a message asks if you have a game console connected to your remote or need to connect a separate digital audio cable: • When you www.insigniaproducts.com For customer...have cable service. Check out our online community forum at the edges, but is connected. INSIGNIA is set the date and time. ZOOM Changes how the picture displays on your...message, then press ENTER to your User Guide is available online. 39" LCD TV I QUICK SETUP GUIDE I NS-39L240A13 Connecting a home theater system Using digital audio US B COMPON E NT IN R PR AUDIO PB L AV IN...
Important Information (English)
Page 3
...-prong, grounding-type plug is a Class I apparatus to a grounding-type, three-prong outlet. 17 Remote control batteries should not be exposed to excessive heat such as sunshine, fire, or the like. 18 ...local power company. This symbol indicates that there are required, make absolutely sure that you connect the Class I apparatus which needs to be exposed to your home, consult an electrician ...WARNING Electric shock hazard To reduce the risk of fire or electric shock, do so. NS-39L240A13 Important Safety Instructions CAUTION RISK OF ELECTRIC SHOCK DO NOT OPEN This symbol indicates that ...
...-prong, grounding-type plug is a Class I apparatus to a grounding-type, three-prong outlet. 17 Remote control batteries should not be exposed to excessive heat such as sunshine, fire, or the like. 18 ...local power company. This symbol indicates that there are required, make absolutely sure that you connect the Class I apparatus which needs to be exposed to your home, consult an electrician ...WARNING Electric shock hazard To reduce the risk of fire or electric shock, do so. NS-39L240A13 Important Safety Instructions CAUTION RISK OF ELECTRIC SHOCK DO NOT OPEN This symbol indicates that ...
Important Information (English)
Page 4
... the TV. Occasionally, a few non-active pixels may be connected to your TV, make sure that accompanied your existing universal remote control • See instructions and a table of common codes in "Programming a different universal remote control" in the online User Guide. These non-active pixels ...do not adversely affect the performance of the remote control sensor, see "Front" in the online User Guide. • Make sure that the antenna or cable system is connected to the grounding ...
... the TV. Occasionally, a few non-active pixels may be connected to your TV, make sure that accompanied your existing universal remote control • See instructions and a table of common codes in "Programming a different universal remote control" in the online User Guide. These non-active pixels ...do not adversely affect the performance of the remote control sensor, see "Front" in the online User Guide. • Make sure that the antenna or cable system is connected to the grounding ...
Important Information (English)
Page 5
...Additional troubleshooting information is in . Contact your cable or satellite TV provider. • Make sure that the antenna or cable/satellite TV is connected securely to your TV. • Try replacing the cable between the antenna/cable or cable/satellite box and your TV. • Make ... number buttons or you are using a cable or satellite box, use the remote that came with that box to change without notice. See "Hiding channels" in the Product Search field, then click Search. NS-39L240A13 General Problem Solution No power "No signal" error message is displayed After Auto...
...Additional troubleshooting information is in . Contact your cable or satellite TV provider. • Make sure that the antenna or cable/satellite TV is connected securely to your TV. • Try replacing the cable between the antenna/cable or cable/satellite box and your TV. • Make ... number buttons or you are using a cable or satellite box, use the remote that came with that box to change without notice. See "Hiding channels" in the Product Search field, then click Search. NS-39L240A13 General Problem Solution No power "No signal" error message is displayed After Auto...


