
User Manual English
Page 1
Before using your new product, please read these instructions to prevent any damage. Product design and specification may differ from actual product appearance. USER GUIDE 24"/32" 720P, 60Hz 48" 1080P, 60Hz LED Roku TV English Version 7.0 NS-24ER310NA17/NS-32DR310NA17/NS-48DR510NA17 Illustrations in this guide are provided for reference only and may be changed without notice.
Before using your new product, please read these instructions to prevent any damage. Product design and specification may differ from actual product appearance. USER GUIDE 24"/32" 720P, 60Hz 48" 1080P, 60Hz LED Roku TV English Version 7.0 NS-24ER310NA17/NS-32DR310NA17/NS-48DR510NA17 Illustrations in this guide are provided for reference only and may be changed without notice.

User Manual English
Page 11
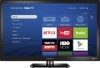
... languages, 24x7 live news and so much more flipping through inputs or wading through complicated menus. This User Guide explains how to use your Roku TV, go to Settings > System > About after it has been updated to get the most -often used devices and streaming channels are organized ...can always see the best priced option. 24"/32" 720P, 48" 1080P, 60Hz, LED Roku TV 24"/32" 720P, 48" 1080P, 60Hz, LED Roku TV Welcome Congratulations on the home screen. After it will unlock a world of your new TV Follow these simple steps to version 7.0. The new standard in just a few taps. Get...
... languages, 24x7 live news and so much more flipping through inputs or wading through complicated menus. This User Guide explains how to use your Roku TV, go to Settings > System > About after it has been updated to get the most -often used devices and streaming channels are organized ...can always see the best priced option. 24"/32" 720P, 48" 1080P, 60Hz, LED Roku TV 24"/32" 720P, 48" 1080P, 60Hz, LED Roku TV Welcome Congratulations on the home screen. After it will unlock a world of your new TV Follow these simple steps to version 7.0. The new standard in just a few taps. Get...

User Manual English
Page 13
...; If you plan to wall-mount your TV, do not install the stand(s). • Store the stand(s) and stand screws in case you decide to use the stand(s) in an entertainment center, go to Installing a wall-mount bracket. 24"/32" 720P, 48" 1080P, 60Hz, LED Roku TV Installing the stand(s) or wall-mount bracket... • If you want to place your TV on a table or in the future.
...; If you plan to wall-mount your TV, do not install the stand(s). • Store the stand(s) and stand screws in case you decide to use the stand(s) in an entertainment center, go to Installing a wall-mount bracket. 24"/32" 720P, 48" 1080P, 60Hz, LED Roku TV Installing the stand(s) or wall-mount bracket... • If you want to place your TV on a table or in the future.

User Manual English
Page 15
Screw type Screw length # of screws ST4 15 mm 4 48" model Note • If your TV is the 24" model, go to 24" model on page 7. • If your TV is the 32" model, go to 32" model on page 8. 1 Carefully place your TV face-down on a cushioned, clean surface to your TV with the screw holes on the bottom of your TV, then secure the stands to protect the screen. 9 www.insigniaproducts.com 24"/32" 720P, 48" 1080P, 60Hz, LED Roku TV 2 Align the TV stands with the four provided screws.
Screw type Screw length # of screws ST4 15 mm 4 48" model Note • If your TV is the 24" model, go to 24" model on page 7. • If your TV is the 32" model, go to 32" model on page 8. 1 Carefully place your TV face-down on a cushioned, clean surface to your TV with the screw holes on the bottom of your TV, then secure the stands to protect the screen. 9 www.insigniaproducts.com 24"/32" 720P, 48" 1080P, 60Hz, LED Roku TV 2 Align the TV stands with the four provided screws.

User Manual English
Page 17
... by a UL Listed wall mount bracket with your wall mount for complete mounting instructions. • Your TV is intended to be securely attached, using all four mounting holes, your TV face-down on the back. If you do not use all four holes. See the documentation that came.... (See Miscellaneous on page 100, 101, or 102.) 1 Carefully place your TV may fall and cause property damage or personal injury. 24"/32" 720P, 48" 1080P, 60Hz, LED Roku TV Installing a wall-mount bracket Warnings • Your TV has four VESA mounting holes on a cushioned, clean surface to protect the screen....
... by a UL Listed wall mount bracket with your wall mount for complete mounting instructions. • Your TV is intended to be securely attached, using all four mounting holes, your TV face-down on the back. If you do not use all four holes. See the documentation that came.... (See Miscellaneous on page 100, 101, or 102.) 1 Carefully place your TV may fall and cause property damage or personal injury. 24"/32" 720P, 48" 1080P, 60Hz, LED Roku TV Installing a wall-mount bracket Warnings • Your TV has four VESA mounting holes on a cushioned, clean surface to protect the screen....

User Manual English
Page 19
... mounting holes on the wall-mount bracket you purchased. See the instructions that came with the wall-mount bracket for information about how to your TV using the mounting holes on the back of the wall-mount screws vary depending on the back the 48" model take type M6 screws. 24... in.(100 mm 13 www.insigniaproducts.com Notes • Images do not necessarily represent the exact design of your television. • The length of your TV. 24"/32" 720P, 48" 1080P, 60Hz, LED Roku TV 3 Attach the wall-mount bracket to correctly hang your...
... mounting holes on the wall-mount bracket you purchased. See the instructions that came with the wall-mount bracket for information about how to your TV using the mounting holes on the back of the wall-mount screws vary depending on the back the 48" model take type M6 screws. 24... in.(100 mm 13 www.insigniaproducts.com Notes • Images do not necessarily represent the exact design of your television. • The length of your TV. 24"/32" 720P, 48" 1080P, 60Hz, LED Roku TV 3 Attach the wall-mount bracket to correctly hang your...
User Manual English
Page 21
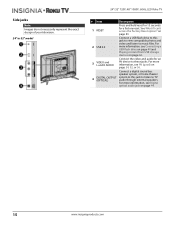
... files. Side jacks Note Images do not necessarily represent the exact design of your television. 24" or 32" model 24"/32" 720P, 48" 1080P, 60Hz, LED Roku TV # Item Description 1 RESET Press and hold reset for 15 seconds for an AV device to these jacks. on page 44. 15 www.insigniaproducts.com For...
... files. Side jacks Note Images do not necessarily represent the exact design of your television. 24" or 32" model 24"/32" 720P, 48" 1080P, 60Hz, LED Roku TV # Item Description 1 RESET Press and hold reset for 15 seconds for an AV device to these jacks. on page 44. 15 www.insigniaproducts.com For...

User Manual English
Page 23
... source, then wait a few seconds. See Connecting headphones on your TV when your TV is off (in standby mode). Back jacks 24" or 32" model Note Images do not necessarily represent the exact design of your television. 24"/32" 720P, 48" 1080P, 60Hz, LED Roku TV # Item 1 /INPUT 2 AC IN 3 HDMI3 4 HDMI2 5 ...HDMI1 (ARC) 6 7 ANT/CABLE IN Description -Press to turn off your TV when TV is on. Press and hold to this jack. Your...
... source, then wait a few seconds. See Connecting headphones on your TV when your TV is off (in standby mode). Back jacks 24" or 32" model Note Images do not necessarily represent the exact design of your television. 24"/32" 720P, 48" 1080P, 60Hz, LED Roku TV # Item 1 /INPUT 2 AC IN 3 HDMI3 4 HDMI2 5 ...HDMI1 (ARC) 6 7 ANT/CABLE IN Description -Press to turn off your TV when TV is on. Press and hold to this jack. Your...

User Manual English
Page 25
... effect regardless of the screen is highlighted, jumps up one page. When playing streaming audio, jumps to the Home screen menu. When watching TV with your TV is off. Subsequent presses cycle among the preset sleep time intervals: 30 minutes, 1 hour, 1.5 hours, 2 hours, and 3 hours....menu option. When playing streaming video that supports this button displays information for the current TV program. 24"/32" 720P, 48" 1080P, 60Hz, LED Roku TV Remote control # Button 1 (power) 2 (back) Description If your TV: Menu-Goes back to the screen from which the input was selected. Home screen...
... effect regardless of the screen is highlighted, jumps up one page. When playing streaming audio, jumps to the Home screen menu. When watching TV with your TV is off. Subsequent presses cycle among the preset sleep time intervals: 30 minutes, 1 hour, 1.5 hours, 2 hours, and 3 hours....menu option. When playing streaming video that supports this button displays information for the current TV program. 24"/32" 720P, 48" 1080P, 60Hz, LED Roku TV Remote control # Button 1 (power) 2 (back) Description If your TV: Menu-Goes back to the screen from which the input was selected. Home screen...
User Manual English
Page 27
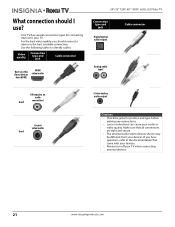
... a device to the best available connection. Make sure that came with your devices. • Always turn off your TV. For the best video quality, you have HDMI) 24"/32" 720P, 48" 1080P, 60Hz, LED Roku TV Connection type and jack Digital optical audio output Cable connector Analog audio input AV (requires an audio Good...
... a device to the best available connection. Make sure that came with your devices. • Always turn off your TV. For the best video quality, you have HDMI) 24"/32" 720P, 48" 1080P, 60Hz, LED Roku TV Connection type and jack Digital optical audio output Cable connector Analog audio input AV (requires an audio Good...

User Manual English
Page 29
Note An HDMI cable carries both audio and video. 24"/32" 720P, 48" 1080P, 60Hz, LED Roku TV 48"model Note If your TV is unplugged and all connected devices are turned off. 2 Connect the incoming cable from the cable wall jack to the cable-in jack on the ...cable or satellite box. 3 Connect an HDMI cable (not provided) to an HDMI jack on the side of your TV and to use any audio cables. 23 www.insigniaproducts.com You do not need to the HDMI OUT jack on the cable or satellite box...
Note An HDMI cable carries both audio and video. 24"/32" 720P, 48" 1080P, 60Hz, LED Roku TV 48"model Note If your TV is unplugged and all connected devices are turned off. 2 Connect the incoming cable from the cable wall jack to the cable-in jack on the ...cable or satellite box. 3 Connect an HDMI cable (not provided) to an HDMI jack on the side of your TV and to use any audio cables. 23 www.insigniaproducts.com You do not need to the HDMI OUT jack on the cable or satellite box...

User Manual English
Page 31
...and R jacks on the back of your TV and to the AV and audio out jacks on page 24. 24"/32" 720P, 48" 1080P, 60Hz, LED Roku TV 48" model Note If your TV is the 24" or 32" model,... go to 24" or 32" model on the cable or satellite box. Note When you connect the audio using the AUDIO L and R jacks, the audio output is analog. 4 Plug your TV...'s power cord into a power outlet, turn on your TV, then turn on the cable or satellite box. 5 On the Home screen, press ...
...and R jacks on the back of your TV and to the AV and audio out jacks on page 24. 24"/32" 720P, 48" 1080P, 60Hz, LED Roku TV 48" model Note If your TV is the 24" or 32" model,... go to 24" or 32" model on the cable or satellite box. Note When you connect the audio using the AUDIO L and R jacks, the audio output is analog. 4 Plug your TV...'s power cord into a power outlet, turn on your TV, then turn on the cable or satellite box. 5 On the Home screen, press ...

User Manual English
Page 33
See Setting up the TV tuner to watch broadcast TV. 24"/32" 720P, 48" 1080P, 60Hz, LED Roku TV 48" model Note If your TV, then turn on your TV is unplugged and all connected devices are turned off. 2 Connect the incoming cable from the cable wall jack to the cable-in jack on the ...cable or satellite box. 3 Connect a coaxial cable (not provided) to the ANT/CABLE IN jack on the side of your TV and to the coaxial out jack on the cable or satellite box. 4 Plug your TV's power cord into a power outlet, turn on the cable or satellite box. 5 Set up Antenna...
See Setting up the TV tuner to watch broadcast TV. 24"/32" 720P, 48" 1080P, 60Hz, LED Roku TV 48" model Note If your TV, then turn on your TV is unplugged and all connected devices are turned off. 2 Connect the incoming cable from the cable wall jack to the cable-in jack on the ...cable or satellite box. 3 Connect a coaxial cable (not provided) to the ANT/CABLE IN jack on the side of your TV and to the coaxial out jack on the cable or satellite box. 4 Plug your TV's power cord into a power outlet, turn on the cable or satellite box. 5 Set up Antenna...

User Manual English
Page 35
... the antenna is not installed correctly, contact qualified service personnel to correct the problem. • If the signal level for Antenna TV, then press OK. 5 Set up Antenna TV on your TV is still displayed as SD, thus the picture quality will not be as clear or crisp as it would be if..., the picture may need to install a set-top box to improve signal reception and picture quality. 24"/32" 720P, 48" 1080P, 60Hz, LED Roku TV 48" model Note If your TV is the 24" or 32" model, go to 24" or 32" model on others, the problem may be caused by a poor or weak...
... the antenna is not installed correctly, contact qualified service personnel to correct the problem. • If the signal level for Antenna TV, then press OK. 5 Set up Antenna TV on your TV is still displayed as SD, thus the picture quality will not be as clear or crisp as it would be if..., the picture may need to install a set-top box to improve signal reception and picture quality. 24"/32" 720P, 48" 1080P, 60Hz, LED Roku TV 48" model Note If your TV is the 24" or 32" model, go to 24" or 32" model on others, the problem may be caused by a poor or weak...

User Manual English
Page 37
...TV Side of your TV and to the HDMI OUT jack on the DVD or Blu-ray player. 3 Plug your TV and DVD or Blu-ray player. 4 On the Home screen, press or to highlight the HDMI 1, HDMI 2, or HDMI 3 tile, then press OK. 24"/32" 720P, 48" 1080P, 60Hz, LED Roku TV... 48" model Note If your TV is turned off. 2 Connect an HDMI cable (not provided) to an HDMI jack on the side ...ray player is the 24" or 32" model, go to 24" or 32" model on your TV's power cord into a power outlet, then turn on page 30. You do not need to ...
...TV Side of your TV and to the HDMI OUT jack on the DVD or Blu-ray player. 3 Plug your TV and DVD or Blu-ray player. 4 On the Home screen, press or to highlight the HDMI 1, HDMI 2, or HDMI 3 tile, then press OK. 24"/32" 720P, 48" 1080P, 60Hz, LED Roku TV... 48" model Note If your TV is turned off. 2 Connect an HDMI cable (not provided) to an HDMI jack on the side ...ray player is the 24" or 32" model, go to 24" or 32" model on your TV's power cord into a power outlet, then turn on page 30. You do not need to ...

User Manual English
Page 39
...jacks, the audio output is analog. 3 Plug your TV's power cord into a power outlet, then turn on page 32. 24"/32" 720P, 48" 1080P, 60Hz, LED Roku TV 48" model Note If your TV is the 24" or 32" model, go to 24..." or 32" model on your TV and DVD or Blu-ray player. 4 On the Home screen...player AV cable AV cable Audio cable connector connectors AV jack Analog audio jacks Back of TV 1 Make sure that your TV's power cord is unplugged and the DVD or Blu-ray player is turned off. 2 ...
...jacks, the audio output is analog. 3 Plug your TV's power cord into a power outlet, then turn on page 32. 24"/32" 720P, 48" 1080P, 60Hz, LED Roku TV 48" model Note If your TV is the 24" or 32" model, go to 24..." or 32" model on your TV and DVD or Blu-ray player. 4 On the Home screen...player AV cable AV cable Audio cable connector connectors AV jack Analog audio jacks Back of TV 1 Make sure that your TV's power cord is unplugged and the DVD or Blu-ray player is turned off. 2 ...

User Manual English
Page 41
... HDMI OUT jack on the game console. 3 Plug your TV and the game console. 4 On the Home screen, press or to highlight the HDMI 1, HDMI 2, or HDMI 3 tile, then press OK. 24"/32" 720P, 48" 1080P, 60Hz, LED Roku TV 48" model Note If your TV is turned off. 2 Connect an HDMI cable (not provided...) to an HDMI jack on the side of TV HDMI cable connector HDMI jack HDMI cable 1 Make sure that your...
... HDMI OUT jack on the game console. 3 Plug your TV and the game console. 4 On the Home screen, press or to highlight the HDMI 1, HDMI 2, or HDMI 3 tile, then press OK. 24"/32" 720P, 48" 1080P, 60Hz, LED Roku TV 48" model Note If your TV is turned off. 2 Connect an HDMI cable (not provided...) to an HDMI jack on the side of TV HDMI cable connector HDMI jack HDMI cable 1 Make sure that your...

User Manual English
Page 43
... connect the audio using the AUDIO L and R jacks, the audio output is the 24" or 32" model, go to 24" or 32" model on your TV and the game console. 4 On the Home screen, press or to highlight the AV tile, then press OK. 37 www.insigniaproducts.com See the documentation...) to the composite jack(s) on the game console. 24"/32" 720P, 48" 1080P, 60Hz, LED Roku TV 48" model Note If your TV is analog. 3 Plug your TV's power cord into a power outlet, then turn on page 36. On your TV Game console AV cable Audio cable connector connectors Console-specific AV cable AV jack Analog...
... connect the audio using the AUDIO L and R jacks, the audio output is the 24" or 32" model, go to 24" or 32" model on your TV and the game console. 4 On the Home screen, press or to highlight the AV tile, then press OK. 37 www.insigniaproducts.com See the documentation...) to the composite jack(s) on the game console. 24"/32" 720P, 48" 1080P, 60Hz, LED Roku TV 48" model Note If your TV is analog. 3 Plug your TV's power cord into a power outlet, then turn on page 36. On your TV Game console AV cable Audio cable connector connectors Console-specific AV cable AV jack Analog...

User Manual English
Page 45
..., 48" 1080P, 60Hz, LED Roku TV 48" model Note If your TV is turned off. 2 Connect an HDMI cable (not provided) to an HDMI jack on the side of your TV and to the HDMI OUT jack on the computer. 3 Plug your TV's power cord into a power outlet, then turn on your TV's power cord is unplugged... the HDMI 1, HDMI 2, or HDMI 3 tile, then press OK. 5 Adjust the display properties on page 38. On your TV Side of TV Computer HDMI cable connector HDMI jack HDMI cable 1 Make sure that your TV and the computer. 4 On the Home screen, press or to 24" or 32" model on the computer, if...
..., 48" 1080P, 60Hz, LED Roku TV 48" model Note If your TV is turned off. 2 Connect an HDMI cable (not provided) to an HDMI jack on the side of your TV and to the HDMI OUT jack on the computer. 3 Plug your TV's power cord into a power outlet, then turn on your TV's power cord is unplugged... the HDMI 1, HDMI 2, or HDMI 3 tile, then press OK. 5 Adjust the display properties on page 38. On your TV Side of TV Computer HDMI cable connector HDMI jack HDMI cable 1 Make sure that your TV and the computer. 4 On the Home screen, press or to 24" or 32" model on the computer, if...

User Manual English
Page 47
Caution Do not remove the USB flash drive or turn off your TV is the 24" or 32" model, go to highlight the Roku Media Player or USB Media Player tile, then press OK. 41 www.insigniaproducts.com 48" model 24"/32" 720P, 48" 1080P, 60Hz, LED Roku TV Note If your TV while using the USB flash drive. You may lose data or damage the USB flash drive. 2 Press or to 24" or 32" model on the side of TV USB flash drive 1 Plug a USB flash drive into the USB port on page 40. Side of your TV.
Caution Do not remove the USB flash drive or turn off your TV is the 24" or 32" model, go to highlight the Roku Media Player or USB Media Player tile, then press OK. 41 www.insigniaproducts.com 48" model 24"/32" 720P, 48" 1080P, 60Hz, LED Roku TV Note If your TV while using the USB flash drive. You may lose data or damage the USB flash drive. 2 Press or to 24" or 32" model on the side of TV USB flash drive 1 Plug a USB flash drive into the USB port on page 40. Side of your TV.


