
User Manual English
Page 2
... stands 5 Installing a wall-mount bracket 7 TV components 9 Package contents 9 Front 9 Side jacks 10 Back jacks 11 Remote control 12 What connection should I use 13 Connecting a cable or satellite box 14 HDMI (best 14 AV (good 15 Coaxial (good 16 Connecting an antenna or cable TV (no box 17 Connecting a DVD or Blu-ray player 18 HDMI (best 18 AV (good 19 Connecting a game console 20 HDMI (best 20 AV (good 21 Connecting a computer 22 Connecting a USB flash drive 23 Connecting headphones 24 Connecting external speakers or a soundbar 25 Digital audio 25 Analog audio...
... stands 5 Installing a wall-mount bracket 7 TV components 9 Package contents 9 Front 9 Side jacks 10 Back jacks 11 Remote control 12 What connection should I use 13 Connecting a cable or satellite box 14 HDMI (best 14 AV (good 15 Coaxial (good 16 Connecting an antenna or cable TV (no box 17 Connecting a DVD or Blu-ray player 18 HDMI (best 18 AV (good 19 Connecting a game console 20 HDMI (best 20 AV (good 21 Connecting a computer 22 Connecting a USB flash drive 23 Connecting headphones 24 Connecting external speakers or a soundbar 25 Digital audio 25 Analog audio...
User Manual English
Page 3
..." model 29 Using the remote control 30 Installing remote control batteries 30 Aiming the remote control 30 Programming universal remote controls 31 Viewing universal remote control codes 31 Turning on your TV for the first time 32 Understanding the basics 34 Turning your TV on or off 34 Selecting the video input source 34 On-screen menu overview 35 Navigating the menus 36 Selecting a channel 36 Adjusting the volume 36 Viewing channel information 36 Using INlink 37 Turning INlink on or off 37 Turning Device Auto Power...
..." model 29 Using the remote control 30 Installing remote control batteries 30 Aiming the remote control 30 Programming universal remote controls 31 Viewing universal remote control codes 31 Turning on your TV for the first time 32 Understanding the basics 34 Turning your TV on or off 34 Selecting the video input source 34 On-screen menu overview 35 Navigating the menus 36 Selecting a channel 36 Adjusting the volume 36 Viewing channel information 36 Using INlink 37 Turning INlink on or off 37 Turning Device Auto Power...
User Manual English
Page 4
... digital signal strength 49 Setting parental controls 50 Setting or changing the password 50 Blocking unrated TV 51 Setting parental control levels 51 Downloading rating information 53 Locking the power button on your TV 54 Using closed captioning 54 Turning closed captioning on or off 54 Selecting the analog closed captioning mode 55 Selecting the digital closed captioning mode 55 Customizing digital closed captioning settings 56 Adjusting time settings 57 Setting the clock 57 Setting the sleep timer 58 Adjusting menu settings 58 Selecting the menu language 58 Turning Input...
... digital signal strength 49 Setting parental controls 50 Setting or changing the password 50 Blocking unrated TV 51 Setting parental control levels 51 Downloading rating information 53 Locking the power button on your TV 54 Using closed captioning 54 Turning closed captioning on or off 54 Selecting the analog closed captioning mode 55 Selecting the digital closed captioning mode 55 Customizing digital closed captioning settings 56 Adjusting time settings 57 Setting the clock 57 Setting the sleep timer 58 Adjusting menu settings 58 Selecting the menu language 58 Turning Input...
User Manual English
Page 7
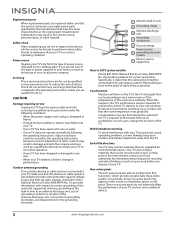
... repair to this , let the TV stand in its new surroundings for about finding a recycler in your area before switching it states that the cable ground must be connected to the grounding system of the building as close to your home, consult an electrician or your TV does not operate normally by following conditions: • When the power supply cord or plug...
... repair to this , let the TV stand in its new surroundings for about finding a recycler in your area before switching it states that the cable ground must be connected to the grounding system of the building as close to your home, consult an electrician or your TV does not operate normally by following conditions: • When the power supply cord or plug...
User Manual English
Page 16
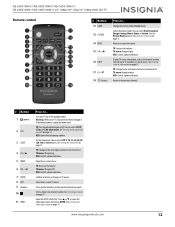
...: Increase the volume. USB: Control a photo slideshow. TV menu: Navigate down. USB: Control a photo slideshow. Enter a digital sub-channel number. Press S or T to Game mode. USB: Control a photo slideshow. See Selecting the video input source on page 58. www.insigniaproducts.com 12 TV: Change to the next higher channel in the channel list. To disconnect power, unplug the power cord. See Setting the sleep timer on page 34. TV: Decrease the volume. NS-24D510NA17/NS-39D310NA17/NS-50D510NA17/ NS-24D510MX17/NS-50D510MX17 24...
...: Increase the volume. USB: Control a photo slideshow. TV menu: Navigate down. USB: Control a photo slideshow. Enter a digital sub-channel number. Press S or T to Game mode. USB: Control a photo slideshow. See Selecting the video input source on page 58. www.insigniaproducts.com 12 TV: Change to the next higher channel in the channel list. To disconnect power, unplug the power cord. See Setting the sleep timer on page 34. TV: Decrease the volume. NS-24D510NA17/NS-39D310NA17/NS-50D510NA17/ NS-24D510MX17/NS-50D510MX17 24...
User Manual English
Page 21
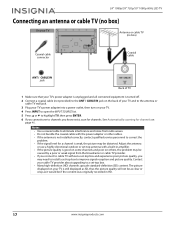
... the antenna or cable TV wall jack. 3 Plug your TV's power adapter into a power outlet, then turn on page 46. Notes • Use a coaxial cable to eliminate interference and noise from the broadcaster or cable TV provider. • If you connect to cable TV without a set-top box and experience poor picture quality, you know exist, scan for a channel is turned off. 2 Connect a coaxial cable (not provided) to the ANT / CABLE IN jack...
... the antenna or cable TV wall jack. 3 Plug your TV's power adapter into a power outlet, then turn on page 46. Notes • Use a coaxial cable to eliminate interference and noise from the broadcaster or cable TV provider. • If you connect to cable TV without a set-top box and experience poor picture quality, you know exist, scan for a channel is turned off. 2 Connect a coaxial cable (not provided) to the ANT / CABLE IN jack...
User Manual English
Page 35
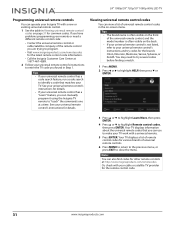
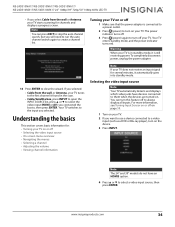
... previous menu, or press EXIT to identify a code that you can use to highlight Remote control codes, then press ENTER. If you have problems programming your remote or need to try codes for details. Note: You can also find codes for various brands of remote control codes for other remote controls at a time. See your universal remote control's instructions for details. • If your universal remote control has a "Learn" feature, you can manually program it using the Insignia TV remote...
... previous menu, or press EXIT to identify a code that you can use to highlight Remote control codes, then press ENTER. If you have problems programming your remote or need to try codes for details. Note: You can also find codes for various brands of remote control codes for other remote controls at a time. See your universal remote control's instructions for details. • If your universal remote control has a "Learn" feature, you can manually program it using the Insignia TV remote...
User Manual English
Page 36
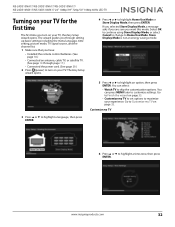
... 60Hz LED TV Turning on your TV for the first time The first time you turn on your TV. Select OK to continue using Store Display Mode, or select Cancel to change to highlight a time zone, then press ENTER. Customize my TV 6 Press S or T to Home Use Mode. Go to customize settings. The wizard guides you through setting up basic settings including the menu language, time setting, picture mode, TV signal source, and the channel list. 1 Make...
... 60Hz LED TV Turning on your TV for the first time The first time you turn on your TV. Select OK to continue using Store Display Mode, or select Cancel to change to highlight a time zone, then press ENTER. Customize my TV 6 Press S or T to Home Use Mode. Go to customize settings. The wizard guides you through setting up basic settings including the menu language, time setting, picture mode, TV signal source, and the channel list. 1 Make...
User Manual English
Page 38
... you will need to run the auto channel search again to create a channel list. 14 Press ENTER to always display all inputs. Your TV switches to them when the devices are turned on your TV. Warning When your TV is in the scan. • Cable/Satellite box, press INPUT to open the INPUT SOURCE list, press S or T to select the video input (HDMI or AV) you connected the box to select a video input source...
... you will need to run the auto channel search again to create a channel list. 14 Press ENTER to always display all inputs. Your TV switches to them when the devices are turned on your TV. Warning When your TV is in the scan. • Cable/Satellite box, press INPUT to open the INPUT SOURCE list, press S or T to select the video input (HDMI or AV) you connected the box to select a video input source...
User Manual English
Page 65
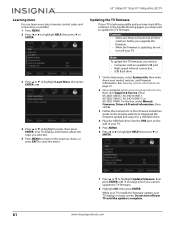
... in the Firmware Installation Guide on the Insignia website to download the firmware update and copy it to a USB flash drive. 4 Plug the USB flash drive into the USB port on page 60. 2 On a computer, go to www.insigniaproducts.com, then click Support & Service. A message asks if you need to highlight a topic, then press ENTER. Your TV displays information about remote control codes and connecting a soundbar. 1 Press MENU. 2 Press W or X to highlight HELP, then...
... in the Firmware Installation Guide on the Insignia website to download the firmware update and copy it to a USB flash drive. 4 Plug the USB flash drive into the USB port on page 60. 2 On a computer, go to www.insigniaproducts.com, then click Support & Service. A message asks if you need to highlight a topic, then press ENTER. Your TV displays information about remote control codes and connecting a soundbar. 1 Press MENU. 2 Press W or X to highlight HELP, then...
User Manual English
Page 67
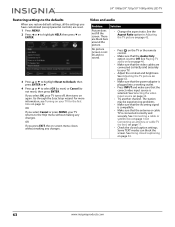
... LED TV Restoring settings to the defaults When you restore default settings, all the settings you select OK, your TV turns off, then turns on again. Some TEXT modes can block the screen. See Adjusting the TV picture on page 42. • Make sure that the power adapter is plugged into a working outlet. • Press INPUT and make sure that the video cables are black bars around the picture. • Change the aspect ratio...
... LED TV Restoring settings to the defaults When you restore default settings, all the settings you select OK, your TV turns off, then turns on again. Some TEXT modes can block the screen. See Adjusting the TV picture on page 42. • Make sure that the power adapter is plugged into a working outlet. • Press INPUT and make sure that the video cables are black bars around the picture. • Change the aspect ratio...
User Manual English
Page 68
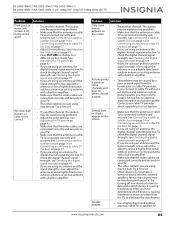
NS-24D510NA17/NS-39D310NA17/NS-50D510NA17/ NS-24D510MX17/NS-50D510MX17 24" 1080p/39" 720p/50" 1080p 60Hz LED TV Problem Solution Dark, poor, or no picture (screen is lit), but sound is connected correctly and securely. See Adjusting the TV picture on page 42. • If you are connected correctly and securely to your TV. • Make sure that the video cables are using an antenna, the digital channel signal may be low...
NS-24D510NA17/NS-39D310NA17/NS-50D510NA17/ NS-24D510MX17/NS-50D510MX17 24" 1080p/39" 720p/50" 1080p 60Hz LED TV Problem Solution Dark, poor, or no picture (screen is lit), but sound is connected correctly and securely. See Adjusting the TV picture on page 42. • If you are connected correctly and securely to your TV. • Make sure that the video cables are using an antenna, the digital channel signal may be low...
User Manual English
Page 69
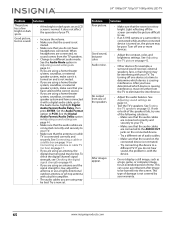
... with a built-in Adjusting sound settings on an LCD screen is turned on page 44. • Test the TV's speakers. This type of your warranty. 65 www.insigniaproducts.com It does not affect the operation of damage is low, adjust the antenna or use a highly directional outdoor antenna or set-top antenna with a digital audio cable, go to see Checking the digital signal strength on page 62. To check the digital channel signal strength, see...
... with a built-in Adjusting sound settings on an LCD screen is turned on page 44. • Test the TV's speakers. This type of your warranty. 65 www.insigniaproducts.com It does not affect the operation of damage is low, adjust the antenna or use a highly directional outdoor antenna or set-top antenna with a digital audio cable, go to see Checking the digital signal strength on page 62. To check the digital channel signal strength, see...
User Manual English
Page 70
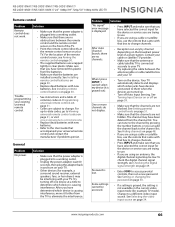
... displays which device is causing interference. Change to access parental controls, then set a new password. See Selecting the video input source on your universal remote control and contact the manufacturer if problems persist. NS-24D510NA17/NS-39D310NA17/NS-50D510NA17/ NS-24D510MX17/NS-50D510MX17 24" 1080p/39" 720p/50" 1080p 60Hz LED TV Remote control Problem Solution Remote control does not work. • Make sure that the power adapter is plugged into a working outlet. • Make sure that there are no channels...
... displays which device is causing interference. Change to access parental controls, then set a new password. See Selecting the video input source on your universal remote control and contact the manufacturer if problems persist. NS-24D510NA17/NS-39D310NA17/NS-50D510NA17/ NS-24D510MX17/NS-50D510MX17 24" 1080p/39" 720p/50" 1080p 60Hz LED TV Remote control Problem Solution Remote control does not work. • Make sure that the power adapter is plugged into a working outlet. • Make sure that there are no channels...
User Manual English
Page 72
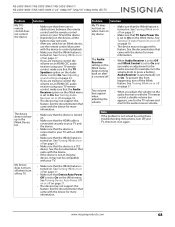
... the HDMI cable is connected securely to your TV and the device. • Make sure that the TV Speakers option on the Audio menu is set to On on an HDMI CEC audio receiver using these troubleshooting instructions, turn the volume knob or press a button), Audio Receiver is automatically set to On and you adjust the volume on page 37. • The device may not support this feature. See Turning TV Auto Power...
... the HDMI cable is connected securely to your TV and the device. • Make sure that the TV Speakers option on the Audio menu is set to On on an HDMI CEC audio receiver using these troubleshooting instructions, turn the volume knob or press a button), Audio Receiver is automatically set to On and you adjust the volume on page 37. • The device may not support this feature. See Turning TV Auto Power...
User Manual English
Page 73
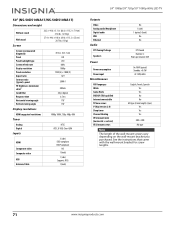
... (V) 16:9 3,000:1 150 nits 3d y/c digital 16 ms 178° 178° Display resolutions HDMI suggested resolutions 1080p, 1080i, 720p, 480p, 480i Tuner Analog Digital NTSC ATSC, 8-VSB, Clear-QAM Inputs HDMI Component video Composite video USB Antenna/Cable 2 (side) EDID compliant HDCP compliant No 1 (back) 1 (side) Supports JPEG 1 (back) Outputs Video Analog audio/Headphone Digital audio WiFi Ethernet No 1 (side) 1 (coaxial) (back) No No Audio DTS Tuning Package Speakers DTS Sound Number: 2 Watts per channel: 2.5W Power Power consumption Power input On: 40W Standby:
... (V) 16:9 3,000:1 150 nits 3d y/c digital 16 ms 178° 178° Display resolutions HDMI suggested resolutions 1080p, 1080i, 720p, 480p, 480i Tuner Analog Digital NTSC ATSC, 8-VSB, Clear-QAM Inputs HDMI Component video Composite video USB Antenna/Cable 2 (side) EDID compliant HDCP compliant No 1 (back) 1 (side) Supports JPEG 1 (back) Outputs Video Analog audio/Headphone Digital audio WiFi Ethernet No 1 (side) 1 (coaxial) (back) No No Audio DTS Tuning Package Speakers DTS Sound Number: 2 Watts per channel: 2.5W Power Power consumption Power input On: 40W Standby:

User Manual English
Page 74
...) LCD LED 60Hz 720p 1366 (H) × 768 (V) 16:9 5,000:1 200 nits 3d y/c digital 6.5 ms 178° 178° Display resolutions HDMI suggested resolutions 1080p, 1080i, 720p, 480p, 480i Tuner Analog Digital NTSC ATSC, 8-VSB, Clear-QAM Inputs HDMI Component video Composite video USB Antenna/Cable 2 (side) EDID compliant HDCP compliant No 1 (back) 1 (side) Supports JPEG 1 (back) Outputs Video Analog audio/Headphone Digital audio WiFi Ethernet No 1 (side) 1 (optical) (back) No No Audio DTS Tuning Package Speakers DTS Sound Number: 2 Watts per channel: 7W Power Power consumption...
...) LCD LED 60Hz 720p 1366 (H) × 768 (V) 16:9 5,000:1 200 nits 3d y/c digital 6.5 ms 178° 178° Display resolutions HDMI suggested resolutions 1080p, 1080i, 720p, 480p, 480i Tuner Analog Digital NTSC ATSC, 8-VSB, Clear-QAM Inputs HDMI Component video Composite video USB Antenna/Cable 2 (side) EDID compliant HDCP compliant No 1 (back) 1 (side) Supports JPEG 1 (back) Outputs Video Analog audio/Headphone Digital audio WiFi Ethernet No 1 (side) 1 (optical) (back) No No Audio DTS Tuning Package Speakers DTS Sound Number: 2 Watts per channel: 7W Power Power consumption...
User Manual English
Page 75
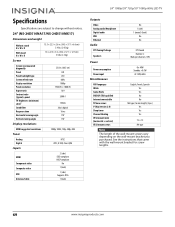
...) Screen Screen size measured diagonally Panel Panel backlight type Screen refresh rate Display resolution Panel resolution Aspect ratio Contrast ratio (typical)-panel TV Brightness (minimum) cd/m2 Comb filter Response time Horizontal viewing angle Vertical viewing angle 49.5 in. (125.7 cm) LCD LED 60Hz 1080p 1920 (H) × 1080 (V) 16:9 3,000:1 200 nits 3d y/c digital 6.5 ms 178° 178° Display resolutions HDMI suggested resolutions 1080p, 1080i, 720p, 480p, 480i Tuner Analog Digital NTSC ATSC, 8-VSB, Clear-QAM Inputs HDMI Component video Composite video USB Antenna/Cable...
...) Screen Screen size measured diagonally Panel Panel backlight type Screen refresh rate Display resolution Panel resolution Aspect ratio Contrast ratio (typical)-panel TV Brightness (minimum) cd/m2 Comb filter Response time Horizontal viewing angle Vertical viewing angle 49.5 in. (125.7 cm) LCD LED 60Hz 1080p 1920 (H) × 1080 (V) 16:9 3,000:1 200 nits 3d y/c digital 6.5 ms 178° 178° Display resolutions HDMI suggested resolutions 1080p, 1080i, 720p, 480p, 480i Tuner Analog Digital NTSC ATSC, 8-VSB, Clear-QAM Inputs HDMI Component video Composite video USB Antenna/Cable...

Quick Setup Guide English
Page 1
... or cord in the box under Manual, Firmware, Drivers & Product Information, then click ►. ! INCLUDED ACCESSORIES Remote control and two AAA batteries ++ 24" AAA AAA Quick Setup Guide | NS-24D510NA17/NS-39D310NA17/NS-50D510NA17 NS-24D510MX17/NS-50D510MX17 24" 1080p / 39" 720p / 50" 1080p 60Hz LED TV 1 START HERE How do I attach the stands to www.insigniaproducts.com, then click Support & Service. A B 24" M4 x 16 mm screw M4 x 16 mm screw WALL MOUNT How...
... or cord in the box under Manual, Firmware, Drivers & Product Information, then click ►. ! INCLUDED ACCESSORIES Remote control and two AAA batteries ++ 24" AAA AAA Quick Setup Guide | NS-24D510NA17/NS-39D310NA17/NS-50D510NA17 NS-24D510MX17/NS-50D510MX17 24" 1080p / 39" 720p / 50" 1080p 60Hz LED TV 1 START HERE How do I attach the stands to www.insigniaproducts.com, then click Support & Service. A B 24" M4 x 16 mm screw M4 x 16 mm screw WALL MOUNT How...
Quick Setup Guide English
Page 2
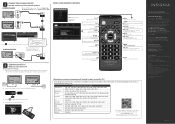
... ©2016 Best Buy. USING YOUR REMOTE CONTROL INPUT SOURCE TV HDMI1 HDMI2 HDMI3 AV USB(Photos) Note: The 24" and 39" do not have a universal remote control. MENU Opens the TV menu. / VOL- ENTER Confirms selections or changes. Numbers Enter channel numbers or the parental controls password. AUDIO IN Enters a digital sub-channel number (for other Insignia TV owners. For all models, plug the power adapter or cord into the power connector on or off . GAME Adjusts the picture for more advanced...
... ©2016 Best Buy. USING YOUR REMOTE CONTROL INPUT SOURCE TV HDMI1 HDMI2 HDMI3 AV USB(Photos) Note: The 24" and 39" do not have a universal remote control. MENU Opens the TV menu. / VOL- ENTER Confirms selections or changes. Numbers Enter channel numbers or the parental controls password. AUDIO IN Enters a digital sub-channel number (for other Insignia TV owners. For all models, plug the power adapter or cord into the power connector on or off . GAME Adjusts the picture for more advanced...


